Table of Contents
Advertisement
Quick Links
Advertisement
Table of Contents

Related Manuals for D-Link DPH-541


Summary of Contents for D-Link DPH-541
-
Page 2: Table Of Contents
Adjusting the Volume ... 19 Making a Call ... 20 Answering a Call ... 20 Using the Key Lock Feature ... 21 D-Link DPH-541 User Manual Table Of Contents Viewing Recent Calls... 21 Returning an Unanswered Call... 22 Transferring a Call ... 22 Using the Call Mute ... - Page 3 Regional Tone ... 41 Speed Dial ... 41 Sound Settings ... 42 Speaker Volume ... 42 Ring Tone ... 42 D-Link DPH-541 User Manual Ring Mode ... 43 Warning Tone ... 43 Display Settings ... 44 Wallpaper ... 44 Greeting ... 44 LCD Off Time ...
-
Page 4: Product Overview
ID numbers. The DPH-541 also supports several advanced calling features, including last number redial, mute, and hold. The DPH-541 uses Session Initiation Protocol (SIP), and is ready to use with an Internet (VoIP) phone service plan. With echo cancellation, packet delay compensation and lost packet recovery, a VoIP call over a wireless network will sound similar to regular phone service. -
Page 5: Package Contents
The battery charging status is properly performed only after uninterrupted charging/discharging. The battery heats up a bit during charging. This is not a malfunction. If the battery is completely exhausted, to be fully charged requires approximately three hours (with the phone powered off). D-Link DPH-541 User Manual Package Contents Charging the Battery... -
Page 6: Phone Features
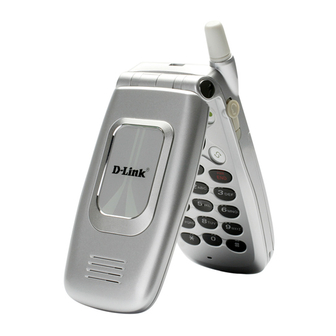
Phone Features 1. Earphone 2. Screen 3. Keypads 4. Microphone 5. Antenna 6. Battery 7. Volume adjustment keys 8. Earphone slot 9. Strap eyelet 10. Data cable slot D-Link DPH-541 User Manual... -
Page 7: Overall Features
• Special keypads: Redial, Hold & Volume control • SIP v2 signaling protocol, RFC-3261 • POP3/SMTP E-mail access • Enhanced security based on WEP/WPA/WPA2 • Support WMM for QoS operation • Embedded Site-Survey to ease WLAN search D-Link DPH-541 User Manual... -
Page 8: Wlan Application
Place a Call via “SIP Proxy Server” Use your new Wi-Fi phone to make and receive VoIP telephone calls when you are within range of a wireless network Telephony Service Provider (ITSP). You do not need to know if the recipient’s connection type is an IP, cellular, or landline-based service. -
Page 9: Learning To Use Your Phone
Learning to Use Your Phone Using the Icons D-Link DPH-541 User Manual... -
Page 10: Entering Text
• You can insert a space between words/letters by pressing the 0 key. • Refer to the chart below for detailed information about the characters available • To delete letters, press the Clear key. D-Link DPH-541 User Manual Entering Text English Mode... -
Page 11: Using Numeric Mode
• Numeric mode enables you to input numbers in your text, such as phone number. Press the keys accordingly to the digits you want before manually switching back to the appropriate text input mode. D-Link DPH-541 User Manual Using Numeric Mode... -
Page 12: Led Indicators
• You can always check your phone’s connection status (Wireless and SIP phone) by using this option. Press Status: Wireless SIP Phone D-Link DPH-541 User Manual LED Indicators Status When receiving an incoming call. When there is an unanswered call or when a new e-mail is Blinking received. -
Page 13: Configuration
If there is an asterisk (*) next to the SSID, the wireless network is using security. 10. If the network you are connecting to requires encryption, press Back, select Security, and then press Select. Set. 11. Select the type of encryption and then press D-Link DPH-541 User Manual... -
Page 14: Account Information
Auth. Passwd.: (Your Password) SIP Domain: wifiphone.com Proxy Addr.: The Address of your SIP Proxy IP: xxx.xxx.xxx.xxx Advance: The following options are indicated on the next page: D-Link DPH-541 User Manual Set. Enter VoIP Settings Select. Options. Scroll down to Rename and press Select. - Page 15 11. Select the SIP account you created and press 12. Press Back until you are at the main screen. Your Wi-Fi connection should be activated. After activation and IP has been received the phone should register with your ITSP Provider. D-Link DPH-541 User Manual Option. Select. Set.
-
Page 16: Firmware Upgrade
When upgrading the firmware of the DPH-541 make sure that the power adapter or the USB cable is plugged in through the entire process. Also, please make sure that the LCD Off Time is set to “Always On” (refer to page 44). - Page 17 8. Click on Browse and locate the firmware file. Highlight it and click Open. Click Upgrade. The screen on the phone will display the status of the upgrade. This process may take up to 3 minutes. D-Link DPH-541 User Manual...
- Page 18 This process may take up to 3 minutes. When the Software Upgrade Successfully message appears, you may close the window. There will be a message on your phone asking to restart. Click OK to reboot the phone. Once the phone reboots, the upgrade is complete. D-Link DPH-541 User Manual...
-
Page 19: Basic Functions
• To turn on again the LCD monitor, just press any key. Adjusting the Volume • You can press volume adjustment keys (Up or Down) to increase or decrease the volume. • Volume adjustment level also indicates on the screen. D-Link DPH-541 User Manual... -
Page 20: Making A Call
Press twice to Search the desired contact member and then press When you receive a call, your phone rings and/or vibrates and displays an incoming call message. D-Link DPH-541 User Manual Making a Call Menu and press Select to view your Phonebook. -
Page 21: Using The Key Lock Feature
1. Call Log > Dialed Calls/Received Calls. 2. Press to view the name and/or the numbers, if available, with the time and date when the call was received. 3. You can also redial the number by pressing the D-Link DPH-541 User Manual Viewing Recent Calls key. -
Page 22: Returning An Unanswered Call
When you are on a call, you can announce that you are transferring an active call to another party, or you can directly transfer the call. Press Keypad keys and D-Link DPH-541 User Manual key. Transferring a Call Put the call on Hold Dial the 3rd party numbers and place a new call While 3rd party is connected to execute transfer function. -
Page 23: Using The Call Mute
(down) to select On and then press Set to activate Call Waiting function. 2. Press 3. Press to answer the incoming call. If you want to switch between calls, press 4. To end the call, press D-Link DPH-541 User Manual... -
Page 24: Using Call Forwarding
Deactivate Call Forwarding: 1. Setting > Call Setting > Call Forward, choose Cancel All and press 2. The Call Forward function is now deactivated. D-Link DPH-541 User Manual Using Call Forwarding will be displayed on the screen. Set to activate the Call Forward function. -
Page 25: Menu Options
Menu and then press 2. To edit an entry, scroll to the name you want to edit and press 3. Enter text using the keypad and press D-Link DPH-541 User Manual Menu Options Phonebook Option, select Search, and then press OK to search. -
Page 26: Delete
3. Five icons will appear. Highlight each icon and enter to following: • Name • Phone Number • Email • Ring • Speed Dial 4. Once you are finished entering the information, press D-Link DPH-541 User Manual Back, and then press Option and select Delete. Yes to save your new entry. -
Page 27: Call Log
Send to dial the number. Delete All 1. From the Call Log menu, select #4 and press D-Link DPH-541 User Manual Call Log Menu, press #2 or scroll to Call Log, and then press Option. You may delete or save the call. -
Page 28: E-Mail
• Content - Select to enter your E-Mail message. • Save to Draft - Select to save your current E-Mail without sending it. • Send Email - Select to send your E-Mail. D-Link DPH-541 User Manual E-Mail Menu, press 3 or scroll to E-Mail, and then press... -
Page 29: Receive Emails
• Forward - Either Preview the details, read the Subject, set the Recipients, write the Content, Save To Draft or Send Mail or Delete the mail or Clear all mails in the Inbox. D-Link DPH-541 User Manual OK to receive your E-Mails. -
Page 30: Outbox
• Edit - Either Preview the detail, read the Subject, set the Recipients, write the Content, Save To Draft or Send Mail or Delete the mail or Clear all mails in the Draft. D-Link DPH-541 User Manual View. Details (From, Date, Recipients, Subject and Content) -
Page 31: Account Settings
• POP3 Port: Provided by your network service provider. (default: 110) • SMTP Port: Provided by your network service provider. (default: 25) • Signature: Enter your signature according to your preference. • Reserve Mail: You can store your mails on the server. D-Link DPH-541 User Manual... -
Page 32: Speed Dial
Speed Dial - Select the key to which you want to assign the speed dialing number. Press Option and entries recorded in the Phonebook is listed. Set the speed dial key from the 1 to 9 key, and press Set. D-Link DPH-541 User Manual... -
Page 33: Profile
• IP Settings - Configure the IP address of the phone • Account Choice - Select the SIP Account • NAT Settings - Configure NAT and STUN settings D-Link DPH-541 User Manual Profile Menu, press 5 or scroll to Profile, and then press OK. -
Page 34: Wireless Settings
• WPA - Select to use WPA (RADIUS). Select either TKIP or AES and then enter the RADIUS server settings. • WPA2 - Select to use WPA2 (RADIUS). Select either TKIP or AES and then enter the RADIUS server settings. D-Link DPH-541 User Manual... -
Page 35: Ip Settings
• NAT TImer - Select this option if your network has a DCHP server or router that assigns the IP settings automatically. • STUN Address - Enter the STUN IP address. • STUN Port - Enter the STUN Port. D-Link DPH-541 User Manual... -
Page 36: Sip Account
• Local Port - Local port number. • Reg. Timer (sec) - Registration refreshing interval. • Codec - Compressed audio format. • PKT Time (ms) - Audio transmitting interval. • Outband DTMF - The working of out-of-band dual-tone multi-frequency. D-Link DPH-541 User Manual Option. -
Page 37: Roaming
• Home Time (you can set from 1000 to 1). Profile Password To change your profile password: 1. input the “Old Password” and then input the “New Password”. OK to save the new password. 2. Press D-Link DPH-541 User Manual... -
Page 38: Settings
2. Enter the format (12 hour or 24 hour (military time) and then press Time Zone 1. To change the time zone, select Timezone and press Select. 2. Enter the format (+ or - GMT) and then press D-Link DPH-541 User Manual... -
Page 39: Daylight Savings
5. If you selected Weekly, you will be able to select what day or days. Press checkmark next to the day or days you want. Press 6. Click Back to exit. D-Link DPH-541 User Manual Select. Set. Set. Set to save your settings. -
Page 40: Call Settings
Refuse Private This feature allows you to block incoming calls that are private. 1. To enable or disable this feature, select Refuse Private and press 2. Select On or Off and then press D-Link DPH-541 User Manual Select. Set. Select. -
Page 41: Beep Notification
• Ask: press and hold the numeric key (e.g. 1) the screen will display the numbers and then press the call. • Dial: press and hold the numeric key (e.g. 1) to make the call directly. D-Link DPH-541 User Manual Set. Select. -
Page 42: Sound Settings
Select Ring Volume and press • To increase the volume, press • To decrease the volume, press OK to set the volume and then press • Press D-Link DPH-541 User Manual up or to the right. down or to the left. Back. Select. -
Page 43: Ring Mode
3. Select the mode you want and then press Warning Tone You can either turn On or Off for warning tone. 1. Select Warning Tone and press 2. Select On or Off and then press D-Link DPH-541 User Manual Select. Set. Select. Set. -
Page 44: Display Settings
LCD off time as Always On, 15 Seconds or 30 Seconds. 1. Select LCD Off Time and press Select. 2. Select Always On, 15 Seconds, or 30 Seconds and then press D-Link DPH-541 User Manual... -
Page 45: Lcd Brightness
This feature facilitates you to view all the settings you’ve set. A small window indicates the value of each setting you’ve done. 1. Select Config. Tip and press 2. Select On or Off and then press D-Link DPH-541 User Manual Select. up or to the right. down or to the left. -
Page 46: Keypad
2. Select Tone Off or Click Tone and then press Set. Key Backlight You can activate (set as On) the key backlight when you press a key. 1. Select Key Backlight and press Select. 2. Select On or Off and then press Set. D-Link DPH-541 User Manual... -
Page 47: Tools
In this menu, you can check the following information: IP Statistics, RTP/RTCP, Encoding, and Decoding. Battery In this menu, you can see Charger Status and Voltage level. Ping In this menu, you can check the reaching status to a host network. Enter the IP address can press OK to ping. D-Link DPH-541 User Manual... -
Page 48: Version
Phonebook & Speed Dial?; Clear E-mail?; Clear Others?; Clear All?) pops up on the screen before the deleting. OK to process the action or press Press Restart A message Restart? will pop up first. Press OK to process the action or press D-Link DPH-541 User Manual Back to the menu. Back to the menu. -
Page 49: Troubleshooting
• Technology advances in IP telephony transportation have made Internet calling as good as or better than normal PSTN connections. This is mostly effective for high speed Broadband connections, whereas dial up services have some way to go before delivering the quality of PSTN calling. D-Link DPH-541 User Manual Troubleshooting... -
Page 50: Technical Specifications
• RFC-3261 • Coding: G.711 u / A-Law, G.729A / B Networking • IPv4, TFTP, DNS • DHCP Client • NAT Transversal; Static NAT, uPnP D-Link DPH-541 User Manual Battery • Li-ion 900 mAh • WMM Security • WEP • WPA •... - Page 51 1. You must choose an Internet (VoIP) Phone Service Plan and sign up for service. VoIP phone plans, rates, and features may vary depending on VoIP Phone Service Provider. D-Link Systems, Inc. is not a Telephone Service Provider or VoIP Phone Service Provider.
-
Page 52: Contact Technical Support
Contact Technical Support You can find software updates and user documentation on the D-Link website. U.S. and Canadian customers can contact D-Link Technical Support through our website, or by phone. Tech Support for customers within the United States: D-Link DPH-541 User Manual... -
Page 53: Warranty
Warranty Period or ninety (90) days, whichever is longer, and is subject to the same limitations and exclusions. If a material defect is incapable of correction, or if D-Link determines that it is not practical to repair or replace the defective Hardware, the actual price paid by the original purchaser for the defective Hardware will be refunded by D-Link upon return to D-Link of the defective Hardware. - Page 54 The customer must submit with the product as part of the claim a written description of the Hardware defect or Software nonconformance in sufficient detail to allow D-Link to confirm the same, along with proof of purchase of the product (such as a copy of the dated purchase invoice for the product) if the product is not registered.
- Page 55 UPS Ground or any common carrier selected by D-Link. Return shipping charges shall be prepaid by D-Link if you use an address in the United States, otherwise we will ship the product to you freight collect. Expedited shipping is available upon request and provided shipping charges are prepaid by the customer.
- Page 56 This Limited Warranty provides specific legal rights and you may also have other rights which vary from state to state. Trademarks: D-Link is a registered trademark of D-Link Systems, Inc. Other trademarks or registered trademarks are the property of their respective owners.
- Page 57 • Connect the equipment into an outlet on a circuit different from that to which the receiver is connected. • Consult the dealer or an experienced radio/TV technician for help. For detailed warranty information applicable to products purchased outside the United States, please contact the corresponding local D-Link office. D-Link DPH-541 User Manual...
-
Page 58: Registration
Registration Product registration is entirely voluntary and failure to complete or return this form will not diminish your warranty rights. Version 1.0 June 13, 2006 D-Link DPH-541 User Manual...
Need help?
Do you have a question about the DPH-541 and is the answer not in the manual?
Questions and answers