Table of Contents
Advertisement
Quick Links
Advertisement
Table of Contents

Related Manuals for SoftBank 303ZT


Summary of Contents for SoftBank 303ZT
- Page 1 SoftBank 303ZT User Guide...
-
Page 3: Table Of Contents
Introduction.................3 Getting Started Parts & Functions.............. 6 Home Screen................ 7 Notifications Pertaining to Data Usage......10 USIM Card................17 Battery Installation............18 SoftBank 303ZT Charging Battery.............. 20 User Guide Contents Power On/Off..............21 Connecting with WLAN WLAN (Wi-Fi)..............24 Enabling WLAN (Wi-Fi)............. 24 Connecting Windows PC........... - Page 4 Showing Support Information........159 Setting from Mobile Devices......... 160 Appendix Troubleshooting.............. 180 Specifications..............183 Warranty & Service............184 Customer Service............185 Safety Precautions Safety Precautions............188 General Notes..............195 Specific Absorption Rate (SAR) Information for this Product................198...
-
Page 5: Introduction
Introduction Introduction Operating Environment (Compatible OSs) Before You Begin Use Wi-Fi router in any of these operating environments. Use outside these environments may affect performance. Operating environment (hardware, connected peripherals, Read "Safety Precautions" and this guide thoroughly installed applications, etc.) may also affect performance. beforehand for proper usage. - Page 6 Trademarks ・SoftBank, SoftBank's equivalent in Japanese and the SSID and Security Key SOFTBANK logo are registered trademarks or trademarks of SOFTBANK CORP. in Japan and other countries. When connecting to a Wi-Fi device, SSID (Network Name) and ・ZTE, ZTE中興, and ZTE logo are trademarks or registered Security Key (WPA Key or WEP Key) are required.
-
Page 7: Getting Started
Getting Started Parts & Functions.............. 6 Home Screen................ 7 Notifications Pertaining to Data Usage......10 USIM Card................17 Battery Installation............18 Charging Battery.............. 20 Power On/Off..............21... -
Page 8: Parts & Functions
Parts & Functions Notes on Using Reset Button Note the Following for Using Reset Button. Wi-Fi Router ・Power on Wi-Fi router in advance before pressing the reset button. ・Be careful not to be injured when pressing Reset Button. ・Do not press Reset Button strongly. May cause damage. ・Do not use sharpened object. -
Page 9: Home Screen
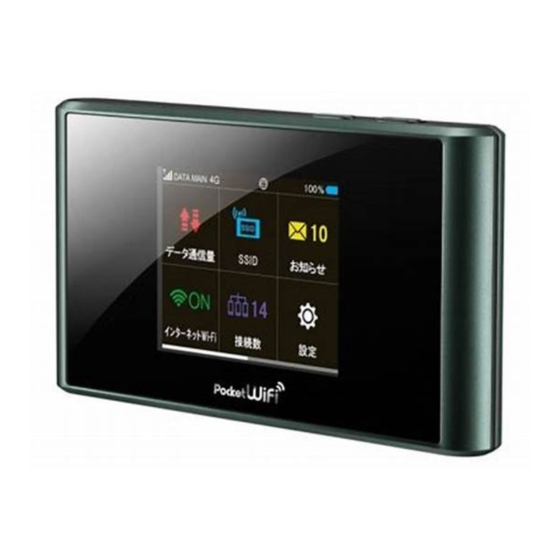
Home Screen Status Indicators Icon Description Layout Mobile networks connected (Signal is strong) Mobile networks connected (Signal is weak) Out of service area Roaming connection status Internet Wi-Fi connected (Signal is strong) Internet Wi-Fi connected (Signal is weak) Network Name Network operator name Internet connecting starts Internet connected... - Page 10 SSID Wi-Fi router. Check and delete received notifications; Notification the number of unread notifications appears. Internet Connect to Internet Wi-Fi and SoftBank Wi-Fi Spot, and configure the settings. Wi-Fi Devices Configure the connected devices. Set Wi-Fi router's various settings. Settings Set WPS connection.
- Page 11 Touchscreen Operations Text Entry Window Wi-Fi router Display is a Touchscreen. Tap and flick to operate Use onscreen keyboard for text entry. ・Tap Tap item or key to open or execute corresponding function/ operation. Item Description Entry Box Text entry Cursor Show entry position Keyboard...
-
Page 12: Notifications Pertaining To Data Usage
Notifications Pertaining to Data Text Entry Usage Multiple letters ("ABC," "DEF") are assigned to each key. Tapping key toggles characters. About the Browser Screen during ・ Example: For "b," Tap twice. Communication Speed Slowdown ・ Example: For "c," Tap three times. The following screen appears when opening webpages To go back to the previous character assigned to the same during a communication speed slowdown. - Page 13 Clearing Notification Icon Clear the data usage Notification icon currently shown. Settings The currently shown Notification icon is cleared. ・This operation only clears Notification icon that appears on the Status bar. The "Limitation" icon on the touch menu cannot be cleared. Notice icon Delete Data volume...
- Page 14 Reserving the Release of Communication Speed Slowdown (Operating from Popup Setting Screen) Request a reservation to release communication speed slowdown when the popup screen which appears gives notice that communication speed will slow down. ・Please note the operations screen may vary from the actual screen.
- Page 15 Reserving the Release of Communication Speed Slowdown (Operating from Touch Setting Menu) Request a reservation to release communication speed slowdown from Wi-Fi router's touch menu. ・Please note the operations screen may vary from the actual screen. Limitation Check reservation ・If an error message appears, please retry the operation. Select Data volume at which to release communication speed slowdown Release reservation request is completed.
- Page 16 Cancelling Reservations to Release Communication Speed Slowdown Setting When communication speed slowdown releases are reserved, the reservations can be cancelled. ・Please note the operations screen may vary from the actual screen. Limitation Check reservation cancellation ・If an error message appears, please retry the operation. Reservation is canceled The request for canceling a reservation is completed.
- Page 17 Releasing Communication Speed Slowdown (Operating from Popup Setting Screen) Request for communication speed slowdown to be released, and for normal speeds to be returned to when a popup screen that announces the start of communication speed slowdown has appeared. ・Please note the operations screen may vary from the actual screen.
- Page 18 Releasing Communication Speed Slowdown (Operating from Touch Menu) Setting Request for releasing communication speed slowdown from Wi- Fi router's touch menu. ・Please note the operations screen may vary from the actual screen. Limitation Check request completion ・If an error message appears, please retry the operation. Select the Data volume for releasing communication speed slowdown The request for releasing communication speed slowdown is...
-
Page 19: Usim Card
USIM Card Slot to pull out USIM Card Tray. environment. ・Specifications and capabilities are subject to change without notice. ・Keep a copy of information saved to USIM Card. SoftBank Install USIM Card Mobile Corp. is not liable for damages incurred due to loss of saved information. -
Page 20: Battery Installation
Battery Installation Removing USIM Card Power off Wi-Fi router in advance. Inserting Battery Power off Wi-Fi router in advance. Pull out USIM Card Tray Remove Battery Cover ・Slowly push USIM Card Tray Tool (free sample) into the hole ・Press where circled ○ (beveled surface) to slide as marked on the right of USIM Card Slot to pull out USIM Card Tray. - Page 21 Removing Battery Checking SSID and Security Key Power off Wi-Fi router in advance. Remove Battery and check SSID (Network Name) and Security Key (WPA Key). Remove Battery Cover Remove Battery Cover ・Press where circled ○ (beveled surface) to slide as marked △...
-
Page 22: Charging Battery
Charging Battery Insert Micro USB Cable (Micro USB plug) into External Device Wi-Fi router is not fully charged by default. Charge Wi-Fi Port and Micro USB Cable (USB plug) to a PC router before use. Wi-Fi router discharges even when not in use. Charge Wi-Fi router before use if it is not in use for a long time. -
Page 23: Power On/Off
Power On/Off Using AC Charger (optional accessory) AC Charger is an optional accessory. Be sure to use SoftBank Power On specified AC Charger (Micro-USB 1.0A) [ZTDAC1], or (Micro- USB 1.8A) [ZTDAD1]. Charging with AC Charger [ZTDAC1] is explained. ・Refer to the User's Guide for the AC Charger being used. - Page 24 Power Off Slide to OFF Power is off.
- Page 25 Connecting with WLAN WLAN (Wi-Fi)..............24 Enabling WLAN (Wi-Fi)............. 24 Connecting Windows PC........... 25 Connecting Mac..............28 Connecting iPhone/iPod touch/iPad........30 Connecting Android™ Devices......... 32 Connecting Wi-Fi Compatible Devices......33 Connecting WPS Supported WLAN Devices..... 34 Changing Wi-Fi Network Mode to Connect.....35...
-
Page 26: Connecting With Wlan
WLAN (Wi-Fi) Enabling WLAN (Wi-Fi) Wi-Fi router connects to the Internet automatically when WLAN (Wi-Fi) powered on. Advanced Settings Connecting to 4G/LTE/3G Change WLAN advanced settings as required. For details, "LAN Wi-Fi Advanced Settings." Slide to ON Simultaneous Connection Up to 14 WLAN devices can be used simultaneously. In addition, wireless LAN and USB connections can be simultaneously used, in that case the maximum number of wireless LAN connections is 14 devices, and one USB... -
Page 27: Connecting Windows Pc
Connecting Windows PC Select Wi-Fi router's SSID Connect Connect a Windows PC to connect to the Internet. Windows 8.1 This section describes setup operations with screenshots and steps for WPA security setting on Windows 8.1. Slide to ON ・For SSID, see "SSID and Security Key."... - Page 28 Windows 7 Select Wi-Fi router's SSID Connect This section describes setup operations with screenshots and steps for WPA security setting on Windows 7. Slide to ON Lock Screen appears when powered on and WLAN function is enabled. Wi-Fi router automatically connects to the ・For SSID, see "SSID and Security Key."...
- Page 29 Windows Vista Connect to a network This section describes setup operations with screenshots and steps for WPA security setting on Windows Vista. Slide to ON Lock Screen appears when powered on and WLAN function is enabled. Wi-Fi router automatically connects to the Internet.
-
Page 30: Connecting Mac
Connecting Mac Close Connect a Mac to connect to the Internet. When connection is established, WLAN connection counter number on Display increases by one (e.g. This section describes setup operations with screenshots and SSID (Network Name) and Security Key steps for WPA security setting on Mac OS X 10.9. (WPA Key) For SSID and Security Key, see "SSID and Security... - Page 31 Wi-Fi Turn Wi-Fi On Enter Security Key in "Password" correctly Click "Remember this network" Join When connection is established, WLAN connection counter number on Display increases by one (e.g. ・For Security Key, see "SSID and Security Key." WLAN function on Mac is enabled. SSID (Network Name) and Security Key (WPA Key) For SSID and Security Key, see...
-
Page 32: Connecting Iphone/Ipod Touch/Ipad
Connecting iPhone/iPod touch/iPad Turn on Wi-Fi Connect an iPhone/iPod touch/iPad to connect to the Internet. iPhone/iPod touch This section describes setup operations with screenshots and steps for WPA security setting on iPhone. Slide to ON Lock Screen appears when powered on and WLAN function WLAN function on iPhone/iPod is enabled. - Page 33 iPad Enter Security Key in "Password" correctly Join This section describes setup operations with screenshots and steps for WPA security setting. Slide to ON Lock Screen appears when powered on and WLAN function is enabled. Wi-Fi router automatically connects to the Internet.
-
Page 34: Connecting Android™ Devices
Connecting Android™ Devices In " CHOOSE A NETWORK..." list, Tap Wi-Fi router's SSID Connect an Android™ device to connect to the Internet. Android™ Device This section describes setup operations with screenshots and steps for WPA security setting on Android™ 4.4. Some operations and screenshots vary by security method. -
Page 35: Connecting Wi-Fi Compatible Devices
Connecting Wi-Fi Compatible SSID (Network Name) and Security Key Devices (WPA Key) For SSID and Security Key, see "SSID and Security Key." If they are changed, use set SSID and Security Key. Connecting Wi-Fi Compatible Devices Default SSID is shown in alphanumeric with leading "303ZTa-"... -
Page 36: Connecting Wps Supported Wlan Devices
Connecting WPS Supported WLAN Devices Connect with Hotspot Notes on WPS Use SSID Stealth When SSID stealth is activated, WPS is unavailable. For SSID stealth, see "LAN Wi-Fi Basic Settings (SSID A)." Security Method When Security is set to WEP, connecting WLAN device by WPS is not available. -
Page 37: Changing Wi-Fi Network Mode To Connect
Changing Wi-Fi Network Mode to Connect Network mode Changing Wi-Fi Network Mode to Connect The default Wi-Fi network mode is set to [2.4GHz/Auto (11b/11g/11n)]. Change to [5GHz/Auto(11a/11n/11ac)] if connecting WLAN devices via 5 GHz. In Home Screen, Settings Tap checkmark in [5GHz/Auto(11a/11n/11ac)] Wi-Fi Use 5 GHz band and IEEE802.11a/n/ac network mode to connect with WLAN devices. - Page 38 Precautions on using 5 GHz ・If set to 5 GHz, communication may be temporarily disconnected due to changes in usage environments as follows. ・When band settings are changed from 2.4 GHz band to 5 GHz band ・When channels are switched within the 5 GHz band ・When Wi-Fi router is powered on ・When out of service continuously for 30 minutes or more...
-
Page 39: Connecting With Micro Usb Cable (Windows)
Connecting with Micro USB Cable (Windows) USB Connection with Windows PC........38 Device Recognition/Removal on Windows PC....38 Setup for Windows............40... -
Page 40: Usb Connection With Windows Pc
USB Connection with Windows PC Device Recognition/Removal on Windows PC Overview Device Recognition (Windows PC) Wi-Fi router automatically connects to the Internet when powered on. Use a PC connected to Wi-Fi router with Micro When connecting Wi-Fi router to a PC for the first time, USB Cable to transfer data. - Page 41 Device Removal (Windows PC) When message for safe removal appears, remove Wi-Fi router ・For Windows 8.1/Windows 7 users, make sure to finish data upload or download, then remove Wi-Fi router. ・For Windows Vista users, use "Safely Remove Hardware/Safe to Remove Hardware" to stop device operation, then remove Wi-Fi router from PC.
-
Page 42: Setup For Windows
Setup for Windows Uninstalling Driver Screenshots and steps described here are for Windows 8.1. Notes on Installation/Uninstallation Removing Desktop Activate Explorer Do not remove Wi-Fi router during installation/ uninstallation. May cause failure of installation/ uninstallation, system shutdown or other abnormality. Computer Uninstall or change a program Administrative Privileges... -
Page 43: Connecting With Micro Usb Cable (Mac)
Connecting with Micro USB Cable (Mac) USB Connection with Mac..........42 Device Recognition/Removal on Mac....... 42 Setup for Mac..............43... -
Page 44: Usb Connection With Mac
USB Connection with Mac Device Recognition/Removal on Overview Notes on Device Recognition Wi-Fi router automatically connects to the Internet when powered on. Use a Mac connected to Wi-Fi router with Micro Wi-Fi router may malfunction if Mac goes into Sleep USB Cable to transfer data. -
Page 45: Setup For Mac
Setup for Mac Setting up Network Installation and uninstallation are not required because Set up Wi-Fi router in "Network Preferences..." required programs are stored in Wi-Fi router. Installation and Uninstallation Power on Mac When connecting Wi-Fi router to Mac with Micro USB Cable, required programs such as drivers are automatically installed. -
Page 47: Settings (Touch Menu)
Settings (Touch Menu) Touch Menu............... 46 Showing/Setting Data Usage........... 46 Setting SSID..............51 Checking Notifications............. 53 Setting Internet Wi-Fi............. 56 Checking WLAN Connected Device Information....58 Other Settings..............59 Using WPS................. 69 Checking Wi-Fi Router Information........ 71 Checking Support..............72... -
Page 48: Touch Menu
Also, set maximum data usage and reset accumulated data usage. Data usage is an estimation. May differ from actual data Touch Menu usage. For actual data usage, contact SoftBank Customer Support. Touch Menu icons are as follows. Data usage does not include Internet Wi-Fi communication. Checking Data Usage Show data usage until present from initial start of use, or after a reset. - Page 49 Showing Data Usage on Home Screen In "Show usage on icon," Usage Switched to and the setting is changed. (Usage icon) in Home Screen switches to (Bar icon). Shows data usage until present from initial start of use, or after a reset. Usage settings ・...
- Page 50 Setting Maximum Data Usage Tap number in "Max Amount" Set monthly data usage. When data usage exceeds the set volume, Notification icon etc. appears. ・When data usage exceeds the maximum data usage set in "Max Amount," (Bar icon) changes to (Bar icon in red).
- Page 51 Setting Auto Reset Date Enter day for Auto Reset Date Set the date on which data usage is to be automatically reset every month. Reset goes into effect the day after the set date. Usage Auto reset date is set. ・Enter numerical value between 1 and 31.
- Page 52 Resetting Data Usage Usage Data usage is reset. Usage settings Reset...
-
Page 53: Setting Ssid
Setting SSID Set Wi-Fi router SSID (Network Name) or Security Key (WPA Key or WEP Key). Also, enable/disable Multi-SSID (SSID B) for using two SSIDs. SSID and Security Key SSID ・Reconnect the connected WLAN devices when SSID name is changed. Enter SSID SSID A Security key... - Page 54 Enabling Multi-SSID Turn on Multi-SSID (SSID B) to set basic WLAN for SSID B. ・To use SSID B, turn off the Internet Wi-Fi function. Connect to the Internet via mobile network. ・If Multi-SSID function is enabled, maximum communication speed may decrease depending on the number of WLAN devices connected.
-
Page 55: Checking Notifications
Checking Notifications Return to Home Screen to confirm "Internet Wi-Fi" icon is Notifications from SoftBank appear on Display. "OFF" SSID Checking Notification Notification SSID B Tap notification to confirm in "SSID B" Confirm notification content SSID B is available. ・Information screen appears when Internet Wi-Fi is enabled with "SSID B"... - Page 56 Deleting Notifications Notification Notification is deleted. Tap notification to delete Delete...
- Page 57 Selecting and Deleting Notifications Notification Selected notifications are deleted. Checkmark notifications to delete ・Checkmark checkbox at the top of the screen to delete all notifications.
-
Page 58: Setting Internet Wi-Fi
Setting Internet Wi-Fi Connect to select a network to connect Connect to the Internet via WLAN router at home or office, SoftBank Wi-Fi Spot, etc. This Internet connection is described as "Internet Wi-Fi." Setting Internet Wi-Fi Connect to the Internet via Wi-Fi. - Page 59 Setting Up SoftBank Wi-Fi Spot Tap Number Keys enter four-digit login password Use SoftBank Wi-Fi Spot to connect to the Internet. correctly Internet Wi-Fi Wi-Fi router connects to SoftBank Wi-Fi Spot. Internet connection is available. SoftBank Wi-Fi Spot Settings In "SoftBank Wi-Fi Spot,"...
-
Page 60: Checking Wlan Connected Device Information
Checking WLAN Connected Device Information Check connected device information Checking WLAN Connected Device Information Check WLAN device information in regards to SSID A and SSID B for devices such as PCs, smartphones, game consoles connected to Wi-Fi router. Devices Device names, IP Address, and MAC address for devices connected to Wi-Fi router are shown. -
Page 61: Other Settings
Other Settings Brightness Set screen brightness, Sleep timer (Sleep mode), etc. Changing Screen Brightness Set screen brightness. Settings Tap the bar at the desired brightness Display Screen backlight is changed to the set brightness. ・Brightness is settable to five levels. - Page 62 Changing Backlight Time Tap checkmark for desired seconds Set backlight timeout for when Wi-Fi router is not operating. Settings Screen settings are changed according to set backlight timeout. Display Display Time Out...
- Page 63 Changing Wi-Fi Network Mode to Connect Tap checkmark in [5GHz/Auto(11a/11n/11ac)] The default Wi-Fi network mode is set to [2.4GHz/Auto (11b/11g/11n)]. Change to [5GHz/Auto(11a/11n/11ac)] if connecting WLAN devices via 5 GHz. Settings Use 5 GHz band and IEEE802.11a/n/ac network mode to connect with WLAN devices.
- Page 64 International Roaming Enable auto-International roaming connection. Settings is turned to . International roaming is available after Wi-Fi router is restarted. International Roaming In "International roaming,"...
- Page 65 Setting Sleep Mode Tap checkmark for desired minutes When operation is not performed for a certain period of time or when charging Battery without connection to any WLAN device, Wi-Fi router goes into Sleep mode after Display goes out for energy-saving. Set time period for Sleep mode. Five minutes is set by default.
- Page 66 Screen Lock Enter four-digit Pass code Set Pass code entry for canceling Screen Lock. Settings Re-enter four-digit Pass code Lock Screen Password Unlocking Pass code is set. ・If the re-entered Pass code is different from the initially entered one, then the screen returns to step .
- Page 67 Entering Pass Code to Unlock Screen Software Update Update software. (Lock icon) Settings Enter four-digit Pass code Software Updates Screen is unlocked, Home Screen appears. ・If the Pass code is incorrect, an error message appears. Re- enter the Pass code. ・If you forget Pass code, reset Wi-Fi router to cancel Screen Check for Updates Lock by Pass code.
- Page 68 Setting Language Confirm message Change Wi-Fi router display language. Settings Check for the latest software. If software update is found, update software. ・When software in use is the latest, "The latest version" appears. Software Update Language Packet communication charges are not applied for Software update.
- Page 69 Clearing Notification Icon Clear Notification icon for present data usage. Settings Shown Notification icon is cleared. ・This step clears only Notification icons shown on Status Bar. "Limitation" icon on Touch Menu is not cleared. Notice icon Delete Data volume...
- Page 70 Resetting Wi-Fi Router Restore Wi-Fi router settings to their factory defaults. ・All settings are restored except contents in USIM Card. ・Alternatively, use Reset Button of WEB UI or Wi-Fi router Reset Button. See "Resetting Wi-Fi Router," "Wi-Fi Router." Settings Wi-Fi router is reset and rebooted. Reset...
-
Page 71: Using Wps
Using WPS Pair With SSID A Pair With SSID B Wi-Fi router supports WPS. Use WPS to connect WPS supported game console or wireless router easily. Notes on WPS Use SSID Stealth When SSID stealth is activated, WPS is unavailable. For SSID stealth, see "LAN Wi-Fi Basic Settings (SSID A)."... - Page 72 Connecting Access Point While window below appears (within 120 seconds), set up WPS Connect WPS supported access point. connection on access point device ・Enable Internet Wi-Fi in advance. Enable WLAN function on access point device, and make any required WPS settings ・Method of setting WPS function varies by device.
-
Page 73: Checking Wi-Fi Router Information
Check Wi-Fi router information Check certification Check information as follows. Item Description (Web UI-name) URL for accessing WEB UI Phone Number Phone number saved to USIM Card SW version Software version Model name Product name (303ZT) Wi-Fi router's certification is shown. -
Page 74: Checking Support
Checking Support Check description for Status Indicators or Touch Menu icons that appear at the top of Display. Viewing Description for Status Indicators or Touch Menu Icons Support Description for Status Indicators or Touch Menu icons appears. - Page 75 Settings (WEB UI) Overview of WEB UI............74 WEB UI Window on PC............. 77 Setting Connected Devices..........81 Setting LAN Wi-Fi............85 Showing/Setting Data Usage.........103 Setting Mobile Network..........109 Device Settings...............130 Advanced Settings............137 Checking Notifications...........154 Showing Device Information.......... 158 Showing Support Information........159 Setting from Mobile Devices.........
-
Page 76: Settings (Web Ui)
Overview of WEB UI Connect Wi-Fi router to a PC or mobile device via Micro USB Cable or WLAN. Use web browser to check Wi-Fi router information or make settings. For web browser support, see "Operating Environment (Compatible OSs)." Activating WEB UI on PC Screen shots and steps described here are for PC (Windows 8.1) compatible with WEB UI. - Page 77 Logging into WEB UI on PC In WEB UI Home Page, Login Login window opens. ・ Alternatively, Click Main Menu item ( Connected Devices Settings Notification About Help...
- Page 78 Enter Login password Login "Logout" button appears at the top right of the screen, then logging in is completed. The Home Screen appears. For login from Main Menu item ( Connected Devices Settings Notification About Help ), clicked item page appears. ・Password is "admin"...
-
Page 79: Web Ui Window On Pc
WEB UI Window on PC Layout Item Description Main Menu Toggle setting menu Signal Level Icon: Icon shows mobile network reception level. Network Operator Name: Shows connected network operator's name. Network: Shows 4G / LTE / 3G. Network Status: Shows network connection status. Network Type: Shows 4G / LTE / 3G. - Page 80 Language Switch language Login/Logout Log in/out to/from WEB UI Reset button: Manually resets data usage meter. Data Usage This month's data usage: Shows transmitted/received data usage for the current month. 1 Input login password if WEB UI is not logged into.
- Page 81 (Currently roaming) Network Type : SoftBank 4G connected Network Operator Name, Network : SoftBank LTE connected Type : SoftBank 3G connected (Including ULTRA SPEED) Internet Wi-Fi signal level Internet Wi-Fi Level (Strong)⇔ (Weak) : Starting Internet connection : Connected to the Internet...
- Page 82 : There are unread notifications. Notifications, Searching radar : Shows when 5 GHz network mode is being used. Checks that Wi-Fi router is not interfering with weather radar, etc. : USIM is inserted. Valid SIM Card : USIM is not inserted. (High)⇒...
-
Page 83: Setting Connected Devices
Setting Connected Devices Check connected devices, and restrict connectable devices. Checking Connected Devices Shows list of WLAN devices connected to Wi-Fi router. In Main Menu, Connected Devices Connected Shows connected devices. - Page 84 MAC Address Filtering Save MAC address of WLAN devices and set WLAN connection permission to enhance security. ・When Multi-SSID (SSID B) is enabled, same MAC Address Filtering is set for SSID A and SSID B. In Main Menu, Connected Devices MAC Address Filtering In "MAC Address Filtering,"...
- Page 85 Enter MAC address Save Changes MAC Address Filtering is set. ・ When deleting or editing entered MAC address, Click Save Changes as well.
- Page 86 Canceling MAC Address Filtering MAC Address Filtering is canceled. In Main Menu, Connected Devices MAC Address Filtering In "MAC Address Filtering," Disable Save Changes MAC Address Filtering is canceled.
-
Page 87: Setting Lan Wi-Fi
WLAN devices connected to Wi-Fi router via LAN Wi-Fi can access the Internet using Internet Wi-Fi function of Wi-Fi router. Also, connect to the Internet via WLAN router at home or office or SoftBank Wi-Fi Spot etc. This Internet connection is described here as "Internet Wi-Fi."... - Page 88 In Menu List, LAN Wi-Fi Basic Settings...
- Page 89 Set each item Save Changes LAN Wi-Fi basic settings for SSID A are configured.
- Page 90 Enabling Multi-SSID Function (SSID B) Configure basic WLAN settings for SSID B. ・To use SSID B, turn off Internet Wi-Fi function. Connect to the Internet via mobile network. ・When Multi-SSID function is enabled, maximum communications speed may slow down depending on the number of WLAN devices connected.
- Page 91 In Menu List, LAN Wi-Fi Basic Settings...
- Page 92 In "Multi SSID," ・ Information message screen appears if "SSID B" is clicked while Internet Wi-Fi is enabled. Click to disable Internet Wi-Fi function automatically.
- Page 93 Set each item Save Changes LAN Wi-Fi basic settings for SSID B are configured.
- Page 94 LAN Wi-Fi Advanced Settings Setting items are as follows: Item Description Country/Region Code Set country where you use WLAN Network Mode Set WLAN Network Mode Set WLAN channel frequency band width; Frequency Bandwidth Select 20 MHz or 40 MHz frequency band Channel Set WLAN channel;...
- Page 95 Set each item Apply LAN Wi-Fi advanced settings are configured. Note on Changing LAN Wi-Fi Settings Changing LAN Wi-Fi setting on WEB UI from device connected via WLAN may disconnect WLAN connection.
- Page 96 Internet Wi-Fi Settings Enable Internet Wi-Fi function to connect to the Internet via Wi-Fi using WLAN router at home or office or public WLAN service. ・When Internet Wi-Fi function is enabled, maximum communications speed may slow down depending on the number of WLAN devices connected.
- Page 97 Confirm that "Internet Wi-Fi" is Scan Scans connectable Internet Wi-Fi access points. ・ Information message screen appears if "Internet Wi-Fi" is clicked while Multi-SSID functions (SSID B) are enabled. Click disable Multi-SSID automatically. ・ Notification Screen appears if in "Internet Wi-Fi" is clicked when the Wi-Fi network mode is 5 GHz. Click to set "Network Mode"...
- Page 98 Connect to select an access point to connect...
- Page 99 Connects to input SSID device. Notes on Changing Internet Wi-Fi Settings If Internet Wi-Fi function (includes SoftBank Wi-Fi spots) settings are changed, be aware that PC, game device, and smartphone WLAN connections are temporarily disconnected, and already set login passwords are disabled.
- Page 100 Setting Up SoftBank Wi-Fi Spot Turning on SoftBank Wi-Fi Spot automatically connects when entering a SoftBank Wi-Fi Spot service area. ・SoftBank Wi-Fi Spot password is a four-digit security code set at subscription. In Menu List, LAN Wi-Fi Internet Wi-Fi...
- Page 101 ・ Notification Screen appears if in "Internet Wi-Fi" is clicked when the Wi-Fi network mode is 5 GHz. Click to set "Network Mode" to Auto (2.4 GHz). Enter SoftBank Wi-Fi spot password Save Changes SoftBank Wi-Fi Spot setup is complete.
- Page 102 Preferred Access Point Set a preference order to APN and set as preferred APN. In Menu List, LAN Wi-Fi Internet Wi-Fi...
- Page 103 Confirm that "Internet Wi-Fi" is Edit Network ・ Information message screen appears if "Internet Wi-Fi" is clicked while Multi-SSID functions (SSID B) are enabled. Click disable Multi-SSID automatically. ・ Notification Screen appears if in "Internet Wi-Fi" is clicked when the Wi-Fi network mode is 5GHz. Click to set "Network Mode"...
- Page 104 Save Changes Preference order is set. ・ To edit access point, select access point, Edit Edit set content Apply ・ To delete access point, select access point, Delete...
-
Page 105: Showing/Setting Data Usage
Set whether to show data usage for mobile network on Display, maximum data usage or reset date. Data usage is estimation. May differ from actual data usage. For actual data usage, contact SoftBank Customer Support. Data usage does not include Internet Wi-Fi communication. - Page 106 In "Show usage on icon," Save Changes (Usage icon) in Home Screen switches to (Bar icon). Shows data usage until present from initial start of use, or after a reset. ・ Data usage shown in (Bar icon) appears with three-digit numbers with decimal places rounded off.
- Page 107 Setting Maximum Data Usage Set monthly data usage. When data usage exceeds the set volume, Notification icon etc. appears. ・ When data usage exceeds the maximum data usage set in Maximum traffic, (Bar icon) changes to (Bar icon in red). ・Maximum traffic does not mean a limit on data communication.
- Page 108 Enter number for data usage Save Changes Maximum traffic is set. ・Numeric value between 1 and 999 is acceptable. ・Set data usage in GB/MB/KB.
- Page 109 Auto Reset Date Set the date on which data usage is to be automatically reset every month. In Menu List, Data Usage...
- Page 110 Select date for resetting Save Changes Auto reset date is set. ・Numerical value between 1 and 31 is acceptable. ・If 31 is set, data usage is reset at the end of the month.
-
Page 111: Setting Mobile Network
Setting Mobile Network Configure advanced settings when using 4G/LTE/3G network. International Roaming Overseas, roaming service for 3G is available. In Menu List, Mobile Network Mobile Settings... - Page 112 In "International Roaming," Apply Wi-Fi router is rebooted and International roaming setting is changed.
- Page 113 Setting Mobile Network While Internationally Roaming Manually search and set mobile network while internationally roaming. See " Searching for Mobile Networks " for details. Precautions When Using Overseas When travelling from overseas to Japan, momentarily power off then restart.
- Page 114 Searching for Mobile Networks Search for mobile networks and set networks. The automatic mode is only usable in Japan. Settings are unchangeable. In Menu List, Mobile Network Mobile Settings Network Search Mode appears. In "International Roaming," Apply...
- Page 115 Wi-Fi router is rebooted and International roaming setting is changed. Manual Search A list of available mobile networks is created.
- Page 116 Select mobile network to be set Apply Network is created.
- Page 117 Creating Profile Set the following items and create profile. Item Description Profile Select profile Profile Name Enter profile name Enter APN Authentication Select authentication method User Name Enter user name Password Enter password In Menu List, Mobile Network...
- Page 118 Add New Set each item Apply Created profile appears for profile name.
- Page 119 Setting Profiles as Default Set registered profiles as default. In Menu List, Mobile Network Select Profile Name Set as Default...
- Page 120 Selected profile is set as default.
- Page 121 Deleting Profile Delete created profiles. Preset profiles are undeletable. In Menu List, Mobile Network Select Profile Name Delete...
- Page 122 ・Enable PIN verification to use Wi-Fi router by PIN entry on Wi-Fi router or WEB UI when Wi-Fi router is powered on. ・Incorrectly entering PIN three consecutive times activates PIN Lock. PUK Code is required to unlock it. For details about PUK, contact SoftBank Customer Support, General Information. Incorrectly entering PUK Code ten consecutive times locks Wi-Fi router completely. If Wi-Fi router is completely locked, Wi-Fi router must be serviced.
- Page 123 PIN Verification Set PIN Verification. USIM PIN is set to "9999" by default. In Menu List, Mobile Network Confirm that "Desired Status" is Enable Save Changes...
- Page 124 Enter PIN code PIN entry from Wi-Fi router or WEB UI is required when Wi-Fi router is powered on.
- Page 125 PIN Verification (WEB UI) Activate web browser and enter "http://web.setting" in address bar Enter four- to eight-digit PIN code Apply When correct PIN is entered, Home page appears.
- Page 126 PIN Verification (Wi-Fi Router) (Lock icon) Enter four- to eight-digit PIN code When correct PIN is entered, Home Screen appears.
- Page 127 Changing PIN Change PIN. PIN is changeable when PIN verification is enabled. In Menu List, Mobile Network Set "Desired Status" to Change PIN Set required items Save Changes PIN is modified.
- Page 128 Canceling PIN Verification Disable PIN Verification. In Menu List, Mobile Network Set "Desired Status" to Disable Save Changes...
- Page 129 Enter PIN code PIN verification is canceled.
- Page 130 Resetting Wi-Fi Router Restore Wi-Fi router settings to their factory defaults. ・All settings are restored except contents in USIM Card. ・Alternatively, use touch menu or Reset Button of Wi-Fi router. See "Resetting Wi-Fi Router," "Wi-Fi Router." In Menu List, Mobile Network Advanced Factory Reset...
- Page 131 Wi-Fi router is reset and rebooted.
-
Page 132: Device Settings
Device Settings Confirm Wi-Fi router status, and change WEB UI login password. Also, set software update. Enable auto-software update to check updates at regular intervals and automatically update if new software is found. If it is disabled, Wi-Fi router checks updates but does not download automatically. Setting Backlight Time Set the backlight timeout when Wi-Fi router is not being operated. - Page 133 Select time in "Display Timeout" Save Changes Display timeout is changed.
- Page 134 Changing Login Password for WEB UI Change Login password. In Menu List, Device Setting Web Interface Enter current password...
- Page 135 Enter a new password Re-enter the new password Save Changes New password is set.
- Page 136 Setting Auto-Software Update In Menu List, Device Setting Software Updates In "Auto Update," Auto-software update downloading is ON/OFF.
- Page 137 Updating Software In Menu List, Device Setting Software Updates Check for Update...
- Page 138 Check for the latest software. If software update is found, update software. ・When software in use is the latest, "The latest version" appears. Software Update Packet communication charges are not applied for Software update. While software is updated, other functions are disabled. Software update is not available during International roaming.
-
Page 139: Advanced Settings
Advanced Settings Set Wi-Fi router functions such as IP address filtering and port mapping, etc. DHCP Assign IP addresses to devices inside LAN. Setting items are as follows: Item Description IP address Set Wi-Fi router private address Subnet Mask Set Subnet mask Set whether to allow VPN client packets that have private IP addresses inside LAN to pass VPN Passthrough through to the Internet... - Page 140 Set each item Save Changes Wi-Fi router is rebooted and DHCP is set.
- Page 141 Firewall Switch Set Firewall function. Setting items are as follows: Item Description IP Address Filtering Set whether to use IP Address Filter function Portmapping Switch Set whether to use port mapping functions In Menu List, Advanced Settings Firewall...
- Page 142 Set each item Apply Setting is configured.
- Page 143 Setting IP Address Filtering Set whether to apply rules and allow transmissions from the Internet through Firewall, based on sender/receiver addresses. Setting items are as follows: Item Description Source IP Address Set source IP address to apply rules; specify IP address from IP addresses used on LAN Source Port Range Set source port number to apply rules Dest.
- Page 144 Set each item Save Setting is configured. ・ Turn status to Drop to filter set IP addresses to reject connections. ・ Turn status to Accept not to filter set IP addresses and permit connection. Use for temporarily deactivating filtering. Filtering is not canceled.
- Page 145 Canceling IP Address Filtering In Menu List, Advanced Settings Firewall Delete...
- Page 146 Setting is canceled.
- Page 147 Setting Portmapping Set a virtual server for accessing a specified device inside LAN via the Internet. Setting items are as follows: Item Description Name Name virtual server Src. Port Set source port number Set the LAN device IP address that is disclosed as the server. Dest.
- Page 148 Set each item Save Portmapping is set.
- Page 149 Canceling Portmapping In Menu List, Advanced Settings Firewall Delete...
- Page 150 Canceling is applied.
- Page 151 UPnP Set UPnP for using UPnP-compatible peripheral devices, audio visual devices, appliances and UPnP-compatible applications such as messenger software. In Menu List, Advanced Settings Customization...
- Page 152 In "UPnP Settings," Save Changes Setting is configured.
- Page 153 Out of Service Notification Set whether to notify on the web browser when Wi-Fi router is out of network service area. ・Set to "ON" to notify that Internet connection is disabled on the web browser when Wi-Fi router is out of service area. In Menu List, Advanced Settings Customization...
- Page 154 In "Notification Setting," Save Changes Setting is configured.
- Page 155 Setting Wi-Fi Automatic Disconnection Set whether to automatically disconnect transmissions with WLAN device out of network area. In Menu List, Advanced Settings Customization In "Setting," Save Changes Setting is configured.
-
Page 156: Checking Notifications
Checking Notifications Information from SoftBank appears on Display. Checking Notifications In Main Menu, Notification Select notification to be confirmed... - Page 157 Confirm notification content Message appears when Notification is tapped. ・ Click to close popup screen.
- Page 158 Selecting and Deleting Notifications In Main Menu, Notification Checkmark notifications to delete ・Checkmark the top checkbox to select all.
- Page 159 Delete Selected Delete selected notifications.
-
Page 160: Showing Device Information
Showing Device Information Checking Wi-Fi Router Information Check Wi-Fi router status such as software version. In Main Menu, About The following information is shown. Item Description Phone Number MAIN MAIN phone number saved to USIM Card SUB phone number saved to USIM Card Current APN Profile Name Current APN IMEI... - Page 161 Showing Support Information Showing Support URL Show URLs for Manual Download and ZTE Support Information. In Main Menu, Help URLs for Manual Download and ZTE Support Information appear.
- Page 162 Setting from Mobile Devices Access WEB UI from a smartphone etc. to show WEB UI page for mobile devices. ■SoftBank does not guarantee compatibility with all mobile devices. ■Available functions differ in WEB UI for mobile devices and WEB UI for PCs.
- Page 163 Activate browser on the mobile device and enter URL (http://web.setting) shown on Display in the address bar of browser WEB UI Home Page appears.
- Page 164 WEB UI Screen on Mobile Device Item Description Language Switch language Log in/out to/from WEB UI Login/Logout PC View Switch to PC view Signal Level Icon: Icon shows mobile network reception level. Network Operator Name: Shows connected network operator's name. Network: Shows 4G / LTE / 3G.
- Page 165 Data usage: Data usage until present after being reset Last date to reset: latest reset date Auto reset date: Data Usage Date that is automatically reset Reset button: Manually reset data usage meter. Used this month Transmitted/received data usage for the current month. Main Manu Toggle setting menu 1 Input login password if WEB UI is not logged into.
- Page 166 Logging into WEB UI from Mobile Device In WEB UI Home Page, Login Login window opens. ・ Alternatively, Tap Main Menu item ( Connected About Support...
- Page 167 Enter Login password Login "Logout" button appears in the top center of the screen, complete login, then Home Screen appears. ・ For login from Main Menu item ( Connected About Support ), tapped item page appears. ・"admin" is set for Login password by default. For Login password, See "Changing Login Password for WEB UI."...
- Page 168 Checking WLAN Connected Device from Mobile Device A list of WLAN devices that are connected to Wi-Fi router appears. In WEB UI Home Page, Connected...
- Page 169 Connected Devices Connected device names and MAC addresses appear.
- Page 170 Setting MAC Address Filtering from Mobile Device Save MAC address of WLAN devices and set WLAN connection permission to enhance security. ・When Multi-SSID (SSID B) is enabled, MAC Address Filtering is settable also in SSID B. In WEB UI Home Page, Connected MAC Address Filtering...
- Page 171 Enable...
- Page 172 Add Devices Enter MAC Address Save Changes ・ When deleting or editing entered MAC address, Tap Save Changes as well.
- Page 173 MAC Address Filtering is set.
- Page 174 Cancelling MAC Address Filtering from Mobile Device MAC Address Filtering is canceled. In WEB UI Home Page, Connected MAC Address Filtering...
- Page 175 Disable Save Changes MAC Address Filtering is canceled.
- Page 176 Checking Wi-Fi Router Information from Mobile Device Check Wi-Fi router status such as software version. In WEB UI Home Page, About...
- Page 177 Check the information The following information is shown. Item Description Phone Number MAIN MAIN phone number saved to USIM Card SUB phone number saved to USIM Card Current APN Profile Name Current APN IMEI Serial number of Wi-Fi router Network Name (SSID A) SSID A of Wi-Fi router Network Name (SSID B) SSID B of Wi-Fi router;...
- Page 178 Checking Support from Mobile Device Show URLs for Manual Download and ZTE Support Information. In WEB UI Home Page, Support...
- Page 179 Check the information URLs for Manual Download and ZTE Support Information appear.
- Page 181 Appendix Troubleshooting.............. 180 Specifications..............183 Warranty & Service............184 Customer Service............185...
- Page 182 Confirm that Wi-Fi router is properly connected to PC. Check Here First Remove Wi-Fi router from PC, restart PC, then reconnect Wi-Fi router. If problem persists, visit your nearest SoftBank Shop or For Windows 8.1, follow these steps to confirm proper contact SoftBank Customer Support, General Information.
- Page 183 Key are properly configured. For settings, see "Setting Internet Wi-Fi." Forgot PIN/Unknown PUK Code/USIM Card is locked Contact SoftBank Customer Support, General Transmission fails Information. Signal may be weak. Move to where signal is stronger. Check Battery of Wi-Fi router. If Battery is low,...
- Page 184 Confirming Administrator logon Wi-Fi router goes off For Windows 8.1, follow these steps to check. Confirm that Wi-Fi router is not used in extreme temperatures/high humidity/direct sunlight/dusty Move the pointer into the upper-right or lower right areas. Read "Safety Precautions" beforehand for using corner charm Control Panel...
- Page 185 ・Continuous standby time and continuous communication time depend on environment, signal conditions, etc. Wi-Fi Router Micro USB Cable Item Description Product Name 303ZT Item Description 62.0 mm (H) x 117.0 mm (W) x 13.9 mm Dimensions Product Name Micro USB Cable (ZEDAD1)
- Page 186 Keep a copy etc. of important files. Keep a Battery Metal part: Copper alloy/Nickel plating copy of important files, etc. SoftBank Mobile is not liable Connection Resin part: LCP for damages resulting from loss or alteration of files or terminals settings due to accident or repair.
- Page 187 From a landline/IP phone, dial toll free at 0088-21-5525 *Not available from outside Japan. SoftBank Mobile Global Call Center From outside Japan or if 303ZT is lost or stolen: +81-92-687-0025 (international charges apply, toll free from SoftBank handsets) ZTE Japan Consumer Support Web Page...
- Page 189 Safety Precautions Safety Precautions............188 General Notes..............195 Specific Absorption Rate (SAR) Information for this Product................198...
- Page 190 Read safety precautions before using Wi-Fi router. Charger (optional accessory) Observe precautions to avoid injury to self or others, or damage to property. SoftBank Mobile is not liable for any damages resulting from use of this product. Labels & Symbols Do not disassemble, modify or solder.
- Page 191 Do not exert excessive force on the exterior of Wi-Fi router and charger by stepping on them Do not put Wi-Fi router, Battery, AC Charger, when Wi-Fi router and Micro USB Cable are Micro USB Cable in cooking appliances such as a connected.
- Page 192 303ZT Do not place Wi-Fi router on unstable/uneven surfaces. Wi-Fi router or related hardware may fall, resulting Power off near electronic devices or equipment in injury, malfunction, etc. Be especially careful while operating on high precision control or weak charging. Also dropping while charging may damage signals.
- Page 193 Do not use Wi-Fi router when it may affect a Do not dispose of Wi-Fi router in fire. vehicle's electronic equipment. Battery may leak, burst, ignite, etc. Wi-Fi router use may affect the equipment and lead to unsafe driving. Do not damage (nail, hammer, stomp, etc.) Wi- Fi router or subject it to strong impact.
- Page 194 Battery may leak, overheat, burst or ignite. Wi-Fi router may malfunction or cause fire. Do not dispose of an old Battery with ordinary refuse. Put tape on contacts and dispose separately or bring it to SoftBank Shop nearby. Dispose Battery according to your municipality rules for recycling.
- Page 195 Cable plug/AC Charger plug while leaving plugged Micro charging other manufacturer's product. USB Cable/AC Charger, or Micro USB Cable plug/AC Charge SoftBank Mobile Corp. is not liable for short circuit, fire, plug is trampled, it may cause electric shock, fire or malfunction resulting from charging other manufacturer's malfunction.
- Page 196 Do not use AC Charger and Micro USB Cable if Power plug/Micro USB plug is damaged or the Grasp Micro USB Cable (USB plug)/AC Charger connection to outlet/PC is loose. to unplug it before cleaning. May cause electric shock, etc. When disconnecting Micro USB Cable from Wi-Fi router, do not pull on the cord, hold Micro USB Always grasp Micro USB Cable (USB plug)/AC...
- Page 197 General Notes Wi-Fi Router Use & Electronic Medical Equipment For Safety ・Do not disassemble, modify or solder. May cause fire, injury, electric shock or malfunction. This section based on "Guidelines on the Use of Radio Communications Equipment such as Cellular Telephones and ・Do not drop, throw or otherwise subject to strong force or Safeguards for Electronic Medical Equipment"...
- Page 198 ・Files may be lost or damaged in the following situations. when carrying Wi-Fi router in a pocket or bag, Touchscreen SoftBank Mobile is not liable for damages incurred due to may cause false operation. lost or altered information. To minimize damages, back up ・Touch with finger.
- Page 199 - SoftBank cannot be held liable for WLAN security issues. Wi-Fi (Wireless LAN) Wi-Fi router uses 2.4 GHz frequency band WLAN between 2400 MHz and 2483.5 MHz. Wireless Frequencies & Modulations information: On Wi-Fi router package. ・2.4: 2400 MHz range...
- Page 200 Association of Radio Industries and Businesses (ARIB) http://www.arib-emf.org/index02.html (Japanese) This product [303ZT] is confirmed to comply with guidelines relating to effects of radio wave exposure as set forth by the Council of Europe (CE) and the Federal Communications Commission (FCC). Refer to the following.
- Page 201 World Health Organization http://www.who.int/emf List of Specific Absorption Rates (SAR) for radio waves by smartphone/3G model http://www.softbank.jp/mobile/support/sar/ (Japanese)
- Page 203 A Advanced Settings............137 B Battery Installation............18 C SoftBank 303ZT User Guide Index Changing Wi-Fi Network Mode to Connect.....35 Charging Battery.............. 20 Checking Notifications............. 53 Checking Notifications...........154 Checking Support..............72 Checking Wi-Fi Router Information........ 71 Checking WLAN Connected Device Information....58 Connecting Android™ Devices......... 32 Connecting iPhone/iPod touch/iPad........
- Page 204 P Parts & Functions...............6 Power On/Off..............21 S Safety Precautions............188 Setting Connected Devices..........81 Setting from Mobile Devices......... 160 Setting Internet Wi-Fi............. 56 Setting LAN Wi-Fi............85 Setting Mobile Network..........109 Setting SSID..............51 Setup for Mac..............43 Setup for Windows............40 Showing Device Information..........
- Page 206 SoftBank 303ZT User Guide December 2014, First Edition SoftBank Mobile Corp. Visit SoftBank Shop for assistance Model : SoftBank 303ZT Manufacturer : ZTE Corporation...
Need help?
Do you have a question about the 303ZT and is the answer not in the manual?
Questions and answers