Table of Contents
Advertisement
Advertisement
Chapters
Table of Contents

Related Manuals for SoftBank 501HW


Summary of Contents for SoftBank 501HW
- Page 1 501HW User Guide...
-
Page 3: Table Of Contents
Getting Started Parts & Functions.............. 6 Home Screen................ 7 Notification for Setting Maximum Traffic....10 USIM Card................11 Inserting/Removing Battery..........13 501HW User Guide Contents Charging Battery.............. 15 Power On/Off..............16 Connecting with WLAN WLAN (Wi-Fi)..............20 Activating WLAN (Wi-Fi) Function........21 Connecting Windows PC........... 21 Connecting Mac..............25... - Page 4 Quick Setup...............97 Setting Mobile Network..........100 Setting Internet Wi-Fi........... 114 Setting LAN Wi-Fi............119 Router Setting..............131 System................149 Showing/Setting Data Usage.........154 Confirming Information..........160 Setting Software Update..........165 Setting from Mobile Device...........167 Setting LAN Wi-Fi (on Mobile)........173 Setting Mobile Network (on Mobile)......181 Showing/Setting Data Usage (on Mobile).....
-
Page 5: Introduction
Introduction Introduction Operating Environment (Compatible OSs) Before You Begin Use Wi-Fi router in any of these operating environments. Use outside these environments may affect performance. Operating environment (hardware, connected peripherals, Read "クイックスタート(Quick Start)" (Japanese), "Safety installed applications, etc.) may also affect performance. Precautions"... - Page 6 SOFTBANK logo are registered trademarks or trademarks of SoftBank Group Corp. in Japan and other countries. SSID and Security Key ・Pocket WiFi is a registered trademark of SoftBank Corp. ・HUAWEI is a trademark or registered trademark of HUAWEI When connecting to a Wi-Fi device, SSID (Network Name) and TECHNOLOGIES CO., LTD.
-
Page 7: Getting Started
Getting Started Parts & Functions.............. 6 Home Screen................ 7 Notification for Setting Maximum Traffic....10 USIM Card................11 Inserting/Removing Battery..........13 Charging Battery.............. 15 Power On/Off..............16... -
Page 8: Parts & Functions
Parts & Functions Notes on Using Reset Button Note the following for using Reset Button. Front/Top/Bottom ・Power on Wi-Fi router in advance. ・Be careful not to be injured when Pressing Reset Button. ・Do not Press Reset Button strongly. May cause damage. ・Do not use sharpened object. -
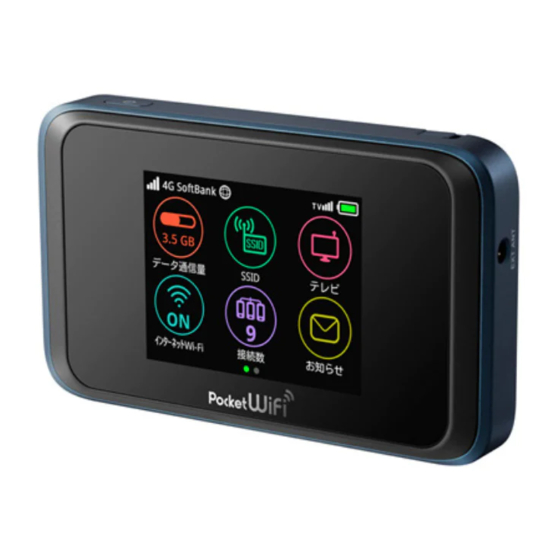
Page 9: Home Screen
Home Screen Status Indicators Indicator Description Layout Mobile networks connected (signal strong) Mobile networks connected (signal weak) Out of service area Appears when roaming Internet Wi-Fi connected (signal strong) Internet Wi-Fi connected (signal weak) Name of currently connected network Name of currently connected network carrier Internet connected Internet unconnected... - Page 10 Configure a device connected to Wi-Fi Wi-Fi Advanced Settings." テレビ router via WLAN to watch TV インター Connect to Internet Wi-Fi and SoftBank Wi-Fi spots and make the settings ネットWi-Fi 接続数 Show number of connected devices Check and deleted received notifications;...
- Page 11 Using Touchscreen Text Entry Window Wi-Fi router uses a touchscreen-type Display. Operate with Use onscreen keyboards for text entry. your fingers on Display. ・Tap Contact Display lightly and briefly. Item Description Text entry Entry box ・Swipe/Flick Cursor Show entry position Contact Display lightly, then brush up/down or left/right.
-
Page 12: Notification For Setting Maximum Traffic
Notification for Setting Maximum Text Entry Traffic Multiple letters ("ABC," "DEF") are assigned to each key. Tapping key toggles characters. Notification for Setting Maximum ・ Example: For "b," Tap twice. Traffic ・ Example: For "c," Tap three times. Communication speed is reduced due to data traffic volume. To go back to the previous character assigned to the same Information, pop-up screen or notification icon at notification key, Tap... -
Page 13: Usim Card
・Specifications and capabilities are subject to change without notice. ・Keep a copy of information saved to USIM Card. SoftBank Corp. is not responsible for damages due to loss of saved information. ・In case USIM Card or Wi-Fi router (USIM Card inserted) is ・Use tab ( ○... - Page 14 Removing USIM Card Close USIM Card Stopper Power off Wi-Fi router in advance. Remove Battery Cover ・ Lower USIM Card Stopper to , then slide it to ・Make sure USIM Card is inserted completely. ・Use notch ( ○ ) to lift Battery Cover then remove it. Insert Battery ・Be careful not to hurt your fingernail etc.
-
Page 15: Inserting/Removing Battery
Inserting/Removing Battery Insert Battery Inserting Battery Remove Battery Cover ・Align Battery terminals with Wi-Fi router terminals with (+) (-) printed side facing up and press Battery in direction , then firmly push down in direction ・Use notch ( ○ ) to lift Battery Cover then remove it. Close Battery Cover ・Be careful not to hurt your fingernail etc. - Page 16 Removing Battery SSID and Security Key Power off Wi-Fi router in advance. Remove Battery and check SSID (Network Name) and Security Key (WPA Key or WEP Key). ・The default SSID and Security Key (WPA Key or WEP Key) can be checked on the included WLAN Initialization Sticker. Remove Battery Cover Remove Battery Cover ・Use notch ( ○...
-
Page 17: Charging Battery
Charging Battery Insert Micro USB Cable (Micro USB plug) into External Device Wi-Fi router is not fully charged by default. Charge Wi-Fi Port and Micro USB Cable (USB plug) to a computer router before use. Wi-Fi router discharges even when not in use. Charge Wi-Fi router before use if it is not in use for a long time. -
Page 18: Power On/Off
Power On/Off Using AC Charger (optional accessory) AC Charger is an optional accessory. Use specified AC Charger Power On (Micro USB 1.0A) [ZTDAC1] or AC Charger (Micro USB 1.8A) [ZTDAD1] only. Charging with AC Charger [ZTDAC1] is explained. ・See AC Charger user guide. (Press &... - Page 19 Power Off (Press & Hold) Power is off.
- Page 21 Connecting with WLAN WLAN (Wi-Fi)..............20 Activating WLAN (Wi-Fi) Function........21 Connecting Windows PC........... 21 Connecting Mac..............25 Connecting Android™ Device........... 26 Connecting iPhone/iPod touch/iPad........27 Connecting Nintendo 3DS LL/3DS........30 Connecting Wii U/Wii............32 Connecting PlayStation Vita/PSP (PlayStation ® ® ® Portable)................34 Connecting PlayStation 4..........37 ®...
-
Page 22: Connecting With Wlan
WLAN (Wi-Fi) Overview Wi-Fi router supports IEEE 802.11 a/b/g/n/ac standards. WLAN (Wi-Fi) Connect WLAN devices (computer, game console, etc.) via WLAN for wireless data transfers. Advanced Settings Wi-Fi router supports Wi-Fi Protected Setup (WPS), which allows WLAN connection settings to be easily configured on Change WLAN settings as required. -
Page 23: Activating Wlan (Wi-Fi) Function
Activating WLAN (Wi-Fi) Function Connecting Windows PC Power on to connect to the Internet automatically. Connect a Windows PC to connect to the Internet. SSID (Network Name) and Security Key Connecting to 4G/LTE/3G (WPA Key or WEP Key) For SSID and Security Key, see "SSID and Security Key."... - Page 24 Windows 8.1 Enter Security Key Next This section describes setup operations with screenshots and steps for SSID A at WPA security setting on Windows 8.1. (Press & Hold) WLAN connection counter number on Display increases by Lock Screen appears when powered on and WLAN function one (e.g.
- Page 25 Windows 7 Enter Security Key Next This section describes setup operations with screenshots and steps for SSID A at WPA security setting on Windows 7. (Press & Hold) Lock Screen appears when powered on and WLAN function is enabled. Wi-Fi router automatically connects to the WLAN connection counter number on Display increases by Internet.
-
Page 26: Windows Vista
Windows Vista Select Wi-Fi router's SSID Connect This section describes setup operations with screenshots and steps for SSID A at WPA security setting on Windows Vista. (Press & Hold) Lock Screen appears when powered on and WLAN function is enabled. Wi-Fi router automatically connects to the Internet. -
Page 27: Connecting Mac
Connecting Mac Connect to a network Connect a Mac to connect to the Internet. SSID (Network Name) and Security Key (WPA Key or WEP Key) For SSID and Security Key, see "SSID and Security Key." Default SSID is shown in alphanumerics with a leading "501HWa-"... -
Page 28: Connecting Android™ Device
Connecting Android™ Device Wi-Fi Turn Wi-Fi On Connect an Android™ device to connect to the Internet. SSID (Network Name) and Security Key (WPA Key or WEP Key) For SSID and Security Key, see "SSID and Security Key." Default SSID is shown in alphanumerics with a leading "501HWa-"... -
Page 29: Connecting Iphone/Ipod Touch/Ipad
Connecting iPhone/iPod touch/iPad Enter Security Key in "Password" Connect Connect an iPhone/iPod touch/iPad to connect to the Internet. WLAN connection counter number on Display increases by SSID (Network Name) and Security Key one (e.g. (WPA Key or WEP Key) For SSID and Security Key, see "SSID and Security Key."... - Page 30 Enable Wi-Fi Enter Security Key in "Password" Join WLAN function on iPhone/iPod touch is enabled. In "CHOOSE A NETWORK..." list, Tap Wi-Fi router's SSID WLAN connection counter number on Display increases by one (e.g. ・ When "SSID" is not shown, Press to exit Sleep mode.
- Page 31 iPad In "CHOOSE A NETWORK..." list, Tap Wi-Fi router's SSID This section describes setup operations with screenshots and steps for "SSID A" under "WPA" security setting on iPad with iOS 8.4. (Press & Hold) Lock Screen appears when powered on and WLAN function ・...
-
Page 32: Connecting Nintendo 3Ds Ll/3Ds
Connecting Nintendo 3DS LL/3DS インターネット接続設定 Connect Nintendo 3DS LL/3DS to Wi-Fi router to connect to Internet. Method of connection in this guide is confirmed and described by HUAWEI TECHNOLOGIES CO., LTD. Please refrain from contacting Nintendo Co., Ltd. regarding these descriptions. SSID (Network Name) and Security Key (WPA Key or WEP Key) For SSID and Security Key, see... - Page 33 アクセスポイントを検索 In list, touch Wi-Fi router's SSID ・ When "SSID" is not shown, Press to exit Sleep mode. Connection test starts. When "接続テストに成功しまし た!" appears, touch "OK" to complete. WLAN connection count number on Display increases by one (e.g. Enter Security Key 決定...
-
Page 34: Connecting Wii U/Wii
Connecting Wii U/Wii Enter Security Key Connect Wii U/Wii to connect to Internet. Method of connection in this guide is confirmed and described Connection test starts. When "接続テストに成功しました。 by HUAWEI TECHNOLOGIES CO., LTD. Please refrain from " appears, setting is complete. WLAN connection count number contacting Nintendo Co., Ltd. - Page 35 Enter Security Key This section describes setup operations with screenshots and steps for "SSID A" at "WPA" security setting. Some operations and screenshots vary by security method. For details, refer to Wii user guide. Before connecting Wii to Wi-Fi router, change the Wi-Fi connection standard setting to "IEEE802.11 b/g/n."...
-
Page 36: Connecting Playstation ® Vita/Psp ® (Playstation ® Portable)
Connecting PlayStation Vita/ ® (PlayStation Portable) ® ® Network Connect PS Vita and PSP to connect to the Internet. ® Method of connection for PlayStation Vita and PSP in this ® ® guide is confirmed and described by HUAWEI TECHNOLOGIES CO., LTD. - Page 37 (PlayStation Portable) ® ® This section describes setup operations with screenshots and steps for "SSID A" at "WPA" security setting on PSP-2000/ PSP-3000. Some operations and screenshots vary when using PSP-1000* or by security method. For details, refer to PSP user guide.
- Page 38 [New Connection] Press button WPA-PSK (TKIP) Press direction key " " ・For PSP-1000, enter connection name and Press direction key " ." Press button Enter Security Key Press direction key " " Scan Press direction key " " Easy Press direction key " "...
-
Page 39: Connecting Playstation ® 4
Connecting PlayStation ® Confirm setting list Press direction key " " Connect PS4™ to connect to the Internet. Method of connection for PlayStation 4 in this guide is ® confirmed and described by HUAWEI TECHNOLOGIES CO., LTD. Please refrain from contacting Sony Computer Entertainment Inc. - Page 40 Use Wi-Fi Press button Enter Security Key Done Press button Saving of settings starts. Easy Press button Test Internet Connection Press button In list, select Wi-Fi router's SSID Press button Connection diagnosis starts. When complete, diagnosis results appear. WLAN connection count number on Display increases by one (e.g.
-
Page 41: Connecting Playstation ® 3
Connecting PlayStation ® Press button Connect PS3 to connect to the Internet. ® Method of connection for PlayStation 3 in this guide is ® confirmed and described by HUAWEI TECHNOLOGIES CO., LTD. Please refrain from contacting Sony Computer Entertainment Inc. regarding these descriptions. SSID (Network Name) and Security Key (WPA Key or WEP Key) For SSID and Security Key, see... - Page 42 Scan Press direction key " " WPA-PSK / WPA2-PSK Press direction key " " In list, select Wi-Fi router's SSID Press button Press button Enter Security Key Press direction key " " ・ When "SSID" is not shown, Press to exit Sleep mode. Confirm the setting list Press button...
-
Page 43: Connecting Wps Supported Wlan Devices
Connecting WPS Supported WLAN Devices Press button Precautions for Using WPS Function SSID Stealth While Wi-Fi router's stealth is enabled, WPS function is not available. For SSID stealth function, see "Quick Setup," "Setting LAN Wi-Fi." Encryption When encryption is set to WEP, WPS function is not available. - Page 44 ・ When "WPS 接続に失敗しました。" appears, Tap , then retry. 無線LAN端末と接続する To make other settings on WLAN device, follow the onscreen instructions WLAN connection count number on Display increases by one (e.g. Wi-Fi-router is on standby to accept WLAN device connection. While window below appears (within 120 seconds), set up WPS connection on WLAN device...
-
Page 45: Connecting Ieee802.11B Wlan Device
Connecting IEEE802.11b WLAN Device 2.4GHz(IEEE802.11 g/n) Connecting IEEE802.11b WLAN Device To connect IEEE802.11b WLAN device, change Wi-Fi communication standard setting. ・Even for non-IEEE802.11b WLAN devices, change of settings may be required for WLAN connection. If you are unable to connect with WLAN, change Wi-Fi communication standard setting and try. -
Page 47: Connecting With Micro Usb Cable (Windows)
Connecting with Micro USB Cable (Windows) USB Connection with a Windows PC....... 46 Device Recognition/Removal on Windows PC....46 Installing/Uninstalling Driver (Windows PC)....47... -
Page 48: Usb Connection With A Windows Pc
USB Connection with a Windows Device Recognition/Removal on Windows PC Overview Device Recognition (Windows) Wi-Fi router automatically connects to the Internet when Upon connecting the first time, the device driver is installed powered on. Connect with PC via Micro USB Cable to allow automatically. -
Page 49: Installing/Uninstalling Driver (Windows Pc)
Installing/Uninstalling Driver Device Removal (Windows) (Windows PC) ・When using a PC, check that data uploading/downloading is completed before removing Wi-Fi router. Notes on Installation/Uninstallation Removing Check that data uploading/downloading is completed. Do not remove Wi-Fi router during installation/ uninstallation. May cause failure of installation/ uninstallation, system shutdown or other abnormality. - Page 50 Uninstalling Driver Windows Vista Screenshots/operations are based on Windows 8.1. Operate as follows. Start menu Control Panel Programs Programs and Features Pocket WiFi Service Desktop Activate Explorer Uninstall/Change In "User Account Control," Continue Uninstallation starts. Computer Uninstall or change a program In list, select Pocket WiFi Uninstall/Change...
-
Page 51: Connecting With Micro Usb Cable (Mac)
Connecting with Micro USB Cable (Mac) USB Connection with a Mac..........50 Device Recognition/Removal on Mac....... 50 Installing/Uninstalling Driver (Mac)........51... -
Page 52: Usb Connection With A Mac
USB Connection with a Mac Device Recognition/Removal on Overview Removal Cautions Wi-Fi router automatically connects to the Internet when powered on. Connect with Mac via Micro USB Cable to allow Before Entering Sleep Mode data communication. Wi-Fi router may malfunction if Mac enters Sleep mode with it connected. -
Page 53: Installing/Uninstalling Driver (Mac)
Installing/Uninstalling Driver (Mac) Continue Driver Installation (Mac) Screenshots and steps described here are for Mac OS X 10.10. Connect Wi-Fi router to Mac Agree "Pocket WiFi" icon appears on desktop and "Pocket WiFi" folder automatically opens. Double-click Pocket WiFi_Driver "Install Pocket WiFi" appears on desktop. Continue Continue... - Page 54 Uninstalling Driver (Mac) Install In Finder menu, In "Favorites," Applications Pocket WiFi Uninstall Enter user name and password Install Software Enter user name and password Uninstallation is complete. Close Installation is complete.
-
Page 55: Settings (Using Router Touch Menu)
Settings (Using Router Touch Menu) Touch Menu............... 54 Quick Setup...............54 Showing/Setting Data Usage........... 56 Setting Internet Wi-Fi............. 61 Setting the TV Function On..........63 Confirming Notifications..........64 Checking WLAN Connected Device Information....66 Setting SSID or Authorization Method......67 Using WPS................. 71 Other Settings.............. -
Page 56: Touch Menu
Touch Menu Quick Setup Wi-Fi router Display is a touchscreen. Tap Touch Menu Icons Use かんたん設定 to show SSID and Security Key, set Pass Code to check function settings or product information. for unlocking Screen Lock, and check details of watching TV. Touch Menu Quick Setup Touch Menu Icons are as follows. - Page 57 次へ Enter four-digit Pass Code ・Enter SSID and Security Key shown on the screen to connect ・When Pass Code is set, Pass Code entry screen appears when unlocking screen. For unlocking screen by entering Pass WLAN devices. ・For connection to WLAN devices, see "Connecting Windows Code, see "Entering Pass Code to Unlock...
-
Page 58: Showing/Setting Data Usage
Showing/Setting Data Usage Confirm description for watching TV 次へ Set to show/hide data traffic volume for mobile network. Also, set a maximum on data traffic or the reset date for data traffic. Data traffic is an estimation. May differ from actual traffic volume. - Page 59 Showing Data Traffic on Home Screen of "当月" or "当日" ( データ通信量 Settings are modified. ・ When Home Screen is shown, (data traffic volume icon) on Home Screen changes. When "当月" is selected, accumulated data traffic volume at データ通信量設定 the moment from start of use or reset is shown on ...
- Page 60 Setting Maximum Traffic Tap number in "最大通信量" Set monthly data traffic volume. When data traffic volume exceeds the set volume, notification icon etc. appears. ・When "当月" is selected to show data traffic volume on Home Screen, (bar icon) is shown on Home screen. When data traffic volume exceeds the maximum volume set in 最大...
- Page 61 Setting Auto Reset Date Enter day for auto reset date Set date of month for automatically resetting accumulated data traffic. It is reset at the timing which changes on the next day from set date. データ通信量 Auto reset date is set. ・Enter value number between 1 and 31.
- Page 62 Resetting Data Traffic はい Reset all data traffic volumes for "当月," "当日," "1日前," "2日 前," and "3日前." データ通信量 Data volume is reset. データ通信量設定 リセット...
-
Page 63: Setting Internet Wi-Fi
Setting Internet Wi-Fi Tap network to connect Wi-Fi router connects to the Internet via a household or office WLAN router, SoftBank Wi-Fi spot, etc. This internet connection is called "Internet Wi-Fi." Setting Internet Wi-Fi Connect to the Internet via Wi-Fi. - Page 64 Setting Up SoftBank Wi-Fi Spot Tap Number Keys to enter four-digit login password Use a SoftBank Wi-Fi Spot to connect to the Internet. インターネットWi-Fi Wi-Fi router connects to SoftBank Wi-Fi Spot. Internet connection is available. Connecting to a New Network via Internet Wi-Fi In "ソフトバンクWi-Fiスポット,"...
-
Page 65: Setting The Tv Function On
Setting the TV Function On for "有効" ( When the TV function is set on, TV is viewable using a TV application on a mobile device connected via Wi-Fi. This function is set to "有効" by default. For watching TV, see "Terrestrial TV."... -
Page 66: Confirming Notifications
Confirming Notifications Deleting Confirmed Notifications Wi-Fi router receives available notifications. お知らせ Confirming Notifications お知らせ Tap notification to delete Tap notification to confirm 削除 Confirm notification. - Page 67 Selecting and Deleting Notifications はい お知らせ Checkmark notifications to delete Notification is deleted. ・Checkmark Checkbox on the top of screen to select all.
-
Page 68: Checking Wlan Connected Device Information
Checking WLAN Connected Device Information はい Check WLAN device information such as computers, smartphones, and game consoles connected to Wi-Fi router. Checking WLAN Connected Device Information 接続数 MAC address or device names, connection times for devices connected to Wi-Fi router are shown. Selected notifications are deleted. -
Page 69: Setting Ssid Or Authorization Method
Setting SSID or Authorization Method Enter SSID Set Wi-Fi router SSID (Network Name), Security Key (WPA Key or WEP Key), authorization or encryption. Also, enable/disable Multi-SSID (SSID B) for using two SSIDs. SSID and Security Key SSID セキュリティーキー SSID Enter Security Key Entered SSID and Security Key are set. - Page 70 Authorization Method and Encryption Method 認証方式 Select authorization and encryption used for WLAN connection. Select authorization method and encryption method from the following. ・Authorization method Item Description "Open" or "Shared key" is selected automatically according to the connecting 自動 device authorization method; "WEP"...
- Page 71 Enabling Multi-SSID 暗号化方式 Turn on Multi-SSID (SSID B) to set basic WLAN for SSID B. ・To use SSID B, turn off Internet Wi-Fi function. Connect to the Internet via mobile network. ・SSID B does not support WPA/WPA2. ・When Multi-SSID is enabled, communication speed may decrease depending on number of WLAN devices connected.
- Page 72 Set SSID and Security Key, authorization and encryption the same as SSID A SSID B is available. Confirm "インターネットWi-Fi" icon is SSID ・For setting procedures, see "Setting SSID or Authorization Method." In "SSID B有効," "SSID B有効" is turned ・If confirmation appears, follow the onscreen instructions.
-
Page 73: Using Wps
Using WPS While window below appears (within 120 seconds), set up WPS Wi-Fi router supports WPS. Use WPS to connect WPS connection on WLAN device supported game console or wireless LAN router easily. Connecting WLAN Devices Connect WPS supported WLAN devices. Enable WLAN function on WLAN device, and make any required WPS settings ・Method of setting WPS function varies by device. -
Page 74: Connecting To The Access Point
Connecting to the Access Point While window below appears (within 120 seconds), make WPS Connect WPS supported access point. connection settings on access point device ・Enable Internet Wi-Fi in advance. Enable WLAN function on access point device, and make any required WPS settings ・Method of setting WPS function varies by device. -
Page 75: Other Settings
Other Settings Tap Icon to switch Make settings including rearranging Touch Menu Icons in Home Screen, roaming, Pass Code for unlocking Screen Lock, brightness, Sleep, Wi-Fi communication standard, software update, clearing notification icons, etc. Home Screen Rearrange Touch Menu Icons on Home Screen. 設定... - Page 76 International Roaming Screen Lock Enable auto-International roaming connection. Set Pass Code entry for canceling Screen Lock. 設定 設定 国際ローミング設定 画面ロック設定 In "自動接続," In "パスコードロック," "パスコードロック" is turned to "自動接続" is turned to . International roaming is available.
- Page 77 Entering Pass Code to Unlock Screen Enter four-digit Pass Code Flick Display up or down to unlock Re-enter four-digit Pass Code Enter four-digit Pass Code Unlocking Pass Code is set. ・If re-entered Pass Code is different from the first one Screen is unlocked.
- Page 78 Changing Screen Brightness Changing Backlight Time Set screen brightness. Set backlight timeout when there is no operation of Wi-Fi router. 設定 設定 ディスプレイ設定 ディスプレイ設定 Tap brightness bar バックライトの点灯時間 Screen backlight is changed to the set brightness. ・Brightness is set in five levels.
- Page 79 Setting Sleep Mode for desired seconds ( When operation is not performed for a certain period of time or when charging Battery without connection to any WLAN device, Wi-Fi router goes into Sleep mode for energy-saving. Set time period for Sleep mode. Five minutes are set by default.
- Page 80 Wi-Fi Communication Standard Setting オフまでの時間 If you are unable to connect with WLAN at the time of purchase, you may be able to do so by changing Wi-Fi communication standard setting. 設定 ・ When not using Sleep mode, Tap to turn to for desired minutes ( Wi-Fi通信規格設定...
- Page 81 Updating Software for communication standard ( Update software. 設定 Wi-Fi communication standard is set. ・When "2.4GHz(IEEE802.11 b/g/n)" is set, Wi-Fi router cannot be used via Internet Wi-Fi 5 GHz access point. ・When "5GHz(IEEE802.11 a/n/ac)" is set, Internet Wi-Fi cannot be used. ソフトウェア更新...
- Page 82 Clearing Notifications for Maximum Traffic Confirm message はい Clear present notification icons for data traffic. 設定 Checks for the latest software. If software update is found, update software. ・When software in use is the latest, "お使いのソフトウェアは 最新版です。" appears. Software Update 通知アイコン消去...
-
Page 83: Checking Wi-Fi Router Information
Phone number saved to USIM Card IMEI Serial number ソフトウェア Software version バージョン 機種名 Product name (501HW) 端末情報 Shown notification icons are cleared. Information is shown. ・This step clears only notification icons shown on Status Bar. "データ量設定" Icon on Touch Menu is not cleared. -
Page 84: Checking Help
Checking Help Checking Certification Check description for Status Indicators or Touch Menu Icons Wi-Fi router is certified according to various standards. appearing in the top of Display. Viewing Description for Status 端末情報 Indicators ヘルプ 認証 ステータスアイコン Wi-Fi router's certification is shown. Description for Status Indicators appears. - Page 85 Viewing Description for Touch Menu Viewing Description for TV Watching Icons ヘルプ ヘルプ タッチメニューアイコン 快適にテレビを見るためには Description for Touch Menu Icons appears. Description for TV watching appears.
-
Page 86: Operation For Setting Maximum Traffic
Operation for Setting Maximum Traffic はい Clearing Notification Icons Clear present notification icons for data traffic. 設定 通知アイコン消去 Shown notification icons are cleared. ・This step clears only notification icons shown on Status Bar. "データ量設定" Icon on Touch Menu is not cleared. ご利用データ量... - Page 87 Applying Ahead for Release from Speed Reduction (on Pop-up Screen) 設定 When a pop-up notice appears for an approaching communication speed reduction, you can apply ahead to have the speed reduction released. ・Operation screen may look different from the actual screens.
- Page 88 Applying Ahead for Release from Speed Reduction (on Touch Menu) 設定 You can apply ahead to have data traffic released from speed reduction on Touch Menu. ・Operation screen may look different from the actual screens. データ量設定 ・When error message is shown, retry. Tap data traffic to release Application ahead is complete.
- Page 89 Canceling Application for Release from Speed Reduction 設定 If release from speed reduction is applied for ahead, you can cancel your application. ・Operation screen may look different from the actual screens. データ量設定 ・When error message is shown, retry. 予約をキャンセルする Application ahead is canceled.
- Page 90 Releasing Speed Reduction (on Pop-up Screen) 設定 When a pop-up notice appears for the start of communication speed reduction, you can apply to have the speed reduction released and return to normal speed. ・Operation screen may look different from the actual screens.
- Page 91 Releasing Speed Reduction (on Touch Menu) 設定 You can apply to have data traffic released from speed reduction on Touch Menu. ・Operation screen may look different from the actual screens. データ量設定 ・When error message is shown, retry. Tap data traffic to release Application is complete.
-
Page 93: Settings (Using Web Ui
Settings (Using WEB UI) Overview of WEB UI............92 WEB UI Window on PC............. 95 Quick Setup...............97 Setting Mobile Network..........100 Setting Internet Wi-Fi........... 114 Setting LAN Wi-Fi............119 Router Setting..............131 System................149 Showing/Setting Data Usage.........154 Confirming Information..........160 Setting Software Update..........165 Setting from Mobile Device...........167 Setting LAN Wi-Fi (on Mobile)........ -
Page 94: Overview Of Web Ui
Overview of WEB UI Connect Wi-Fi router to a computer or mobile device via Micro USB Cable or WLAN. Use web browser to check Wi-Fi router information or make settings. For web browser support, see "Operating Environment (Compatible OSs)." Activating WEB UI on Computer Screenshots and steps described here are for PC (Windows 8.1) compatible with WEB UI. - Page 95 Logging In to WEB UI from Computer In WEB UI Home Page, Log In Login window opens. Enter Login password Log In Log Out appears at top right, and login is complete. ・Password is "admin" by default. Default Login Password For enhancing security, it is recommended to change default Login password.
- Page 96 Changing Settings via WLAN Connection Changing Internet Wi-Fi setting, LAN Wi-Fi setting on WEB UI from device connected via WLAN may disconnect WLAN connection.
-
Page 97: Web Ui Window On Pc
Toggle setting menu Connected network Connected network details and signal level SupportSite Connect SoftBank web page and open Support Site of 501HW User Manual Connect SoftBank web page and open User Guide of 501HW Received data volume: ・ Show accumulated received data traffic at the moment from start of connection Transmitted data volume: ・... -
Page 98: Settings Window
: SoftBank LTE connected Network Type : SoftBank 3G connected Internet Wi-Fi : Internet Wi-Fi connected (Including SoftBank Wi-Fi spot) : Connected to Internet Internet Connection Status : Not connected to Internet : WLAN is ON, operating at 2.4 GHz (Wi-Fi) -
Page 99: Quick Setup
Quick Setup Clicking "Settings" in WEB UI Main Menu opens Quick Setup Wizard. Set basic items such as SSID, authorization, and Security Key for connecting WLAN device. Settings are changed later. Quick Setup Setting items are as follows: Item Description SSID Set SSID (Network Name) Authorization method... - Page 100 Next Confirm description for SSID and SSID Stealth in LAN Wi-Fi setup, Next...
- Page 101 Set LAN Wi-Fi items, Next Check network configuration, Complete Settings such as SSID, authorization, Security Key are complete and Home Page appears.
-
Page 102: Setting Mobile Network
Setting Mobile Network Make advanced settings when using 4G/LTE/3G network. Setting Network Search Search for and set a network manually. In Japan, always use auto-mode. Settings are not changed. In Menu List, Mobile Network Setting Mobile Network In network search mode, Manual Apply... - Page 103 Select the network Network search is set.
- Page 104 International Roaming Overseas, roaming service for 3G is available. In Menu List, Mobile Network Setting Mobile Network Change International roaming Apply International roaming setting is changed.
- Page 105 Creating Profile Set the following items and create profile. Item Description Profile name Enter profile name Enter APN User name Enter username Password Enter password Authorization method Select authorization method In Menu List, Mobile Network Setting Profile Management New profile...
- Page 106 Set each item Save Created profile appears for profile name.
- Page 107 Editing Profile Edit already saved profile. Initial profile set by default and currently used profile cannot be edited. In Menu List, Mobile Network Setting Profile Management Select profile name Edit...
- Page 108 Enter each item Save Edited information appears.
- Page 109 Deleting Profile Delete created profiles. Preset profiles are not deleted. In Menu List, Mobile Network Setting Profile Management Select profile name Delete...
- Page 110 Profile is deleted. USIM PIN PIN (Personal Identification Number) is a code to prevent unauthorized use. ・ Set PIN verification to Enable to use Wi-Fi router by PIN entry on Wi-Fi router or WEB UI when Wi-Fi router is powered on. ・Incorrectly entering PIN code three consecutive times activates PIN Lock.
- Page 111 PIN Verification Set PIN Verification. USIM PIN is "9999" by default. In Menu List, Mobile Network Setting PIN Management Set "PIN verification" to Enable Enter PIN code Apply PIN code entry from Wi-Fi router or WEB UI is required when Wi-Fi router is powered on.
- Page 112 PIN Verification (WEB UI) Activate web browser and enter "http://web.setting" in address bar Enter four- to eight-digit PIN code Apply When correct PIN is entered, Home Page appears.
- Page 113 PIN Verification (Wi-Fi Router) Slide Display up or down to unlock Enter four- to eight-digit PIN When correct PIN is entered, Home Screen appears.
- Page 114 Changing PIN Change the PIN to any four- to eight-digit number if required. In Menu List, Mobile Network Setting PIN Management Set "PIN verification" to Modify Set required items Apply PIN is modified.
- Page 115 Canceling PIN Verification Disable PIN verification. In Menu List, Mobile Network Setting PIN Management Set "PIN verification" to Disable Enter PIN code Apply PIN verification is canceled. Setting Mobile Network during International Roaming Scan mobile network manually to set during international roaming. In Menu List, Mobile Network Setting Mobile Network...
-
Page 116: Setting Internet Wi-Fi
Setting Internet Wi-Fi Wi-Fi router connects to the Internet via a household or office WLAN router, SoftBank Wi-Fi spot, etc. This internet connection is called "Internet Wi-Fi." Simultaneous use of Internet Wi-Fi and Multi-SSID (SSID B) is not available. Connecting to a New Network via Internet Wi-Fi... - Page 117 Turn "Internet Wi-Fi" to In access point to connect, Connect ・ Click Scan to re-scan surrounding Internet Wi-Fi access points. ・ When of "Internet Wi-Fi" is clicked with Multi-SSID (SSID B) enabled, information screen appears. Click to disable Multi-SSID automatically. Enter Security Key Connect Connection is established and "Connected"...
- Page 118 Setting Up SoftBank Wi-Fi Spot Turning on SoftBank Wi-Fi Spot automatically connects when entering a SoftBank Wi-Fi Spot service area. ・SoftBank Wi-Fi Spot password is a four-digit security code set at subscription. In Menu List, Internet Wi-Fi Internet Wi-Fi Confirm that "Internet Wi-Fi" is set to Turn "SoftBank Wi-Fi spot"...
- Page 119 Enter SoftBank Wi-Fi spot password Save SoftBank Wi-Fi Spot setup is complete.
- Page 120 ・ To edit access point, Edit set content Click Save ・ To delete access point, Click Pre-set Access Points Four SoftBank Wi-Fi Spot access points are pre-set. Priority of those four access points cannot be changed or deleted.
-
Page 121: Setting Lan Wi-Fi
Setting LAN Wi-Fi Connect to computers, smartphones, game consoles, etc. via WLAN. This WLAN connection is described as "LAN Wi-Fi." WLAN devices connected to Wi-Fi router via LAN Wi-Fi access the Internet using Internet Wi-Fi function of Wi-Fi router. Note on Changing LAN Wi-Fi Settings Changing LAN Wi-Fi setting on WEB UI from device connected via WLAN may disconnect WLAN connection. - Page 122 Set each item Apply LAN Wi-Fi basic settings for SSID A are made.
- Page 123 Enabling Multi-SSID Function (SSID B) Make basic WLAN settings for SSID B. ・To use SSID B, turn off Internet Wi-Fi function. Connect to the Internet via mobile network. ・SSID B does not support WPA/WPA2. ・When Multi-SSID is enabled, communication speed may decrease depending on number of WLAN devices connected. Setting items are as follows: Item Description...
- Page 124 Turn "SSID B" to ・ Information screen appears when clicking of "SSID B" with Internet Wi-Fi enabled. Click to disable Internet Wi-Fi function automatically. Set each item Apply LAN Wi-Fi basic settings for SSID B are made.
- Page 125 LAN Wi-Fi Advanced Settings Setting items are as follows: Item Description Country Set country where you use WLAN Channel Set WLAN channel; only Auto is selected when Internet Wi-Fi is enabled Communication standard Set WLAN communication standard Set whether to permit interactive communication between devices connected SSID A and SSID Multi-SSID AP isolation B;...
- Page 126 Set each item Apply LAN Wi-Fi advanced settings are made.
-
Page 127: Mac Address Filtering
MAC Address Filtering Save MAC addresses of WLAN devices and set WLAN connection permission to enhance security. ・When Multi-SSID (SSID B) is enabled, MAC Address Filtering is set in SSID B. In Menu List, LAN Wi-Fi MAC Address Filtering In "MAC Address Filtering," Allow Deny Enter MAC address... - Page 128 MAC Address Filtering is set.
- Page 129 Canceling MAC Address Filtering Set MAC addresses are deleted and MAC Address Filtering is canceled. In Menu List, LAN Wi-Fi MAC Address Filtering In "MAC Address Filtering," Disable Apply...
- Page 130 MAC Address Filtering is canceled.
- Page 131 DHCP Assign IP addresses to devices inside LAN. Setting items are as follows: Item Description IP address Set Wi-Fi router private address Subnet mask Set subnet mask DHCP server Set whether to use DHCP function Start IP address Set lowest IP address to be assigned to WLAN devices End IP address Set highest IP address to be assigned to WLAN devices DHCP lease time (s)
- Page 132 Wi-Fi router is rebooted and DHCP is set.
-
Page 133: Router Setting
Router Setting Set router function such as Firewall and IP address filter. Firewall Switch Set Firewall function. Setting items are as follows: Item Description Firewall Set whether to use Firewall function IP address filtering Set whether to use IP Address Filter function WAN port ping reply Set whether to enable WAN ping to respond In Menu List,... - Page 134 Setting IP Address and Port Filtering Set whether to apply rules and allow transmissions from Internet through Firewall, based on sender/receiver addresses. Setting items are as follows: Item Description LAN IP Address Set source IP address to apply rules; specify IP address from IP addresses used on LAN LAN Port Set source port number to apply rules WAN IP Address...
- Page 135 Enter each item ・ Turn Status to to filter set IP addresses and reject connection. ・ Turn Status to not to filter set IP addresses and permit connection. Use for temporarily deactivating filtering. Filtering is not canceled. Apply IP address filtering is set.
- Page 136 Canceling IP Address and Port Filtering In Menu List, Router Setting IP Address Filtering Delete...
- Page 137 Apply IP address filtering settings are canceled.
- Page 138 Setting Portmapping Set a virtual server for accessing a specified device inside LAN via the Internet. Setting items are as follows: Item Description Name Name of virtual server WAN Port Set source port number Set IP address for device inside LAN to make available as a server; specify IP address from IP LAN IP Address addresses used on LAN Set destination port number for device inside LAN to make available as a server when...
- Page 139 Enter each item ・ Turn Status to to activate portmapping. ・ Turn Status to to deactivate portmapping. Use for temporarily deactivating mapping. Mapping is not canceled. Apply Portmapping is set.
- Page 140 Canceling Portmapping In Menu List, Router Setting Portmapping Delete...
- Page 141 Apply Portmapping settings are canceled.
- Page 142 Setting Special Applications Enable to use special applications such as online games and video phone system. Setting items are as follows: Item Description Name Name applications Status Set whether to apply rules Trigger Port Set port number for data control Trigger Protocol Select protocol for data control Open protocol...
- Page 143 Enter each item Apply Special application settings are added.
- Page 144 Canceling Special Applications In Menu List, Router Setting Special Applications Delete...
- Page 145 Apply Special application settings are canceled.
- Page 146 Set specified device inside LAN as DMZ host isolated from other devices. Setting items are as follows: Item Description Select whether to set DMZ host DMZ IP address Set IP address for DMZ host In Menu List, Router Setting Set each item Apply DMZ host settings are applied.
- Page 147 SIP ALG Set when using an SIP application to use Internet telephone, etc. Setting items are as follows: Item Description SIP ALG Select whether to enable SIP ALG function SIP port Enter port number provided by SIP service provider 1 SIP ALG is to be enabled when using SIP applications (e.g. X-Lite, Yate, Sipdroid, etc.) on a WLAN device connected to Wi-Fi router. If normal calling is not available with the SIP application, uncheck "SIP ALG"...
- Page 148 UPnP Set UPnP for using UPnP-compatible peripheral devices, audio visual devices, appliances and UPnP-compatible applications such as messenger software. Setting items are as follows: Item Description UPnP Set whether to use UPnP In Menu List, Router Setting UPnP Enable Disable Apply UPnP settings are applied.
- Page 149 Convert private IP address used inside LAN to global IP address for connecting to the Internet. Setting items are as follows: Item Description Low security but normal operation of application; high compatibility with applications, Cone gaming device etc. Symmetric Used for higher security gateway Set how long to maintain a session when there is no transmission after a TCP session is Tcp Nat Time(s) established;...
- Page 150 Out of Service Notification Set whether to show notification when Wi-Fi router is out of network service area on the browser of a terminal accessing the Internet via Wi-Fi router. In Menu List, Router Setting Out Of Service Notification Turn On Turn Off Apply Out of service notification setting is applied.
-
Page 151: System
Check Wi-Fi router device information and change login password for WEB UI. Also reset and reboot Wi-Fi router. Checking Wi-Fi Router Information Check device information such as software version. Item Description Device name Product name (501HW) IMEI Serial number Number Phone number saved to USIM Card Hardware version Hardware version... - Page 152 Changing Login Password for WEB UI Change Login password. ・For enhancing security, it is recommended to change Login password regularly. ・Set safer Login password when setting a new one. In Menu List, System Change Login password Enter current password Enter a new password Re-enter the new password Apply New password is set and WEB UI Home Page appears.
- Page 153 Resetting Wi-Fi Router Restore Wi-Fi router settings to their factory defaults. ・All settings are restored except contents in USIM Card. ・Alternatively, use Reset Button of Wi-Fi router. See description of Reset Button in "Front/Top/Bottom." In Menu List, System Factory Data Reset Reset...
- Page 154 Wi-Fi router reboots to its default settings.
- Page 155 Rebooting Wi-Fi Router In Menu List, System Reboot Reboot Wi-Fi router is rebooted.
-
Page 156: Showing/Setting Data Usage
Check data traffic volume. Also, set maximum traffic or reset date for data traffic. Data traffic is an estimation. May differ from actual traffic volume. For actual traffic volume, contact SoftBank Customer Support. Data traffic does not include Internet Wi-Fi communication. - Page 157 Setting Auto Reset Date Set date of month for automatically resetting accumulated data traffic. In Main Menu, Data Traffic Setting...
- Page 158 Select date for resetting Save Auto reset date is set. ・Value number is selected between 1 and 31. ・If 31 is set, data traffic is reset at the end of the month. "Reset" and "Auto Reset" The reset items differ in "Reset" and "Auto Reset." With "Reset,"...
- Page 159 Setting Maximum Traffic Set monthly data traffic volume. When data traffic volume exceeds the set volume, notification icon etc. appears in Home Screen of Wi-Fi router. ・ When "当月" is selected to show data traffic volume on Home Screen of Wi-Fi router, (bar icon) is shown on Home Screen.
- Page 160 Enter number for data traffic Select units Save Maximum traffic is set. ・Enter value between 1 and 999. ・Set data volume in GB/MB.
- Page 161 Resetting Data Traffic In Main Menu, Data Traffic Reset Data traffic volume is reset.
-
Page 162: Confirming Information
Confirming Information Information is received by Wi-Fi router. Confirming Information In Main Menu, Information Select information to confirm Information is shown. - Page 163 Deleting Viewed Information In Main Menu, Information Select information...
- Page 164 Delete Information is deleted after pop-up screen is shown.
- Page 165 Selecting and Deleting Information In Main Menu, Information Checkmark information to delete ・Checkmark "Select All" to select all.
- Page 166 Delete Information is deleted after pop-up screen is shown.
-
Page 167: Setting Software Update
Setting Software Update Make settings for software updates. Turn auto-software update to Enable to automatically update. If it is Disable , Wi-Fi router checks updates but does not update automatically. Setting Auto-Software Update In Main Menu, Software Update Enable Disable Auto-software update downloading turns Enable Disable... -
Page 168: Software Update
Updating Software In Main Menu, Software Update Continue Wi-Fi router checks the latest software. ・When software is the latest, "The latest version" appears. If not the latest, software is updated. Software Update Packet communication charges are not applied for software update. While software is updated, other functions are disabled. -
Page 169: Setting From Mobile Device
Access WEB UI from a smartphone etc. to show WEB UI page for mobile devices. Activating WEB UI from Mobile Device ・SoftBank Corp. does not guarantee compatibility with all mobile devices. ・Available functions differ in WEB UI for mobile devices and WEB UI for computers. - Page 170 Logging In to WEB UI from Mobile Device In WEB UI Home Page, Settings Login window opens. Enter Login password Login Settings open. ・"admin" is set for Login password by default. For Login password, see "Changing Login Password for WEB UI."...
- Page 171 Show download page for TV application Settings Show settings for all functions Customer Support Connect SoftBank web page and open Support Site of 501HW User Manual Connect SoftBank web page and open User Guide of 501HW Open WEB UI Home Page for computer...
- Page 172 : 4G connected : LTE connected : 3G connected ・Internet Wi-Fi Icons : Internet Wi-Fi connected (including SoftBank Wi-Fi Spot) ・Internet connection status : Appears when Internet connected : Appears when Internet not connected ・WLAN status : Appears when WLAN is ON, operating at 2.4 GHz (Wi-Fi) : Appears when WLAN is ON, operating at 5 GHz (Wi-Fi) Number below Wi-Fi communication standard (2.4G/5G) is current number of connected WLAN...
- Page 173 Layout Other than Home Page Item Description Logout Log out from WEB UI Return to Home Page Home Menu Show settings for all functions...
- Page 174 Installing TV Application Access the download page for iOS or Android™ application. For iOS For Android Application download page opens.
-
Page 175: Setting Lan Wi-Fi (On Mobile)
Setting LAN Wi-Fi (on Mobile) LAN Wi-Fi Sleep Settings Setting items are as follows: Item Description Set whether to disable WLAN function automatically when Wi-Fi router does not connect to Sleep Mode Settings WLAN devices; WLAN function is not turned off while charging even if Sleep Mode Settings is In WEB UI menu, Settings Login window opens. - Page 176 LAN Wi-Fi Set time until entering Sleep mode Apply Sleep mode setting is complete. ・ Select to disable Sleep setting.
- Page 177 LAN Wi-Fi Basic Settings (SSID A) Make basic WLAN settings for SSID A. ・Setting items are as follows: Item Description SSID Set SSID (Network Name) Authorization method Set authorization method Encryption method Set encryption method Appears when "WPA2-PSK" or "WPA/WPA2-PSK" is selected in "Authorization method;" enter WPA security key Security Key Appears when "Auto,"...
- Page 178 Enter Login password Login Settings open. LAN Wi-Fi...
- Page 179 Set each item Apply LAN Wi-Fi basic settings for SSID A are made.
- Page 180 Enabling Multi-SSID Function (SSID B) Make basic WLAN settings for SSID B. ・SSID B does not support WPA/WPA2. ・ When Multi-SSID is , communication speed may decrease depending on number of WLAN devices connected. ・Setting items are as follows: Item Description SSID Set SSID (Network Name)
- Page 181 Enter Login password Login Settings open. LAN Wi-Fi...
- Page 182 Turn "SSID B" to ・ Information screen appears when Tapping of "SSID B" with Internet Wi-Fi enabled. Tap to disable Internet Wi-Fi function automatically. Set each item Apply LAN Wi-Fi basic settings for SSID B are made.
-
Page 183: Setting Mobile Network (On Mobile)
Setting Mobile Network (on Mobile) Connect to a 4G/LTE/3G network with Wi-Fi router and make detailed settings. International Roaming Overseas, roaming service for 3G is available. In WEB UI menu, Settings Login window opens. ・ When already logged in, go to step Enter Login password Login Settings open. - Page 184 Mobile Network Change International roaming Apply International roaming setting is changed. ・The mobile network can be set manually during International roaming. For details, see "Setting Mobile Network."...
- Page 185 Notes for Overseas Use When coming to Japan from overseas, turn the power off and back on.
-
Page 186: Showing/Setting Data Usage (On Mobile)
Showing/Setting Data Usage (on Mobile) Check data traffic volume. Also, set maximum traffic or reset date for data traffic. Data traffic is an estimation. May differ from actual traffic volume. For actual traffic volume, contact SoftBank Customer Support. Checking Data Traffic Volume Accumulated data traffic volume at the moment from start of use or reset is shown. - Page 187 Data Usage Data traffic volume is shown. ・Data traffic volume to present for Maximum Traffic set in Data Usage is shown. For setting maximum traffic, see "Setting Maximum Traffic."...
- Page 188 Setting Auto Reset Date Set date of month for automatically resetting accumulated data traffic. In WEB UI menu, Settings Login window opens. ・ When already logged in, go to step Enter Login password Login Settings open.
- Page 189 Data Usage...
- Page 190 Select date for resetting Apply Auto reset date is set. ・Value number is selected between 1 and 31. ・If 31 is set, data traffic is reset at the end of the month. "Reset" and "Auto Reset" The reset items differ in "Reset" and "Auto Reset." With "Reset,"...
- Page 191 Setting Maximum Traffic Set monthly data traffic volume. ・Maximum traffic does not mean a limit on data communication. Use this volume as measure of usage. In WEB UI menu, Settings Login window opens. ・ When already logged in, go to step Enter Login password Login Settings open.
- Page 192 Data Usage...
- Page 193 Enter number for data traffic Select units Apply Maximum traffic is set. ・Enter value number between 1 and 999. ・Set data volume in GB/MB.
- Page 194 Resetting Data Traffic In WEB UI menu, Settings Login window opens. ・ When already logged in, go to step Enter Login password Login Settings open.
- Page 195 Data Usage Reset...
- Page 196 Data volume is reset.
-
Page 197: Confirming Information (On Mobile)
Confirming Information (on Mobile) Information is received by Wi-Fi router. Confirming Information In WEB UI menu, Settings Login window opens. ・ When already logged in, go to step Enter Login password Login Settings open. - Page 198 Information Information is shown.
- Page 199 Select information to confirm Information is shown.
- Page 200 Selecting and Deleting Information In WEB UI menu, Settings Login window opens. ・ When already logged in, go to step Enter Login password Login Settings open.
- Page 201 Information Checkmark information to delete ・Checkmark "Select All" to select all.
- Page 202 Delete Information is deleted after pop-up screen is shown.
-
Page 203: Checking Wi-Fi Router Information (On Mobile)
Checking Wi-Fi Router Information (on Mobile) Checking Wi-Fi Router Information Check device information such as software version. Item Description Device name Product name (501HW) IMEI Serial number Number Phone number saved to USIM Card Hardware version Current hardware version Software version... - Page 204 Enter Login password Login Settings open. Device Information Information is shown.
-
Page 205: Viewing Digital Terrestrial Broadcasting (Tv
Viewing Digital Terrestrial Broadcasting (TV) Terrestrial TV..............204 Setting the TV Function On..........206 Watching TV on Android™ Device.........207 Watching TV on iPhone/iPod touch/iPad......212 Checking TV Help............218... -
Page 206: Terrestrial Tv
Terrestrial TV Precautions for TV Watch One Seg and Full Seg by connecting Wi-Fi router with a TV Antenna smartphone, a tablet, etc. via WLAN (only in Japan). Note the following when using TV Antenna. ■ By default, ワンセグ/フルセグ切替 is set to ワンセグ固... - Page 207 Checking Models Compatible with TV Application Copyright Protection TV programs are protected under copyright. Do not use One TV viewing requires a special application. Models that are Seg/Full Seg for any purpose other than watching TV. compatible with the TV application can be checked by scanning the QR code viewable as follows.
-
Page 208: Setting The Tv Function On
Setting the TV Function On Scan QR code with smartphone or tablet Setting the TV Function On ・This function is set to "有効" by default. テレビ Page listing of models compatible with TV application opens. ・No listing of models only indicates that operation has not been confirmed, and does not indicate that models will not function correctly. -
Page 209: Watching Tv On Android™ Device
Watching TV on Android™ Device Scan shown "テレビ視聴" application download QR code with Android™ smartphone or tablet Installing TV Application Scan QR code shown on Wi-Fi router Display with a compatible device, then install the Android™ application from the download page. テレビ... - Page 210 Installing TV Application from Google Installing TV Application from WEB UI Play™ Screenshots and steps described here are for installation on Connect smartphone with Wi-Fi router via WLAN Android™ 5.1 from Google Play™. ・To use Google Play™, you need a Google account. Activate web browser on smartphone Enter "http:// web.setting"...
- Page 211 Settings on Android™ Device In channel scan completion screen, 次へ Screenshots and steps described here are for installation on Android™ 5.1. In Home screen or App list of Android™ device, (テレビ視 聴) TV screen is shown. ・It may take about several minutes until channel scan is complete.
- Page 212 Watching TV Tap any channel Screenshots and steps described here are for installation on Android™ 5.1. In Home screen or App list of Android™ device, (テレビ視 聴) Broadcast screen of selected channel appears. ・ Flick TV screen left or right Tap any channel or on channel name area to switch channel.
- Page 213 TV Screen (Vertical Screen) Audio In TV screen (vertical screen), 設定 音声設定 Select each item ・Programs which do not have switchable audio cannot be set. Priority Full Seg/One Seg Only In TV screen (vertical screen), 設定 ワンセグ/フルセ グ切替 フルセグ優先 ワンセグ固定 Scan Channels How to scan channels manually is described.
-
Page 214: Watching Tv On Iphone/Ipod Touch/Ipad
Watching TV on iPhone/iPod TV Screen (Full Screen) touch/iPad ・When only TV viewing screen is shown, Tap screen to show other items. Installing TV Application Scan QR code shown on Wi-Fi router Display with a compatible device, then install the iOS application from the download page. - Page 215 Installing TV Application from App Store Scan shown "テレビ視聴" application download QR code with iOS smartphone or tablet Screenshots and steps described here are for installation on iPhone with iOS 8.4 from App Store. ・For use of App Store, Apple ID is required. In Home screen of iPhone/iPod touch/iPad, (App Store) Application download page opens.
- Page 216 Installing TV Application from WEB UI Input "テレビ視聴" in search column 検索 Connect iPhone/iPod touch/iPad to Wi-Fi router via WLAN Activate web browser with iPhone/iPod touch/iPad Enter "http://web.setting" in address bar (テレビ視聴) Tap Install icon in Software screen Install TV application. In "TV Application Link,"...
- Page 217 Settings on iPhone/iPod touch/iPad In channel scan completion screen, 次へ Screenshots and steps described here are for on iPhone with iOS 8.4. In Home screen of iPhone/iPod touch/iPad, (テレビ視聴) TV screen appears. ・It may take about several minutes until channel scan is complete.
- Page 218 Watching TV Tap any channel Screenshots and steps described here are for on iPhone with iOS 8.4. In Home screen of iPhone/iPod touch/iPad, (テレビ視聴) Broadcast screen of selected channel appears. ・ Flick TV screen left or right Tap any channel or on channel name area to switch channel.
- Page 219 TV Screen (Vertical Screen) Subtitles In TV screen (vertical screen), 設定 字幕設定 Select each item ・Programs which are not subtitled cannot be set. Audio In TV screen (vertical screen), 設定 音声設定 Select each item ・Programs which do not have switchable audio cannot be set.
-
Page 220: Checking Tv Help
Checking TV Help TV Screen (Full Screen) Check helpful hints for enjoyable TV viewing. ・When only TV screen is shown, Tap the screen to show other items. Checking TV Help テレビ Item Description Received Show TV reception level signal level Channel name appears;... -
Page 221: Appendix
Appendix Troubleshooting.............. 220 Specifications..............223 Warranty & Service............225 Customer Service............225... -
Page 222: Troubleshooting
Confirm that Wi-Fi router is properly connected to PC. Remove Wi-Fi router from PC, restart PC, then If symptoms continue even after checking, contact a nearby reconnect Wi-Fi router. SoftBank Shop or Customer Service. Follow these steps to confirm proper Wi-Fi router installation. - Page 223 PC does not recognize Wi-Fi router by USB connection Transmission fails (Windows Vista) Signal may be weak. Move to where signal is stronger. Confirm that Wi-Fi router is properly connected to PC. Check Battery of Wi-Fi router. If Battery is low, Remove Wi-Fi router from PC, restart PC, then charge Battery with PC using Micro USB Cable or AC reconnect Wi-Fi router.
- Page 224 USIM Card is not recognized/recognized as an invalid Wi-Fi router operations are unstable USIM Card Confirm that Wi-Fi router is not used in extreme Make sure USIM Card is inserted correctly. For details, temperatures/high humidity/direct sunlight/dusty "Installing USIM Card." areas. Read "Safety Precautions" beforehand for using under proper environment.
-
Page 225: Specifications
Adjust the direction of TV Antenna. Item Description Check area setting of Channel Scan. Product Name 501HW Put Wi-Fi router and mobile devices close. Approx. 60.1 mm (H) × 104.1 mm (W) × Dimensions When "インターネットWi-Fi" on Wi-Fi router is 18.3 mm (D) - Page 226 ・Battery Continuous Communication Approx. 10 hours Parts Materials/Finishing Time Label 1 Charging time depends on ambient temperature, Battery Terminal Copper/nickel plating, gold plating usage, etc. Outer Case 2 Carrier aggregation not applied. (Top/Bottom) 3 Continuous standby time and continuous communication time depend on environment, signal conditions, etc. GPL Written Offer Micro USB Cable This product contains free software complying with GNU...
-
Page 227: Warranty & Service
From a landline/IP phone, dial toll free at 0800-919-0157 Damages For Customer Assistance SoftBank Corp. is not liable for any damages resulting from use of Wi-Fi router. From a SoftBank handset, dial toll free at 113 From a landline/IP phone, dial toll free at 0800-919-0113... -
Page 229: Safety Precautions
Safety Precautions Safety Precautions............228 General Notes..............235 Specific Absorption Rate (SAR) Information for this Product................237... -
Page 230: Safety Precautions
Read safety precautions before using Wi-Fi router. Observe precautions to avoid injury to self or others, or damage to property. SoftBank Corp. is not liable for any damages resulting from use of this product. Labels & Symbols Use specified Battery, AC Charger (optional accessory) and Micro USB Cable only. - Page 231 When Wi-Fi router and AC charger are connected, do not step on or otherwise apply Do not put Wi-Fi router, Battery, AC Charger excessive force. (optional accessory), Micro USB Cable in cooking appliances such as a microwave or Damaging the terminals and continuing to charge may pressure cooker or on IH cooking heaters.
- Page 232 Wi-Fi Router Do not place Wi-Fi router on unstable/uneven surfaces. Wi-Fi router or related hardware may fall, resulting in Power off near electronic devices or equipment injury, malfunction, etc. Failure to do so while charging operating on high precision control or weak may cause damage to the charging terminal.
- Page 233 Battery Check battery type on label for use/disposal. Do not use Wi-Fi router when it may affect a Mark Battery type vehicle's electronic equipment. Li-ion 00 Lithium-ion polymer battery Wi-Fi router use may affect the equipment and lead to unsafe driving. If you experience any skin irritation associated Do not dispose of Wi-Fi router in fire.
- Page 234 Battery may leak, overheat, burst or ignite. Wi-Fi router may malfunction or cause fire. Do not dispose of an old Battery with ordinary refuse. Tape on contacts and dispose separately or bring it to SoftBank Shop nearby. Dispose Battery according to your municipality rules for recycling.
- Page 235 (optional accessory) plug/Micro USB Cable plug or AC product. Charger (optional accessory) plug/Micro USB Cable plug is SoftBank Corp. is not liable for short circuit, fire, trampled, it may cause electric shock, fire, or malfunction. malfunction resulting from use to other manufacturer's product.
- Page 236 Wi-Fi Router Use & Electronic Medical Equipment Grasp AC Charger (optional accessory)/Micro USB Cable (USB plug) to unplug it before This section based on "Guidelines for Use of Mobile Phones cleaning. and Other Device in Hospitals" (Electromagnetic Compatibility May cause electric shock, etc. Conference Japan, August 2014) and "Guidelines to safeguard implanted medical devices against radio emissions from the use of radio equipment"...
-
Page 237: General Notes
・Files may be lost or damaged in the following situations. malfunction. Wi-Fi router or related hardware may become SoftBank Corp. is not liable for damages incurred due to too hot to touch, leading to burn injuries, etc. lost or altered information. To minimize damages, back up ・Wi-Fi router may become hot while in use or while charging... - Page 238 Touchscreen Wi-Fi (Wireless LAN) ・Do not press Display surface with nails, sharp or hard Wi-Fi router uses 2.4 GHz frequency band WLAN between object, etc. forcibly. May cause scratch or damage. Touch 2400 MHz and 2483.5 MHz. lightly with your fingers. Do not push Display with your Wireless Frequencies &...
-
Page 239: Specific Absorption Rate (Sar) Information For This Product
- Inquire with Customer Service to consult if you are unable Specific Absorption Rate (SAR) to configure the security settings. Information for this Product - SoftBank Corp. cannot be held liable for WLAN security issues. This product [501HW] meets Japanese technical regulations* and international guidelines for exposure to radio waves. - Page 240 -World Health Organization http://www.who.int/emf -List of Specific Absorption Rates (SAR) for radio waves by smartphone/3G model http://www.softbank.jp/mobile/support/sar/ (Japanese)
- Page 241 Activating WLAN (Wi-Fi) Function........21 C Charging Battery.............. 15 Checking Help..............82 Checking TV Help............218 501HW User Guide Index Checking Wi-Fi Router Information........ 81 Checking Wi-Fi Router Information (on Mobile)...201 Checking WLAN Connected Device Information....66 Confirming Information..........160 Confirming Information (on Mobile)......195 Confirming Notifications..........
- Page 242 Other Settings..............73 Watching TV on iPhone/iPod touch/iPad......212 Overview of WEB UI............92 WEB UI Window on PC............. 95 WLAN (Wi-Fi)..............20 P Parts & Functions...............6 Power On/Off..............16 Q Quick Setup............... 54 Quick Setup............... 97 R Router Setting..............131 S Safety Precautions............228 Setting from Mobile Device...........167 Setting Internet Wi-Fi.............
- Page 244 501HW User Guide December 2015, First Edition SoftBank Corp. Visit SoftBank Shop for assistance Model : 501HW Manufacturer : HUAWEI TECHNOLOGIES CO., LTD.
Need help?
Do you have a question about the 501HW and is the answer not in the manual?
Questions and answers