VTech VSP726 User Manual
Eristerminal sip deskset
Hide thumbs
Also See for VSP726:
- Quick user manual (2 pages) ,
- Configuration manual (11 pages) ,
- Administrator and provisioning manual (225 pages)
Table of Contents
Advertisement
Quick Links
Advertisement
Table of Contents

Related Manuals for VTech VSP726


Summary of Contents for VTech VSP726
- Page 1 ErisTerminal SIP Deskset ® VSP726 User Guide...
- Page 3 Congratulations on your purchase of this VTech product. Before using this product, please read Important Safety Information on page 4 of this manual. Please thoroughly read this user’s manual for all the feature operations and troubleshooting information necessary to install and operate your product. You can also visit our businessphones.vtech.com...
-
Page 4: Important Safety Information
Important Safety Information This symbol is to alert you to important operating or servicing instructions that may appear in this user’s manual. Always follow basic safety precautions when using this product to reduce the risk of injury, fire, or electric shock. Important safety instructions When using your telephone equipment, basic safety precautions should always be followed to reduce the risk of fire, electric shock and injury, including the... - Page 5 12. To reduce the risk of electric shock, do not disassemble this product, but take it to an authorized service facility. Opening or removing parts of the telephone base or handset other than specified access doors may expose you to dangerous voltages or other risks. Incorrect reassembling can cause electric shock when the product is subsequently used.
- Page 6 20. For pluggable equipment, the socket-outlet shall be installed near the equipment and shall be easily accessible. 21. In wall mounting position, make sure to mount the telephone base on the wall by aligning the eyelets with the mounting studs of the wall plate. Then slide the telephone base down on both mounting studs until it locks into place.
-
Page 7: Table Of Contents
ErisTerminal SIP Deskset VSP726 User Guide Table of Contents Forwarding calls ......23 Transferring calls ......25 Making a conference call ....27 Important Safety Information Retrieving messages ....... 29 Important safety instructions....4 Using a shared line ......30 Introduction Call monitoring......... - Page 8 Deregistering the cordless headset User Preferences......64 without the deskset ......49 Programmable Feature Keys... 66 Cordless accessory registration and Programmable Hard Keys ....69 deregistration time-out ..... 49 Speed Dial ........71 Cordless Handset Directory .......... 72 Registering an optional cordless Servicing ..........
-
Page 9: Introduction
There are two ports, known as the Ethernet port and PC port, at the back of the deskset. The Ethernet port allows the VSP726 deskset to connect to the hosted IP PBX via a router. The PC port is for another device such as a personal computer to connect to the local area network through the deskset. -
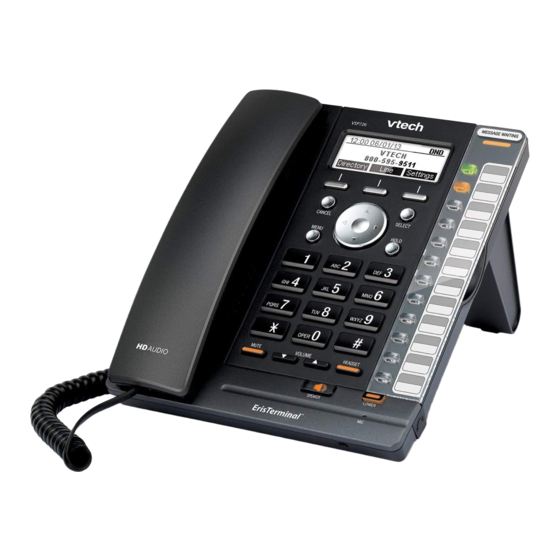
Page 10: Quick Reference Guide
Quick Reference Guide Front panel features MESSAGE WAITING indicator Programmable keys Illuminates when you have Can be programmed to perform various a new voice message. functions or access various features. For example: • Press to access a line to make a call. •... -
Page 11: Dial Pad And Audio Keys
Quick Reference Guide Dial pad and audio keys Dial pad Use to dial numbers and enter text. For a list of special characters you can enter with the dial pad, see page 80. HEADSET MUTE When a headset is During a call, press to prevent connected to the deskset, your voice from being heard. -
Page 12: Deskset Installation
PoE, install the phone near a power outlet not controlled by a wall switch. The phone can be placed on a flat surface or vertically mounted on the wall. For customer service or product information, visit our website at businessphones.vtech.com 1 (888) 370-2006 or call Network requirements A switched network topology is recommended for your LAN. -
Page 13: Location
Location Avoid placing the deskset too close to: • Communication devices such as television sets, DVD players, or other cordless telephones • Excessive heat sources • Noise sources such as a window with traffic outside, motors, microwave ovens, refrigerators, or fluorescent lighting •... -
Page 14: Rear Panel Features
Handset jack Corded headset jack Connecting the phone IMPORTANT INFORMATION 1. Use only a compatible VTech power adapter. To get a replacement power adapter, visit our website at businessphones.vtech.com 1 (888) 370-2006 , or call Note: An AC adaptor with Ferrite Core must be used with this equipment to ensure compliance with the Class A FCC limits. - Page 15 2. Plug the end of the coiled handset cord into the Handset jack on the rear of the phone. Secure the cord by routing it through the slot and underneath the tab. 3. Plug one end of the Ethernet cable into the Ethernet port on the rear of the deskset (marked by ), and plug the other end of the cable into your network router or switch.
- Page 16 Deskset Installation To mount the phone on the wall: 1. Prepare the wall-mount screws. The deskset will fit onto wall-mount screws with centers 3 ¼ inches (8.2 cm) or 4 inches (10.2 cm) apart. Most standard wall plates have screw centers 3 ¼ inches (8.2 cm) apart. 2.
-
Page 17: Using The Phone
Using the Phone Idle screen The Idle screen appears after the phone is connected and configured for your SIP PBX service. The Idle screen indicates that you have no active or held calls. From the Idle screen, you can press: •... -
Page 18: Programmable Feature Key Lights
Using the Phone Programmable feature key lights The programmable feature key lights indicate call status and other information, depending on how the key is configured. Light Activity Description Line Flashing ORANGE Line is unregistered Solid GREEN On a call or dialing Quickly flashing GREEN Ringing incoming call Slowly flashing GREEN... -
Page 19: Main Menu Items
Using the Phone Main menu items 1. Features (see page 34) 3. User Settings (see page 53) 2. Status (see page 52) 4. Admin Settings (available only to your system administrator) Making calls You can make a call at any time by choosing an off-hook method (such as lifting the handset, pressing a Line key, or pressing HEADSET or SPEAKER), and then dialing a number. - Page 20 Using the Phone Making calls (continued) To make a call by pre-dialing: 1. Use the key pad to enter the desired phone number. • Press if you enter an incorrect digit. Backspc • Press to change from entering digits to entering letters (if you need to enter a domain name as part of the number).
-
Page 21: Answering Calls
Using the Phone Answering calls To answer a call: • Lift the handset, or press , SPEAKER, or HEADSET. Answer You can also press a flashing green Line key to answer that incoming call. If you have multiple incoming calls, (as indicated by ), press q p to select the call you want to answer. -
Page 22: Putting A Call On Hold
Using the Phone Putting a call on hold Use this feature to hold one call while you access another. The deskset also puts calls on hold automatically when you answer another call, transfer a call, or create a conference. See also, “Putting a shared-line call on hold” on page 30. To put a call on hold: •... -
Page 23: Forwarding Calls
Using the Phone Forwarding calls You can forward an incoming call to another number, either by entering the number yourself, or by selecting a number from the directory, redial list, or call history. Note: Your deskset Call Forward–No Answer setting will cancel the manual forwarding process if it takes effect first. - Page 24 Using the Phone Forwarding calls (continued) To forward a call using the directory, redial list, or call history: 1. When an incoming call appears, press Forward The deskset stops ringing and the Forward to screen appears. 2. Press a programmable key (if available) to display the directory, redial list, or call history.
-
Page 25: Transferring Calls
Using the Phone Transferring calls You can transfer a call to someone else at another phone. If you talk to the transfer recipient before completing the transfer, you are making a “supervised” transfer. However, the transfer recipient does not have to talk to you before receiving the transferred call. - Page 26 Using the Phone Transferring calls (continued) To transfer a call (blind): 1. During a call, press . The call is automatically put on hold and the Transfer transfer setup screen appears. â 2. On the transfer setup screen, enter the number to which you want to transfer the call.
-
Page 27: Making A Conference Call
Using the Phone Making a conference call You can hold a conference call between yourself and two other callers. To make a conference call: 1. During a call, press . The call is automatically put on hold and the Conf conference setup screen appears. - Page 28 Using the Phone Making a conference call (continued) When you have an active call and a held call, you can also create a conference with the held call. To create a conference with a held call: 1. While on a call with another call on hold, press Conf 2.
-
Page 29: Retrieving Messages
Using the Phone Retrieving messages The phone alerts you when you have a new message. The Message Waiting indicator also turns on whenever you have new messages. On the New Message alert screen, you can press: • to return to the Idle screen. Exit •... -
Page 30: Using A Shared Line
Using the Phone Using a shared line Your phone may be configured to have one or more shared lines. This means that a group of phones, including yours, can make and receive calls on the same line. The shared line can have more than one programmable key assigned to it. Ask your system administrator for the configuration that applies to your deskset. -
Page 31: Barging In
Using the Phone Putting a shared-line call on hold (continued) When you transfer a call or start a conference call, the other call is put on private hold automatically. During the transfer or conference setup process, no other desksets can retrieve the call on hold. As well, when you are on a call and you answer another incoming call or retrieve another call on hold, your first call is put on private hold automatically. -
Page 32: Busy Lamp Field
Using the Phone Busy lamp field As with shared lines, you can monitor call activity using Busy Lamp Field (BLF) keys. However, BLF keys and LEDs represent activity on an individual deskset, not on a line. Keys configured for BLF allow you to monitor call activity for the extension only. -
Page 33: Paging
Using the Phone Paging Your phone supports two types of paging: server-based paging and multicast paging. An incoming page may interrupt any active calls you are on, depending on how your system administrator has configured the paging function. To send a server-based page: 1. -
Page 34: Phone Features
Phone Features Using the Features menu On the Features menu, you can manage incoming calls, use the Directory, access your messages, view your call history, and manage your speed dial numbers. Navigating menus To select a submenu on a numbered list, you can: •... -
Page 35: Using The Call Menu
Phone Features Using the Call menu On the Call menu, you can manage how your phone handles incoming calls. The settings available on the Call menu include: Setting Description page… 1. Do Not Disturb Silences incoming ringing and paging. Do Not Disturb (DND) is set on a per-line basis. - Page 36 Phone Features Using the Call menu (continued) To set Do Not Disturb: 1. From the Call menu, if necessary, press p or q to highlight Do Not Disturb. 2. Press SELECT. 3. On the Do Not Disturb menu, highlight the line for which you want to turn Do Not Disturb On or Off.
- Page 37 Phone Features Using the Call menu (continued) 6. On the next screen, press t or u to turn call forwarding On or Off. 7. Press q. 8. Enter the number to which you would like to forward calls. 9. (If you selected Call forward no ans earlier) Press q. 10.
- Page 38 Phone Features Using the Call menu (continued) To enable missed call alerts: 1. From the Call menu, press q to highlight Missed call alert. 2. Press SELECT. The Missed call alert menu appears. 3. Press t or u to turn missed call alerts on or off. 4.
-
Page 39: Using The Local Directory
Phone Features Using the local directory You can store the names and phone numbers for up to 1000 contacts in the deskset directory. Once directory entries are saved, you can dial them directly from the directory. You can also search directory entries by first or last name. When adding an entry, you can enter numbers for work, mobile, and other. - Page 40 Phone Features Using the local directory (continued) To call a contact: 1. Press p or q or to view the desired directory entry. Search 2. To view other numbers for the entry, press Type 3. When the desired number appears, press Dial Note: If you view a directory entry when you have already entered digits in dial mode, an...
- Page 41 Phone Features Using the local directory (continued) To search directory entries: 1. From the Directories screen or from a directory entry, press Search The Local directory search screen appears. 2. To filter your search by first name or last name, press t or u. 3.
-
Page 42: Blacklist
Phone Features Blacklist The directory also includes a blacklist, which is a list of numbers that cannot reach your phone. If you experience nuisance calls, you can add the callers’ contact information to the blacklist. Calls from blacklisted numbers will not ring your phone, or be recorded in your call history. - Page 43 Phone Features Call history (continued) The following soft keys are available when viewing a call history entry: Delete Deletes the entry Dial Dials the Edit Dial Displays the predial entry screen so you can edit the number before dialing Save Saves the call information to the local directory...
- Page 44 4. The directory add/edit screen appears. The deskset automatically fills in the name and number, if available. • If necessary, edit the name and number. Press q to move the cursor to the next line. • Press to delete incorrect characters. Backspc 5.
-
Page 45: Speed Dial
Phone Features Speed Dial The speed dial menu allows you to enter up to 10 numbers that you dial frequently. To dial a speed dial number, press and hold the dial pad key that matches the speed dial entry number (for entry 10, press and hold 0). You can also enter speed dial numbers using the WebUI. -
Page 46: Call Recording
Phone Features Call recording If you have the call recording feature available (a microSD card must be installed and your administrator must enable call recording), you will have a Record soft key available during an active call. To record a call: 1. -
Page 47: Transferring Call Recordings To A Computer
5. Press to listen to the recording. Play The recording playback screen appears and the message begins playing. 6. While the recording is playing, you can press: • to pause playback. Pause • to move forward or backward 8 seconds at a time. Jump •... -
Page 48: Cordless Headset
Cordless Headset Registering an optional cordless headset You can register one cordless headset to a VSP726 deskset. When a deskset has a cordless accessory, the deskset and headset are all part of the same extension, and only one device can be used at a time. -
Page 49: Deregistering A Cordless Headset
Cordless Headset Deregistering a cordless headset You must deregister a cordless headset from its original deskset before you can register it to a different deskset. To deregister a cordless headset: 1. When the phone to which the headset is registered is idle, press Menu. 2. -
Page 50: Cordless Handset
Cordless Handset Registering an optional cordless handset You can register one VSP601 DECT cordless handset to a VSP726 deskset. When a deskset has a cordless accessory, the deskset and handset are all part of the same extension, and only one device can be used at a time. -
Page 51: Deregistering The Cordless Handset
Cordless Handset Deregistering the cordless handset Before using the cordless handset with a different deskset, you must deregister the handset from the device to which it is currently registered. To deregister using the handset: Registration 1. Press MENU on the handset. The Main Menu appears. Handset Deregistration 2. -
Page 52: Finding The Firmware Version
Status Finding the firmware version To view the firmware version of your phone: 1. When the phone is idle, press MENU. 2. On the Main menu, press q to highlight Status, and then press SELECT. 3. On the Status screen, press q to highlight Product Info, and then press SELECT. -
Page 53: Configuring The Phone
Configuring the Phone You can configure the phone using one of two methods: 1. The User Settings menu on the phone. 2. The WebUI, which you access using your Internet browser. This section describes the User Settings menu. For information about the WebUI, see page 60. -
Page 54: Preferences
Configuring the Phone Preferences Use the Preferences menu to set the language, date and time formats, and restart the phone. To use the Preferences menu: 1. Press MENU, then select User Settings, or press 3. The User Settings menu appears. 2. - Page 55 Note: If the NTP server is disabled, you must manually set the time and date. This setting is valid only if the system administrator has already configured the Network Time settings. For more information, see the VSP726 Deskset Administrator and Provisioning Guide.
-
Page 56: Setting The Key Unlock Pin
To manually set the Year, Month, Day, Hour and Minute: 1. From the Date & Time menu, press q to highlight Set manually. 2. Press SELECT. Note: If the NTP server is enabled, you cannot modify this setting. See “To enable or disable the NTP (Network Time Protocol) server:”... -
Page 57: Display
Display Use the Display menu to set screen appearance and backlight behavior. To use the Display menu: 1. Press MENU, then select User Settings, or press 3. 2. On the User Settings menu, press q to highlight Display, and then press SELECT. -
Page 58: Audio
Configuring the Phone Audio Use the Audio menu to pick one of ten ringer tones, turn key tones on and off, or select the default audio mode. Note: To adjust the ringer volume, press the deskset VOLUME q or p keys while the phone is idle. -
Page 59: Configuring The Programmable Keys
Configuring the Phone To set the key tone: 1. From the Audio menu, press q to highlight Key tone and then press SELECT. The Key tone menu appears. 2. On the Key tone menu, press t or u to turn key tones on or off. When off, key presses are silent. -
Page 60: Webui
WebUI Using the WebUI Use an Internet browser to access the Web User Interface (WebUI) that resides on your deskset. After you log on to the WebUI, you can configure the following features: • Call Settings • User Preferences • Programmable Keys •... -
Page 61: Status
5. Under User Name, enter user. 6. Under Password, enter user, or your own password, if you have created one. You can create or change a password after you log on. 7. Click Log In. The WebUI appears. Click topics from the navigation bar at the top of the page, and then click the desired setting on the left side of the WebUI to see the page for that setting. -
Page 62: Call Settings
WebUI Call Settings To view the call settings, click SYSTEM in the WebUI header, and then click Call Settings in the sidebar. You can configure call settings for each account that is available to your phone. Click Account 1, Account 2, and so on to select the call settings page for the desired account. - Page 63 Call Forward Settings Setting Description Enable Call Forward Select to enable call forwarding for all calls on that account. Always Target Number Enter a number to which all calls will be forwarded. Enable Call Forward Select to enable call forwarding for calls when you are on another Busy call on that account.
-
Page 64: User Preferences
WebUI User Preferences On the User Preferences page, you can configure some basic settings for your phone and set how your phone responds to calls. After changing any settings on this page, click Save to save them. General User Settings Setting Description Range... - Page 65 WebUI User Preferences (continued) Call Hold Reminder Settings Setting Description Range Default Enable Call Hold Enables or disables the call hold n/a — Select Enabled Reminder Tone reminder tone. to enable Tone Interval (secs) Sets the interval for the call hold 10–300 reminder tone.
-
Page 66: Programmable Feature Keys
WebUI Programmable Feature Keys The deskset has 12 dual-function programmable keys. You can assign up to 24 functions to the programmable keys on the Programmable Keys page. Keys can have identical functions, depending on the “Type” of key. For example, you can assign several “Line”-type keys to Account 1 so that you can manage multiple calls on Account 1. - Page 67 Type Description Redial Configures the key to access the Redial list. You can then press the key to view the Redial list. Messages Configures the key to access the Message menu. You can then press the key to view the Message menu. Do Not Disturb Configures the key to turn Do Not Disturb on or off.
- Page 68 Type Description Retrieve Park Call Enables you to retrieve a parked call. Pressing the key dials the Parked Call Retrieval feature access code (FAC). Your System Administrator must configure the feature access code and any other settings for Retrieve Park Call. In Call DTMF Configures the key to dial a string of numbers while you are on a call.
-
Page 69: Programmable Hard Keys
WebUI Programmable Hard Keys In addition to the 12 programmable feature keys, you can also program other keys on the Deskset to perform additional actions. The following keys are available for programming on the Programmable Hard Keys page: • UP arrow •... - Page 70 Type Description Quick Dial Configures the key to dial a number on the selected line. After selecting Quick Dial, enter the number to be dialed in the Value column. In the Account column, select the account on which the number will be dialed out. XML App Configures the key to open the XML browser.
-
Page 71: Speed Dial
WebUI Speed Dial The speed dial keys are used for dialing numbers with one key press. To view the speed dial keys, click SYSTEM in the WebUI header, and then click Speed Dial in the sidebar. On the Speed Dial page, you can enter up to 10 numbers that you dial frequently. To dial a speed dial number, press and hold the dial pad key that matches the speed dial entry number (for entry 10, press 0). -
Page 72: Directory
WebUI Directory To view the local directory, click CONTACTS in the WebUI header, and then click Local directory in the sidebar. On the Local Directory page, you can manage your local directory entries. You can sort, edit, delete, and add contact information for up to 1000 entries. The page also allows you to export your phone’s local directory or import a local directory file. - Page 73 Local Directory Click To... Sort the list by last name. Edit information for an entry. View the last page of entries. View the next page of entries. Delete selected entries from the directory. Click Select All to select every entry on the page you are viewing. Add a new directory entry.
- Page 74 To edit a directory entry: 1. Click Edit for the entry you want to edit. The Edit Local Directory Entry page appears. 2. Edit or add the desired information. 3. Click Save. Import Local Directory You can import an existing local directory file. Importing a directory file replaces all your previous local directory entries.
-
Page 75: Servicing
To change the User password: 1. Enter the old password (for a new VSP726, the default password is user). 2. Enter and re-enter a new password. The password is case sensitive and can consist of both numbers and letters (to a maximum of 15 characters). -
Page 76: Phone Lock
Setting Description Enable Hidden Enable to mask all DTMF digits entered during an Active Call. DTMF digits Enable Delay for Enable to add a one-second delay before DTMF digits are Hidden DTMF digits masked. By default, the digits are masked immediately. Enable Password Enable to hide PIN numbers entered as part of the dial string. -
Page 77: Troubleshooting
Troubleshooting If you have difficulty with your telephone, please try the suggestions below. For businessphones.vtech.com customer service, visit our website at or call 1 (888) 370-2006 General issues Screen is blank. • Ensure power is connected. If powered by an AC adapter, check that adapter is plugged into a wall socket and the Deskset power jack. -
Page 78: Electrical And Environmental
Specifications Electrical and environmental specifications RF frequency band 1921.536–1928.448 MHz Channels Operating temperature 32–122 °F (0–50 °C) AC adapter output voltage 5.0 Vdc @ 1.5 A Ethernet network ports GigE RJ-45 ports... -
Page 79: Soft Keys
Soft Keys Index of soft keys The table below provides an alphabetical list of the labels that appear above the deskset soft keys. Label Description abc/ABC/123 Selects the text format for input Enters a new directory group editor Add dot Enters dot in IP editing field Answer Answers an incoming call... -
Page 80: Special Characters
Soft Keys Index of soft keys (continued) Label Description Resume Resumes a call put on hold Save 1) Saves current setting 2) Begins save process Search Opens the Directory search editor Select Selects a highlighted option Settings Opens the User settings menu Conf Confirms to set up conference Transf... -
Page 81: Maintenance
Maintenance Taking care of your telephone • Your telephone contains sophisticated electronic parts, so you must treat it with care. • Avoid rough treatment. • Place the corded handset down gently. • Save the original packing materials to protect your telephone base if you ever need to ship it. -
Page 82: Gpl License Information
VTech Parties make no representations with respect to the origin, accuracy, usability, or usefulness of such code, and the VTech Parties have no responsibility to you whatsoever concerning the code, including without limitation any responsibility to provide explanation, support, upgrade, or any communication whatsoever.
Need help?
Do you have a question about the VSP726 and is the answer not in the manual?
Questions and answers