Crestron ST-1550C Operation Manual
1-way wireless rf touchpanel
Hide thumbs
Also See for ST-1550C:
- Brochure & specs (36 pages) ,
- Operation manual (28 pages) ,
- User's operation manual (20 pages)
Table of Contents
Advertisement
Quick Links
Download this manual
See also:
User's Operation Manual
Advertisement
Table of Contents

Related Manuals for Crestron ST-1550C


Summary of Contents for Crestron ST-1550C
- Page 1 Crestron ST-1550C 1-Way Wireless RF Touchpanel Operations Guide...
- Page 2 This document was prepared and written by the Technical Documentation department at: Crestron Electronics, Inc. 15 Volvo Drive Rockleigh, NJ 07647 1-888-CRESTRON All brand names, product names and trademarks are the property of their respective owners. ©2005 Crestron Electronics, Inc.
-
Page 3: Table Of Contents
Crestron ST-1550C Contents 1-Way Wireless RF Touchpanel: ST-1550C Introduction ... 1 Functions and Features ... 1 Specifications ... 2 Physical Description... 3 Industry Compliance ... 5 Setup ... 6 Applying Power... 6 Identity Codes... 6 Configuring the Touchpanel... 7 General Use and Safety ... 11 Recommended Touchpanel Cleaning ... -
Page 5: 1-Way Wireless Rf Touchpanel: St-1550C
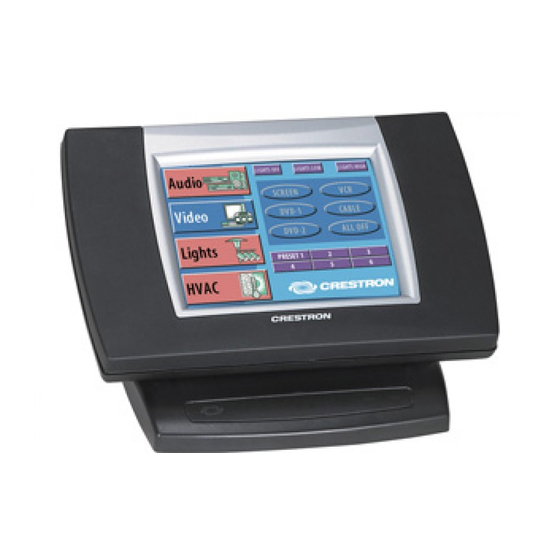
ST-1550C Introduction Functions and Features The ST-1550C is a one-way wireless RF touchpanel that provides user interface to a Crestron and an international version (STI-1550C), the lightweight, hand-held touchpanel, with long-life NiMH battery and RF wireless communication with a range of up to 300 feet, allows complete freedom of movement, indoors or out. -
Page 6: Specifications
The latest versions can be obtained from the Crestron website. Refer to NOTE after last footnote. Crestron 2-Series control systems include the AV2 and PRO2. Consult the latest Crestron Product Catalog for a complete list of 2-Series control systems. -
Page 7: Physical Description
Extension requires a prefix specific to the touchpanel type. In DETAILS, projectname represents the assigned project name, and 5xxx. represents a version number. Requires Crestron CNRFGWA 1-Way RF Receiver, or either an ST-CP or MC2W control processor, both of which have a built-in CNRFGWA. - Page 8 ST-1550C Touchpanel Physical Views (continued) A battery compartment is located on the underside of the unit. The compartment holds one Crestron ST-BTPN, rechargeable power pack. There are also four rubber feet on the underside of the unit for stability and to prevent slippage.
-
Page 9: Industry Compliance
Increase the separation between the equipment and receiver. Connect the equipment into an outlet on a circuit different from that to which the receiver is connected. Consult the dealer or an experienced radio/TV technician for help. 1-Way Wireless RF Touchpanel: ST-1550C • 5... -
Page 10: Setup
ST-1550C Power Source Options Identity Codes The ST-1550C touchpanel uses two distinct types of identity codes: Cresnet identity (NET ID), and RF ID. These codes are assigned to the touchpanel from the Interface Submenu when the unit is configured. Refer to “Interface” on page 11. For the touchpanel to be identified within the Cresnet system, these assignments must match assignments made in the SIMPL Windows program. -
Page 11: Configuring The Touchpanel
During this short period, the words “SETUP MODE” appear. The opening screen appears when the finger is removed from the touchscreen. 3. Touch the opening screen and select the Calibration button from the Preferences And Settings screen to enter “calibration mode.” 1-Way Wireless RF Touchpanel: ST-1550C • 7... - Page 12 Clock Adjust If a screen page in your customized program employs a clock display, the touchpanel’s internal clock and date setting must be set. To set date and time parameters select the Clock Adjust button located in the Preferences Menu and display the Clock Adjust screen, shown to the left.
-
Page 13: Power Management
This setting turns off all power when the touchpanel is inactive for the specified time. When the touchpanel is activated, the first page of the project appears or the last screen to be displayed reappears. Selection depends on how you setup your custom program. -
Page 14: Advanced Settings Screen
Standby timeout still functions. After timeout parameters have been set, touch the SAVE TIMEOUTS button in the lower left corner of the ST-1550C to save the new settings. Touch the RETURN button to display the Preferences And Settings screen. -
Page 15: Interface Screen
Interface Screen Interface The touchpanel communicates with an ST-CP (for SmarTouch) or other Crestron control system (for Cresnet) via wireless RF (through a CNRFGWA gateway). To do so, the touchpanel Cresnet ID and RF ID settings and those assigned in the control system program must match. -
Page 16: Programming
Crestron’s True Blue Support, log in at http://support.crestron.com. First-time users will need to establish a user account. You can create a program that allows you to set up the ST-1550C to operate a Crestron control system using the Crestron programming tools Crestron SystemBuilder™... -
Page 17: Programming With Simpl Windows
Crestron ST-1550C SystemBuilder is fully integrated with Crestron's suite of software development tools, including SIMPL Windows, VT Pro-e, Crestron Database, User IR Database, and User Modules Directory. SystemBuilder accesses these tools behind the scenes, enabling you to easily create robust systems. -
Page 18: C2Net-Device Slot In Configuration Manager
System Views. Similarly, the MC2W control processor is configured with a CNRFGWA in its MC2W-Net Device Slot 8. Drag the ST-1550C from the Touchpanels (Wireless | Wireless one way) folder of the Device Library and drop it on the CNRFGWA symbol in System Views. The PRO2 system tree displays the CNRFGWA gateway in Slot 9, with a default NET ID of 24. - Page 19 NOTE: Recall that in both the ST-CP and the MC2W configurations, the CNRFGWA has a fixed NET ID, which cannot be changed. Similarly, expand the system tree in the lower pane and double-click the ST-1550C icon to open the “Device Settings” window for the touchpanel. Select the RF/IR ID tab to change the touchpanel RF ID, as shown in the following figure.
-
Page 20: Programming With Vt Pro-E
For additional software information, refer to the help file provided with the software. The latest version of VT Pro-e can be obtained from the Crestron website. Virtual Feedback Programming a one-way RF touchpanel such as the ST-1550C requires consideration of “feedback."... - Page 21 Duration feedback is assigned to a group of buttons that are to be activated simultaneously, remain active for a specified period of time, and then return to the inactive state. 1-Way Wireless RF Touchpanel: ST-1550C • 17...
- Page 22 Select New to create a new interlock group. Select Edit if you wish to modify an existing group. In either case, the “Create Interlock” window appears. 18 • 1-Way Wireless RF Touchpanel: ST-1550C Crestron ST-1550C Operations Guide – DOC. 6096A...
- Page 23 “Simulate Button xx” appears in the Sequence Group list. When all the desired joins have been added, click Close to accept the entries and close the “Feedback” window. (Refer to the following figure.) Operations Guide – DOC. 6096A 1-Way Wireless RF Touchpanel 1-Way Wireless RF Touchpanel: ST-1550C • 19...
- Page 24 Momentary feedback does not require anything special in the SIMPL Windows program. You simply connect the signal from the appropriate touchpanel join number to the logic in the program (to the feedback of the same digital press).
- Page 25 Because there is no way to communicate the state of the toggle button between the panel and the control system by using that single button, Crestron models a toggle on a one-way panel as a two-button interlock group. The button shown on the panel is the first button.
-
Page 26: Reserved Join Numbers
On the touchpanel, if timing is specified in the sequence, the button that specifies the sequence will appear active for the whole sequence;... -
Page 27: Uploading And Upgrading
3360 3361 * Holding a button (assigned with join number 1035) for more than five seconds places the touchpanel into "setup mode". Use this mode to configure the touchpanel. ** While discharging, the touchpanel backlight is set to maximum and the timeouts are disabled. -
Page 28: Communication Settings
The following sections define how one would upload a VT Pro-e project or upgrade the firmware of the ST-1550C touchpanel. However, before attempting to upload or upgrade, it is necessary to establish communications. - Page 29 RJ-11 cable. NOTE: The RJ-11 (part of ST-PK) and ST-CBL cables can also be found as part numbers CNSP-585 and CNSP-586, respectively, in the Crestron cable database. The database can be downloaded from the Crestron website. Operations Guide – DOC. 6096A 1-Way Wireless RF Touchpanel 1-Way Wireless RF Touchpanel: ST-1550C •...
- Page 30 1-Way Wireless RF Touchpanel Programming Cable Specifications 26 • 1-Way Wireless RF Touchpanel: ST-1550C 1. Before making any connections to the touchpanel, verify that the control system is properly connected to the PC (using ST-PK cable 15717 and adapter) and powered on.
- Page 31 RTS/CTS is selected. Click the OK button to save the settings and close the window. 8. Proceed to “Uploading a VT Pro-e Project” on the next page or “Firmware Upgrade” that begins on page 29, as appropriate. 1-Way Wireless RF Touchpanel: ST-1550C • 27...
-
Page 32: Uploading A Vt Pro-E Project
VT Pro-e is a Windows compatible software package for creating Crestron touchpanel the extension .vtz. screen designs. Refer to “Programming with VT Pro-e” on page 16 for additional details. To upload a VT Pro-e project to the ST-1550C, complete the following steps. Select Send Touchpanel “Select Network ID” Window “Touch Panel Transfer”... -
Page 33: Firmware Upgrade
2. As shown below, select File Transfer | Update Touchpanel Firmware from the Viewport menu. Select Update Touchpanel Firmware 3. As shown on the next page, select the network ID of the ST-1550C and then click OK. 1-Way Wireless RF Touchpanel: ST-1550C • 29... - Page 34 1-Way Wireless RF Touchpanel “Select Network ID” Window Select CSF File 30 • 1-Way Wireless RF Touchpanel: ST-1550C 4. As shown below, select Sx51000a.csf to upload first, the second file, Sx51000b.csf, will then upload once the first file has completed. The transfer will complete automatically.
-
Page 35: Problem Solving
Crestron ST-1550C Problem Solving Troubleshooting The table below and on the next page provides corrective action for possible trouble situations. If further assistance is required, please contact a Crestron customer service representative. ST-1550C Troubleshooting Project cannot be uploaded to touchpanel: 1. -
Page 36: Further Inquiries
For assistance in your local time zone, refer to the Crestron website (http://www.crestron.com/) for a listing of Crestron worldwide offices. You can also log onto the online help section of the Crestron website to ask questions about Crestron products. First-time users will need to establish a user account to fully benefit from all available features. -
Page 37: Software License Agreement
This Agreement may only be modified by a writing signed by an authorized officer of Crestron. Updates may be licensed to You by Crestron with additional or different terms. This is the entire agreement between Crestron and You relating to the Software and it supersedes any prior representations, discussions, undertakings, communications or advertising relating to the Software. - Page 38 “applets” incorporated into the Software), the accompanying media and printed materials, and any copies of the Software are owned by Crestron or its suppliers. The Software is protected by copyright laws and international treaty provisions. Therefore, you must treat the Software like any other copyrighted material, subject to the provisions of this Agreement.
-
Page 39: Return And Warranty Policies
CRESTRON shall not be liable to honor the terms of this warranty if the product has been used in any application other than that for which it was intended, or if it has been subjected to misuse, accidental damage, modification, or improper installation procedures. - Page 40 Crestron Electronics, Inc. Operations Guide – DOC. 6096A 15 Volvo Drive Rockleigh, NJ 07647 02.05 Tel: 888.CRESTRON Fax: 201.767.7576 Specifications subject to www.crestron.com change without notice.
Need help?
Do you have a question about the ST-1550C and is the answer not in the manual?
Questions and answers