Advertisement
Available languages
Available languages
Quick Links
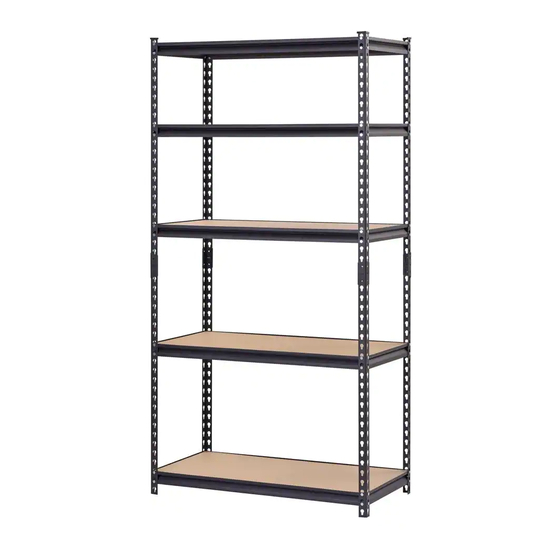
Model UR-185PBB
36"w x 18"d x 72"h
Description
Qty
(A) beam
10
(B) brace
10
(C) post
8
(D) wood shelf
5
(E) post coupler
4
(F) post cap
8
Safety Instructions
These units should be placed on a level surface. Failure to do so can result in poor product performance or create a possible
safety hazard. This unit should be securely anchored to a wall or floor with suitable fasteners, which are not included. Do not
use this unit for anything other than the manufactures intended purpose. DO NOT STAND ON ANY PART OF THE UNIT, OR
USE IT AS A LADDER. Evenly distribute the weight on each level and always keep the heavier loads on the bottom. Use care
when working with metal parts. Do not use this unit to store aquariums.
General Instructions
Assembly is done with the rivets of the beams and braces fitting into the slots of the post. A rubber mallet may be used on the
beams and braces to seat the rivets properly. A hammer can also be used, providing one uses a cloth or a block of wood
between the hammer head and the parts to prevent damage. Tap gently and be sure the rivets are straight and fully engaged.
Should you have any comments, damage, missing parts, or problems with assembly of this unit contact us:
Chat: www.edsal.com/chat or www.edsal.com/contact
Email: support@edsal.com
Phone: 773-475-3131
To obtain replacement parts please provide: Model Number, Part Number & Description,
Steel Storage Rack
B - Brace
Description
Part Number
URBM36-BLK
(A) beam
URBR18-BLK
(B) brace
URPS36-BLK
(C) post
RPB31836
(D) wood shelf
CPOUT-BLK
(E) post coupler
RL-PC-B1.4
(F) post cap
Location Purchased, and Date Purchased
A - Beam
D - Wood Shelf
Model UR-4818PBB
48"w x 18"d x 72"h
Qty
Part Number
10
URBM48-BLK
10
URBR18-BLK
8
URPS36-BLK
5
RPB31848
4
CPOUT-BLK
8
RL-PC-B1.4
Models:
UR-185PBB
UR-4818PBB
UR-245PBB
C - Post
E - Post Coupler
F - Post Cap
Model UR-245PBB
48"w x 24"d x 72"h
Description
Qty
(A) beam
10
(B) brace
10
(C) post
8
(D) wood shelf
5
(E) post coupler
4
(F) post cap
8
Edsal Manufacturing Co. LLC
Chicago, IL 60609
US Patents & Patents Pending
Part Number
URBM48-BLK
URBR24-BLK
URPS36-BLK
RPB32448
CPOUT-BLK
RL-PC-B1.4
Rev: 032620_hd
Advertisement

Related Manuals for Edsal UR-185PBB


Summary of Contents for Edsal UR-185PBB
- Page 1 Tap gently and be sure the rivets are straight and fully engaged. Should you have any comments, damage, missing parts, or problems with assembly of this unit contact us: Edsal Manufacturing Co. LLC Chat: www.edsal.com/chat or www.edsal.com/contact Chicago, IL 60609 US Patents &...
- Page 2 Assembly Instructions UR-185PBB, UR-4818PBB & UR-245PBB Step Step Figure B Brace/Beam Tap lightly ledge Posts are to seat directional. rivets The narrow end of the slots must point down. Rivets Figure A Figure C Post Figure C Wood Shelf Brace...
- Page 4 Instrucciones de Ensamblaje UR-185PBB, UR-4818PBB & UR-245PBB Paso Paso Figura B Golpee Saliente de la Abrazadera/Viga ligeramente Los postes son para asentar direccionales. remaches El extremo angosto de las ranuras debe apuntar hacia Remaches abajo Figura A Figure C Poste...
Need help?
Do you have a question about the UR-185PBB and is the answer not in the manual?
Questions and answers
Need instructions for HORIZONTAL assembly of UR-185PBB.
The assembly instructions for the Edsal UR-185PBB in a horizontal configuration are as follows:
1. Prepare Posts: Use 8 posts (Part C, URPS36-BLK). Ensure the narrow end of the slots points downward.
2. Assemble Frames:
- Connect two posts using one brace (Part B, URBR18-BLK), skipping one slot from the bottom.
- Repeat to make four corner frames.
3. Add Beams and Shelves:
- Insert two beams (Part A, URBM36-BLK) between each pair of corner frames to form a shelf level.
- Place a wood shelf (Part D, RPB31836) on the beams.
4. Build Additional Levels:
- Continue adding beams and bracing for the next levels.
- Use post couplers (Part E, CPOUT-BLK) to join two post sections vertically if needed.
- Tap parts gently with a hammer and block of wood to avoid damage and ensure rivets are fully seated.
5. Finish Assembly:
- Place post caps (Part F, RL-PC-B1.4) on top of each post.
6. Safety Note:
- Ensure the unit is placed on a level surface to prevent instability.
This answer is automatically generated