Table of Contents
Advertisement
Quick Links
Battery Operated Irrigation Controller
Installation and Operating Instructions
Main Features
•
Independent programming of each individual valve
•
Weekly or cyclical programming
•
Up to 4 operations per day in weekly program mode
•
Irrigation duration 1 minute to 12 hours
•
Irrigation frequency starts from one day to once every thirty days
in a cyclical program
•
Waterproof (IP68)
•
Rain off sensor option
•
Weather resistant
•
Irrigation duration modifiable as a function of percentage entered
•
Operation of one to 6 valves and a master valve
•
Computerized "manual" operation of individual valves
•
Sequential "manual" operation
•
Batteries: 9V alkaline batteries (not included)
•
Operation temperature -10° to 70°
* "S" series features are detailed in chapter 8
Series 61XXX
(Not including "S" series*)
:
Advertisement
Table of Contents

Related Manuals for Galcon 61 Series


Summary of Contents for Galcon 61 Series
- Page 1 Series 61XXX Battery Operated Irrigation Controller Installation and Operating Instructions Main Features (Not including "S" series*) • Independent programming of each individual valve • Weekly or cyclical programming • Up to 4 operations per day in weekly program mode • Irrigation duration 1 minute to 12 hours •...
-
Page 2: Table Of Contents
Table of contents Parts Identification Manual-Mechanical Operation Installing the controller in the irrigation system 3.1 Battery lnstallation System Installation 4.1 Installing on the solenoid 4.2 Installing on the wall 4.3 Wiring the solenoids 4.4 Wiring the Solenoids Programming the Irrigation Controller 5.1 Setting the Current Time and Day of the Week 5.2 Switching between AM/PM and 24 Hours Time Format 5.3 Valve Selection... - Page 3 Additional Displays 7.1 Valve in Wait Mode 7.2 Blinking Low Battery Warning 7.3 Permanent low battery warning 7.4 Missing Program Data 7.5 Sensor Additional Instructions for “S” Series DC-1S, DC-4S, DC-6S 24 8.1 Irrigation Window In the Cyclical Program Mode 8.2 Opening an Irrigation Window after Start Time has passed 8.3 Sensor Maintenance, Troubleshooting and Repairs...
-
Page 5: Parts Identification
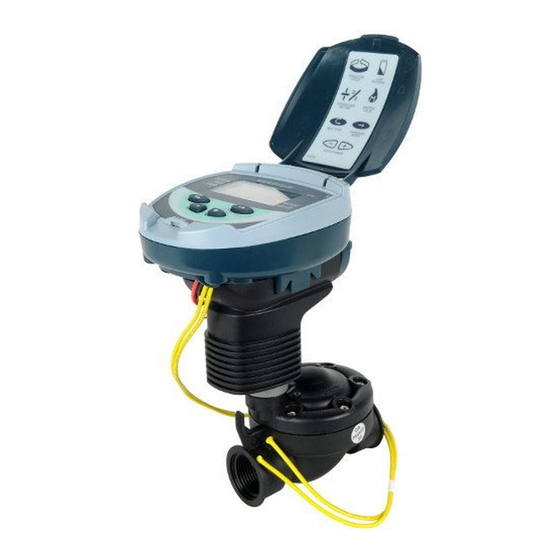
1. Parts Identification 1. Cover 2. Controller display 3. push buttons 4. Adaptor 5. Solenoid 6. Mechanical operation lever 7. Hydraulic valve 8. Battery compartment cover 2. Manual-Mechanical Operation The irrigation valve can be opened and closed independent of the controller's operation by mechanical opening lever. -
Page 6: Installing The Controller In The Irrigation System
3. Installing the controller in the irrigation system 3.1 Battery lnstallation a. Open the battery compartment cover (1). b. lnsert 9V batteries - (1 or 2, depends on model) (2). NOTE - AII the controller display elements appears briefly at the display, followed by a blinking "12:00". -
Page 7: System Installation
4. System Installation The controller can be installed on the solenoid or on the wall. 4.1 Installing on the solenoid Place the controller (1) on the adaptor. Locate the solenoid adaptor (2) on top of the solenoid (3). Verify "Click" sound. NOTE - Assembly of a filter upstream of the valve is mandatory! -
Page 9: Installing On The Wall
4.2 Installing on the wall a. Place the mounting plate (1) on the wall using 3 screws (2) not included. b. Remove bracket (3) from controller and slide onto the mounting plate. c. Press the controller (4) to the bracket. - Page 10 4.3 Wiring the solenoids - 2 wires NOTE - Each zone requires a dedicated pair of wires from the controller. The controllers have red and black pairs of wires numbered for each valve. Notice there are 2 extra sets of wires. One set of wires (black and red) is stamped with the letter M representing the master valve, and one set of wires (yellow) with the letter S representing the rain sensor connection.
- Page 11 Labeled cables (1) emerge from the controller. The end of each cable is protected by a cover that must be removed prior to connecting the cable. The cables are specifically designed to connect to Galcon DC type irrigation valves and solenoids (3).
-
Page 12: Programming The Irrigation Controller
5. Programming the Irrigation Controller This section describes the programming steps for a simple irrigation schedule. It is followed by a section dealing with advanced irrigation controller operations. The irrigation controller is programmed with the aid of 4 buttons: Enter Button - Used to select the desired programming screen (e.g., clock setting mode). -
Page 13: Setting The Current Time And Day Of The Week
5.1 Setting the Current Time and Day of the Week To enable the irrigation controller to operate the irrigation system at the correct times, the current time and current day of the week must first be set. 1. Press “Enter” several times until the “Clock”... -
Page 14: Valve Selection
5.3 Valve Selection This section does not apply to the DC1-& DC1S models Program an irrigation schedule for each valve valve individually. duration days First select the desired valve, and then starts manual program a schedule as follows: 1. Press "Enter" until "Valve"... -
Page 15: Selecting Days Of The Week For Irrigation
5.5 Selecting Days of the Week for Irrigation This setting determines which days of the week the irrigation controller will operate the specified valve. 1. Press "Enter" until "Days" appears. 2. Press "Set" . A blinking arrow appears at the top of the display, under Monday. -
Page 16: Setting Irrigation Start Times
5.6 Setting Irrigation Start Times In this step, up to 4 separate irrigation start times can be programmed for selected days, for the valve being programmed. The selected valve will open at each of the start times set, for the irrigation duration set as described in Section 5.4. - Page 17 1. Press "Enter" until "Valve" appears. 2. Press "Set" . A blinking arrow appears at the bottom of the display. 3. Press “Plus” or “Minus” to move the arrow to the valve number to be programmed. 4. Press "Enter" until "Duration" appears.
-
Page 18: Additional Functions
6. Additional Functions 6.1 One-Time Irrigation This function is used to program the irrigation controller to operate the irrigation system once only, for the set irrigation duration, at the set time. (Duration set as described in Section 5.4). 1. Press "Enter" until "Days"... -
Page 19: Setting The Day Of The Week And Time For Cyclical And One-Time Irrigation Programs
6.3 Setting the Day of the Week and Time For Cyclical and One-Time Irrigation Programs These programs enable you to pre-set the time of valve opening. The number of days until the valve opening appears on the display, to the right of the irrigation start time (above the word “days”). -
Page 20: Manual" Irrigation System Operation Via The Irrigation Controller
2. Press "Enter" until "Days" appears 3. Press "Set" a number of times (for all the days of the week) until OnCE appears blinking on the display. 4. While the display is still blinking, press “Plus” or “Minus” until “5 days” appears on the display, representing the irrigation frequency . -
Page 21: Sequential "Manual" Operation Of All The Valves
4. To close the valve manually before the end of the irrigation duration, press "Enter" until manual and "ON" appears again on the display. Press "minus" to close the valve. NOTE- Up to two valves can be operated simultaneously in this manner. Simply repeat the above steps for the second valve. -
Page 22: Suspension
6.7 Suspension This option is used to temporarily suspend the irrigation controller’s control of the valves, for example, while it is raining. The irrigation schedule remains stored in the controller, but is not implemented. The suspension option disables ALL valves connected to the irrigation controller. -
Page 23: Additional Displays
1. Press "Enter" until the "Clock" appears. 2. Wait until no digit is blinking 3. Press “Plus” simultaneously. 00+% is displayed. 4. Press Enter” . The 00 blinks. Press “Plus” or “Minus” to increase or decrease the percentage as necessary (in increments of 10%). -
Page 24: Blinking Low Battery Warning
7.2 Blinking Low Battery Warning When the batteries are low, a blinking battery icon appears on the display. In this state, the batteries still enable valve operation, but must be promptly replaced. After replacing the batteries, press any button to resume irrigation controller operation. -
Page 25: Sensor
7.5 Sensor The irrigation controller offers advanced irrigation control using a rain off sensor. That is, as long as the conditions defined for activation of the sensor are not met, the irrigation schedule will not be implemented. (The rain off sensor contact remains closed). -
Page 26: Additional Instructions For "S" Series Dc-1S, Dc-4S, Dc-6S
8. Additional Instructions for “S” Series DC-1S, DC-4S, DC-6S • Irrigation duration in professional controllers of the “S” series: 6 seconds to 12 hours • Irrigation frequency in professional controllers of the “S” series: Once every minute to once every 30 days in the cyclical program •... - Page 27 1. Press "Enter" until "Open window" appears on the display next to "W. OPEN". The word "OFF" or the last "Open window" time setting entered is displayed. 2. Press "Set" .The word "OFF" blinks on the display. 3. Press “Plus” and “Minus”...
-
Page 28: Opening An Irrigation Window After Start Time Has Passed
8.2 Opening an Irrigation Window after Start Time has passed Example: Set current time to 9:20 AM. set duration for 5 minutes and cycle every 30 minutes. Set start Ι to 9:05 AM, set window from 9:00 AM to 5:00 PM. The program will not commence today, but only from 9:00 AM tomorrow. -
Page 29: Maintenance, Troubleshooting And Repairs
9. Maintenance, Troubleshooting and Repairs • Batteries should be removed if the irrigation controller is not going to be used for a lengthy period. The programs will disappear when removing batteries. when entering the batteries after this period, reprogram the controller. •... -
Page 30: Additional Accessories And Products
Line Filter, BSP 1” Waterproof connector Extension cable for solenoid cables 10.2 Two-way (2W) Controllers Valve + DC solenoid from Galcon: 2W 3/4” (valve + solenoid) 2W 1” (valve + solenoid) 2W 1112” (valve + solenoid) 2W 2” (valve + solenoid) 2W DC Solenoid Only 3/4”... - Page 31 Auxiliary Table for Irrigation Planning with Galcon Controllers...
-
Page 32: Limited Warranty Certificate
Galcon's discretion, replaced; All subject to the terms and conditions of this limited warranty certificate. 4. Galcon's warranty for the product or otherwise shall not apply to any of the following: (i) any conduct (by act or omission) not by Galcon, including any misuse/abuse of any product (or part/s thereof), and/or any failure to install and/or use any product in full compliance with Galcon's instructions;... - Page 33 (including negligence), product liability or otherwise - arising from the performance or non- performance of any aspect of the product or any part thereof; All of the above, whether or not Galcon and/or the customer shall have been made aware of the possibility of such loss.
- Page 34 : FCC STATEMENT Note: This equipment has been tested and found to comply with the limits for a Class B digital device, pursuant to part 15 of the FCC Rules. These limits are designed to provide reasonable protection against harmful interference in a residential installation.
- Page 35 Galcon Kfar Blum Tel. 972-4-6900222 Email info@galconc.com Website www.galconc.com...
Need help?
Do you have a question about the 61 Series and is the answer not in the manual?
Questions and answers