Advertisement
Quick Links
MILKSHAKE AND SOFT-SERVE MACHINES
Taylor Company
Milkshake and Soft-serve Machine
Model C602
Daily maintenance tasks
SS 3 D1
Opening
procedures
SS 3 D2
Closing procedures
Weekly maintenance tasks
SS 3 W1
Clean and sanitize
syrup lines with
duckbill valves
SS 3 W2
Clean hot sundae
topping water baths
SS 3 W3
Clean and sanitize
hot sundae topping
pumps
Bi-weekly maintenance tasks
SS 3 B1
14 day brush
cleaning
Monthly maintenance tasks
SS 3 M1
Calibrate hopper
temperatures
SS 3 M2
Calibrate draw
temperatures
SS 3 M3
Calibrate hot
sundae topping
temperatures and
volumes
Quarterly maintenance tasks
SS 3 Q1
Replace soft-serve
mix scraper blades
SS 3 Q2
Clean non-
aluminum air filter
SS 3 Q3
Replace machine
components
Semi-annual maintenance tasks
SS 3 S1
Replace milkshake
mix scraper blades
Annual maintenance tasks
SS 3 A1
Replace syrup
pump tubes
SS 3 A2
Replace non-
aluminum air filter
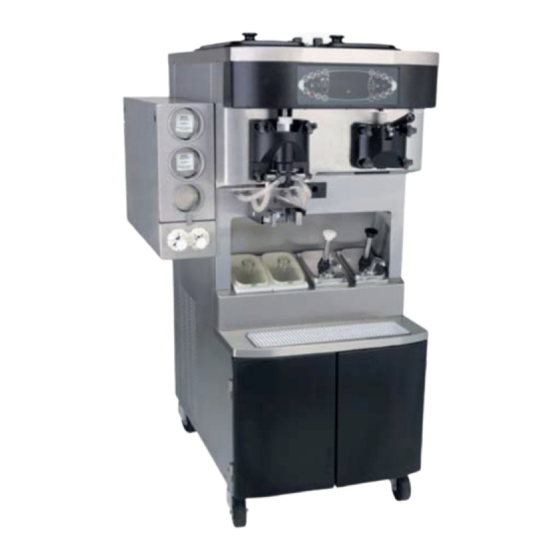
Model C602
1. Hopper Covers
2. Keypad-Soft Serve
3. Soft Serve Door Assembly
4. Topping Pump
5. Drip Tray/Splash Shield
Hazards
These icons alert you to a possible risk of personal injury.
Equipment alerts
Look for this icon to find information about how to avoid damaging the
equipment while doing a procedure.
Tips
Look for this icon to find helpful tips about how to do a procedure.
©McDonald's Corporation · Planned Maintenance Manual · Revised January, 2021
SS 3
6. Cabinet Doors
7. Cold Topping Containers
8. Cup & Cone Dispenser
9. Shake Door Assembly
10. Keypad-Shake
Advertisement

Related Manuals for McDonald's Taylor Company C602


Summary of Contents for McDonald's Taylor Company C602
- Page 1 SS 3 MILKSHAKE AND SOFT-SERVE MACHINES Taylor Company Milkshake and Soft-serve Machine Model C602 Daily maintenance tasks Model C602 SS 3 D1 Opening procedures SS 3 D2 Closing procedures Weekly maintenance tasks SS 3 W1 Clean and sanitize syrup lines with duckbill valves SS 3 W2 Clean hot sundae...
- Page 2 Opening Procedures Daily SS 3 D1 Prepare Milkshake/Soft-Serve machine for serving product after the heat treatment cycle is completed Time required 5 minutes to prepare 30 minutes to complete Time of day When store opens in the morning 24-hour restaurants: during low-volume periods Hazard icons Tools and supplies Brushes...
- Page 3 Opening Procedures (continued) Procedure – Shake Side Sanitize door spout, driven spinner, spinner blade, and Remove syrup valve retainers syrup line fittings. and syrup hole plugs. Brush clean each item for a total of 60 seconds, Remove the syrup valve repeatedly dipping the brush retainers and the syrup hole in sanitizing solution.
- Page 4 Opening Procedures (continued) Remove duckbill valve. Install syrup valves. Remove the duckbill valve Raise the syrup valve retainer and the o-ring from each and install the syrup valve. syrup nose fitting, by using Push the retainer down to the seal removal tool. hold the valve in place.
- Page 5 Opening Procedures (continued) Procedure – Soft Serve Side Install shake cup holder, front drip tray and splash shield. Sanitize door spout and bottom of draw valve. With a pail placed beneath the soft serve door, dip the door spout brush in sanitizing solution.
- Page 6 Closing Procedures Daily SS 3 D2 Prepare Milkshake/Soft-Serve machine for the heat treatment cycle Time required 30 minutes Time of day At closing 24-hour restaurants: one hour before heat treatment cycle begins Hazard icons Tools and supplies Brushes SolidSense All Kay 5 Sanitizing Valve Cap Syrup Hole Plugs...
- Page 7 Closing Procedures (continued) Remove restrictor cap. Remove syrup lines. Remove the restrictor cap Raise the retaining pins and from the door spout. remove the syrup valves. Clean and sanitize parts. Clean syrup port holes. At the sink, brush clean and Place a bucket beneath the sanitize: door.
- Page 8 Closing Procedures (continued) Procedure – Soft Serve Side Flush syrup port holes with sanitizing solution. Fill mix hopper. Insert the tube end of the squeeze bottle filled with Fill the hopper with fresh sanitizing solution into each mix, up to the line on the syrup port.
- Page 9 Closing Procedures (continued) Remove the agitator paddle Note: Mix in the drip pans from the hopper and take it indicates there is a leak that to the sink. Brush clean, needs to be corrected before sanitize, and reinstall the damage occurs inside the agitator paddle.
- Page 10 Closing Procedures (continued) Make sure unit is in AUTO. Note: The machine must be in AUTO (or STANDBY) to start the heat treatment cycle at the programmed time. DO NOT attempt to draw product or disassemble the machine during the HEAT cycle.
- Page 11 Clean and sanitize syrup lines with duckbill SS 3 W1 Weekly valves To break the bacteria cycle Time required 5 minutes to prepare 20 minutes to complete Time of day At close For 24-hour restaurants: during breakfast menu Hazard icons Tools and supplies Brushes Bucket, SolidSense...
- Page 12 Clean and sanitize syrup lines with duckbill valves (continued) Place empty bucket under Pump all liquid from syrup milkshake draw valve. line. Place a clean plastic bucket Remove the syrup feed tube under the milkshake draw from the bucket of APSC valve.
- Page 13 Clean and sanitize syrup lines with duckbill valves (continued) Remove valve and o-ring. Insert duckbill valve. Remove the duckbill valve Install the duckbill valve into and o-ring from each syrup one of the nose fittings with nose fitting, by using the seal the flat end aligned with the removal tool.
- Page 14 Clean and sanitize syrup lines with duckbill valves (continued) Drain syrup feed tubes. Stop flow of syrup. Remove the syrup feed tubes Press the Flavor Select key to from the bucket of sanitizer stop the flow of syrup. solution and allow them to drain back into the bucket.
- Page 15 Clean hot sundae topping water baths Weekly SS 3 W2 To maintain food quality Time required 5 minutes to prepare 10 minutes to complete Time of day At close and after topping pumps and For 24-hour restaurants: during breakfast menu and containers have been removed after topping pumps and containers have been removed Hazard icons...
- Page 16 Clean hot sundae topping water baths (continued) Drain water bath. Repeat steps 4 through 7 to If the drain is plugged, drain and discard the APSC remove the drain screw solution. Remember to tighten completely by turning it the drain screw before begin- counterclockwise.
- Page 17 Clean and sanitize hot sundae topping pumps Weekly SS 3 W3 To break the bacteria cycle Time required 5 minutes to prepare 30 minutes to complete Time of day During 14 day brush cleaning During 14 day brush cleaning Hazard icons Tools and supplies Brushes Spatula, rubber...
- Page 18 Clean and sanitize hot sundae topping pumps (continued) Remove plunger nut. Remove lid. Remove the plunger nut from Lift the lid off the spout and the plunger tube. plunger cylinder. Remove plunger tube and Remove plunger cylinder from insert. valve body. Remove the plunger tube and Turn cylinder counter- insert from the plunger as-...
- Page 19 Clean and sanitize hot sundae topping pumps (continued) Clean top side of inlet valve on Lubricate seal assembly valve body. o-ring. Retrieve the valve body. Use Lubricate the seal assembly the bristle end of the brush to o-ring, using Taylor Lube. scrub the top side of the inlet valve.
- Page 20 Clean and sanitize hot sundae topping pumps (continued) Install knob. Connect spout and valve body. Place the knob with the knob Insert the spout into the o-ring onto the threaded end smaller opening in the valve of the plunger. Push the body by aligning the flats on plunger tube down toward the the spout with the locking...
- Page 21 Clean and sanitize hot sundae topping pumps (continued) Lubricate plunger assembly. Lubricate bottom of the plunger assembly, using Taylor Lube. Install plunger assembly. Slide the plunger assembly through the cylinder opening in the lid and into the pump body. Tighten plunger nut. Securely tighten the plunger nut on to the lid by turning it clockwise.
- Page 22 14 Day Brush Cleaning Every 14 Days SS 3 B1 Required Cleaning and Lubrication of Machine Time required 5 minutes to prepare 4 hours to complete Time of day At close For 24-hour restaurants: during low-volume periods Hazard icons Tools and supplies SolidSense All Purpose Kay-5 Sanitizing Solution Pail, clean and sanitized...
- Page 23 14 Day Brush Cleaning (continued) Remove the agitator. Remove syrup lines and install syrup plugs (shake side only). Remove the syrup lines from the freezer door by raising the syrup valve retainers and pulling the valves straight out of the door. Press WASH and PUMP Insert the syrup hole plugs in symbols and drain product.
- Page 24 14 Day Brush Cleaning (continued) Using the double ended Cleaning, Rinsing and brush, clean the mix inlet Sanitizing hole. Note: Perform all cleaning, Do not clean the mix inlet rinsing, and sanitizing steps for hole while the machine is in the shake side and then the WASH mode.
- Page 25 14 Day Brush Cleaning (continued) Draw off cleaning solution. Disassembly - Shake Side Place an empty pail beneath the door spout and draw off Note: As parts are removed, the solution. place them on a roll-a-cart for transport to the sink. Turn power switch off.
- Page 26 14 Day Brush Cleaning (continued) Take cart of parts to the sink. Disassemble pump cylinder. From the shake pump cylinder, remove the retaining pin, mix inlet adaptor, valve cap, pump gasket, and the piston. Remove the check valve and all o-rings. Remove drive shaft seal.
- Page 27 14 Day Brush Cleaning (continued) Remove drip pans. Remove pump drive shaft. Remove the long drip pan Using the pump drive shaft from the front panel, the two removal tool, remove the short drip pans from the rear pump drive shaft from the panel, and the two notched drive hub in the rear wall of drip pans from the left and...
- Page 28 14 Day Brush Cleaning (continued) Rinse parts. Brush clean soft serve side. Rinse all parts with clean, Repeat brush cleaning and warm water, one tray at a sanitizing steps for the soft time, including the tray. serve side of the freezer. Clean drive hub opening.
- Page 29 Calibrate hopper temperatures Monthly SS 3 M1 To meet food safety standards and to maintain product quality Time required 5 minutes to prepare 5 minutes to complete 30 minutes to complete if a service technician has recalibrated the machine Time of day At open For 24-hour restaurants: during breakfast menu Hazard icons...
- Page 30 Calibrate draw temperatures Monthly SS 3 M2 To maintain product quality Time required 5 minutes to prepare 5 minutes to complete 30 minutes to complete if a service technician has recal- ibrated the machine Time of day At open For 24-hour restaurants: during breakfast menu Hazard icons Tools and supplies Pyrometer with sanitized...
- Page 31 Calibrate draw temperatures (continued) Read temperature of soft serve. Place the needle probe into the soft serve. Allow the py- rometer to stabilize for 10 seconds, and read the temper- ature on the pyrometer. The temperature should be between 16° and 18°F (-9° and -8°C).
- Page 32 Calibrate hot sundae topping temperatures SS 3 M3 Monthly and volumes To meet food quality standards and to meet Gold Standard quality descriptions Time required 5 minutes to prepare 5 minutes to complete 30 minutes to recalibrate temperatures Time of day At open For 24-hour restaurants: during breakfast menu Hazard icons...
- Page 33 Calibrate hot sundae topping temperatures and volumes (continued) Replace right panel. Remove the probe and wipe it thoroughly with a clean, sani- When all hot topping temper- tized towel. atures have been calibrated, reinstall the right panel. Hold the panel in position, and use the screwdriver to replace the Metal surfaces and water bath screws.
- Page 34 Replace soft-serve scraper blades Quarterly SS 3 Q1 To scrape frozen mix off the cold freezing cylinder wall. Time required 0 minutes to prepare 2 minutes to complete Time of day At 14 Day Brush Cleaning Hazard icons Procedure IMPORTANT: The scraper blade replacement procedures must be performed during the 14 Day Brush Cleaning. Perform the 14 Day Brush Cleaning per the Operations Manual to properly drain, disassemble, clean, rinse, assemble, sanitize, and prime the machine.
- Page 35 Clean non-aluminum air filter Quarterly SS 3 Q2 To prevent dust and dirt build-up on the main condenser Time required 5 minutes to prepare 30 minutes to complete Time of day During 14 day brush cleaning. For 24-hour restaurants: During 14 day brush cleaning. Hazard icons Tools and supplies Bucket, clean and...
- Page 36 Clean non-aluminum air filter (continued) Replace filter. Install the new filter. Push firmly until the filter is seated. Page 2 of 2 ©McDonald’s Corporation · Planned Maintenance Manual · Revised January, 2021...
- Page 37 Replace machine components Quarterly SS 3 Q3 To meet food safety and food quality standards and to ensure proper machine operation Time required 5 minutes to prepare 30 minutes to complete Time of day During 14 day brush cleaning For 24-hour restaurants: During 14 day brush cleaning Hazard icons Tools and supplies Taylor Tune-up Kit,...
-
Page 38: Semi-Annually
Replace milkshake mix scraper blades Semi-annually SS 3 S1 To prevent frozen milkshake mix from freezing on the cylinder wall Time required 5 minutes to prepare 5 minutes to complete Time of day During low-volume periods For 24-hour restaurants: during low-volume periods Hazard icons Procedure Drain milkshake mix from... - Page 39 Replace syrup pump tubes Annually SS 3 A1 To break the bacteria cycle and to ensure proper flow of syrup to the draw valve Time required 5 minutes to prepare 20 minutes to complete Time of day At open For 24-hour restaurants: during breakfast menu Hazard icons Tools and supplies Bucket, SolidSense™...
- Page 40 Replace syrup pump tubes (continued) Place syrup line and valve in Place empty bucket under bucket. milkshake draw valve. Hang the syrup line and valve Place a clean plastic bucket into the empty bucket. under the milkshake draw valve. Start flow of SolidSense APSC solution though syrup line.
- Page 41 Replace syrup pump tubes (continued) Remove clips. Close pump. Remove the two clips at- Push down on the hinged tached to the pump tube cover to close the pump body. collars. To avoid damage to the pump tube, make sure it is seated Remove fittings.
- Page 42 Replace syrup pump tubes (continued) Calibrate syrup system. Calibrate the syrup system, checking every flavor. Page 4 of 4 ©McDonald’s Corporation · Planned Maintenance Manual · Revised January, 2021...
- Page 43 Replace non-aluminum air filter Annually SS 3 A2 To maintain proper operation of the main condenser Time required 5 minutes to prepare 10 minutes to complete Time of day During low-volume periods For 24-hour restaurants: during low-volume periods Hazard icons Tools and supplies Screwdriver, flat Procedure...
Need help?
Do you have a question about the Taylor Company C602 and is the answer not in the manual?
Questions and answers