Table of Contents
Advertisement
Available languages
Available languages
Advertisement
Table of Contents

Related Manuals for C-LOGIC 900-TC


Summary of Contents for C-LOGIC 900-TC
- Page 1 Manual de usuario C-LOGIC 900-TC User manual SKU: CLOGIC900TCDUALCBINT CONFORTLINE Termostato programable digital WiFi CRONO SMART WiFi digital programmable thermostat Cronotermostato SMART WIFI SMART WIFI programmable thermostat Manual de instrucciones Instructions manual...
-
Page 2: Table Of Contents
ÍNDICE Descripción ............................3 Datos técnicos ..........................3 Precauciones antes de la instalación ..................3 Diagrama de cableado ........................3 Visualización de la pantalla ......................4 Funcionamiento de las teclas ..................... 4 Modos de funcionamiento ......................4 Ajuste de hora ..........................5 Programación automática ...................... -
Page 3: Descripción
Descripción Este cronotermostato digital permite el control de la calefacción de su casa. Dispone de conexión wifi para poder conectarse a internet y controlar el dispositivo desde una aplicación en su dispositivo móvil, además de desde el propio terminal. La aplicación “Smart RM” está disponible tanto para iOS como para Android. -
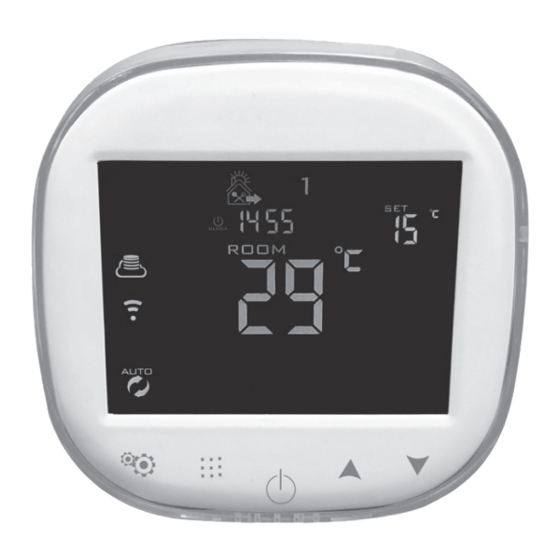
Page 4: Visualización De La Pantalla
Visualización de la pantalla Funcionamiento de las teclas Símbolo Descripción Encendido / Apagado: Presione la tecla para encender o apagar. 1. Pulsación corta para alternar entre modo manual y modo automático 2. Con el cronotermostato encendido, una pulsación larga (3 segundos) para confi gurar el programa automático. -
Page 5: Ajuste De Hora
Modo Explicación Modo Pulse la tecla durante 3 segundos para activar y confi gurar el modo vacacio- vacaciones nes. Seleccione ON para activar el modo vacaciones y presione la tecla para confi rmar. A continuación ajuste el número de días (cuenta atrás de días hasta regresar al modo automático) y presione la tecla para confi rmar. -
Page 6: Opciones Vanzadas
Opciones avanzadas Con el cronotermostato apagado, pulse la tecla para entrar en el menú de confi guración de opciones avanzadas. Modifi que los parámetros con las teclas y pulse la tecla para confi rmar y avanzar al parámetro siguiente. Una vez ajustados los parámetros deseado, espere 5 segundos para salir del menú... -
Page 7: Configuración Desde La App
Confi guración desde la APP Para la comunicación y control remoto del cronotermostato desde un dispositivo móvil, siga los siguientes pasos: Paso 1: Descarga de la aplicación Escanee el siguiente código QR o busque la app “SMART RM” en el Google Play o en el App Store. Paso 2: Registre una cuenta Después de descargar e instalar la aplicación, pulse sobre “Crear cuenta nueva”. - Page 8 Paso 3: Crear un hogar Para defi nir la ubicación en la que se va a instalar el cronotermostato, pulse sobre “Crear hogar” y accederá a una pantalla donde indicar el nombre, ubicación o número de habitaciones de las que dispone. Una vez defi nido, podrá...
- Page 9 Paso 5: Conexión a través del modo compatible Si su router no es el adecuado para esta comunicación, la señal es demasiado débil o no puede conectar mediante el modo habitual, pulse sobre la opción de “Modo compatible” en la esquina superior derecha.
- Page 10 Paso 7: Ajustes de la cuenta En este menú accesible desde la pantalla principal pulsando sobre la opción “yo” en la esquina inferior izquierda de la pantalla, tendrá acceso a la configuración de diversos ajustes de la aplicación. Paso 8: Creación de Escenas y Automatizaciones: Seleccionando la opción “Inteligencia”...
-
Page 11: Description
Description This programmable thermostat allows the control of heating units. The device is equipped with Wifi connection in order to access to Internet and control it via app from a mobile phone, apart from the terminal directly. The app is available for both iOS and Android. Technical data •... -
Page 12: Screen Display
Screen display Key operation Symbol Description ON/OFF: Press the key to turn on / turn off. 1. Short press to switch between automatic and manual mode. 2. Under turn on state, long press (3 seconds) to set the automatic pro- gram. -
Page 13: Time Setting
Mode Explanation Under automatic mode and unlock state, when acting on the keys adjust the setting temperature, the thermostat will enter into the temporary Temporary manual mode. This temporary mode works to next interval when it will return to manual mode the automatic mode. -
Page 14: Advanced Options
Advanced options Under turn off state, press the key to access advanced setting. Modify the parameter by using the keys and press the key to confi rm and jump to the next parameter. When the parameters are set, wait 5 seconds and the thermostat exit from the advanced setting menu. Default Symbol Description... -
Page 15: Setting Form App
Setting from APP To communicate and control a thermostat from a mobile phoe, follow the next steps: Step 1: Download the app Scan the follow QR code or search “SMART RM” at Google Play or App Store. Step 2: Register your account After downloading the app, click “Register”... - Page 16 Step 3: Add a home To defi ne the location where the thermostat is installed, press “Add home” and a new screen will be displayed. In that screen, you can enter a name, location or the number of rooms of the home. Then, you can observe the setting for that home.
- Page 17 Step 5: Connection through AP Mode If your router doesn´t support it, your wifi signal is weak or you cannot connect by the normal mode, press “AP Mode” on the upper right corner of the screen. Press “Confi rm indicator rapidly blink”. Under the turn on state of the thermostat, press the keys at the same time until the icon blinks and press “Connect now”.
- Page 18 Step 7: Account settings This page is available from the main screen pressing on the “profile” option at the bottom right corner. In that screen, you could change some settings of your account. Step 8: Create Scenes and Automations Selecting the options “Smart Scenes”, you could create Scenes and automations. Scenes are pre-set configurations prepared to be used in specific situations.
- Page 20 FABRICANTE: MGL International APAC: MGL GLOBAL SOLUTIONS info.apac@mgl-intl.com Flat 4-1, 4/F, No. 35, Section 3 Min- quan East Road. Taipei, Taiwan. Tel: +886 2-2508-0877 EMEA: MGL EUMAN S.L. info.emea@mgl-intl.com Parque Empresarial Argame, 33163 Morcín. Asturias, Spain. Tel: +34 985-08-18-70 AMERICAS: MGL AMERICA, LLC. info.na@mgl-intl.com US East Coast: 2810 Coliseum Centre Drive, Ste.
Need help?
Do you have a question about the 900-TC and is the answer not in the manual?
Questions and answers