Table of Contents
Advertisement
Quick Links
Advertisement
Table of Contents

Subscribe to Our Youtube Channel
Related Manuals for InFocus JTOUCH INF6540e


Summary of Contents for InFocus JTOUCH INF6540e
- Page 1 INF6540e HARDWARE GUIDE INF7540e INF8640e 65"/75"/86" 009-1838-00...
- Page 2 ABOUT THIS GUIDE This guide contains assembly and connection instructions for your touch display, and also basic instructions on its operation. It applies to interactive touch displays; where appropriate, specific models are noted. Page 1 Interactive Touch Display Hardware Guide...
-
Page 3: Table Of Contents
CONTENTS SAFETY PRACTICES ............................................4 Safety definitions ............................................4 General ................................................4 Moving the display ............................................4 Installation and location ..........................................4 Ventilation ................................................. 5 Power source, power cord, plugs ......................................5 Medical concerns ............................................6 The display and the remote control ......................................6 Cleaning the display ............................................ - Page 4 Storage ................................................36 Advanced storage functions .......................................38 The Storage window ..........................................39 The Info window .............................................39 Sound ................................................. 40 Apps ...................................................41 The Info window ............................................41 Personal ................................................42 Security ..............................................42 Language & input ...........................................43 Startup & shutdown ..........................................44 Password ..............................................45 Input Setting ............................................46 Other Settings ............................................47 System ................................................48 Date &...
-
Page 5: Safety Practices
SAFETY PRACTICES Read and follow all safety instructions in this guide, and on the display and packaging, before connecting the display to power. Failure to comply with safety instructions may result in property damage, personal injury or even death. Save these instructions for future reference. Safety definitions This guide contains information that is very important to know and understand. -
Page 6: Ventilation
face should comply with the UL1678 standard. If these conditions are not met the display may fall, which may cause severe person- al injury or death. • To avoid the potential for electrocution, do not use any components of the display, including the speakers, near water. •... -
Page 7: Medical Concerns
Do not remove the cover or back of the display, or service the display yourself. Doing so will void the warranty. Refer all service to qualified service personnel. • Use only replacement parts specified by InFocus. In addition to personal injury and/or product damage, doing so may void the warranty. WARNING Do not allow children to climb on the display. -
Page 8: Included Accessories
INCLUDED ACCESSORIES Included Accessories Start Space Alt + Tab Alt + F4 Display Input Home Menu Enter Back CH.+ VOL+ PgUp PgDn CH.- VOL- 009-1835-XX 009-1836-XX 009-1724-XX 009-1807-XX PrtScr PgUp PgDn Home Pause NumLk ScrLk & Backspace Optional Accessories ” Caps Lock Enter ’... -
Page 9: Set Up - All Models
SET UP — ALL MODELS Mounting technique This product does not ship with mounting accessories. Only use commercially manufactured mounting accessories which meet the product specifications. • Use a professional technician to install the display. • Mount the display to a solid wall or a stable horizontal surface. •... -
Page 10: Basic Functions
BASIC FUNCTIONS Using the remote control The remote uses two AAA batteries (not included). Install the batteries by removing the cover from the back of the remote, orienting the positive and negative ends of the batteries, sliding them in place and replacing the cover. To operate, point the remote at the sensor button on the front of the touch display. -
Page 11: Adjust The Volume
Adjust the volume Press the volume up or down button on the remote (page 11); or 2) Touch the button with the volume icon on the front of the touch display (page 16). A sliding scale appears. Move the button to the left or right. 3) Open the LiveView input selection window (page 23) and adjust the on-screen volume by sliding the level indicator to the left or right. -
Page 12: The Remote Buttons
The remote buttons Name Function Power Switches the power on or off Start Access the Windows Start menu (when the PC is selected as the source). Space A keyboard space bar (Windows only) Number Numeric input keys keys Display Shows the source and screen resolution for all sources except Android. -
Page 13: Side Panel Ports
SIDE PANEL PORTS Page 12 Interactive Touch Display Hardware Guide... -
Page 14: Front Panel Ports & Buttons
FRONT PANEL PORTS & BUTTONS UNDER PANEL PORTS AUDIO IN SPDIF RS232 AUDIO OUT Page 13 Interactive Touch Display Hardware Guide... -
Page 15: Connecting To Other Devices
CONNECTING TO OTHER DEVICES Connection ports are located on the front, the right side panel and under the display. They can be used to connect the display to a full range of digital input and output devices, including: accessories; source (input) devices; PCs; tablets; and daisy-chain displays. For PC port connection instructions, see pagepage 53. -
Page 16: The Under Panel Ports
Connect to an external audio source. Connect an RJ45 cable to provide internet connections for the Android and/or Windows operating systems. This port is dedicated to the Android operating system. InFocus recommends connecting the Android wifi adapter to this port (see page 17). -
Page 17: The Front Panel Buttons
The front panel buttons The front panel buttons are located just below the display screen, on the right side. This table shows their functions. Button Name Function IR sensor Receives the signal from the remote control Power Switches the power to the screen on or off. Home Takes you to the home screen. -
Page 18: Connect The Internal Android To Wi-Fi
CONNECT THE INTERNAL ANDROID TO WI-FI Connect the provided USB extender and the USB dual-band WiFi adapter to the USB 2.0 port on the bottom side of the panel as shown. 2) At Android Settings, configure the WiFi to your network. Tap Settings to select a WiFi net-... -
Page 19: Connect The Display To An External Pc
CONNECT THE DISPLAY TO AN EXTERNAL PC NOTE: The two available alternatives are shown below; make your connection based on your installation parameters. Make one of the following two connections: Connect a VGA cable from the “VGA” port on the under panel of the touch display to the VGA port on the external PC. (This connection is color-coded blue in the illustration below.) Or…... -
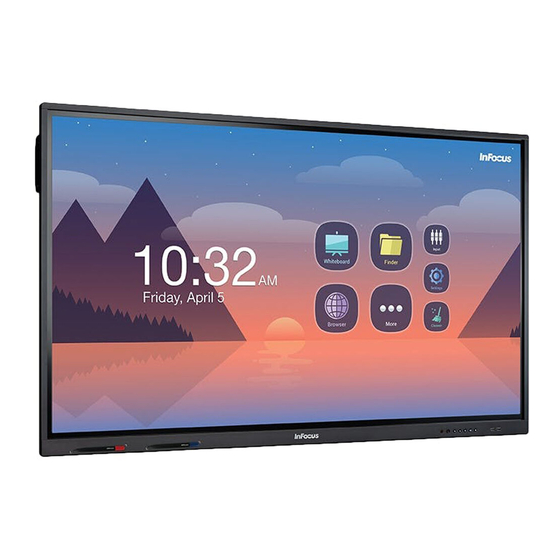
Page 20: The Home Page
THE HOME PAGE The software and tools available at the home page are identified below. System settings and Total Touch Control™ are explained in sub- sequent sections; for software operating instructions, refer to the appropriate software guide at infocus.com. 1. Connectivity icons A network (ethernet) connection is established. -
Page 21: Total Touch Control
TOTAL TOUCH CONTROL™ With Total Touch Control (TTC), anything you want to do within an Android application can be accomplished by touching the screen. Use the touch-controlled menus to move through desired tasks, choose tools and manipulate the display. NOTE: The remote control and the buttons on the lower right of the display are still active in TTC, and can also be used in navigation and selection. -
Page 22: The Primary Menu Icons
The primary menu icons Icon Name Function Close Closes the Total Touch Control menu bar Back Returns to the previous screen in Android applications — back one level in an application or back one page in a browser Home Displays the home screen Active Displays a list of currently-open Android applications Applications... -
Page 23: The More Tools Submenu
The More Tools submenu More Tools contains applications and tools to facilitate the exchange of ideas. Their functions are explained below. Icon Name Description SpotLight Use the SpotLight tool to focus attention on a particular area of the display. The size of the spotlight, and the opacity of the remainder of the screen, are controlled with slider bars. -
Page 24: Select A Source Through Liveview
SELECT A SOURCE THROUGH LIVEVIEW™ Connect an input source to the appropriate port (see page 14 and page 15). 2) Select Access Input Sources by one of five methods: From the icon on the home page (page 19); b) From the Total Touch Control menu bar (page 21); From the front panel button (page 16);... - Page 25 Screen Three aspect ratios are available — 4:3; 16:9; or PTP (Pic- ture-to-Picture), which fills the screen. Tap the on/off button above Pixel Shift to enable/disable it. Display Modifies the appearance of the display. Choose one of three presets — Standard, Bright and Soft — or create a Custom display setting.
-
Page 26: Settings
SETTINGS There are a wide variety of settings you can use to adjust the display to your preferences. To access them, tap the Settings icon on the home page (page 19) or at the More Tools submenu (page 22). To access one of the settings, tap its name or its icon. Once at a setting menu, tap the name of the setting or the On/Off button, whichever is closer, to make changes. - Page 27 Perm scan symbol indicates signal strength Indicates pass- word protection Add network 3) Turn WiFi on to show a window with a list of the saved and available WiFi networks. To the left of each address, the perm scan symbol indicates signal strength. b) To the right of each address, a padlock indicates password protection.
-
Page 28: Ethernet
5) Tap a network name for signal, security and network information. Ethernet Tap Ethernet, or the Ethernet icon. If necessary, turn the Ethernet settings on: Press Off, (to the left) or press the On/Off button (to the right). 2) Choose a Local Network Setting — DHCP or Static IP. Selecting DHCP automatically allocates an IP address. - Page 29 3) If you choose Static IP as your local network — Tap any of the numbers under the IP address, Default gateway, Netmask, or the DNS 1 and DNS 2 settings. The Static Net- work Config window appears. b) Use a connected keyboard or the on-screen keyboard to enter the required information; at the bottom right of the window, tap Cancel or OK to dismiss or confirm your settings.
-
Page 30: Bluetooth
Bluetooth Tap Bluetooth, or the Bluetooth icon. A list of available devices is displayed. If necessary, turn the Bluetooth settings on: Press Off, (to the left) or press the On/Off button (to the right). 2) Choose an available device and tap it to initiate pairing. Tap to turn the settings menu on or off... -
Page 31: More
More Tap More, or the More icon. To add a Virtual Private Network, tap VPN and then the “+” symbol at the upper right. The Edit VPN profile window appears. Use a connected keyboard or the on-screen keyboard to enter a Name. b) Select the Type of VPN from the drop-down list, and enter the Server address. -
Page 32: Share
Share SAMBA Tap SAMBA, the SAMBA icon or click the check box to the right to enable file sharing. Click the check box to enable file sharing. Click the check box. The UserName is locked to “admin.” 2) If you choose to enter a password, tap Use password for protection, or click the check box to the right, and enter the password. 3) For Macintosh operating systems: Open the shared section of a Finder window and press “command + K.”... - Page 33 Select “Turn Windows Features on or off.” d) Scroll down to, and select, “SMB File Sharing Support.” Select “SMB Client.” Press “OK” at the bottom of the window. NOTE: It may be necessary to restart Windows to enable SMB. Page 32 Interactive Touch Display Hardware Guide...
- Page 34 Type “File Explorer” in the Windows search box. h) At the next window, type “\\” followed by the panel’s ip address. Press Enter. NOTE: See WiFi (page 25) or Ethernet (page 27), under Settings, for the panel’s ip address. Enter your network credentials. At the next window, enter the user name (“admin”) and the password, if one was chosen.
-
Page 35: Device
Device Display Tap Display, or the Display icon. A selection of animated and static backgrounds is available under Wallpaper. Tap Live Wallpapers, then a wallpaper thumbnail, and then the check mark in the upper right to select it. Tap the back arrow in the upper left to return to the previous screen. - Page 36 4) Tap Pixel Shift and choose an interval time between shifts. Or you can choose to turn Pixel Shift off. Page 35 Interactive Touch Display Hardware Guide...
-
Page 37: Storage
Storage Tap Storage, or the Storage icon. The Storage window appears. If a portable device is connected, the Storage window will show the amount of data used in the portable device (Portable storage) as well as in the system (Device storage). Tap the triangular icon to the right of Portable storage to eject or reinstall the device. - Page 38 2) At the Storage window, tap a category to show the amount of data each application within the category is using. (If a portable device is connected, tap Internal shared storage and Portable storage for the same information.) 3) Tap the back arrow at the upper left to return to Storage. Tap FREE UP SPACE. The Choose items to remove window appears, with a list of downloads and infrequently-used apps.
-
Page 39: Advanced Storage Functions
Advanced storage functions In the Settings menu, under Device, tap Storage, or its icon. The Storage window appears. If a portable device is connected, the Storage window will show the amount of data used in the system (Device storage) as well as the portable device (Portable storage). -
Page 40: The Storage Window
The Storage window In the Settings menu, under Device, tap Storage, or its icon. Tap any category to show its applications. Tap the name of any application, or its icon, to show the Storage window for that application. From this window you can reset the app to its original settings, clear the cache, or access additional settings. -
Page 41: Sound
The remaining settings are available for most applications. • Tap App notifications to turn notifications on or off. You can also allow a notification dot, sound on notification, or allow a Do Not Disturb override. • Tap Permissions to control which capabilities or information the app can access. •... -
Page 42: Apps
Apps Tap Apps, or the Apps icon. At the App info window, tap the More icon at the upper right for a drop-down window with two selections: Tap Show system/Hide system to switch between a list of all apps and their components, or only the applications. Tap the More icon for a... -
Page 43: Personal
Personal Security Tap Security, or the Security icon. At Credential storage, tap Trusted Credentials. A list of the System certificate authority (CA) companies that Android regards as “trusted” (for the purpose of verifying the identity of a server) is displayed. To mark a company as not trusted, tap the On/Off button (page 25) to turn it Off. -
Page 44: Language & Input
Language & input Tap Language & input, or the Language & input icon. At Languages, tap to choose between six languages. 2) At Keyboard & inputs: Select Virtual keyboard to access settings for the two keyboard choices: Android Keyboard (AOSP): Preferences —... -
Page 45: Startup & Shutdown
Startup & shutdown Tap Startup & shutdown, or the Startup & shutdown icon. At Startup and shutdown option, tap to select a Startup channel: Last startup channel (the last one running) or Default startup channel. If you select Default startup channel, choose between Android, ChromeOS, HDMI1, HDMI2, or VGA. b) Or, check the box to the right to select Standby after startup (black screen). -
Page 46: Password
Tap Change or Cancel. NOTE: It may be necessary to move the on-screen keyboard to Change or Cancel the Settings password. NOTE: InFocus encourages password protection to prevent unauthorized changes to administrator settings. Page 45 Interactive Touch Display Hardware Guide... -
Page 47: Input Setting
Input Setting Tap Input Setting, or the Input Setting icon. To set an alias, the Input Alias Switch must be enabled — turn the On/Off button (page 25), located to the right, to On. Use the on-screen keyboard to enter a user-friendly alias. Double-tap the name of a source to CUT, COPY or SHARE it. 2) To the right of the source, choose to Always dispay or to Auto hide the source name from the LiveView input source selection menu (page 23). -
Page 48: Other Settings
Other Settings Tap Other Settings, or the Other Settings icon. The available settings are: • Floating Annotation Settings: Select Slide Toolbar to show the Total Touch Control menu as a tab (page 20); select Universal System Toolbar to show the Total Touch Control menu as a circle. NOTE: In order to display the Universal System Toolbar, long-touch the panel with two fingers held approximately 2 inches (5 cm) apart. -
Page 49: System
System Date & Time Tap Date & Time, or the Date & Time icon. • Tap the On/Off button (page 25) to the right of Automatic date & time to enable/disable it. With Automatic date & time disabled, you can manually Set date and Set time. Other settings in this category include choosing a time zone, the choice between a 12-hour and a 24-hour clock, and the choice of a date format. -
Page 50: System Settings
System Settings Tap System Settings, or the System Settings icon. Tap Android, or the On/Off button to the right (page 25), to show the Disable Embedded OS window. Tap Confirm to erase all Android functions completely. CAUTION Selecting Confirm from the Disable Embedded OS window will erase all Android functions. -
Page 51: System Update
System Update Tap System Update, or the System Update icon. Press Check update to see if an update is available. Tap to check for an update. Page 50 Interactive Touch Display Hardware Guide... -
Page 52: Install The Pc, Keyboard Extender & Camera
INSTALL THE PC, KEYBOARD EXTENDER & CAMERA (The PC, Keyboard and Camera are optional accessories) Install the PC module Remove the PC cover plate on the right side panel by removing the two Phillips screws (1). 2) Insert the PC into the slot with an orientation as shown in (2). 3) Push gently until the side tab locks into place, and the PC is flush to the surface of the panel. -
Page 53: Install The Camera
Install the camera Remove the plastic film from the camera lens, if any is present (1). 2) Attach the camera to the bracket with the four provided thumbscrews (2). 3) Position the camera at the top of the panel, so that the two holes at either end of the bracket (3) align to two screws. -
Page 54: The Pc Ports
THE PC PORTS (The PC is an optional accessory) For all panel ports, see page 12 and page 13. Two USB Four USB 3.0 ports 2.0 ports (black insert) (blue insert) DisplayPort USB-C Connecting the PC ports to other devices The PC and its ports are located on the right side panel (above). - Page 55 If a hardware defect arises and a valid claim is received within the Warranty Period, at its option and to the extent permitted by law, InFocus will either (1) repair the hardware defect at no charge, using new parts or refurbished parts that...
- Page 56 (l) if the product is not used under normal operating conditions which are defined as use not in excess of 16 hours continuously per day with a minimum 8 hour period of continuous rest in the powered off state; or (m) if any InFocus serial number has been removed or defaced.
- Page 57 InFocus specifies in the materials shipped with a replacement CSR part whether a defective part must be returned to InFocus. In cases where it is required to return the defective part to InFocus, you must ship the defective part back to InFocus within a defined pe- riod of time, normally five (5) business days, and clearly display the Return Material Authorization (RMA#) on the outside of the shipping carton or a similar package affording an equal degree of protection.
- Page 58 Upon receipt of the replacement product or part, the original product or part becomes the property of InFocus and you agree to follow instructions, including arranging the return of original product or part to InFocus in a timely manner. When providing a product exchange or Customer Self Repair (CSR) part requiring the return of the original product or part, InFocus may require a credit card authorization as security for the retail price of the replacement product or part and applicable shipping costs.
- Page 59 SRS Labs, Inc. InFocus, In Focus, INFOCUS (stylized), MondoCenter, Mondopad, BigTouch, JTouch, and ShareView are either registered trademarks or trademarks of InFocus Corporation in the United States and other countries. All other trademarks are the property of their respective owners. Any other trademarks, service marks, personal names or product names are assumed to be the property of their respective owners and are used only for reference.
- Page 60 See product certification label. This document applies to regulatory model: D103, D104, D105, D106, D107, D108, D109. Input ratings: AC 100-240V AC, 50-60Hz, D103 (5.0A), D104 (5.5A), D105 (3.0A), D106 (2.5A), D107 (4.0A), D108 (4.0A), D109 (6.0A). InFocus re- serves the right to alter product offerings and specifications at any time without notice...
Need help?
Do you have a question about the JTOUCH INF6540e and is the answer not in the manual?
Questions and answers