Table of Contents
Advertisement
Quick Links
Advertisement
Table of Contents

Related Manuals for MSI MX400 Series


Summary of Contents for MSI MX400 Series
- Page 1 MX400 Series Graphics Accelerator Version 1.0 Oct. 2001 G52-MA00455...
- Page 2 FCC-B Radio Frequency Interference Statement This equipment has been tested and found to comply with the limits for a class B digital device, pursuant to part 15 of the FCC rules. These limits are designed to provide reasonable protection against harmful interfer- ence when the equipment is operated in a commercial environment.
- Page 3 Copyright Notice The material in this document is the intellectual property of MICRO- STAR INTERNATIONAL. We take every care in the preparation of this document, but no guarantee is given as to the correctness of its contents. Our products are under continual improvement and we reserve the right to make changes without notice.
- Page 4 Important Safety Precautions Always read and follow these basic safety precautions carefully when handling any piece of electronic component. 1. Keep this User’s Manual for future reference. 2. Keep this equipment away from humidity. 3. Lay this equipment on a reliable flat surface before setting it up. 4.
-
Page 5: Table Of Contents
3.6 More Information ................3-6 3.7 Display Adjustment ............... 3-7 Chapter 4 MSI Live Update Series 4.1 Installing MSI Live Update Series ..........4-1 4.2 Using MSI Live Update Series ............4-2 4.3 Live VGA Driver Update ..............4-2 4.4 Live VGA BIOS Update ..............4-7 4.5 SafeBIOS™... - Page 6 4 .1 In stal ling M S I Li ve U p date Se ries........4 -1 4 .2 Us in g MSI L ive U pdate Ser ies ..........4-2 4 .3 L ive VGA D rive B IO S Upda te ...
-
Page 7: The Nvidia Geforce2 Mx400 Gpu
1 1 1 1 1 1. Introduction 1.1 The nVIDIA GeForce2 MX400 GPU Congratulations on purchasing the VGA card with nVIDIA GeForce2 MX400 GPU, a high performance graphics accelerator that enables you to experience the realistic and exciting 3D world. Based on nVIDIA GeForce2 MX400 GPU, the VGA card uses the first shading GPU (Graphics Processing Unit) with the new nVIDIA Shad- ing Rasterizer and a High Definition Video Processor (HDVP). -
Page 8: The Mx400 Series
1.3 The MX400 Series MX400 Pro- TC64S <Layout> nVIDIA GeForce2 MX400 GPU AGP Interface 64MB SDRAM VGA port Video Encoder TV_Out connector (S) VGA Flash BIOS TV_Out connector (C) <Features> General Features Optimized for Direct3D acceleration with complete support for Microsoft DirectX 5.0, 6.0, 7.0 and 8.1... - Page 9 2.8GB/second memory bandwidth Support 64/128-bit SDRAM AGP 4x fast writes Supports NTSC, NTSC-EIA(Japan), and PAL(B, D, G, H, I, M, and N) TV formats High quality video playback DVD and HDTV ready motion compensation for MPEG-2 decoding up to 1920x1080i ATSC format Support for VIP 2.0 interface Full Software Support Windows...
- Page 10 2.5 TV_Out Connector (S) ..............2-5 3. Software Installation ................3-1 4. MSI Live Update Series 4.1 Installing MSI Live Update Series ..........4-1 4.2 Using MSI Live Update Series ............4-2 4.3 Live VGA Drive Update ..............4-2 4.4 Live VGA BIOS Update ..............4-7...
- Page 11 MX400 Pro- VT32S <Layout> Work Sa fe M ode M ode NTSC M ode M ode nVIDIA GeForce2 MX400 GPU VGA port 32MB SDRAM TV_Out connector (S) Video Encoder TV_Out connector (C) VGA SafeBIOS Video_In connector (S) AGP Interface VGA SafeBIOS jumper (J1) Fan connector TV mode jumper (J2)
- Page 12 Support 128-bit SDRAM w/ 200MHz Supports NTSC, NTSC-EIA(Japan), and PAL(B, D, G, H, I, M, and N) TV formats Supports Video In (Capture) function (S/AV) MSI Safe BIOS Technology support High quality video playback DVD and HDTV ready motion compensation for MPEG-2 decoding...
- Page 13 2.6 Video_In Connector (S) ..............2-6 3. Software Installation ................3-1 4. MSI Live Update Series 4.1 Installing MSI Live Update Series ..........4-1 4.2 Using MSI Live Update Series ............4-2 4.3 Live VGA Drive Update ..............4-2 4.4 Live VGA BIOS Update ..............4-7 4.5 Safe BIOS...
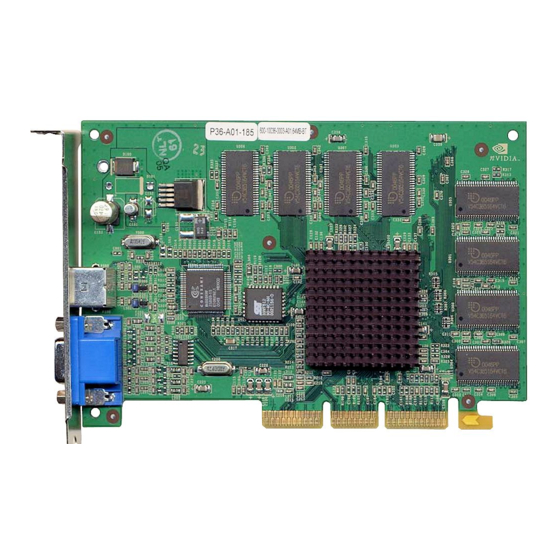
- Page 14 MX400 Pro2- T32S <Layout> nVIDIA GeForce2 MX400 GPU AGP Interface 32MB SDRAM VGA port Video Encoder TV_Out connector (S) VGA Flash BIOS <Features> General Features Optimized for Direct3D acceleration with complete support for Microsoft DirectX 5.0, 6.0, 7.0 and 8.1 256-bit 2D and 3D graphics accelerator 350MHz Palette-DAC 128-bit Memory Interface...
- Page 15 2.8GB/second memory bandwidth Support 64/128-bit SDRAM AGP 4x fast writes Support NTSC, NTSC-EIA (Japan), and PAL (B, D, G, H, I, M, and N) TV formats High quality video playback DVD and HDTV ready motion compensation for MPEG-2 decoding up to 1920x1080i ATSC format Support for VIP 2.0 interface Full Software Support Windows...
- Page 16 2.5 TV_Out Connector (S) ..............2-5 3. Software Installation ................3-1 4. MSI Live Update Series 4.1 Installing MSI Live Update Series ..........4-1 4.2 Using MSI Live Update Series ............4-2 4.3 Live VGA Drive Update ..............4-2 4.4 Live VGA BIOS Update ..............4-7 5.
-
Page 17: Chapter 2 Hardware Installation
2 2 2 2 2 2. Hardware Installation 2.1 Card Installation To install the VGA card to your computer, please follow the steps below: Installation on new system 1. Remove the computer case. 2. Locate the AGP slot on your mainboard. Warning: Inserting your VGA card into a wrong type of slot (e.g. - Page 18 Installation on system with existing VGA card To replace the existing VGA card to your computer, please follow the steps below: 1. If your operating environment is Windows NT system, switch your ® display driver to standard VGA first (refer to Windows NT docu- ®...
-
Page 19: Vga Connector (Db 15-Pin)
2.2 VGA Connector (DB 15-Pin) The VGA card provides a standard VGA connector, which allows you to connect a CRT or LCD monitor. Simply plug your monitor cable into the VGA connector on your VGA card, and make sure that the other end of the cable is properly connected to your monitor (refer to your monitor manual for more information). -
Page 20: Digital Panel Connector (Dvi-I)
2.3 Digital Panel Connector (DVI-I) The VGA card provides a DVI (Digital Visual Interface) connector which allows you to connect an LCD monitor. The DVI connector provides a high-speed digital interconnection between the computer and its display device. To connect a LCD monitor, simply plug your monitor cable into the DVI connector on the VGA card, and make sure that the other end of the cable is properly connected to your monitor. -
Page 21: Tv_Out Connector (C)
2.4 TV_Out Connector (C) The VGA card provides a TV_Out connector for video-out function which allows you to output the image to a TV or video device. Simply plug one end of the RCA cable into the TV_Out connector on the VGA card, and the other end to the video input connector on your TV or video device. -
Page 22: Video_In Connector (C)
2.6 Video_In Connector (C) The VGA card provides a Video _In connector for video-in function which allows you to input the image from video devices. Simply plug one end of the RCA cable into the Video_In connector on the VGA card, and the other end to the video output connector on your video devices. -
Page 23: Chapter 3 Software Installation
3 3 3 3 3 3. Software Installation This chapter describes how to install MSI VGA card software for Windows 98/ME/2000 or NT, including the driver and useful utilities. ® 3.1 Drivers for Windows 98/ME ® To install the driver for the VGA card to your computer running Win-... -
Page 24: Drivers For Windows 2000/Nt
Click the “nVIDIA VGA Drivers” button on the setup program. You can easily complete the driver installation through the on-screen instructions. After finishing the installation, restart the computer as instruction. 3.2 Drivers for Windows 2000/NT ® Note: For Windows NT 4.0 users, “Service Pack 3” or later version ®... - Page 25 Tip: If, on your computer, the “Autorun” program does not execute automatically, please 1) enable the CD-ROM drive’s auto-detect function from Control Panel; or 2) find and run the setup.exe manu- ally from the CD-ROM. Click the “nVIDIA VGA Drivers” button on the setup program. You can easily complete the driver installation through the on-screen instructions.
-
Page 26: Install Nvidia Capture Driver
3.3 Install nVIDIA Capture Driver The VGA card provides a video-in function that allows you to connect the external video devices for images capture function. With this driver installed, you can capture the images on your computer through the video input port on the card. -
Page 27: Install Optional Software
After restarting the computer, you can install the optional software from the CD-ROM provided, such as Microsoft DirectX 8.0, Adobe Acrobat Reader, and MSI 3D Turbo 2001. Simply click the button you select and follow the on-screen instructions to complete installation. -
Page 28: More Information
To browse the contents of the CD-ROM provided, simply click the “Browse CD” button under each tabs; and, you can use the Manual tab to learn more on your MSI products. Insert the CD-ROM provided into the CD-ROM drive and enter the setup program. -
Page 29: Display Adjustment
3.7 Display Adjustment After you have completed the driver installation, the setup program adds many specific options into Windows Display Properties. You can ® configure the specific display properties of the VGA card to obtain optimized performance. To launch the display properties window, click in the task bar, choose Settings -->... - Page 30 MSI Information This screen shows the detail information of the VGA card, including the model name, display mode, version of driver and BIOS, memory size,...
- Page 31 MSI Clock MSI Clock MSI Clock MSI Clock MSI Clock This screen shows the settings of the VGA card’s core clock and memory clock, and it provides you the overclocking function. Simply use the mouse to adjust the slide bar to the value you want, then click on “Apply” button.
- Page 32 GPU Information GPU Information GPU Information GPU Information GPU Information This screen shows the detailed information of GPU used on your VGA card, including the bus type, BIOS version, memory size, and so on. Click here Click the “Additional Properties” button, you may access further settings on Direct3D and OpenGL.
- Page 33 Performance and Compatibility Options Performance and Compatibility Options Performance and Compatibility Options Performance and Compatibility Options Performance and Compatibility Options This option contains many items that allow you to set the options influenc- ing the performance and compatibility in your 3D games. Mipmapping Mipmapping Mipmapping...
- Page 34 OpenGL Settings This screen allows you to adjust the Performance and Compatibility op- tions for your OpenGL application. Performance and Compatibility Options This option contains many items that allow you to set the options influ- encing the performance and compatibility in your OpenGL application. Default Color Depth for Textures This option allows you to choose the default color depth for texture.
- Page 35 TwinView (for MX Series only) If your VGA card is equipped with a S-Video connector, you can use a second output device (e.g. a TV or a computer monitor) as part of your operating desktop --- extending your desktop to the second device or copying your desktop on the second device.
- Page 36 Note: When the extending function is enabled, you can move your mouse, place the icons and show program windows on the second device. However, some certain programs do not support this function. If your program stops working or intermittently when using more than one monitor, please disable the function.
- Page 37 TV Mode Support: NTSC, NTSC-EIA (Japan), and PAL The default setting for TV-out function is PAL (for Europe region). If you want to use this function in different area, please adjust the proper set- tings (e.g. NTSC for Taiwan and USA region). Otherwise, the display in TV may be abnormal.
- Page 38 Color Correction This option allows you to adjust the proper values of Digital Vibrance, Brightness, Contrast, and Gamma through the software. Click the “Output Device” button (see the figure in page 3-14), and choose the “Color Correction” item in the pop-up box. Under the Color Correction tab, control the slide bar to the proper value in the relative fields.
- Page 39 Screen Adjustment This option allows you to adjust the proper position of display image through the software. Click the “Output Device” button (see the figure in page 3-14), and choose the “Screen Adjustment” item in the pop-up box. Click on the buttons to set the proper position of the image.
- Page 40 3-18...
-
Page 41: Chapter 4 Msi Live Update Series
4.1 Installing MSI Live Update Series To use this feature, you have to install the software program first; you can: 1) from the CD-ROM provided in the package; 2) from the MSI website. Install from the CD-ROM Insert the CD-ROM provided into the CD-ROM drive, and enter the setup program. -
Page 42: Using Msi Live Update Series
Live VGA BIOS and Live VGA Driver options are used for your MSI VGA card. 4.3 Live VGA Driver Update To run MSI Live VGA Driver, click the <Live VGA Driver> item on the left column of the main page. Click here Note: The model name and driver/BIOS version appear in the instruction are for reference only;... - Page 43 Click here Click the graph button at the bottom to connect to MSI Live Update Series Server. Then, it will automatically connect to the Internet and compare the version of the driver in the database.
- Page 44 The results are displayed as below: Supported driver not found Supported driver found Click the download/install button at the right side of the ta- ble to download and update the driver. All actions will proceed automatically. Follow the on-screen instructions to complete the update...
- Page 45 Select a folder to save the driver file Downloading Driver updating...
- Page 46 Restar the computer Note: 1. Always click <Yes> button when Internet Explorer asks the security question. 2. Click <Yes> button when Internet Explorer shows the Security Warning for installing and running the <InstallFromTheWeb Client>.
-
Page 47: Live Vga Bios Update
4.4 Live VGA BIOS Update To run MSI Live VGA BIOS, click the <Live VGA BIOS> item on the left column of the main page. This utility will detect your system; if your VGA card does not sup- port the Live VGA BIOS function, the screen as below will appear*: * For more information on the MSI SafeBIOS , please see page 4-12. - Page 48 BIOS version of your VGA card, and shows these data as a list: Click here Click the graph button at the bottom to connect to MSI Live Update Series Server. Then, MSI Live VGA BIOS will automatically connect to Internet and search the supported BIOS on the database of MSI.
- Page 49 Supported BIOS found If it found one (or several) supported BIOS for your VGA card, click the download/install button at the right side of the table to download and start to update the BIOS. All actions will proceed automatically. Note: Your monitor may go BLANK during the software EEPROM being erased, please wait for a while.
- Page 50 Downloading Asking to continue Restart the computer after the BIOS updated 4-10...
- Page 51 Note: 1. Always click <Yes> button when Internet Explorer asks the security question. 2. Click <Yes> button when Internet Explorer shows the Security Warning for installing and running the <InstallFromTheWeb Client>. 4-11...
-
Page 52: Safebios
4.5 Safe BIOS™ The diagram below describes the procedure in brief: BIOS I Return to BIOS I Run the flash utility BIOS II Boot up with BIOS II Successfully updated! OOPS! Failed... 4-12... - Page 53 Our products are under continual improvement, and there may be the newer version of BIOS to solve the existing problems on displays or installaton. When you use the flash utility* to update the BIOS on the card, it is una- voidably with some danger to your devices because of some unexpected factors (e.g.
- Page 54 Replace the case and restart the computer. * NOTE: To update the BIOS, you must only use the special flash utility (MSI Live Update Series) provided from MSI, which can fully support the SafeBIOS technology. If the third party’s utility is used during the updating, it will erase the data in BIOS II.
-
Page 55: Chapter 5 Troubleshooting
5.1 General Help Q: Where can I find more information about my VGA card? Please visit our website at: http://www.msi.com.tw Q: How do I know my VGA driver’s version? How to update it? To get the information of your VGA card’s driver, simply click , choose Settings -->... -
Page 56: Display Problem
5.2 Display Problem Q: My monitor displays nothing after the system boots up. Your VGA card may not be installed correctly. Please check the installation procedure as described in Chapter 2 Hardware Installation. Make sure that your monitor are connected to the VGA card properly, and the power is turned on. - Page 57 Settings ¡÷ Control Panel ¡÷ Display to set the values. For example, when you installed the dedicated driver for your MSI VGA card, which is provided in the CD- ROM packaged with your VGA card, you will see the “MSI Informa- tion”...
- Page 58 Q: The DVD video playback is poor quality (skipping frames, color blocks, etc.), why? Change the refresh rate, color and resolution settings to proper values. Enable the DMA mode for your DVD drive. However, not all DVD drives support this function, please see your DVD drive’s documen- tation for more information.
-
Page 59: Chapter 6 3D Stereo Glasses
6 6 6 6 6 6. 3D Stereo Glasses The 3D stereo glasses provided by MSI is a Stereo3D visualization tool that enables you to view stereoscopic images or movies. You can have more fun wihle playing PC games which support 3D effect. -
Page 60: Installing The 3D Stereo Glasses
6.2 Installing the 3D Stereo Glasses To install the 3D stereo glasses in your computer, please follow the steps below and refer to the diagram: Installing the 3D stereo glasses adaptor Turn the power off and remove the computer case. Place and screw the 3D stereo glasses adaptor to your computer. - Page 61 The diagram for easy installing The diagram below can help you to installation the 3D stereo glasses. 6. Plug the stereo g l a s s e s t o t h e adaptor 3. Connect the power 5. Connect the monitor 4.
-
Page 62: Installing The 3D Theater
6.3 Installing the 3D Theater To have a 3D viewing experience on the PC, a 3D software application is necessary. The product offers a VCD/DVD player “MSI 3D Theater ” for you to view 3D stereoscopic movies and images or create 3D presenta- tion on the monitor. - Page 63 Enter your own information including the product’s serial number in the fields. Click “Next”. Click “Next” to continue. Click “Next”.
- Page 64 The installation program starts to copy files into your system. Click “Finish” to complete the installation.
- Page 65 The Microsoft DirectX Setup dialog box will appear. Click “No” to skip the step if you have already installed DirectX 8.0 or above before; otherwise, you must click “Yes” to install DirectX 8.0 or the latest version. 10. Click “Yes” to continue. 11.
-
Page 66: Using The 3D Theater
6.4 Using the 3D Theater Now you are ready to enjoy 3D stereo presentation with 3D stereo glasses and MSI 3D Theater on the PC monitor. To start MSI 3D Theater double click the MSI 3D Theater icon (as right view) on the desktop screen. - Page 67 Click on (Setup) button. The Setup window appears. Click on Region tab. click here Select the appropriate region for the decoder. Click on Stereo 3D tab. Check “Enable Stereo 3D” and select the appropriate video format from “Video Source”.
- Page 68 enable this item default value If you want to view 3D contents in 2D fashion, check “Convert to 2D Video”. For more information on different video formats, refer to 3D Setup in the on-line help. Click “OK”. Playing Single Media File Click on (Open) button.
- Page 69 Highlight the files you want and click “Add” or click “Add all” to select all files under the same folder. If you need to play these files frequently afterwards, click “Save” to save these files as a play list file. Next time you can just click “Open”...
-
Page 70: Optimizing The 3D Stereo Glasses
6.5 Optimizing the 3D Stereo Glasses When the monitor refresh rate is too low to match the refresh rate of the 3D stereo glasses, your eyes will feel uncomfortable for the flickering screen. Thus you have to adjust the monitor refresh rate upward. Test each setting to find out the proper refresh rate for the 3D stereo glasses. - Page 71 Click “Adapter” tab to shift the window as below: set the refresh rate to a higher value Test the refresh rate upward to find out the proper one, then click “OK” button. 6-13...
-
Page 72: Health Warning
6.6 Health Warning Here we suggest that long periods of using the 3D stereo glasses may be associated with physical discomfort and injury to nerves, tendons, and muscles. If you experience symptoms such as persistent or recurring discomfort, pain, throbbing, aching, tingling, numbness, burning sensation, or stiffness, DO NOT IGNORE THESE WARNING SIGNS. - Page 73 If the recommendations above do not solve your symptoms, please ask ophthalmologist for help. 6-15...
Need help?
Do you have a question about the MX400 Series and is the answer not in the manual?
Questions and answers