Table of Contents
Advertisement
Advertisement
Table of Contents

Related Manuals for MSI MS-8916


Summary of Contents for MSI MS-8916
- Page 1 SER’S UIDE RX Series Version 5.0 December 2004 G52-V1ARX05...
- Page 2 (1) this device may not cause harmful interference, and (2) this device must accept any interference received, including interference that may cause undesired operation. Micro Star International Micro Star International Micro Star International MS-8916 MS-8932 MS-8940 Micro Star International Micro Star International Micro Star International...
-
Page 3: Copyright Notice
MSI has been working on graphics products for years and has achieved a superior accomplishment in various graphics series. MSI is not only devoted to delivering the best product quality, but also to bringing up the most novel solutions. Here MSI presents the patents that MSI obtained for users reference. - Page 4 Important Safety Precautions Always read and follow these basic safety precautions carefully when handling any piece of electronic component. Keep this User’s Manual for future reference. 2. Keep this equipment away from humidity. 3. Lay this equipment on a stable, flat surface before setting it up. 4.
-
Page 5: Table Of Contents
4.4 Display Adjustment ..................4-4 Chapter 5 MSI Live Update 3 5.1 Installing the MSI Live Update 3 with MSI Live Monitor ........ 5-2 5.2 Using the MSI Live Update 3 ................. 5-3 5.3 Live VGA Driver Update ................5-4 5.4 Live VGA BIOS Update ................. -
Page 7: Chapter 1 Getting Started
1 1 1 1 1 GETTING STARTED This user’s guide is designed for a series of VGA cards. Read this chapter first, and it will give you a clear instruction on how to use this guide. -
Page 8: How To Use This Guide
VGA card software for Windows XP, or 2000, including the driver and useful utilities. Chapter 5, MSI LIVE UPDATE 3, a useful utility for you to upgrade your MSI mainboard and VGA card. Because of this powerful capacity of this... -
Page 9: Conventions Of This Guide
3.5 TV_Out Connector (S)............ 3-6 4. Software Installation............4-1 5. MSI Live Update 3 5.1 Installing the MSI Live Update 3 with MSI Live Monitor..5-2 5.2 Using the MSI Live Update 3 ........... 5-3 5.3 Live VGA Drive Update...........5-4 Corresponding function for 5.4 Live VGA BIOS Update............5-8... - Page 10 Chapter 1...
-
Page 11: Chapter 2 Introduction
2 2 2 2 2 INTRODUCTION This chapter provides the brief specification and function of each VGA card. For detailed description of all functions, you may refer to the rest of the chapters. Note that the VGA card you purchased may not cover all functions mentioned herein;... -
Page 12: System Requirements
Chapter 2 2.1 System Requirements To install the VGA card, your system needs to meet the following Computer Intel Pentium II/III/4 processor, ® Intel Celeron processor, or ® compatible system Expansion Slot AGP / PCI EXPRESS slot Monitor VGA support, minimum 640 x 480 resolution Operating System Windows... -
Page 13: Card List
Introduction 2.2 Card List RX850 Series Features & Specifications Twelve extreme parallel pixel pipelines Six programmable vertex shader pipelines 256-bit quad-channel GDDR3 memory interface AGP 8X or PCI Express support Support for Microsoft DirectX 9.0 programmable vertex and pixel ® ®... - Page 14 Chapter 2 Features & Specifications VIDEOSOAP™ noise removal filtering for captured video MPEG1/2/4 decode and encode acceleration DXVA Support Hardware Motion Compensation, iDCT, DCT and color space conversion Adaptive Per-Pixel De-Interlacing and Frame Rate Conversion (temporal filtering) 0.11-micron low-k process technology for higher levels of integra- tion and higher operating clock speeds.
- Page 15 Introduction Features & Specifications Operating Systems Support Windows XP / 2000 ® Power supply of 350 (and up) watt is highly recommended for system stability 2D Display Modes: Resolutions, colors and maximum refresh rates (Hz) in 256, 65K or 16.7M colors - 640 x 480 200Hz - 800 x 600...
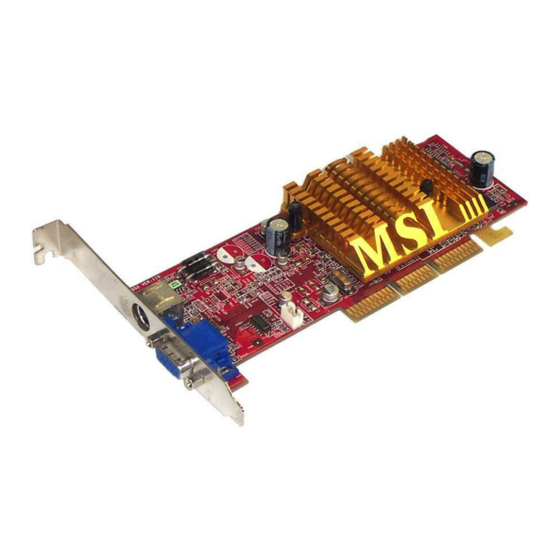
- Page 16 TV_Out / Video_In 128MB DDR3 RAM Connector (S&C) PCI Express Interface HDTV intergtated DVI-I Connector MSI reminds you... Note that the VGA card shown above may vary from the actual card. For further information, please visit MSI website at http://www.msi.com.tw...
-
Page 17: Package Contents
4. SOFTWARE INSTALLATION ............4-1 5. MSI LIVE UPDATE 3 ............... 5-1 5.1 Installing MSI Live Update 3 with MSI Live Monitor ....5-2 5.2 Using the MSI Live Update 3 ..........5-3 5.3 Live VGA Drive Update ............5-4 5.4 Live VGA BIOS Update ............ - Page 18 TV_Out Connector (S) 128MB DDR3 RAM HDTV intergtated PCI Express Interface DVI-I Connector Fan Connector MSI reminds you... Note that the VGA card shown above may vary from the actual card. For further information, please visit MSI website at http://www.msi.com.tw...
- Page 19 4. SOFTWARE INSTALLATION ............4-1 5. MSI LIVE UPDATE 3 ............... 5-1 5.1 Installing MSI Live Update 3 with MSI Live Monitor ....5-2 5.2 Using the MSI Live Update 3 ..........5-3 5.3 Live VGA Drive Update ............5-4 5.4 Live VGA BIOS Update ............
-
Page 20: Rx800 Series
Chapter 2 RX800 Series Features & Specifications Twelve extreme parallel pixel pipelines Six programmable vertex shader pipelines 256-bit quad-channel GDDR3/ GDDR memory interface AGP 8X or PCI Express support Support for Microsoft ® DirectX ® 9.0 programmable vertex and pixel shadersl data format Direct X 9.0 Vertex Shaders Vertex programs up to 65,280 instructions with flow control... - Page 21 Introduction Features & Specifications Operating Systems Support Windows XP / 2000 ® Power supply of 350 (and up) watt is highly recommended for system stability 2D Display Modes: Resolutions, colors and maximum refresh rates (Hz) in 256, 65K or 16.7M colors - 640 x 480 200Hz - 800 x 600...
- Page 22 Chapter 2 Features & Specifications PERFORMANCES (for RX800XT Platinum series) (For Reference Only) Memory Bandwidth: 35.8GB/sec. (This value is for reference only, depending on the type/size of memory implemented) GigaFLOPS: 200 billion floating point operations/sec. Peak Pixel Fill Rate: 8.3 GB/s Transform Rate: 780 million vertices/sec.
- Page 23 Introduction Features & Specifications PERFORMANCES (for RX800 series)(For Reference Only) Memory Bandwidth: 22.4GB/sec. (This value is for reference only, depending on the type/size of memory implemented) GigaFLOPS: 120 billion floating point operations/sec. Peak Pixel Fill Rate: 4.7 GB/s Transform Rate: 588 million vertices/sec. Textures applied per pass: supports up to 12 textures per pass PERFORMANCES (for RX800SE PCI-Express series) (For Reference Only)
- Page 24 D-Sub Port (DB 15-Pin) 256MB DDR3 RAM TV_Out Connector (S) PCI Express Interface DVI-I Connector Fan Connector MSI reminds you... Note that the VGA card shown above may vary from the actual card. For further information, please visit MSI website at http://www.msi.com.tw 2-14...
- Page 25 4. SOFTWARE INSTALLATION ............4-1 5. MSI LIVE UPDATE 3 ............... 5-1 5.1 Installing MSI Live Update 3 with MSI Live Monitor ....5-2 5.2 Using the MSI Live Update 3 ..........5-3 5.3 Live VGA Drive Update ............5-4 5.4 Live VGA BIOS Update ............
- Page 26 256MB DDR3 RAM TV_Out / Video_In PCI Express Interface Connector (S&C) Fan Connector DVI-I Connector MSI reminds you... Note that the VGA card shown above may vary from the actual card. For further information, please visit MSI website at http://www.msi.com.tw 2-16...
- Page 27 4. SOFTWARE INSTALLATION ............4-1 5. MSI LIVE UPDATE 3 ............... 5-1 5.1 Installing MSI Live Update 3 with MSI Live Monitor ....5-2 5.2 Using the MSI Live Update 3 ..........5-3 5.3 Live VGA Drive Update ............5-4 5.4 Live VGA BIOS Update ............
- Page 28 TV_Out / Video_In ATI Radeon X800SE GPU Connector (S&C) 256MB DDR3 RAM DVI-I Connector AGP Interface MSI reminds you... Note that the VGA card shown above may vary from the actual card. For further information, please visit MSI website at http://www.msi.com.tw 2-18...
- Page 29 4. SOFTWARE INSTALLATION ............4-1 5. MSI LIVE UPDATE 3 ............... 5-1 5.1 Installing MSI Live Update 3 with MSI Live Monitor ....5-2 5.2 Using the MSI Live Update 3 ..........5-3 5.3 Live VGA Drive Update ............5-4 5.4 Live VGA BIOS Update ............
- Page 30 D-Sub Port (DB 15-Pin) ATI Radeon X800SE GPU TV_Out Connector (S) 256MB DDR3 RAM DVI-I Connector MSI reminds you... Note that the VGA card shown above may vary from the actual card. For further information, please visit MSI website at http://www.msi.com.tw 2-20...
- Page 31 4. SOFTWARE INSTALLATION ............4-1 5. MSI LIVE UPDATE 3 ............... 5-1 5.1 Installing MSI Live Update 3 with MSI Live Monitor ....5-2 5.2 Using the MSI Live Update 3 ..........5-3 5.3 Live VGA Drive Update ............5-4 5.4 Live VGA BIOS Update ............
- Page 32 Connector (S&C) 128MB DDR3 RAM HDTV intergtated PCI Express Interface DVI-I Connector Fan Connector MSI reminds you... Note that the VGA card shown above may vary from the actual card. For further information, please visit MSI website at http://www.msi.com.tw 2-22...
- Page 33 4. SOFTWARE INSTALLATION ............4-1 5. MSI LIVE UPDATE 3 ............... 5-1 5.1 Installing MSI Live Update 3 with MSI Live Monitor ....5-2 5.2 Using the MSI Live Update 3 ..........5-3 5.3 Live VGA Drive Update ............5-4 5.4 Live VGA BIOS Update ............
- Page 34 Connector (S&C) 128MB DDR3 RAM HDTV intergtated PCI Express Interface DVI-I Connector Fan Connector MSI reminds you... Note that the VGA card shown above may vary from the actual card. For further information, please visit MSI website at http://www.msi.com.tw 2-24...
- Page 35 4. SOFTWARE INSTALLATION ............4-1 5. MSI LIVE UPDATE 3 ............... 5-1 5.1 Installing MSI Live Update 3 with MSI Live Monitor ....5-2 5.2 Using the MSI Live Update 3 ..........5-3 5.3 Live VGA Drive Update ............5-4 5.4 Live VGA BIOS Update ............
- Page 36 256MB DDR3 RAM or HDTV intergtated 128MB DDR3 RAM DVI-I Connector PCI Express Interface Fan Connector MSI reminds you... Note that the VGA card shown above may vary from the actual card. For further information, please visit MSI website at http://www.msi.com.tw 2-26...
- Page 37 4. SOFTWARE INSTALLATION ............4-1 5. MSI LIVE UPDATE 3 ............... 5-1 5.1 Installing MSI Live Update 3 with MSI Live Monitor ....5-2 5.2 Using the MSI Live Update 3 ..........5-3 5.3 Live VGA Drive Update ............5-4 5.4 Live VGA BIOS Update ............
- Page 38 256MB DDR3 RAM or HDTV intergtated 128MB DDR3 RAM DVI-I Connector PCI Express Interface Fan Connector MSI reminds you... Note that the VGA card shown above may vary from the actual card. For further information, please visit MSI website at http://www.msi.com.tw 2-28...
- Page 39 4. SOFTWARE INSTALLATION ............4-1 5. MSI LIVE UPDATE 3 ............... 5-1 5.1 Installing MSI Live Update 3 with MSI Live Monitor ....5-2 5.2 Using the MSI Live Update 3 ..........5-3 5.3 Live VGA Drive Update ............5-4 5.4 Live VGA BIOS Update ............
-
Page 40: Rx700 Series
Chapter 2 RX700 Series Features & Specifications SMARTSHADER™ 2.0 SMARTSHADER™ defines the level of realism in latest 2D/3D games and applications Complete hardware-accelerated Microsoft® DirectX® 9.0 program- mable vertex and pixel shader support Full hardware support for OpenGL® 2.0 VISION™ improves image SMOOTHVISION™... - Page 41 Introduction Features & Specifications VISION™ improves image ADDITIONAL FEATURES Dual integrated display controllers Dual integrated 10 bit per channel 400 MAz DACs Integrated 165 MHz TMDS transmitter (DVI 1.0 / HDMI compliant and HDCP ready) Windows Logo Program compliant 128-bit memory interface supporting 128MB or 256MB DDR/ DDR3 memory configurations Native x16 lane PCI Express OTHERS...
- Page 42 Connector (S&C) 256MB DDR/DDR3 RAM or DVI-I Connector 128MB DDR/DDR3 RAM PCI Express Interface MSI reminds you... Note that the VGA card shown above may vary from the actual card. For further information, please visit MSI website at http://www.msi.com.tw 2-32...
- Page 43 4. SOFTWARE INSTALLATION ............4-1 5. MSI LIVE UPDATE 3 ............... 5-1 5.1 Installing MSI Live Update 3 with MSI Live Monitor ....5-2 5.2 Using the MSI Live Update 3 ..........5-3 5.3 Live VGA Drive Update ............5-4 5.4 Live VGA BIOS Update ............
- Page 44 Connector (S&C) 256MB DDR/DDR3 RAM or DVI-I Connector 128MB DDR/DDR3 RAM PCI Express Interface MSI reminds you... Note that the VGA card shown above may vary from the actual card. For further information, please visit MSI website at http://www.msi.com.tw 2-34...
- Page 45 4. SOFTWARE INSTALLATION ............4-1 5. MSI LIVE UPDATE 3 ............... 5-1 5.1 Installing MSI Live Update 3 with MSI Live Monitor ....5-2 5.2 Using the MSI Live Update 3 ..........5-3 5.3 Live VGA Drive Update ............5-4 5.4 Live VGA BIOS Update ............
- Page 46 D-Sub Port (DB 15-Pin) 256MB DDR/DDR3 RAM or TV_Out Connector (S) DVI-I Connector 128MB DDR/DDR3 RAM MSI reminds you... Note that the VGA card shown above may vary from the actual card. For further information, please visit MSI website at http://www.msi.com.tw 2-36...
- Page 47 4. SOFTWARE INSTALLATION ............4-1 5. MSI LIVE UPDATE 3 ............... 5-1 5.1 Installing MSI Live Update 3 with MSI Live Monitor ....5-2 5.2 Using the MSI Live Update 3 ..........5-3 5.3 Live VGA Drive Update ............5-4 5.4 Live VGA BIOS Update ............
-
Page 48: Rx600 Series
Chapter 2 RX600 Series Features & Specifications SMARTSHADER™ 2.0 SMARTSHADER™ defines the level of realism in latest 2D/3D games and applications Complete hardware-accelerated Microsoft® DirectX® 9.0 program- mable vertex and pixel shader support Full hardware support for OpenGL® 2.0 VISION™ improves image SMOOTHVISION™... - Page 49 Introduction Features & Specifications VISION™ improves image ADDITIONAL FEATURES Dual integrated display controllers Dual integrated 10 bit per channel 400 MAz DACs Integrated 165 MHz TMDS transmitter (DVI 1.0 / HDMI compliant and HDCP ready) Windows Logo Program compliant 128-bit memory interface supporting 128MB or 256MB DDR1 memory configurations Native x16 lane PCI Express PERFORMANCES (for RX600 XT)
- Page 50 TV_Out / Video_In PCI Express Interface Connector (S&C) Power Connector D-Sub Port (DB 15-Pin) MSI reminds you... Note that the VGA card shown above may vary from the actual card. For further information, please visit MSI website at http://www.msi.com.tw 2-40...
- Page 51 4. SOFTWARE INSTALLATION ............4-1 5. MSI LIVE UPDATE 3 ............... 5-1 5.1 Installing MSI Live Update 3 with MSI Live Monitor ....5-2 5.2 Using the MSI Live Update 3 ..........5-3 5.3 Live VGA Drive Update ............5-4 5.4 Live VGA BIOS Update ............
- Page 52 128MB DDR/DDR3 RAM TV_Out Connector (S) PCI Express Interface D-Sub Port (DB 15-Pin) Power Connector MSI reminds you... Note that the VGA card shown above may vary from the actual card. For further information, please visit MSI website at http://www.msi.com.tw 2-42...
- Page 53 4. SOFTWARE INSTALLATION ............4-1 5. MSI LIVE UPDATE 3 ............... 5-1 5.1 Installing MSI Live Update 3 with MSI Live Monitor ....5-2 5.2 Using the MSI Live Update 3 ..........5-3 5.3 Live VGA Drive Update ............5-4 5.4 Live VGA BIOS Update ............
- Page 54 TV_Out Connector (S) D-Sub Port (DB 15-Pin) 128MB DDR/DDR3 RAM PCI Express Interface Power Connector MSI reminds you... Note that the VGA card shown above may vary from the actual card. For further information, please visit MSI website at http://www.msi.com.tw 2-44...
- Page 55 4. SOFTWARE INSTALLATION ............4-1 5. MSI LIVE UPDATE 3 ............... 5-1 5.1 Installing MSI Live Update 3 with MSI Live Monitor ....5-2 5.2 Using the MSI Live Update 3 ..........5-3 5.3 Live VGA Drive Update ............5-4 5.4 Live VGA BIOS Update ............
- Page 56 TV_Out Connector (S) D-Sub Port (DB 15-Pin) 128MB DDR/DDR3 RAM PCI Express Interface Power Connector MSI reminds you... Note that the VGA card shown above may vary from the actual card. For further information, please visit MSI website at http://www.msi.com.tw 2-46...
- Page 57 4. SOFTWARE INSTALLATION ............4-1 5. MSI LIVE UPDATE 3 ............... 5-1 5.1 Installing MSI Live Update 3 with MSI Live Monitor ....5-2 5.2 Using the MSI Live Update 3 ..........5-3 5.3 Live VGA Drive Update ............5-4 5.4 Live VGA BIOS Update ............
-
Page 58: Rx300 Series
Chapter 2 RX300 Series Features & Specifications SMARTSHADER™ 2.0 SMARTSHADER™ defines the level of realism in latest 2D/3D games and applications Complete hardware-accelerated Microsoft® DirectX® 9.0 program- mable vertex and pixel shader support Full hardware support for OpenGL® 2.0 VISION™ improves image SMOOTHVISION™... - Page 59 Introduction Features & Specifications VISION™ improves image ADDITIONAL FEATURES Dual integrated display controllers Dual integrated 10 bit per channel 400 MAz DACs Integrated 165 MHz TMDS transmitter (DVI 1.0 / HDMI compliant and HDCP ready) Windows Logo Program compliant 128-bit memory interface supporting 128MB or 256MB DDR1 memory configurations Native x16 lane PCI Express OTHERS...
- Page 60 TV_Out Connector (S) 128MB DDR RAM PCI Express Interface D-Sub Port (DB 15-Pin) Power Connector MSI reminds you... Note that the VGA card shown above may vary from the actual card. For further information, please visit MSI website at http://www.msi.com.tw 2-50...
- Page 61 4. SOFTWARE INSTALLATION ............4-1 5. MSI LIVE UPDATE 3 ............... 5-1 5.1 Installing MSI Live Update 3 with MSI Live Monitor ....5-2 5.2 Using the MSI Live Update 3 ..........5-3 5.3 Live VGA Drive Update ............5-4 5.4 Live VGA BIOS Update ............
- Page 62 TV_Out Connector (S) 128MB DDR RAM PCI Express Interface D-Sub Port (DB 15-Pin) Power Connector MSI reminds you... Note that the VGA card shown above may vary from the actual card. For further information, please visit MSI website at http://www.msi.com.tw 2-52...
- Page 63 4. SOFTWARE INSTALLATION ............4-1 5. MSI LIVE UPDATE 3 ............... 5-1 5.1 Installing MSI Live Update 3 with MSI Live Monitor ....5-2 5.2 Using the MSI Live Update 3 ..........5-3 5.3 Live VGA Drive Update ............5-4 5.4 Live VGA BIOS Update ............
- Page 64 ATI Radeon X300SE GPU/ TV_Out Connector (S) ATI Radeon X300 GPU DVI-I Connector 128MB DDR RAM MSI reminds you... Note that the VGA card shown above may vary from the actual card. For further information, please visit MSI website at http://www.msi.com.tw 2-54...
- Page 65 4. SOFTWARE INSTALLATION ............4-1 5. MSI LIVE UPDATE 3 ............... 5-1 5.1 Installing MSI Live Update 3 with MSI Live Monitor ....5-2 5.2 Using the MSI Live Update 3 ..........5-3 5.3 Live VGA Drive Update ............5-4 5.4 Live VGA BIOS Update ............
- Page 66 ATI Radeon X300 GPU TV_Out Connector (S) 128MB DDR RAM D-Sub Port (DB 15-Pin) MSI reminds you... Note that the VGA card shown above may vary from the actual card. For further information, please visit MSI website at http://www.msi.com.tw 2-56...
- Page 67 4. SOFTWARE INSTALLATION ............4-1 5. MSI LIVE UPDATE 3 ............... 5-1 5.1 Installing MSI Live Update 3 with MSI Live Monitor ....5-2 5.2 Using the MSI Live Update 3 ..........5-3 5.3 Live VGA Drive Update ............5-4 5.4 Live VGA BIOS Update ............
-
Page 68: Rx9800 Series
Chapter 2 RX9800 Series Features & Specifications SMARTSHADERTM 2.1’s flexible architecture removes many of the stumbling blocks that developers previously encountered, giving them the chance to fully explore and express their creativity. SMARTSHADERTM 2.1 offers complete DirectX ® 9.0 support, enabling cinematic quality lighting effects. - Page 69 Introduction Features & Specifications YPrPb output adapter (available in North America only) System Requirements - RADEON™ 9800 Series of products requires connection to your PC's internal power supply for operation. Consult your system builder or OEM to ensure your system has an adequate power supply.
- Page 70 128MB DDR/DDR3 RAM D-Sub Port (DB 15-Pin) Fan Connector TV_Out Connector (S) DVI-I Connector MSI reminds you... Note that the VGA card shown above may vary from the actual card. For further information, please visit MSI website at http://www.msi.com.tw 2-60...
- Page 71 4. SOFTWARE INSTALLATION ............4-1 5. MSI LIVE UPDATE 3 ............... 5-1 5.1 Installing MSI Live Update 3 with MSI Live Monitor ....5-2 5.2 Using the MSI Live Update 3 ..........5-3 5.3 Live VGA Drive Update ............5-4 5.4 Live VGA BIOS Update ............
- Page 72 D-Sub Port (DB 15-Pin) 128MB DDR/DDR3 RAM TV_Out Connector (S) AGP Interface DVI-I Connector MSI reminds you... Note that the VGA card shown above may vary from the actual card. For further information, please visit MSI website at http://www.msi.com.tw 2-62...
- Page 73 4. SOFTWARE INSTALLATION ............4-1 5. MSI LIVE UPDATE 3 ............... 5-1 5.1 Installing MSI Live Update 3 with MSI Live Monitor ....5-2 5.2 Using the MSI Live Update 3 ..........5-3 5.3 Live VGA Drive Update ............5-4 5.4 Live VGA BIOS Update ............
-
Page 74: Rx9600 Series
Chapter 2 RX9600 Series Features & Specifications Quad-Pipe architecture delivers real-time cinematic rendering and animation 128-bit full floating point precision enables billions of color varia- tions to render the same lighting and effects as Hollywood studios Full AGP 8X support doubles available bandwidth for the most engaging gameplay in its class Enjoy better performance and 3D imagery in multimedia, games and applications with Microsoft... - Page 75 Introduction Features & Specifications Dual integrated display controllers Dual integrated 10-bit per channel 400 MHz DACs Integrated 165 MHz TMDS transmitter (DVI 1.0 compliant) Integrated TV Output support up to 1024x768 resolution Optimized for Pentium 4 SSE2 and AMD Athlon™ 3Dnow! ®...
- Page 76 TV_Out Connector (S) 128MB DDR/DDR3 RAM AGP Interface D-Sub Port (DB 15-Pin) Fan Connector MSI reminds you... Note that the VGA card shown above may vary from the actual card. For further information, please visit MSI website at http://www.msi.com.tw 2-66...
- Page 77 4. SOFTWARE INSTALLATION ............4-1 5. MSI LIVE UPDATE 3 ............... 5-1 5.1 Installing MSI Live Update 3 with MSI Live Monitor ....5-2 5.2 Using the MSI Live Update 3 ..........5-3 5.3 Live VGA Drive Update ............5-4 5.4 Live VGA BIOS Update ............
- Page 78 ATI Radeon 9600 SE GPU TV_Out Connector (S) 128MB DDR/DDR3 RAM DVI-I Connector AGP Interface MSI reminds you... Note that the VGA card shown above may vary from the actual card. For further information, please visit MSI website at http://www.msi.com.tw 2-68...
- Page 79 4. SOFTWARE INSTALLATION ............4-1 5. MSI LIVE UPDATE 3 ............... 5-1 5.1 Installing MSI Live Update 3 with MSI Live Monitor ....5-2 5.2 Using the MSI Live Update 3 ..........5-3 5.3 Live VGA Drive Update ............5-4 5.4 Live VGA BIOS Update ............
- Page 80 ATI Radeon 9600 SE GPU TV_Out Connector (S) 128MB DDR/DDR3 RAM D-Sub Port (DB 15-Pin) AGP Interface MSI reminds you... Note that the VGA card shown above may vary from the actual card. For further information, please visit MSI website at http://www.msi.com.tw 2-70...
- Page 81 4. SOFTWARE INSTALLATION ............4-1 5. MSI LIVE UPDATE 3 ............... 5-1 5.1 Installing MSI Live Update 3 with MSI Live Monitor ....5-2 5.2 Using the MSI Live Update 3 ..........5-3 5.3 Live VGA Drive Update ............5-4 5.4 Live VGA BIOS Update ............
-
Page 82: Rx9550 Series
Chapter 2 RX9550 Series Features & Specifications Quad-Pipe architecture delivers real-time cinematic rendering and animation SMARTSHADER 2.0 technology supports Microsoft DirectX ® ® feature sets, enabling more complex and cinematic-quality lighting effects SMOOTHVISION 2.1 technology delivers the sharpest, clearest textures without sacrificing frame rates 128-bit full floating point precision enables billions of color varia- tions to render the same lighting and effects as Hollywood studios Full AGP 8X support doubles available bandwidth for the most... - Page 83 Introduction Features & Specifications SMARTSHADER - Programmable pixel and vertex shaders - 16 textures per pass - Pixel shaders up to 160 instructions with 128-bit floating point precision - Vertex shaders up to 1024 instructions with flow control - Multiple render target support - Shadow volume rendering acceleration - High precision 10-bit per channel frame buffer support - Supports DirectX...
- Page 84 ATI Radeon 9550 SE GPU TV_Out Connector (S) 128MB DDR RAM DVI-I Connector AGP Interface MSI reminds you... Note that the VGA card shown above may vary from the actual card. For further information, please visit MSI website at http://www.msi.com.tw 2-74...
- Page 85 4. SOFTWARE INSTALLATION ............4-1 5. MSI LIVE UPDATE 3 ............... 5-1 5.1 Installing MSI Live Update 3 with MSI Live Monitor ....5-2 5.2 Using the MSI Live Update 3 ..........5-3 5.3 Live VGA Drive Update ............5-4 5.4 Live VGA BIOS Update ............
- Page 86 ATI Radeon 9550 SE GPU D-Sub Port (DB 15-Pin) 128MB DDR RAM AGP Interface MSI reminds you... Note that the VGA card shown above may vary from the actual card. For further information, please visit MSI website at http://www.msi.com.tw 2-76...
- Page 87 4. SOFTWARE INSTALLATION ............4-1 5. MSI LIVE UPDATE 3 ............... 5-1 5.1 Installing MSI Live Update 3 with MSI Live Monitor ....5-2 5.2 Using the MSI Live Update 3 ..........5-3 5.3 Live VGA Drive Update ............5-4 5.4 Live VGA BIOS Update ............
-
Page 88: Rx9250/Rx9200 Series
Chapter 2 RX9250 / RX9200 Series Features & Specifications Drive one VGA monitor and your TV or VCR simultaneously Includes a simple, forward facing input block with s-video, composite video inputs and stereo audio input THRUVIEW creates live, translucent TV, video and DVD win- dows for easy desktop access New EAZYLOOK™... - Page 89 Introduction Features & Specifications PERFORMANCES (for RX9250 Series) (For Reference Only) Memory Interface: 128-bit Memory Bandwidth: 6.4GB/sec. (This value is for reference only, depending on the type/size of memory implemented) Fill Rate: 0.96 billion texels/sec. Vertices: 60 million/sec. Engine Clock: 240MHz Memory Clock: 200MHz Dual RAMDACs: 350MHz PERFORMANCES (for RX9200 Series)
- Page 90 Chapter 2 RX9250- TD128 Layout ATI Radeon 9250 GPU TV_Out Connector (S) 128MB DDR RAM DVI-I Connector AGP Interface ATI Radeon 9250 GPU DVI-I Connector 128MB DDR RAM TV_Out Connector (S) AGP Interface HDTV intergrated Fan Connector D-Sub Port (DB 15-Pin) Power Connector 2-80...
- Page 91 4. SOFTWARE INSTALLATION ............4-1 5. MSI LIVE UPDATE 3 ............... 5-1 5.1 Installing MSI Live Update 3 with MSI Live Monitor ....5-2 5.2 Using the MSI Live Update 3 ..........5-3 5.3 Live VGA Drive Update ............5-4 5.4 Live VGA BIOS Update ............
- Page 92 D-Sub Port (DB 15-Pin) AGP Interface MSI reminds you... TV Out functions only work through S-video connection. Note that the VGA card shown above may vary from the actual card. For further information, please visit MSI website at http://www.msi.com.tw 2-82...
- Page 93 4. SOFTWARE INSTALLATION ............4-1 5. MSI LIVE UPDATE 3 ............... 5-1 5.1 Installing MSI Live Update 3 with MSI Live Monitor ....5-2 5.2 Using the MSI Live Update 3 ..........5-3 5.3 Live VGA Drive Update ............5-4 5.4 Live VGA BIOS Update ............
- Page 94 D-Sub Port (DB 15-Pin) AGP Interface MSI reminds you... TV Out functions only work through S-video connection. Note that the VGA card shown above may vary from the actual card. For further information, please visit MSI website at http://www.msi.com.tw 2-84...
- Page 95 4. SOFTWARE INSTALLATION ............4-1 5. MSI LIVE UPDATE 3 ............... 5-1 5.1 Installing MSI Live Update 3 with MSI Live Monitor ....5-2 5.2 Using the MSI Live Update 3 ..........5-3 5.3 Live VGA Drive Update ............5-4 5.4 Live VGA BIOS Update ............
- Page 96 Chapter 2 2-86...
-
Page 97: Chapter 3 Hardware Installation
3 3 3 3 3 HARDWARE INSTALLATION This chapter tells you how to install your VGA card into your computer correctly and the function of each connector on the VGA card. Note that your VGA card may not cover all functions mentioned in this chapter. -
Page 98: Card Installation
3.1.1 Installation on new system Remove the computer case. Locate the AGP slot or PCI Express slot on your mainboard. MSI reminds you... Inserting your VGA card into a wrong type of slot will damage your card (refer to your mainboard manual for more information). - Page 99 Remove the computer case. Remove the existing VGA card. Locate the AGP slot or PCI Ex- press slot on your mainboard. MSI reminds you... Inserting your VGA card into a wrong type of slot will damage your card (refer to your mainboard manual for more information).
- Page 100 VGA card. Attach the other ends of the power cord to the power supply connector of the computer. MSI reminds you... The VGA card which is displayed above may appear dif- ferent from the card you purchased.
-
Page 101: D-Sub Port (Db 15-Pin)
Hardware Installation 3.2 D-Sub Port (DB 15-Pin) The VGA card provides a standard D-Sub Port, which allows you to connect a CRT or LCD monitor. Simply plug your monitor cable into the D-Sub Port on your VGA card, and make sure that the other end of the cable is properly connected to your monitor (refer to your monitor manual LCD Monitor CRT Monitor... -
Page 102: Digital Panel Connector (Dvi-I)
Chapter 3 3.3 Digital Panel Connector (DVI-I) The VGA card provides a DVI (Digital Visual Interface) connector which allows you to connect an LCD monitor. The DVI connector provides a high-speed digital interconnection between the computer and its dis- play device. To connect a LCD monitor, simply plug your monitor cable into the DVI connector on the VGA card, and make sure that the other end of the cable is properly connected to your monitor. -
Page 103: Tv_Out Connector (C)
Hardware Installation 3.4 TV_Out Connector (C) The VGA card provides a TV_Out connector for video-out function which allows you to output the image to a TV or video device. Simply plug one end of the RCA cable into the TV_Out connector on the VGA card, and the other end to the video input connector on your TV or video device. -
Page 104: Video_In Connector (C)
Chapter 3 3.6 Video_In Connector (C) The VGA card provides a Video _In connector for video-in function which allows you to input the image from video devices. Simply plug one end of the RCA cable into the Video_In connector on the VGA card, and the other end to the video output connector on your video devices. -
Page 105: Tv_Out Connector (S & C)
Hardware Installation 3.8 TV_Out Connector (S & C) The VGA card provides a 9-pin TV_Out connector (S & C) for video-out function which allows you to output the image to a TV or video device. This type of connector can be used for either RCA cable or S_Video cable if the attached TV-Out 1-to-2 connector is plugged in. -
Page 106: Tv_Out / Video_In Connector (S & C)
Chapter 3 3.9 TV_Out / Video_In Connector (S & C) The VGA card provides a 9-pin TV_Out / Video_In connector (S & C) for video-out / video-in function which allows you to output / input the image to / from a TV or video device. This type of connector can be used for either RCA cable or S_Video cable if the attached TV-Out / Video_In 1-to- 4 connector is plugged in. - Page 107 Hardware Installation 3-11...
- Page 108 Chapter 3 3-12...
-
Page 109: Chapter 4 Software Installation
4 4 4 4 4 SOFTWARE INSTALLATION This chapter describes how to install MSI VGA card software for Windows XP or 2000, including the driver. -
Page 110: Installing The Vga Card Drivers
3. Click ATI VGA Drivers. Follow the on-screen instructions to com- plete the installation. 4. After finishing the installation, restart the computer as instructed. MSI reminds you... If, on your computer, the “Autorun” program does not run automatically, please 1) enable the CD- ROM drive’s auto-detect function from Control... -
Page 111: Browsing The Web
4.3 More Information To browse through the contents on the CD, simply click Browse CD under each tab. You can use the Manual tab to learn more about your MSI products. 1. Insert the CD into the CD-ROM drive and start the Setup program. -
Page 112: Display Adjustment
Display Properties window appears on the screen, select Settings tag and then click Advanced button on the Setting tag. Click here MSI reminds you... The figures in this section are for reference only. The actual information on the Display Properties window may... - Page 113 Software Installation In this section, we list the most important information on how to configure these specific options of the VGA card. Options Version Information tells t h e C a t a l y s t v e r s i o n n u m b e r , 2 D v e r s i o n number and the packag- ing (driver) information.
- Page 114 Chapter 4 Color This tag allows you to adjust the proper values of Gamma, Brightness, and Contrast. Select Desktop or Full Screen 3D first to decide that which mode the new adjustment will take effect. Gamma / Brightness / Contrast sliders allow you to increase or de- crease the value as you desired.
- Page 115 Software Installation Overlay This tag allows you to adjust the proper values of Gamma, Brightness, Contrast, Hue, and Saturation. Brightness allows you to adjust the brightness of the video image. Contrast allows you to adjust the contrast of the video image. Saturation allows you to adjust the vividness of the color.
- Page 116 Chapter 4 VPU Recover VPU Recover allows the ATI display driver to reset the graphics accelerator when it stops responding to com- mands from the display driver. Using VPU Recover the display driver will, in most cases, be able to reset the graphics accelerator without requiring a system restart.
- Page 117 Software Installation 3D --Direct3D-- Click Default button to re- set the Direct 3D settings to the default values. Setting Slider: Moving the slider to the left will maxi- m i z e a p p l i c a t i o n p e r f o r m a n c e , w h i l e movingthe slider to the right will provide excellent...
- Page 118 Chapter 4 SMOOTHVISION(tm) - SMOOTHVISION Improves image quality by removing jagged edges from 3D images, resulting in smoother, more naturallooking objects. Selecting Application Preference will result in high quality images, with negligible reduction in the application’s performance. - SMOOTHVISION slider can be applied using different sample pat- terns and sample points such as 2X, 3X, 4X, 5X or 6X.
- Page 119 Software Installation Support DTX texture formats al- lows applications to use this kind of texture format. There are a few applications that can only support a limited number of texture formats. By selecting Disabled, the driver will not support DTX tex- ture formats, thus reducing the n u m b e r o f t e x t u r e f o r m a t s supported.
- Page 120 Chapter 4 Custom Settings Anisotropic Filtering - Anisotropic Filtering uses a texture filtering technique that blends multiple texture sam- ples together. Selecting Application Preference will result in high quality textures, with a negligi- ble reduction in the ap- plication’s performance - By moving Anisotropic Filtering slider to the right, as the number of...
- Page 121 Software Installation mipmap, delivering the highest quality application experience. Mov- ing the slider to the left selects a lower quality mipmap, delivering the highest application performance. Wait for Vertical Sync This will lower the frame rate of full screen games but reduce the image tearing that can occur with the higher frame rate.
- Page 122 Chapter 4 4-14...
-
Page 123: Msi Live Update 3
5 5 5 5 5 MSI LIVE UPDATE 3 MSI LIVE UPDATE 3 is a useful utility for you to enhance the performance of your MSI mainboards and VGA cards. With its auto-search & scheduling function, the Live Update 3 saves you the efforts &... - Page 124 2. Select /Download/VGA/ on the upper of MSI’s homepage. Click / VGA/Utility/ on the left pane of the web page. 3. Click MSI Live Update to have the programs of MSI Live Update & MSI Live Monitor downloaded. 4. Double-click the downloaded LiveUpdate.exe utility and follow...
-
Page 125: Using The Msi Live Update 3
MSI Live Update 3 5.2 Using the MSI Live Update 3 After the installation is completed, you can launch the MSI Live Update 1) double-clicking the MSI Live Update 3 icon on the desktop; or 2) clicking the Start button , and select Programs / MSI / Live Update 3/MSI Live Update 3. -
Page 126: Live Vga Driver Update
1. To update your VGA driver, click Live VGA Driver on the left pane of the main page. Click here MSI reminds you... The model name and driver/BIOS version appear in the following instructions are for reference only; the actual result should depend on the card you installed. - Page 127 MSI Live Update 3 3. Click the graphic button at the bottom to connect to the MSI Live Update Server. It will automatically connect to the Internet and search for drivers of more updated versions in the database. 4. It may take several minutes to detect the required drivers. Please wait until the detection is completed.
- Page 128 Chapter 5 6. Click the Live Update button on the right side of the table to download and update the driver. All actions will proceed automatically. 7. Follow the on-screen instructions to complete the updating Select a folder to save the driver file Click Next to start installing the VGA Driver...
-
Page 129: Live Vga Bios Update
MSI Live Update 3 5.4 Live VGA BIOS Update MSI reminds you... MSI reminds you... * Note that to use this feature, make sure your operation system is either Windows 2000 or XP. * Reflashing BIOS may take at least 3 minutes. Please do not shut down your computer, or the VGA card may damage. - Page 130 Chapter 5 Select No to keep Select Yes to continue everything unchanged 5. If you click Yes to continue, it will check the information and BIOS version of your VGA card, and list them in a table:...
- Page 131 MSI Live Update 3 6. Click the graphic button at the bottom to connect to the MSI Live Update Server. 7. The MSI Live VGA BIOS will automatically connect to the Internet and search for BIOS of more updated versions in the database of MSI.
- Page 132 Live Update button on the right side of the table to have the new BIOS downloaded and updated automatically. MSI reminds you... Your monitor may go BLANK while the software EEPROM is being erased. Please wait for a while before proceeding to the next step.
- Page 133 MSI Live Update 3 Click Next to continue. It is recommended that you close all programs (by clicking Close all listed programs, and then clicking Next to continue) before updating new VGA BIOS. Click Start to start flashing VGA BIOS.
-
Page 134: Live Utility
MSI’s software in accordance with the system information being detected. Click here first. Click here to connect to MSI Live Update Server. -
Page 135: How To Use The Msi Live Monitor
MSI Live Update 3 5.6 How to Use the MSI Live Monitor MSI Live Update 3 comes with a useful utility, MSI Live Monitor, to help users detect their system information, and search for the up-to-date drivers or BIOS online. To use MSI Live Monitor, follow the instructions shown below. - Page 136 Chapter 5 3. The utility will at first detect your system information in order to search for corresponding downloads from the MSI on-line Searching Click Finish Searching Result Click the Live VGA BIOS / Live VGA Driver Tag or click the listed items on the page to browse the Up-to-date VGA BIOS/ Drivers found by MSI Live Monitor.
- Page 137 MSI Live Update 3 4. Click the item that you would like to download. Click either item to select what you wish to download Click here to download the selected item. 5. Follow the on-screen instructions, and the InstallShield Wiz a rd will guide you through the downloading and installation of the selected new VGA BIOS/Drivers.
- Page 138 Chapter 5 View Last Result MSI Live Monitor provides a shortcut for users to recall the last search result more efficiently. 1. Right-click the MSI Live Monitor icon on the Win- dows system tray in the lower-right corner of the screen.
- Page 139 MSI Live Update 3 Preference MSI Live Monitor provides a scheduling function of automatically search- ing for the latest BIOS/Drivers on-line in a set period or condition. 1. Right-click the MSI Live Monitor icon on the Win- dows system tray in the lower-right corner of the screen.
- Page 140 Start Up Function MSI News Color Selections 5. To contact MSI for further technical support or to get the informa- tion about the MSI Live Monitor utility, click About and Support on the left pane of the window. Click here...
- Page 141 2. Select FAQ from the shortcut menu. Select FAQ 3. To find the answers to your questions in MSI FAQ database, try selecting a particular category relevant to your questions. Select the...
-
Page 142: Contact Us
Chapter 5 5.7 Contact Us Users will be able to contact MSI for further information or help by click- ing Contact us on the left pane of the window. Click here If you need any technical support, it is strongly recommended that you... -
Page 143: Twin-Bios™ (Optional)
MSI Live Update 3 5.8 Twin-BIOS™ (Optional) The diagram below describes the procedures in brief: BIOS I Return to BIOS I Run the flash utility BIOS II Boot up with BIOS II Successfully updated! OOPS! Failed... 5-21... - Page 144 Chapter 5 Our products are under continual improvement, and there may be a later version of the BIOS to solve the existing problems on displays or the installation. When you use the flash utility* to update the BIOS on the card, it is inevitable that your devices may encounter some unex- pected risks, such as power interruption, during the updating process.
- Page 145 6. Replace the case and restart the computer. MSI reminds you... * To update the BIOS, you must use the special flash utility (MSI Live Update Series) provided by MSI only, which can fully support the Twin-BIOS technology. If the third party’s utility is used in the updating procedure, it will erase the data in BIOS II.
- Page 146 Chapter 5 5-24...
-
Page 147: Chapter 6 Troubleshooting
6 6 6 6 6 TROUBLESHOOTING TROUBLE SHOOTING, provides you with the gen- eral methods to solve problems that might hap- pen to your system or VGA card. -
Page 148: General Help
Chapter 6 6.1 General Help Q: Where can I find more information about my VGA card? Please visit our Web site at http://www.msi.com.tw Q: How do I know the driver version of my VGA card? How do I update it? - Page 149 Troubleshooting 6.2 Install InterVideo WinDVR Q: My monitor displays nothing after the system boots up. Your VGA card may not be installed correctly. Please check the installation procedure described in Chapter 2 Hardware Installation. Make sure that your monitor are connected to the VGA card properly, and the power is turned on.
- Page 150 MSI VGA card, which is on the software CDs in your VGA card package, you will see the MSI Information tab in the Display Properties window. Click 4x under AGP Information to enable this function (see instructions in Chapter 3 Software Installation).
- Page 151 Troubleshooting Q: The DVD playback is of poor quality (skipping frames, color blocks and so on). Why? Change the refresh rate, color and resolution settings to proper values. Enable the DMA mode for your DVD drive. However, not all DVD drives support this function.
- Page 152 Chapter 6...
- Page 153 Troubleshooting...
- Page 154 Chapter 6...
Need help?
Do you have a question about the MS-8916 and is the answer not in the manual?
Questions and answers