Table of Contents
Advertisement
Quick Links
Advertisement
Table of Contents

Subscribe to Our Youtube Channel
Related Manuals for smirthwaite Strato


Summary of Contents for smirthwaite Strato
- Page 1 User Manual Strato P a g e...
-
Page 2: Table Of Contents
Additional Warnings and Safety Notices ................7 Components/Key Parts ......................8 Key Parts ..........................8 Size 1 and 2 ........................8 Size 3, 4 and 5 ......................9 Strato Hi-Lo ........................9 Strato Configurations ......................10 Packaging .......................... 11 Installation ........................... 12 Adjustments ........................12 Seat Height ......................... - Page 3 CONTENTS Extension Handle ......................21 Attachment ........................21 Adjustment ........................21 Handy Hooks ........................22 Attachment ........................22 Adjustment ........................22 Laterals ..........................23 Lateral Width ....................... 23 Lateral Height ......................23 Technical Specification ......................24 Chair Dimensions ......................24 Environmental - Storage and Operating Conditions ............
-
Page 4: Safety Instructions And Warnings
If you require larger print or videos – these are available on the Smirthwaite website: www.smirthwaite.co.uk/product/Strato/ The information in this manual is important for the safety of anyone near the Strato chair and must be read and understood to help prevent injuries. It is also crucial to the proper operation and maintenance of the Strato chair. -
Page 5: Symbols Used
European Community 1.4 Contraindications/Limitations There are no known “contraindications” associated with the usage of the Strato chair and its accessories, provided they are used as per manufacturer’s recommendations and guidelines. Smirthwaite Ltd. does not recommend a required number of care givers for the use of our... -
Page 6: Intended Use
Strato. The Strato is designed to be checked and adjusted by a therapist to ensure the child is seated correctly. 1.6 Chair Operating Environment The Strato chair is suitable for use within the professional health care facility environment as well as the home health care environment. -
Page 7: Chair Essential Performance
• Smirthwaite Ltd will not accept liability for any injury or damage incurred through such malpractices. Any repairs required must be carried out by Smirthwaite Ltd authorised personnel. -
Page 8: Components/Key Parts
2 minutes If in any doubt, always seek advice. Always turn hand wheels, levers and screws clockwise to tighten or anti-clockwise to loosen. Conveniently packaged in a single box the following components are included with your new Strato chair: Size 1 and 2... -
Page 9: Size 3, 4 And 5
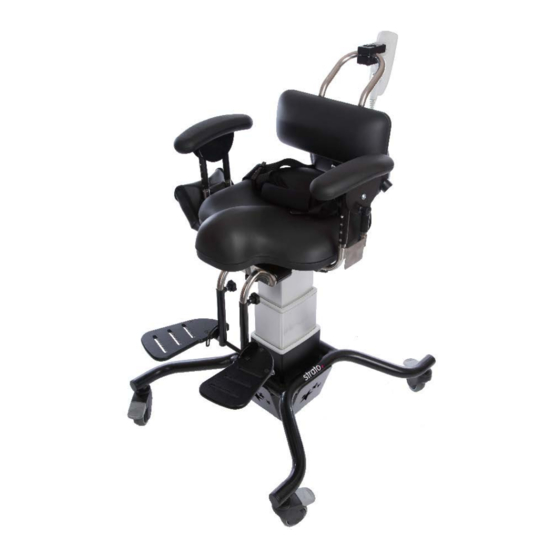
COMPONENTS/ KEY PARTS Size 3, 4 and 5 Item Description Handle Handy Hook Lumbar Prompt Pelvic Strap Armrest Personal Pocket Seat Lever Footrest Footplate Castor Strato Hi-Lo Item Description Seat Capsule Electric Hi-Lo Chassis Armrests Lumbar Support Footrest Battery Pack Tilt-in-space Stop... -
Page 10: Strato Configurations
Please see above to familiarise yourself with the components of the Strato chair. The image above shows the key components of the Strato chair. If you have not received all the components contact your local Smirthwaite dealer immediately – contact details are provided on the last page of this manual. -
Page 11: Packaging
COMPONENTS/ KEY PARTS 2.3 Packaging • When delivered, the chair will be supplied fully assembled except for the attachment of any special accessories ordered. • If your order has been supplied as a custom kit, please ensure you follow both the instructions documented in this IFU and any additional instructions supplied. -
Page 12: Installation
INSTALLATION 3.0 INSTALLATION When delivered, the chair will be supplied fully assembled except for the attachment of any special accessories ordered. Always turn hand wheels, levers and screws clockwise to tighten or anti-clockwise to loosen. 3.1 Adjustments Seat Height 3.1.1.1 Size 1 and 2 •... -
Page 13: Seat Angle
INSTALLATION 3.1.1.3 Strato Hi-Lo • The height of the chair can be altered by using the ‘Actuator Control Pad’ which is hooked onto the push handle of the chair. This pad can be unhooked and can be moved to a more suitable position if required. -
Page 14: Lumbar Prompt
INSTALLATION 3.1.2.2 All Other Sizes NOTE: The user should NOT be seated in chair when adjusting the angle. Please keep hands clear of area (B). Ensure memory stop is at maximum setting. • Hold handle (C) • Loosen lever lock (D) •... - Page 15 INSTALLATION 3.1.3.2 Depth • Loosen handwheels (B). • Slide lumbar prompt tubes (C) in or out to the desired position. • Re-tighten handwheels (B). 3.1.3.3 Attachment • Insert ends of lumbar prompt tube (C) into receivers (D). • Tighten handwheels (B). •...
-
Page 16: Armrests
INSTALLATION Armrests Three adjustments can be made to the armrests; height, width and angle. 3.1.4.1 Height • Depress spring pins (A). • Slide the armrest (B) up or down to the desired position. • Ensure both spring pins are re- engaged. -
Page 17: Pelvic Strap (4 Point)
INSTALLATION Pelvic Strap (4 Point) 3.1.5.1 Attachment • Remove the lumbar prompt (see 6.2) • Thread the lower ends of the lumbar prompt tubes (D) through the looped ends (B) of the pelvic strap (A) • Slide up locating rings (C) below looped ends (B) •... -
Page 18: Footrest (All Other Sizes)
INSTALLATION Footrest (All Other Sizes) 3.1.7.1 Height • Loosen handwheels (B) • Depress pins (D) if needed • Slide footrest up or down to the desired position • Re-tighten handwheel (B) The height adjustment is fitted with a maximum height stop. When the footrest is extended downwards to its maximum, two pins locate into holes in the rear of the tubes. -
Page 19: Compatible Accessories
COMPATIBLE ACCESSORIES 4.0 COMPATIBLE ACCESSORIES The Strato chair comes with a variety of compatible accessories. These accessories and part codes are listed below (Table 1); Size 1 Size 2 Size 3 Size 4 Size 5 Accessories Code Code Code Code... -
Page 20: User Operation
COMPATIBLE ACCESSORIES User Operation • To apply the brakes, simply push the lever (C) downwards. • The brakes can then be locked on by parking the lever – simply pull the lever toward the seat cushion when it has reached its fully downward position. -
Page 21: Extension Handle
COMPATIBLE ACCESSORIES 4.3 Extension Handle Attachment • Locate clips (A) and push them onto the existing handle. • Place extension handle (B) into place, lining up the holes in the handle and the holes in the clips. • Secure in place by tightening the hex bolt (C) on both sides. -
Page 22: Handy Hooks
COMPATIBLE ACCESSORIES 4.4 Handy Hooks Attachment • Locate Handy Hooks (A) and push them onto the existing handle in desired position. • Secure in place by tightening the hex bolt (C) on both sides. Adjustment • Locate hex bolts (C) on both clips (A). -
Page 23: Laterals
COMPATIBLE ACCESSORIES 4.5 Laterals Lateral Width • Locate handwheels (A) on the rear of the backrest. • Loosen handwheels (A). • Adjust position of laterals. • Tighten handwheels (A) to secure laterals in place. Lateral Height • Locate handwheel (B) on the rear of the backrest. -
Page 24: Technical Specification
TECHNICAL SPECIFICATION 5.0 TECHNICAL SPECIFICATION 5.1 Chair Dimensions Seat Depth Armrest Height Seat Width Armrest Angle Seat Height Seat to Footrest Height Seat Angle Footprint Distance Between Armrests The diagram above shows the relevant dimensional sizes of the chair. Below (Table 3) is a table containing the dimensions of each size. -
Page 25: Environmental - Storage And Operating Conditions
The Strato chair suffers little from any effects of lint, dust and light. • Lint – Due to there being no mechanical or electrical mechanisms on the Strato chair, lint would not affect the chair working. •... -
Page 26: Normal Operating Conditions
It is recommended that the chair is stored in a cool, dry place out of direct sunlight. If cleaning is required after storage, please see section 7.0 Cleaning of the user manual for instructions. Shipping and storage conditions are also contained on Strato Box Label:... -
Page 27: Standards Applied
TECHNICAL SPECIFICATION 5.3 Standards Applied The standards that have been applied to the device are as follows: • BS EN ISO 12182:2012 (Assistive products for persons with disability. General requirements and test methods). • IEC 62366:2015 (Application of usability engineering to medical devices). •... -
Page 28: General Inspection And Maintenance
• The battery will become fully charged in approximately 6 hours. 6.3 Service Interval The Strato chair should be serviced every 1 year(s). Servicing must only be undertaken by a Smirthwaite Ltd. service engineer, or by a Smirthwaite Ltd. trained representative. -
Page 29: Nominal Service Life
• Use by a client who is extremely active, either voluntarily or involuntarily. 6.5 Extending Nominal Service Life At Smirthwaite Ltd. we are proud to produce products that have a reputation for quality and durability. We believe our products have the potential to provide benefits to our clients beyond the nominal service life documented above. -
Page 30: Final Inspection
GENERAL INSPECTION AND MAINTENANCE 6.7 Final Inspection When the service is complete: • Remove any waste created as part of the service from the site. • Confirm with the operator if the chair is safe to use and that it has been left in a working state. -
Page 31: Cleaning
7.1 General cleaning The exterior of the Strato chair can be cleaned using a damp soapy cloth for general cleaning duties. Please ensure the cloth is damp and not wet. Ensure the exterior of the chair is dry after cleaning. -
Page 32: Service Documentation
SERVICE DOCUMENTATION 8.0 SERVICE DOCUMENTATION 8.1 Documentation/ Records It is the responsibility of the current equipment owner to ensure the Service Manual (As well as any further manuals for accessories fitted to the equipment) are handed over to the new owner at the time of exchange/sale. -
Page 33: Service Record History
SERVICE DOCUMENTATION 8.2 Service Record History Complete this record after each service, repair inspection and/or maintenance. * Photocopy additional pages as required * Product Information Model Size Date of Manufacture Serial Number Service & inspection record form: Date Procedure Service Personnel... -
Page 34: Warranty
WARRANTY 9.0 WARRANTY Smirthwaite Ltd warrants the products detailed on your order to be free from defects in materials and workmanship for a period of 2 years from date of delivery. If a fault develops during the period, please call Customer Services by email or telephone 01626 835552 who will advise you on the best course of action. - Page 35 Smirthwaite Ltd, 16 Wentworth Road • Heathfield • Newton Abbot • Devon • TQ12 6TL Part Number: 999-1-05 / Rev: 1 / Date: Jun 21...
Need help?
Do you have a question about the Strato and is the answer not in the manual?
Questions and answers