Table of Contents
Advertisement
Quick Links
Advertisement
Table of Contents

Related Manuals for Perenio Power Link


Summary of Contents for Perenio Power Link
- Page 1 Installation and Operation Manual for Perenio® Power Link Devices July, 2021...
-
Page 3: Introduction
Copyright of ©Perenio IoT spol s r.o. All rights reserved. The Perenio® trademark is owned by Perenio IoT spol s r.o. (hereinafter referred to as the Perenio IoT). All other similar trademarks and names, as well as logos and other symbols are the property of their respective owners*. -
Page 4: Responsibility And Technical Support
Perenio IoT reserves the right to modify the device and make corrections or changes to this document without prior notice of the User, and shall not be responsible for any... -
Page 5: Conformance To Standards
To protect the environment and human health, please dispose of used electrical and electronic equipment according to approved safe disposal guidelines ©Perenio IoT spol s r.o. All rights reserved Doc Version: 1.4.3 Page 5 of 49... - Page 6 Details on available Certificates are specified in Section 6 of the present document. For copies of Certificates and Reports, please visit a corresponding Section at perenio.com. Doc Version: 1.4.3 ©Perenio IoT spol s r.o. All rights reserved Page 6 of 49...
-
Page 7: Table Of Contents
2.1 Initial Installation and Configuration ............19 2.1.1 Powering On the Device ..............19 2.1.2 Selection of the Connection Method ............ 19 2.1.3 Activation in the Perenio Smart Mobile Application ........ 20 2.1.4 Additional Settings ................24 2.1.5 Activation in Apple HomeKit ..............26 2.1.6 Management Through Google, Yandex and Amazon Apps...... - Page 8 Connection to the Perenio Smart Mobile App A. LOGIN TO THE EXISTING USER ACCOUNT ............20 B. CONNECTION TO THE CONTROL GATEWAY/IOT ROUTER ......... 20 Doc Version: 1.4.3 ©Perenio IoT spol s r.o. All rights reserved Page 8 of 49...
-
Page 9: General Description And Specifications
1 General Description and Specifications 1.1 General Purpose The Perenio® Power Link device is designed to monitor, control and automatically cutoff power consumption by electrical equipment, as well as notify users of overloads. This power plug is equipped with an autonomous timer that saves User settings even... -
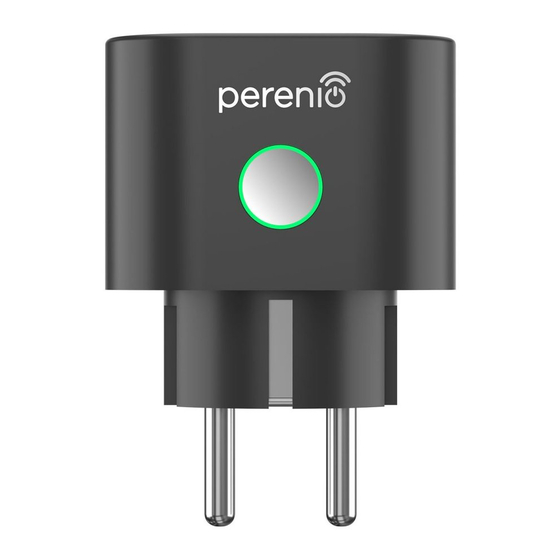
Page 10: Figure 2 - Buttons, Ports And Indicators
It is used to power on and off the device, as well as to Button switch to different operating modes, and connect to the Perenio Smart Mobile App via the Control Gateway/IoT Router LED Indicator Light ring around the button perimeter where color... - Page 11 NOTE. If the device is activated in the Perenio Smart app, you will not be able to connect it via Bluetooth in Apple HomeKit until it is switched to the MFi mode.
-
Page 12: Technical Specification
Receiver Sensitivity: -95dBm Antenna Gain: -2dBi Repeater Function Operating Frequency 2,400MHz to 2,485MHz Server Remote Power Input voltage: AC 180V to 250V Max current: 16A Doc Version: 1.4.3 ©Perenio IoT spol s r.o. All rights reserved Page 12 of 49... - Page 13 Data Protection GDPR Compliance NOTE. The firmware update will occur within twenty-four (24) hours after connecting the Power Link device to the mobile application, if there is an uninterrupted Internet connection. ©Perenio IoT spol s r.o. All rights reserved Doc Version: 1.4.3...
-
Page 14: Scope Of Delivery
Installation and Operation Manual for Perenio® Power Link Devices 1.3 Scope of Delivery The following items and accessories are supplied within the Perenio® Power Link package: 1. Power Link device (1 шт.) 2. Quick Start Guide (1 pc.) 3. Warranty Card (1 pc.) 4. - Page 15 ATTENTION! Faulty wiring and excessive mains voltage can cause electric shock. There is a danger of burns because the device becomes hot during operation! Let the device cool down completely. ©Perenio IoT spol s r.o. All rights reserved Doc Version: 1.4.3 Page 15 of 49...
- Page 16 Warnings related to non-compliance with electrical safety rules when connecting devices Perenio® Power Link smart plug is designed for use in domestic areas and connection of general-purpose devices thereto. When several power consumers are plugged into the smart plug at the same time, the following parameters must be considered: 1.
-
Page 17: Standalone Operation Of Perenio® Devices
1.6 Standalone Operation of Perenio® Devices The Control Gateway/IoT Router in not necessarily required for all Perenio® devices in order to alert Users on potentially dangerous situations Thus, due to integration with Apple HomeKit the power plug can be used autonomously. -
Page 18: Installation And Setup
Perenio® Power Link Devices 2 Installation and Setup Installation of the Perenio® Power Link device is not required, since it shall be just plugged into the electrical socket to start operation. NOTE. It is not recommended to install the device in areas with a high level of noise and a high-frequency interference. -
Page 19: Initial Installation And Configuration
Bluetooth (MFi) Mode that is used for activation in Apple HomeKit without the Perenio® Control Gateway or the IoT Router. When you first switch on the Power Link device, or did not activate it in the Perenio Smart App through the Control Gateway or the IoT Router, the default mode will be the Bluetooth (MFi) Mode. -
Page 20: Activation In The Perenio Smart Mobile Application
Release the button and wait for the indicator to start blinking blue. 2.1.3 Activation in the Perenio Smart Mobile Application To connect the Power Link device through the Control Gateway or the IoT Router, the User shall perform the following steps: 1. - Page 21 Press and hold the reset button until the LED Indicator starts blinking violet; NOTE. Several smart plugs and other Zigbee devices may be connected to the Control Gateway/IoT Router at once. ©Perenio IoT spol s r.o. All rights reserved Doc Version: 1.4.3 Page 21 of 49...
- Page 22 Installation and Operation Manual for Perenio® Power Link Devices After the Power Link device being detected, click on “DONE”; To complete the connection process, the following shall be entered: Device name; Room of installation; Image (optional). NOTE. All the above data may be entered or edited later in Settings Section of the Power Link device.
-
Page 23: Figure 6 - Add New Device (Power Plug) Procedure
Installation and Operation Manual for Perenio® Power Link Devices The entire process of the Power Link connection in the Mobile App is shown below. – Add new device (Power Plug) procedure Figure 6 ©Perenio IoT spol s r.o. All rights reserved Doc Version: 1.4.3... -
Page 24: Additional Settings
Installation and Operation Manual for Perenio® Power Link Devices 2.1.4 Additional Settings After activation of the power plug in the Perenio Smart application, the User may perform the following settings remotely: • Change or upload an image for the Power Link device to make it easier to recognize it in the list of connected devices;... - Page 25 Perenio® Power Link Devices Setting the Power Range The Power Link device has a peak power of 4,000W. However, the User may set a custom maximum value so that the supply or power to the power plug will be automatically blocked and the User will be notified accordingly when this set limit is exceeded.
-
Page 26: Activation In Apple Homekit
Amazon Alexa, it must be previously activated in the Perenio Smart application (See par.2.1.3 above). NOTE. When activating the Power Link in Google Home, Yandex Smart Home or Amazon Alexa, the User shall follow instructions specified in corresponding Google and Yandex applications or uploaded at perenio.com/faq. -
Page 27: Power Link Control Panel
Installation and Operation Manual for Perenio® Power Link Devices 2.2 Power Link Control Panel The Power Link device control panel is displayed when you click on its image in the list of connected devices in the “Devices” tab. In this control panel, the User may perform the following actions: •... -
Page 28: Viewing Energy Statistics
For this purpose, you need to go to the “Calendar” in the upper left corner of the Statistics screen and select the required days for comparison. Doc Version: 1.4.3 ©Perenio IoT spol s r.o. All rights reserved Page 28 of 49... -
Page 29: Setting The Countdown Timer
To change the timer settings, click on the settings icon in the “Settings” field of the Power Link device control panel (See above). The screen for selecting time and the device status will be displayed (See left). -
Page 30: Setting Scheduled Timers
NOTE. Available options to set timers depend on the selected action for the power plug (turning on or off). Setting scheduled timer to turn on the Power Link 1. In the “Add scheduled event” screen select the power type – “Turn on”. - Page 31 A maximum of eight (8) weekly timers can be activated at a time. Setting the scheduled timer to turn off the Power Link 1. In the “Add scheduled event” screen, select the power type – “Turn off”. ©Perenio IoT spol s r.o. All rights reserved Doc Version: 1.4.3...
- Page 32 6. Activate the timer in the “Scheduled timer” tab. 7. The User may make changes to the created timer by clicking on it in the “Scheduled timer” tab. Doc Version: 1.4.3 ©Perenio IoT spol s r.o. All rights reserved Page 32 of 49...
-
Page 33: Event History
NOTE. The number of days available for viewing in the event history depends on the type of subscription (for a free subscription - 7 days). ©Perenio IoT spol s r.o. All rights reserved Doc Version: 1.4.3 Page 33 of 49... -
Page 34: Device Scenarios
2. In the window that opens, select a suitable scenario template from 2 (two) suggested ones. NOTE. If one of the devices required to create and activate the scenario is absent, the “DEVICES MISSING” indicator will light up. Doc Version: 1.4.3 ©Perenio IoT spol s r.o. All rights reserved Page 34 of 49... - Page 35 “Next” button. Select the action “Turn on/off the power”, select the power plug and click “Next”. Enter the name of the scenario and click “Save”. ©Perenio IoT spol s r.o. All rights reserved Doc Version: 1.4.3 Page 35 of 49...
- Page 36 “Opened/Closed” state and click “Next”. Select the action “Turn on/off the power”, select the power plug and click “Next”. Enter the name of the scenario and click “Save”. Doc Version: 1.4.3 ©Perenio IoT spol s r.o. All rights reserved Page 36 of 49...
- Page 37 To stop a running scenario just click on the “Stop” button. Deleting a scenario To delete a scenario, click on the settings icon in the upper right corner of the scenario control panel. ©Perenio IoT spol s r.o. All rights reserved Doc Version: 1.4.3 Page 37 of 49...
-
Page 38: Changing The Room Or Location For The Power Plug
NOTE. A deleted scenario cannot be recovered so if it is accidentally deleted it must be recreated. 2.3 Changing the Room or Location for the Power Plug When using the Power Link device, it may be necessary to change its installation area. The following options are possible: 1. Change the room/location (The... -
Page 39: History And Push-Notifications
NOTE. To check that the Power Link device was successfully disconnected, you should update the list in the Devices tab (Pull the screen down until the progress icon appears and the data is updated). If the Power Link device is disconnected, it will disappear from the list of connected devices. -
Page 40: Led Indication Of Loads And Overload Protection
Disarmed mode. 2.5 LED Indication of Loads and Overload Protection The Power Link device may operate under power of up to 4,000 Watts. Changes in the power level will be displayed in the mobile application, as well as indicated by different colors of the Power Button LED. - Page 41 Installation and Operation Manual for Perenio® Power Link Devices The Power Link device is equipped with overvoltage and overpower protection, as well as protection from overheating. When this protection is activated, the LED Indicator of the Power Button starts blinking red.
-
Page 42: Maintenance And Repair
In the case of warranty repairs or replacement, the User shall provide the Seller with the sales receipt and the purchased device. For details on the replacement and repairs of the Perenio® Power Link device, please contact your local Company representative or the Tech Support Department at perenio.com. -
Page 43: Warranty Obligations
LIMITATION OF LIABILITY Perenio® devices SHALL NOT BE SUBJECT TO a free warranty service in the case of identification of at least one of the following damages or defects: ©Perenio IoT spol s r.o. All rights reserved Doc Version: 1.4.3... - Page 44 CONSEQUENTIAL DAMAGE OR LOSS INCLUDING BUT NOT LIMITED TO COMMERCIAL LOSS, LOSS OF PROFITS, LOSS OF CONFIDENTIAL OR OTHER INFORMATION, AS WELL AS DAMAGES CAUSED BY BREAKS IN COMMERCIAL OR PRODUCTION ACTIVITIES DUE Doc Version: 1.4.3 ©Perenio IoT spol s r.o. All rights reserved Page 44 of 49...
- Page 45 ©Perenio IoT spol s r.o. All rights reserved Doc Version: 1.4.3 Page 45 of 49...
-
Page 46: Storage, Transportation And Disposal Of Devices
Perenio® Power Link Devices 5 Storage, Transportation and Disposal of Devices The Perenio® Power Link device may be shipped by any kind of covered vehicles (by rail, or road or in sealed heated airplane compartments, etc.) in accordance with the requirements of current regulatory documents applicable to fragile goods sensitive to moisture. -
Page 47: Other Information
RF Exposure Test Report #IP19102934 as of October 22, Declarations, Reports 2019; Radio Test Report #IP19102934 as of October 22, 2019. Addresses of Service Centers are available at perenio.com in the ‘Support’ Section. ©Perenio IoT spol s r.o. All rights reserved Doc Version: 1.4.3 Page 47 of 49... -
Page 48: Troubleshooting
Installation and Operation Manual for Perenio® Power Link Devices 7 Troubleshooting Table below shows typical errors and problems that may occur in the process of connection and configuration of the Power Link device. Table 4 – Typical Errors and Troubleshooting Methods Item Problem... -
Page 49: Glossary
80 mm and solid bodies larger than 12 mm. No moisture protection Made for iPhone/iPod/iPad Perenio Smart Software developed by Perenio IoT for remote control of wireless Cameras from smartphones A class of plastic that provides for self-extinguishing of the UL94-V0 material within 10 seconds on a vertically mounted sample.
Need help?
Do you have a question about the Power Link and is the answer not in the manual?
Questions and answers