Table of Contents
Advertisement
Quick Links
Advertisement
Table of Contents

Related Manuals for Dive Rite O2PTIMA CM


Summary of Contents for Dive Rite O2PTIMA CM
- Page 1 USER MANUAL October 2020 – Rev C...
- Page 2 This is the user manual for the Dive Rite O2ptima CM eCCR rebreather. This user manual is proprietary and copyright Lamartek, Inc. 2020. It may not be reproduced, changed, or distributed without authorization from Lamartek, Inc. All information contained in this manual has been carefully reviewed and is believed to be accurate, however it is subject to change.
-
Page 3: General Safety Statements And Warnings
General Safety Statements and Warnings DO NOT use the O2ptima CM without successfully completing an O2ptima CM specific training program. Training on previous versions of the back- mounted O2ptima is not sufficient for diving the O2ptima CM. ... -
Page 4: Table Of Contents
Installing the Water Trap Tubes ..................... 18 How to Install a Micropore ExtendAir Cartridge ................19 How to Pack the Scrubber ......................20 Installing the Scrubber End Cap & Water Trap ................23 October 2020 © Lamartek, Inc. dba Dive Rite... - Page 5 Appendix I: Checklists ..........................44 Assembly Guide Checklist ......................45 Survival Checklist ........................... 46 Pre-flight Checklist ......................... 47 Post Dive Checklist ......................... 48 Appendix II: Galvanic Oxygen Sensors Applied to Closed Circuit Rebreathers ........49 October 2020 © Lamartek, Inc. dba Dive Rite...
-
Page 6: Introduction
At Dive Rite, we understand that one size does not fit all, so in addition to the standard O2ptima CM features there are a number of options to ensure a proper fit for any diver and mission. Contact Dive Rite or visit www.diverite.com... -
Page 7: System Overview
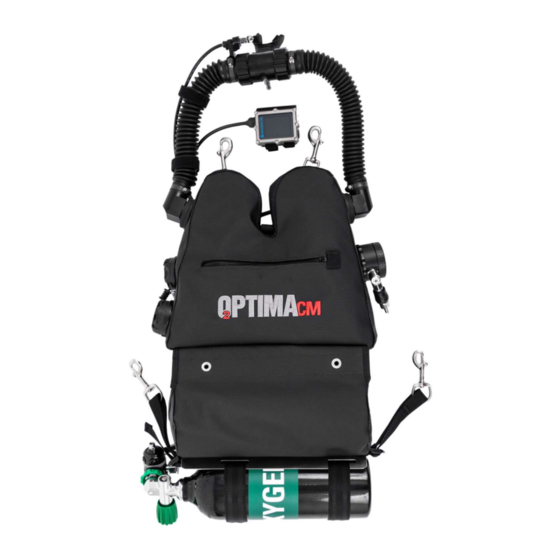
System Overview The O2ptima CM is a chest mounted electronically controlled, constant PPO2, fully closed circuit rebreather (eCCR). It has built-in decompression calculation and mixed gas capabilities. The following features come standard on the unit: Chest mounted counterlungs with 6 Liter total loop volume ... -
Page 8: The Breathing Loop
The Breathing Loop The O2ptima CM incorporates a chest mounted, dual counterlung design. The breathing loop consists of the DSV, breathing hoses and hose fittings, inhalation and exhalation counterlungs, scrubber canister, canister end cap, and electronics head. Gas flows from the diver—to the right counterlung—through the scrubber canister—to the left counterlung—back to the diver. -
Page 9: Component Features & Functions
Component Features and Functions Counterlungs The O2ptima CM uses two integrated, chest mounted counterlungs. The counterlung position keeps them as close to the diver’s lung centroid as possible providing excellent breathing characteristics in a variety of diver positions. The counterlungs consist of an abrasion resistant outer bag and removable welded polyurethane inner bladders. -
Page 10: Automatic Diluent Addition Valve (Adv)/Manual Addition Valve (Mav)
The ADV/MAV comes with a standard LP inflator hose fitting to allow the use of any off-board diluent gas supply. For dives exceeding 130ft/40m, Dive Rite recommends upgrading this fitting to a high flow quick disconnect QC-6 fitting. Contact Dive Rite for details. -
Page 11: Scrubber Canister
OPV properly so that buoyancy shifts will be kept to a minimum without any diver action. The OPV is also used for de-watering the loop. This procedure will be covered in your O2ptima CM class. Scrubber Canister The scrubber canister contains the scrubbing media that removes CO2 from the breathing loop. -
Page 12: Electronics Head
Oxygen Sensors The O2ptima CM uses four oxygen sensors. These sensors are threaded into the sensor disk mounted inside the electronics head. Dive Rite uses both Analytical Industries, Inc. and American Sensor Technologies, Inc. type R22D sensors. -
Page 13: Controller
For detailed information on the DiveCAN Petrel controller, please see the Shearwater Petrel DiveCAN Rebreather Controller Model Operations Manual. Dive Rite now offers an optional Shearwater NERD controller for the O2ptima CM which allows full set- point control without a Petrel 2 controller. Contact Dive Rite for more information. -
Page 14: Hud
The OPV should be inspected for bubbling during the S-drill at the beginning of the dive. The first stage needs to be serviced annually by an Authorized Dive Rite service center or directly by Dive Rite. Call Dive Rite directly (1-800-495-1046) or email support@diverite.com... -
Page 15: Cylinders & Valve
Braided nylon Airflex LP hoses are used for oxygen gas supply on the O2ptima CM. Airflex hoses are flexible, yet tough. The hose lengths are optimized for streamlined routing. A small button SPG is included to monitor oxygen tank pressures. A BAR gauge is used to help simplify gas consumption calculations. -
Page 16: Micropore Extendair Cartridge Overview
All of the air would flow down those five straws, and none of the air would flow through the other 45. The same thing would happen if you blew air into just one side of an ExtendAir® cartridge canister: all of the air would flow through that side only. October 2020 © Lamartek, Inc. dba Dive Rite... - Page 17 ExtendAir® Cartridge (EAC) is relatively simple, and takes seconds to perform. The O2 injection tube runs through the center of the EAC and with the use of a plug any possibility of “CO2 Channeling” is prevented. October 2020 © Lamartek, Inc. dba Dive Rite...
-
Page 18: Assembling The O2Ptima Cm
Assembling the O2ptima CM This section will explain basic assembly procedures of the O2ptima CM. These instructions will serve as a guideline for correct initial assembly as well as disassembly necessary for transportation or maintenance. Importance of Checklists Many rebreather accidents and fatalities could have been prevented with the use of assembly and pre- dive checklists. -
Page 19: How To Install A Micropore Extendair Cartridge
CO2 breakthrough. Install the cartridge by sliding it all the way into the canister (See Figure Figure 2 - Installing EAC Figure 2 – Installing ExtendAir Cartridge October 2020 © Lamartek, Inc. dba Dive Rite... -
Page 20: How To Pack The Scrubber
Dive Rite includes a filter disc that should be used when packing the scrubber with granular absorbent. This is to reduce the amount of dust that reaches the head and the rest of the breathing loop. It is placed in the bottom of the scrubber body, underneath the stainless steel mesh screen. - Page 21 (See Figure 7). If it is not, add or remove absorbent and relevel until it is. Note—the wire handle on the top plate is only for removing the plate. It is not a carry handle for the scrubber. October 2020 © Lamartek, Inc. dba Dive Rite...
- Page 22 Clean up any excess absorbent dust before installing the scrubber canister. The dust will quickly react with any exposure to water and can create a caustic solution in the breathing loop. October 2020 © Lamartek, Inc. dba Dive Rite...
-
Page 23: Installing The Scrubber End Cap & Water Trap
If the flat seal must be removed, reinstall the clean and lightly lubricated seal by pressing into place on opposite sides and then slowly, working back and forth, flattening it into the groove (See Figure 12). Figure 12 - Inserting Flat Seal October 2020 © Lamartek, Inc. dba Dive Rite... -
Page 24: Installing The Electronics Head
Figure 14 - Locked Position Installing the Electronics Head Check that the orange electronics head O-rings and flat seal are clean and lubricated. Dive Rite recommends lubricating these seals with Tribolube 71 grease. Confirm that the small orange O-ring is in place on the premix tube. The O-ring should be above the sensor disk. - Page 25 (See Figure 16), pushing the head into position, and then rotating clockwise until the head arrow is aligned with the “LOCKED” position (See Figure 17). Figure 11 – Installing Electronics Head Figure 17 - Locked Position Figure 128 – Complete Scrubber October 2020 © Lamartek, Inc. dba Dive Rite...
-
Page 26: Installing The Scrubber Assembly
With the canister in place, confirm that the fitting O-rings are present, clean, and lightly lubricated. Press the fittings into place, and then tighten the threaded rings. (See Figure 20). Figure 20 - Scrubber Canister Installed October 2020 © Lamartek, Inc. dba Dive Rite... -
Page 27: Mounting The Electronics/Battery Canisters
Figure 22 – Stowing Excess Cable Installing the Loop Hoses There are two hoses that connect the DSV to the counterlungs to complete the breathing loop. Each hose has counterlung fittings attached to the end. October 2020 © Lamartek, Inc. dba Dive Rite... -
Page 28: Installing The Dsv
Once you have confirmed proper mushroom valve function, ensure that the O-rings and O-ring sealing surfaces are clean and lightly lubricated (See Figure 25) and then install the DSV. Figure 25 - Lubricate DSV Sealing Surfaces October 2020 © Lamartek, Inc. dba Dive Rite... -
Page 29: Installing The Oxygen Cylinder, Regulator And Hoses
It should be oriented with the white locking buttons at the bottom with the DSV in the diver’s mouth. The lever should also point down when the DSV is closed. Orientation of the DSV is critical as it determines the gas flow direction through the loop. The O2ptima CM will not function correctly if the DSV is reversed. - Page 30 “Y” block as shown in Figure 28. Ensure that the second black hose is plugged into the Oxygen Manual Add Valve (MAV). October 2020 © Lamartek, Inc. dba Dive Rite...
- Page 31 Figure 28 – Oxygen Hose Routing October 2020 © Lamartek, Inc. dba Dive Rite...
-
Page 32: Basic Operation & Use
Harness Attachment The O2ptima CM attaches using two bolt snaps on the shoulders and two bolt snaps on the waist. It may be worn with any harness system that can allow a high shoulder mounted D-ring on the top of each shoulder, as well as a D-ring on each hip on the waist belt. -
Page 33: Dsv Operation
If you cannot read the PPO2 values or if for any reason you are unsure of the true PPO2 in the loop you must bail out to an independent, open circuit bailout system. October 2020 © Lamartek, Inc. dba Dive Rite... -
Page 34: Electronic Vs Manual Operation
“when in doubt, bail out!” The O2ptima CM can also be used manually. In this case the diver monitors the PPO2 readings on the HUD and controller, and manually injects oxygen into the breathing loop by pressing the manual addition valve on the exhalation counterlung. -
Page 35: Diluent Injection
All of these scenarios and operation modes will be covered in your training class. Dive Rite recommends diving the O2ptima CM with a PPO2 setpoint of between 0.7 and 1.2 depending on the dive. Diving at PPO2s higher than 1.2 can increase the risks of oxygen toxicity. -
Page 36: Oxygen Sensor Care
If a discrepancy occurs, the diver has several options available to determine which sensors are reading October 2020 © Lamartek, Inc. dba Dive Rite... - Page 37 12 months. Even unused sensors still in their original packaging have a limited shelf life. Dive Rite uses Analytical Industries, Inc. and American Sensor Technologies, Inc. sensors which both have a “Sell by” date of 4 months after manufacture and a “Do not use after”...
-
Page 38: Oxygen Sensor Replacement
(See Figure 31). Figure 31 – Oxygen Sensor Wiring Harness The sensors are threaded into the sensor plate. Remove the sensor by turning it counterclockwise (See Figure 32). October 2020 © Lamartek, Inc. dba Dive Rite... - Page 39 Finally, reinstall the sensor plate with the sensor plate screw. Once the sensor is installed, perform an oxygen flush and calibration (See the Oxygen Sensor Calibration section). Verify that the sensor is reading correctly before diving. Figure 33 - Sensors Installed October 2020 © Lamartek, Inc. dba Dive Rite...
-
Page 40: Battery Replacement
Battery Replacement There are 3 batteries on the O2ptima CM. The first is the internal battery located inside the controller. The controller displays this battery voltage in yellow when the battery is low and needs replacement. It will display flashing red when the battery is critically low and must be replaced as soon as possible. To replace this battery, see the Changing the Battery section of the Shearwater Petrel Dive CAN Rebreather Controller Model Operations Manual. -
Page 41: Battery Recommendations
Failure to do this can lead to damage of internal components. Storage If you plan to store your O2ptima CM without use for an extended period of time there are several steps you should take to protect the unit. -
Page 42: Annual Service
Annual Service Once every year you should return your O2ptima CM to Dive Rite or an approved Dive Rite O2ptima service center for an annual service. This service includes replacement of O-rings, loop hoses, and oxygen sensors, along with a rebuild of the DSV and regulators, and checks of the electronics to confirm correct operation and up to date firmware. - Page 43 Micropore ExtendAir Cartridges (EACs) or granular scrubber media: Intersorb 812 or Sofnolime 797 (8-12 mesh) Granular Scrubber Capacity Approximately 5 lbs (2.2 kg) (will vary slightly depending upon granular type and packing method) October 2020 © Lamartek, Inc. dba Dive Rite...
-
Page 44: Revisions & Changes In Documentation
The “Survival Checklist” is intended for users who are thoroughly familiar with assembling and operating the O2ptima CM and are actively using it. It provides a condensed list of the critical checks that must be performed before every dive. If multiple dives are performed in a single day, this list should be used before every dive.
Need help?
Do you have a question about the O2PTIMA CM and is the answer not in the manual?
Questions and answers