Table of Contents
Advertisement
Quick Links
Advertisement
Table of Contents

Related Manuals for Dive Rite O2ptima eCCR


Summary of Contents for Dive Rite O2ptima eCCR
- Page 1 USER MANUAL USER MANUAL USER MANUAL USER MANUAL March 2018 – Rev A...
- Page 2 This is the user manual for the Dive Rite O2ptima eCCR rebreather. This user manual is proprietary and copyright Lamartek, Inc. 2018. It may not be reproduced, changed, or distributed without authorization from Lamartek, Inc. All information contained in this manual has been carefully reviewed and is believed to be accurate, however it is subject to change.
-
Page 3: General Safety Statements And Warnings
If you do not have adequate training, equipment, physical conditioning, and proper mind-set, do not get in the water. As the diver, YOU have the final responsibility for your own actions and safety while using this rebreather. March 2018 © Lamartek, Inc. dba Dive Rite... -
Page 4: Table Of Contents
Micropore ExtendAir Cartridge Overview ....................19 Assembling the O2ptima ..........................21 Importance of Checklists........................ 21 Gas Analyzation ..........................21 Installing the Cylinders and Regulators ..................21 How to Install a Micropore ExtendAir Cartridge ................22 March 2018 © Lamartek, Inc. dba Dive Rite... - Page 5 Annual Service ..........................45 Recommended Care Products ....................... 45 Technical Specifications ..........................45 Revisions & Changes in Documentation ....................46 Appendix I: Checklists ..........................47 Assembly Guide Checklist ......................48 Survival Checklist ........................... 49 March 2018 © Lamartek, Inc. dba Dive Rite...
-
Page 6: March 2018 © Lamartek, Inc. Dba Dive Rite
Pre-flight Checklist ......................... 49 Post Dive Checklist ......................... 50 Appendix II: Galvanic Oxygen Sensors Applied to Closed Circuit Rebreathers by Analytical Industries, Inc....................... 51 March 2018 © Lamartek, Inc. dba Dive Rite... -
Page 7: Introduction
The O2ptima now utilizes Shearwater electronics for their proven and unparalleled reliability and functionality. At Dive Rite, we understand that one size does not fit all, so in addition to the standard O2ptima features there are a number of options to ensure a proper fit for any diver and mission. Contact Dive Rite or visit www.diverite.com... -
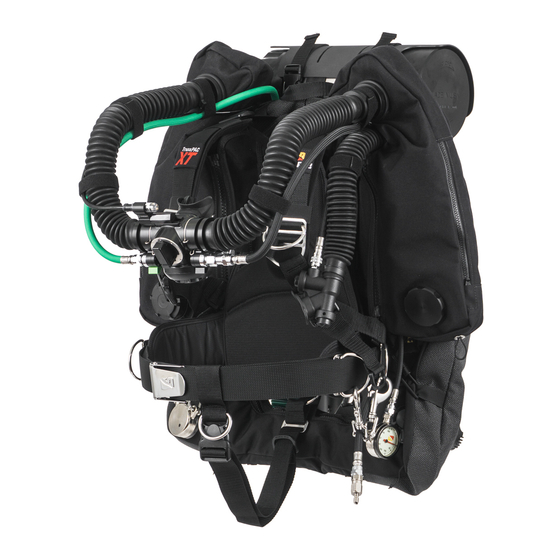
Page 8: System Overview
Kydex cover for abrasion protection Stainless Steel and StarBoard frame and stand AL 20 oxygen and diluent cylinders with valves Dive Rite TransPac Harness (Transplate harness optional) March 2018 © Lamartek, Inc. dba Dive Rite... -
Page 9: The Breathing Loop
BOV or DSV, breathing hoses and hose fittings, inhalation and exhalation counterlungs, scrubber canister, canister end cap, and electronics head. Gas flows in a clockwise direction—from the left shoulder—to the diver—to the right shoulder. March 2018 © Lamartek, Inc. dba Dive Rite... -
Page 10: Component Features & Functions
Other sizes are available for improved fit on smaller divers. Divesoft BOV + ADV + MAVs The Divesoft BOV (Bail Out Valve) comes standard on the O2ptima. (The Dive Rite DSV is optional.) The BOV features an integrated ADV (Automatic Diluent Valve) and manual oxygen and diluent addition valves. -
Page 11: Overpressure/Dump Valve
OPV slightly in order to maintain proper loop volume. The valve can also be manually opened by pressing on the valve. The valve is screwed into a welded flange on the counterlung inner bladder. March 2018 © Lamartek, Inc. dba Dive Rite... -
Page 12: Scrubber Canister
The controller (Shearwater DiveCan system) interprets the readings from the oxygen sensors and makes decisions on when to add oxygen via the solenoid. March 2018 © Lamartek, Inc. dba Dive Rite... -
Page 13: Oxygen Sensors
HUD allows the diver to independently verify the controller’s voting logic. Beginning in Q1 of 2018 Dive Rite will begin shipping all new rebreather units with digital O2 cells. These new sensors from Analytical Industries operate as traditional analog sensors but provide several benefits... -
Page 14: Controller
Controller Dive Rite has chosen to use Shearwater electronics to control and monitor the O2ptima. The controller is a DiveCAN Petrel 2 handset. The controller allows diver control of the PPO2 setpoint and PPO2 monitoring of oxygen sensors 1, 2, and 3C. -
Page 15: Hud
The OPV should be inspected for bubbling during the S-drill at the beginning of the dive. The first stages need to be serviced annually by an Authorized Dive Rite service center or directly by Dive Rite. Call Dive Rite directly (1-800-495-1046) or email support@diverite.com... -
Page 16: Cylinders & Valves
The scrubber canister mounts to the top of the backplate using a special rubberized cam strap to grip the canister and prevent shifting. A StarBoard brace underneath the canister provides additional stability. March 2018 © Lamartek, Inc. dba Dive Rite... -
Page 17: Cover
Slots at the top and sides of the cover are ideal for adding pockets to hold additional ballast weight, if necessary. Holes on the sides of the cover allow optional mounting of Dive Rite’s QRM receivers for quick and secure attachment of accessories such as a battery canister or small drysuit inflation bottle. - Page 18 An optional 10 lb trim pillow can also be installed in the bottom of the wing. The trim pillow helps divers maintain optimal horizontal trim even when wearing a wet suit or minimal exposure protection. The bailout bladder and trim pillow can be retrofitted on current CCR XT wings. Contact Dive Rite directly for these options.
-
Page 19: Micropore Extendair Cartridge Overview
All of the air would flow down those five straws, and none of the air would flow through the other 45. The same thing would happen if you blew air into just one side of an ExtendAir® cartridge canister: all of the air would flow through that side only. March 2018 © Lamartek, Inc. dba Dive Rite... - Page 20 Cartridge (EAC) is relatively simple, and takes seconds to perform. The O2 injection tube runs through the center of the EAC and with the use of a plug any possibility of “CO2 Channeling” is prevented. March 2018 © Lamartek, Inc. dba Dive Rite...
-
Page 21: Assembling The O2Ptima
Tighten the cam straps and Velcro straps on the cylinders. Check to make sure that both cylinders are held securely and do not slide. March 2018 © Lamartek, Inc. dba Dive Rite... -
Page 22: How To Install A Micropore Extendair Cartridge
If the cartridge is removed between dives and then later reinstalled, it is critical that the cartridge be reinstalled in the same orientation to prevent premature CO2 breakthrough (See Figure 2). Figure 2 - Installing EAC March 2018 © Lamartek, Inc. dba Dive Rite... -
Page 23: How To Pack The Scrubber
The scrubber canister can be packed with approximately 5 pounds of loose granular CO2 absorbent. Dive Rite recommends Intersorb 812 or Sofnolime 797 (8-12 mesh) granular absorbent. 408 (4-8 mesh) is not recommended. It is important to use fresh absorbent for every dive. Granular absorbent should never be reused. - Page 24 (See Figure 7). If it is not, add or remove absorbent and relevel until it is. Note—the wire handle on the top plate is only for removing the plate. It is not a carry handle for the scrubber. March 2018 © Lamartek, Inc. dba Dive Rite...
- Page 25 Clean up any excess absorbent dust before installing the scrubber canister. The dust will quickly react with any exposure to water and can create a caustic solution in the breathing loop. March 2018 © Lamartek, Inc. dba Dive Rite...
-
Page 26: Installing The Scrubber Assembly
With the canister in place, tighten the cam strap around the canister positioning the cam buckle low and close to the cylinders to prevent interference with the cover (See Figure 11). Figure 11 - Cam Buckle Position March 2018 © Lamartek, Inc. dba Dive Rite... -
Page 27: Installing The Electronics Head
Installing the Electronics Head Check that the orange electronics head O-rings and flat seal are clean and lubricated. Dive Rite recommends lubricating these seals with Tribolube 71 grease. Confirm that the small orange O-ring is in place on the premix tube. The O-ring should be above the sensor disk. -
Page 28: Installing The Scrubber End Cap & Water Trap
The cone shaped water trap snaps into the end cap and can be removed for maintenance and cleaning. There is a large orange O-ring sealing the edge of the water trap (See Figure 16). Figure 106 - Water Trap Sealing O-ring March 2018 © Lamartek, Inc. dba Dive Rite... - Page 29 (See Figure 18). Figure 118 - Inserting Flat Seal Figure 19 shows the completed end cap assembly ready for installation. Figure 19 - Complete End Cap Assembly March 2018 © Lamartek, Inc. dba Dive Rite...
-
Page 30: Mounting The Electronics/Battery Canisters
Carefully route the cables so that they are not pinched or kinked, and then insert the canisters into the elastic sleeves (See Figure 21). Figure 21 - Electronics Canister Installed in Sleeve March 2018 © Lamartek, Inc. dba Dive Rite... -
Page 31: Installing The Air Cell & Harness
Make sure the counterlungs are oriented with the OPV facing forward. Press the fittings on the back of the counterlungs into the head and end cap fittings and then tighten the connector rings. March 2018 © Lamartek, Inc. dba Dive Rite... - Page 32 It is important to only use the oversized fender washers supplied with the unit—smaller washers do not distribute the load as well and can cause the metal grommets to be pulled out of the material. Figure 24 - Harness Installed with Fender Washers March 2018 © Lamartek, Inc. dba Dive Rite...
-
Page 33: Installing The Cover
Before installing the hoses, lightly lubricate the O-rings and sealing surfaces on the counterlung fittings with Tribolube 71. Install the loop hoses by pressing them into place and tightening the threaded rings. (See Figure 26). March 2018 © Lamartek, Inc. dba Dive Rite... - Page 34 BOV manual addition valves (See Figure 27). These connections are threaded on and only need to be hand tight. Install the HUD into the BOV HUD mount to complete the assembly of the unit. Figure 27 - Installing Manual Addition Feed Lines March 2018 © Lamartek, Inc. dba Dive Rite...
-
Page 35: Basic Operation & Use
NOT a substitute for unit specific training. Harness Size & Adjustment Proper harness adjustment begins with selecting the correct size harness. Dive Rite offers Transpac and Transplate harnesses from XS through XXL. Your T-shirt size is usually a good starting point, but for more accurate sizing, use the sizing chart available at www.diverite.com... -
Page 36: Bov Operation
BOV. Do this by exhaling through the BOV mouthpiece before turning the knob back to the horizontal or closed circuit position. March 2018 © Lamartek, Inc. dba Dive Rite... -
Page 37: Breathing On The Loop
This gives the diver complete control over the PPO2 in the loop. March 2018 © Lamartek, Inc. dba Dive Rite... -
Page 38: Diluent Injection
All of these scenarios and operation modes will be covered in your training class. Dive Rite recommends diving the O2ptima with a PPO2 setpoint of between 0.7 and 1.2 depending on the dive. Diving at PPO2s higher than 1.2 can increase the risks of oxygen toxicity. -
Page 39: Oxygen Sensor Care
A new sensor will have a linear response to the partial pressure of oxygen throughout the normal operating range used in rebreather diving. However, as they age, their output becomes increasingly March 2018 © Lamartek, Inc. dba Dive Rite... - Page 40 12 months. Even unused sensors still in their original packaging have a limited shelf life. Dive Rite uses Analytical Industries, Inc., sensors which have a “Sell by” date of 4 months after manufacture and a “Do not use after”...
-
Page 41: Oxygen Sensor Replacement
(See Figure 30). Figure 30 – Oxygen Sensor Wiring Harness The sensors are threaded into the sensor plate. Remove the sensor by turning it counterclockwise (See Figure 31). March 2018 © Lamartek, Inc. dba Dive Rite... - Page 42 Finally, reinstall the sensor plate with the sensor plate screw. Once the sensor is installed, perform an oxygen flush and calibration (See the Oxygen Sensor Calibration section). Verify that the sensor is reading correctly before diving. Figure 32 - Sensors Installed March 2018 © Lamartek, Inc. dba Dive Rite...
-
Page 43: Battery Replacement
Typically, the SOLO/solenoid 9V battery will need changing more frequently than the OBOE/HUD AA battery. Dive Rite recommends changing both batteries at the same time once either one indicates a low battery voltage. Rechargeable batteries are not recommended for use in these locations. -
Page 44: Battery Recommendations
SOLO/solenoid external canister, and the AA battery in the OBOE/HUD external canister. There is a slight current draw on the batteries even when the unit is turned off. Also, alkaline batteries tend to leak when they are fully discharged. March 2018 © Lamartek, Inc. dba Dive Rite... -
Page 45: Annual Service
Annual Service Once every year you should return your O2ptima to Dive Rite or an approved Dive Rite O2ptima service center for an annual service. This service includes replacement of O-rings, loop hoses, and oxygen sensors, along with a rebuild of the BOV and regulators, and checks of the electronics to confirm correct operation and up to date firmware. -
Page 46: Revisions & Changes In Documentation
130 fsw (40 m) depth *Granular duration may be similar, but can vary greatly depending upon the type of granular and packing technique Revisions & Changes in Documentation Revision Date Description 3/2/18 Original document March 2018 © Lamartek, Inc. dba Dive Rite... -
Page 47: Appendix I: Checklists
March 2018 © Lamartek, Inc. dba Dive Rite... -
Page 48: Assembly Guide Checklist
O2ptima BMCL Assembly Guide Checklist Date_______________________ Dive Location _________________________ Dive Buddy _____________________ 1. ____ Fill oxygen, diluent, and bailout cylinders if needed. 2. ____Analyze gas: Oxygen _______% O2 , Diluent _______% O2 / _______% He , Bailout 1 _______% O2 / _______% He , Bailout 2 _______% O2 / _______% He 3. -
Page 49: Survival Checklist
Survival Checklist Confirm scrubber media, bore plug, and premix tubing O-ring are correctly installed Confirm diluent and oxygen cylinder contents and pressures Perform leak down check on both diluent and oxygen systems Conduct positive and negative checks ... -
Page 50: Post Dive Checklist
Post Dive Checklist Immediately Post Dive Close the BOV Change set point to 0.19 PO2 Check battery voltages Note pressure remaining in oxygen & diluent cylinders and total dive time to determine scrubber usage Close cylinder valves and bleed down system via manual add valves (***Never turn off the cylinder valves before you are out of the water and have removed the rebreather! ***) ... - Page 51 Galvanic Oxygen Sensors Applied to Closed Circuit Rebreathers Company Profile Analytical Industries Inc. was founded by individuals whose experience included the development (original and recent patents), pioneering the application of electrochemical galvanic sensors and refining the manufacturing process. Formed in 1994, Analytical Industries Inc. started with a clean sheet of paper, 60 years of experience and devoted their first year to R&D with the objective of advancing existing sensor technology.
- Page 52 Pressure: Influences signal output on a proportional basis. Tests show sensors are accurate at any constant pressure up to 30 atm provided the sensor is pressurized equally front and rear. A pressurized sensor must decompressed gradu- ally (similar to a human). Altitude: Dives of 200 ft.
- Page 53 Liquid/Moisture: Condensation on the sensing surface of the sensor reduces the signal output by blocking the diffusion of oxygen into the sensor and is mistakenly categorized as a sensor defect. The reality, there is no damage to the sensor, simply remove the liquid and the signal output returns.
- Page 54 Quality Assurance Program Quality is taken very seriously. Mandated for medical devices, industrial and diving products comply with the same quality standards. The quality assurance program is independently certified annually by and conforms to: ISO 9001:2008, U.S. FDA: 510(k) No. K952736, Europe: Annex II of Medical Device Directive 93/42/EEC as amended by 2007/43/EEC, Canada: ISO 13485:2003...
- Page 55 What We Have Learned . . . The effects of the topics listed below are discussed in detail in the preceding pages and in the interest of brevity are not duplicated. Challenging Application: When it comes to the closed circuit rebreather the oxygen sensor is exposed to an environ- ment that plays to more of the device’s weaknesses than its strengths.
Need help?
Do you have a question about the O2ptima eCCR and is the answer not in the manual?
Questions and answers