Table of Contents
Advertisement
Quick Links
Advertisement
Table of Contents

Related Manuals for Dive Rite TravelPac


Summary of Contents for Dive Rite TravelPac
- Page 1 TravelPac/VoyagerPac Manual...
- Page 2 40 TravelPac/VoyagerPac Owners Manual Congratulations… …on your Dive Rite BC purchase. The TravelPac and Voy- agerPac are essentially the same BC, differing only in air cell size and lift capacity. They have been designed, manu- factured, and tested for the highest possible performance and reliability.
-
Page 3: Table Of Contents
TravelPac/VoyagerPac Owners Manual iii of 40 Contents Congratulations…..............ii 1.0 Important Warnings ......... 1 2.0 CE Certification ..........4 2.1 EN 250: 2000 norm regulations and what they mean ............... 4 2.2 Definition of Scuba according to EN 250: 2000 ................5 2.3 Limitations Provided by... - Page 4 11.2 Post-Dive Cleaning ............33 11.3 Transportation, Storage and General Protection ..35 11.4 Inspection and Service Interval ......... 35 Important: Your TravelPac/VoyagerPac will have a sewn-in label that lists both the serial number and date of manufacture. Record this information in the space provided in the back of this manual.
-
Page 5: Important Warnings
Retain this manual for as long as you own your BC. If you do not understand any part of this manual, contact Dive Rite at (386) 752-1087 or Support@DiveRite.com. Make sure you fully understand this BC’s features and function, and adjust the straps correctly before diving. - Page 6 If you wear a weight belt with the TravelPac/Voyag- erPac, you must fasten the crotch strap first and then put the weight belt on over it. Failure to do so may hinder your ability to release the weight belt in an emergency.
- Page 7 In accordance with European standards, Dive Rite BCs can only be considered certified where all com- ponents are present, as per the original Dive Rite con- figuration. Any variation of the original configura- tion invalidates conformity to European certification...
-
Page 8: Ce Certification
In Europe, the EN 250: 2000 norm defines the minimum technical stan- dards of acceptance for recreational diving regulators. All Dive Rite regulators have successfully passed the certifica- tion test required by this regulation. -
Page 9: Definition Of Scuba According To En 250: 2000
TravelPac/VoyagerPac Owners Manual 5 of 40 2.2 Definition of S according to cuba EN 250: 2000 This regulation defines a Scuba unit as a self-contained open-circuit underwater breathing apparatus. A Scuba unit can be composed of component groups. During use, the... -
Page 10: Important Precautions Relating To Ce Certification
6 of 40 TravelPac/VoyagerPac Owners Manual 3.0 Important Precautions Relating to CE Certification Use this equipment according to the instructions con- tained in this manual and only after having completely read and understood all instructions and warnings. Use of this equipment is limited to the uses described in this manual or for applications approved in writing by Dive Rite. - Page 11 Repairs and maintenance must be carried out by an Authorized Dive Rite Dealer service facil- ity and with the exclusive use of original Dive Rite parts. Dive Rite equipment must be serviced at recommended intervals by a qualified technician. Failure to service Dive...
-
Page 12: General Information
8 of 40 TravelPac/VoyagerPac Owners Manual 4.0 General Information A BC harness and air cell can serve many functions. Chief among them: The harness serves as the primary attachment point for single cylinders, as well as the optional integrated weight system and other accessories. -
Page 13: Harness/Air Cell Features
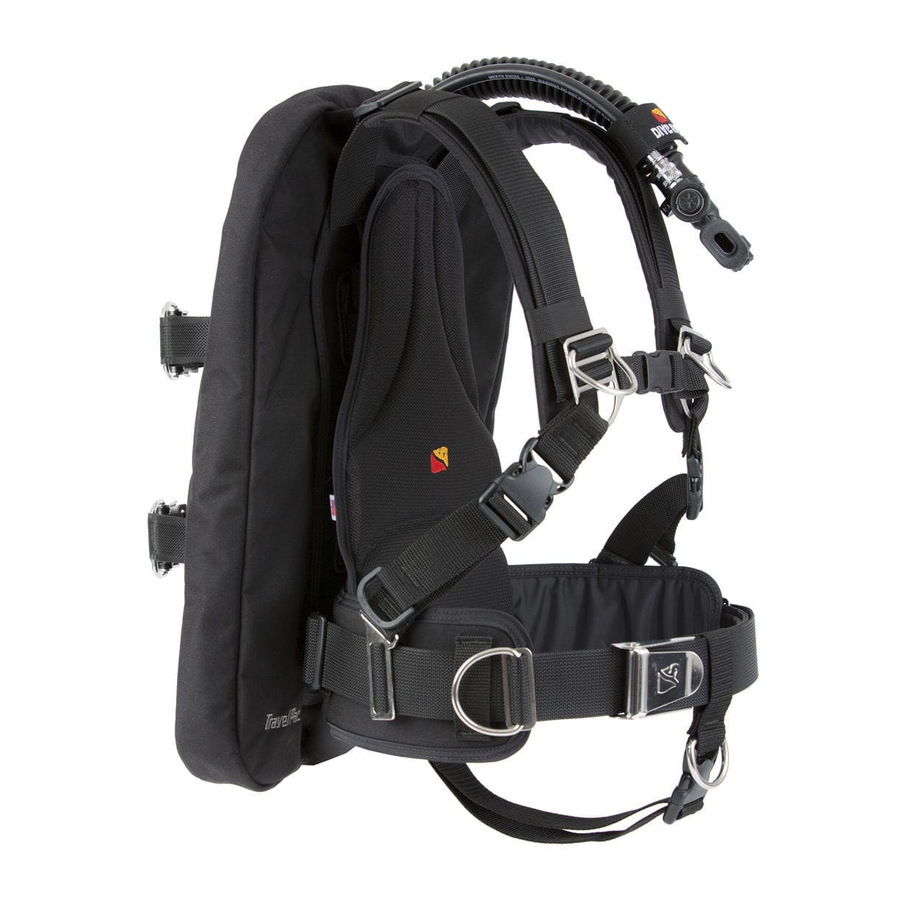
5.0 Harness/Air Cell Features The TravelPac/VoyagerPac uses a true mountaineer back- pack design with integrated hip pads, molded foam lumbar support pad, and ergonomic shoulder pads. The TravelPac is available in sizes XS-XL; the VoyagerPac is available in sizes XS-XXL... -
Page 14: Technical Specifications
Dual cam straps are positioned to give plenty of head room for easy maneuvering in the water. Neutrally buoyant, the TravelPac/VoyagerPac weighs less than 3 kg/7 lbs and packs flat for travel. Optional weight pockets slide easily onto the waist belt. - Page 15 50 mm/2.0 in straps. A 38 mm/1.5 in crotch strap with stainless scooter ring and slide-release buckle is standard. Made in the USA. Harness Weight TravelPac/VoyagerPac weights are as follow: TravelPac: 2.9 kg/6.5 lbs VoyagerPac: 3.0 kg/6.6 lb Shelf life...
-
Page 16: Air Cells
LP hose and Pneumatic Inflation Valve operating pres- sure: 6.5-13.8 bar/95-200 psi Low-Pressure inflator hose threads: 3/8-24 UNF O-Rings/Seals: EPDM, Buna/Nitrile, Silicone 5.2 Air Cells The TravelPac andVoyagerPac differ only in the size and lift capacity of their air cells. Wing Use With Rated Lift... -
Page 17: Optional Accessories
TravelPac/VoyagerPac Owners Manual 13 of 40 6.0 Optional Accessories Optional accessories include: Dive Rite Gravity Weight Pockets or 7.25 kg/16 lb or 14.5 kg/32 lb QB Weight Pockets Dive Rite Bellows or Clipper Pocket Dive Rite Z-Knife or Trauma Shears... -
Page 18: Sizing
160-170 cm/5’3” to 5’7” 50-70 kg/ 110-155 lbs 170-213 cm/5’7” to 6’2” 66-84 kg/ 145-185 lbs >178 cm/>5’10” >79 kg/ >175 lbs There are two primary components to the TravelPac/ VoyagerPac: Shoulder pads. Sideplates with adjustment straps. Let’s take a look at each. -
Page 19: Shoulder Pads
TravelPac/VoyagerPac Owners Manual 15 of 40 7.1 Shoulder Pads Shoulder pad length determines the size of the harness. The shoulder pad terminates on the chest at the pivot point for the chest strap and sideplate straps. T-shirt size is nor- mally a good indicator of what size shoulder pad is needed for an optimal fit. - Page 20 For sizing questions or concerns, contact Dive Rite at 800-495-1046 or Support@DiveRite.com. Video: To understand how a TravelPac/VoyagerPac should fit and see the critical fitting points, go to www.DiveRite.com/DiveRiteTV and see our how-to...
-
Page 21: Attaching Single Cylinders
TravelPac/VoyagerPac Owners Manual 17 of 40 8.0 Attaching Single Cylinders You can easily attach the TravelPac/VoyagerPac harness to a single tank using standard stainless steel cam strap provid- Before each use, check the TravelPac/VoyagerPac’s bands, straps, quick-disconnect clips and the hip pad/waist strap for wear. -
Page 22: Threading Cam Buckle
TravelPac/VoyagerPac Owners Manual Figure 8a: Tank height adjustment strap 8.2 Threading Cam Buckle The buckle assembly on TravelPac/VoyagerPac cam bands works largely the same as most other cylinder cam bands. You may, however, notice some differences. The buckle itself is made from a solid piece of stainless steel. - Page 23 TravelPac/VoyagerPac Owners Manual 19 of 40 Figure 8b: Step one Please Note: The single biggest mistake divers make when threading cam buckles is that they fail to flip the buckle over and thread the webbing from under- neath. Figure 8c: Step two...
- Page 24 20 of 40 TravelPac/VoyagerPac Owners Manual Figure 8d: Step three At this point, you want to pull the cam strap as tight as pos- sible, and continue to hold it while progressing to step four. Figure 8e: Step four...
- Page 25 TravelPac/VoyagerPac Owners Manual 21 of 40 Figure 8f: Step five To prevent accidental tank loss, make sure the straps are tight enough so that the cylinder cannot move or slide on the BC. Failure to do so could result in seri- ous personal injury or death.
-
Page 26: Donning/Adjusting Your Bc
To ensure proper fit while diving, the BC should be donned according to the following sequence: Assuming you already have the air cell and tank attached, loosen the chest strap and waist belt of the TravelPac/Voy- agerPac. Slide your arms into the shoulder straps and fasten the chest strap. -
Page 27: Adjusting Your Bc
Video: For more information, see our helpful video series at www.DiveRite.com/DiveRiteTV. 9.2 Adjusting Your BC Once you fit the TravelPac/VoyagerPac to your stature, it is important to understand how to customize the fit for your personal enjoyment and best product performance. - Page 28 Video: For more information, see our helpful video series at www.DiveRite.com/DiveRiteTV. Adjusting the Side Plates Your TravelPac/VoyagerPac comes set up to dive single tanks. The movable waist side plate is approximately 10 cm/4.0 in from the edge of the soft backplate.
- Page 29 TravelPac/VoyagerPac Owners Manual 25 of 40 Adjusting Shoulders, Adding/Removing Hardware It is easy to adjust TravelPac/VoyagerPac shoulder length. You can make adjustments of less than 38 cm/1.5 in using the excess webbing tucked under the shoulder strap as- sembly. Unweave the webbing from the bottom two slots of the shoulder transition plate and slide the transition plate to the desired location.
-
Page 30: Bc Inflation And Deflation
26 of 40 TravelPac/VoyagerPac Owners Manual 10.0 BC Inflation and Deflation 10.1 Connecting the Low-Pressure Inflator Do not attach a low-pressure (LP) hose to a regula- tor high-pressure (HP) port or to an air supply with pressure in excess of 14 bar/200 psi. This may result... -
Page 31: Low-Pressure Inflator Operation
TravelPac/VoyagerPac Owners Manual 27 of 40 10.2 Low-Pressure Inflator Operation To inflate the BC, press the power inflator button. Air should enter the BC. Figure 10a: Power inflator button For better control during inflation use short bursts of air by repeatedly pressing and releasing the power inflator button. -
Page 32: Bc Deflation
28 of 40 TravelPac/VoyagerPac Owners Manual Figure 10b: Oral inflator Release the button before taking your mouth off the mouthpiece. Failure to do so can result in loss of inflation and buoyancy. Repeat these steps until the desired amount of buoyancy is reached. - Page 33 Using Remote Exhaust Valve TravelPac/VoyagerPac air cells are equipped with a remote exhaust valve at the point where the large-diameter BC in- flator hose joins the air cell. This valve is activated by pull- ing down on the inflator assembly.
- Page 34 30 of 40 TravelPac/VoyagerPac Owners Manual Figure 10c: Remote exhaust and overpressure relief valves Using Overpressure Relief Valve The air cell’s overpressure relief valve helps prevent acciden- tal overinflation of the BC. It is designed to open automat- ically when pressure inside the air cell reaching approxi- mately 0.14 bar/2.0 psi over ambient pressure.
- Page 35 TravelPac/VoyagerPac Owners Manual 31 of 40 General Recommendations With all deflation methods, hold the valve open no longer than needed. This helps prevent excess water from enter- ing the BC. Do not depress the oral inflator button when activating the remote exhaust or overpressure relief valve, as water...
-
Page 36: Pre-, Post-Dive Procedures
All equipment must be regularly inspect- ed by an authorized Dive Rite equipment repair facility. Do not dive with a BC that does not pass any of the pre-dive or post-dive inspections and tests. Loss of buoyancy control or air holding integrity could oc- cur, resulting in serious personal injury or death. -
Page 37: Post-Dive Cleaning
TravelPac/VoyagerPac Owners Manual 33 of 40 Inflate the BC air cell until it is firm. Listen and check for leaks. Let the BC stand inflated for 30 minutes or more, then check to make sure there has been no significant air loss. - Page 38 34 of 40 TravelPac/VoyagerPac Owners Manual Clean the BC only with fresh water and mild detergent. Chemicals, strong detergents, and cleaning solutions can damage the BC and shorten its life. Rinse the BC thoroughly with cool, fresh water after every use.
-
Page 39: Transportation, Storage And General Protection
11.4 Inspection and Service Interval Your BC should be inspected and maintained at an autho- rized Dive Rite service center at least once a year, more of- ten if you dive frequently. Any damage caused due to failure to properly maintain the BC is not covered by the warranty. - Page 40 12.0 Warranty Dive Rite will — at its sole discretion — repair or replace TravelPac/VoyagerPac components proved to be damaged by faulty manufacture or material, at no cost, for the life- time of the BC.
- Page 41 BC is adequately packaged and protected. Dive Rite is not responsible for any shipping costs in- curred, regardless of warranty status. Dive Rite is not responsible for any damage that may oc- cur during shipping. Repairs made under the warranty will not extend the warranty period.
- Page 42 38 of 40 TravelPac/VoyagerPac Owners Manual...
- Page 43 TravelPac/VoyagerPac Owners Manual 39 of 40 Record Serial Numbers Here Item Serial Number TravelPac VoyagerPac Service Record Date Authorized Dive Rite Service Center...
- Page 44 40 of 40 TravelPac/VoyagerPac Owners Manual...
Need help?
Do you have a question about the TravelPac and is the answer not in the manual?
Questions and answers