
Related Manuals for Berkel BH+25T

Summary of Contents for Berkel BH+25T
- Page 1 BMR22T BH+25T BH+50F BH+80F BH+180F BH+25T BH+50F BH+80F BH+180F MANUALE DI USO E MANUTENZIONE USE AND MAINTENANCE MANUAL GEBRAUCHS– UND WARTUNGSHANDBUCH MODE D’EMPLOI ET D’ENTRETIEN MANUAL DE USO Y MANUTENCIÓN...
- Page 3 8BH+180F) la rotazione delle due eliche avviene una opposta ma su due assi di rotazione paralleli. Per facilitare lo svuotamento della vasca nel modello da 25 kg (BH+25T), basta alzare completamente il frontale, estrarre l'elica a prodotto mescolato e motore spento. In tutti gli altri modelli (BH+50F - BH+80F - BH+180F) è...
- Page 4 Usi non previsti Il mescolatore deve essere utilizzato solamente per gli scopi previsti dal costruttore; in particolare: - Non utilizzare la macchina per mescolare prodotti alimentari diversi da carne. - Non utilizzare la macchina se non è stata correttamente installata con tutte le protezioni integre e correttamente montate per evitare il rischio di severe lesioni personali.
- Page 5 Predisporre intorno alla macchina una idonea illuminazione per garantire la corretta visibilità all’operatore adibito all’utilizzo del mescolatore. 3.3.1 Installazione BH+25T Il movimento dell'imballo deve essere eseguito con un carrello elevatore o altri macchinari similari in quanto la macchina viene fornita in un cartone. Per movimentare l'imballo manualmente bisogna eseguire le manovre almeno in due operatori in quanto l'imballo ha una massa di 55 kg.
- Page 6 Il mescolatore così allestito è fornito di un cavo di alimentazione di lunghezza di circa 2,5 metri e di sezione 4x1 mm nel modello BH+25T, 4x1,5 mm nei modelli BH+50F - BH+80F - BH+180F. Allacciare il cavo alla rete di alimentazione trifase, interponendo un interruttore differenziale magnetotermico di adeguato valore.
- Page 7 In allestimenti con voltaggi diversi da quelli citati, consultare il costruttore e in questi casi viene fornita senza spina di alimentazione. Nel caso si debba allungare il cavo di alimentazione, utilizzare un cavo della stessa sezione di quello installato dal costruttore. Per la verifica del corretto collegamento elettrico, vedi par.
- Page 8 Fig. 5.1.1 5.2 Verifica presenza ed efficienza delle protezioni e delle Sicurezze BH+50F - BH+80F - BH+180F BH+25T Fig. 5.2.1 1 - Griglia di protezione utensile (Fig. 5.2.1) La verifica si effettua eseguendo un controllo visivo della presenza e integrità della griglia di protezione utensile.
- Page 9 "0". Il prodotto da mescolare deve essere completamente contenuto all'interno della vasca di carico, facendo attenzione a non superare il peso massimo consentito Chiudere la griglia ed eseguire le operazioni di avviamento (cap. 5). BH+50F - BH+80F - BH+180F BH+25T Fig. 6.2.1...
- Page 10 Svuotamento e pulizia BH+25T Mettere in posizione "0" l'interruttore differenziale. Alzare la griglia, sganciare le tre cerniere "1" fig. 6.2.1, sollevare il frontale "5" fig. 6.2.1. Togliere completamente il contenuto mescolato e l'utensile (elica) "2" fig. 6.2.1. Pulire accuratamente la macchina, vedi cap. 7.6.
- Page 11 7 Manutenzione Prescrizioni ATTENZIONE! Ogni intervento di manutenzione e di pulizia del mescolatore deve es- sere eseguito solamente a macchina ferma, con la spina scollegata dalla rete elettrica. La zona ove si eseguono gli interventi di manutenzione deve essere mantenuta sem- pre pulita ed asciutta e ben illuminata.
- Page 12 Controlli e verifiche da eseguire all’installazione Per assicurarsi che la macchina non abbia subito danni durante il trasporto o durante l’installazione, effettuare con scrupolo i controlli di seguito elencati: Prima della messa in funzione: Verificare che la tensione di alimentazione corrisponda al valore riportato sulla targa della macchina.
- Page 13 Lubrificazione Nel riduttore di trasmissione del mescolatore modello ME 30 vi è dell'olio specifico per ingranaggi che non andrà mai sostituito. Negli altri modelli vi è del grasso a lunga vita che non andrà mai sostituito. Messa fuori servizio Per la realizzazione della macchina principalmente si sono utilizzati materiali come acciaio inossidabile, che non richiedono particolari accorgimenti per la loro rottamazione.
- Page 14 Installing 3.3.1 - Installing BH+25T 3.3.2 - Installing BH+50F - BH+80F - BH+180F 3.3.3 - Disposing of packaging 3.3.4 - Handling appliance model BH+25T 3.3.5 - Handling appliance model BH+50F - BH+80F - BH+180F 3.4 - Connecting to electricity supply 3.4.1 - Three-phase appliance 400 volt 50/60 Hz and three-phase appliance...
- Page 15 Using the appliance 6.1 - Rules 6.2 - How to use the appliance 6.3 - Emptying and cleaning BH+25T 6.4 - Emptying and cleaning BH+50F - BH+80F - BH+180F 6.5 - Mounting rotor BH+25T 6.6 - Mounting rotor BH+50F - BH+80F - BH+180F Maintenance 7.1 -...
- Page 17 1 Delivery and warranty Introduction The following symbol is used in this manual to call the reader’s attention to points and operations considered dangerous for the operator or that could damage the appliance. Do not use the appliance if you have not correctly understood what is written in these warnings.
- Page 18 The size of the pieces to be mixed must be contained in the mixing drum and must not stick out over the rim and must never exceed 25 kg for model BH+25T, 50 kg for BH+50F, 80 kg for BH+80F, and 180 kg for BH+180F...
- Page 19 ance from the electricity supply: there is risk of electrocution. Do Not mix quantities that cannot be contained in the mixing drum. Do Not wear clothing that does not conform with the accident prevention regulations. Ask your employer regarding safety regulations and accident prevention clothing. Do Not turn on the appliance if faulty or out of service.
- Page 20 This information is given on the metal plate shown in Fig. 1.7.1. As a memo we suggest you fill in the below box with the in- formation requested. BH+25T A = machine model B = serial number...
- Page 21 The correct work position for using the appliance is shown in Fig. 1.10.1 1.11 Environment BH+25T The appliance is designed for working in the following environment: - minimum environment temperature: 5 °C; - maximum environment temperature: +40 °C; - humidity: 50% at 40 °C.
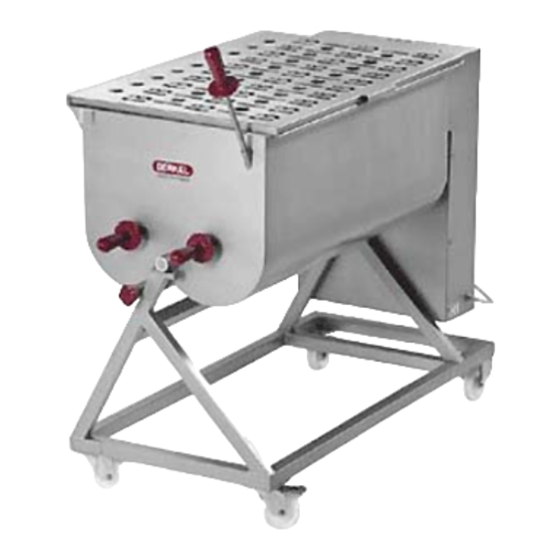
- Page 22 Fig. 2.1.1 . 1- Electric motor. 2- Base. 3- Mixing drum. 4- Transmission shaft. 5- Rotor. 6- Protection grille. 7- Controls. 8- Transmission belt. Fig. 2.1.1 Technical Data BH+25T BH+50F BH+80F BH+180F Power Watt/Hp 1460-2 1800-2,5 1850-2,5 2200-3 Tank dimensions...
- Page 23 Electrical circuit diagram...
- Page 24 All the goods delivered have been carefully controlled before being consigned to the forwarder or courier for transport. Unless otherwise agreed upon with the customer or for specific transport necessities, the appliance, BH+25T, is packed in a cardboard box, whereas models BH+50F - BH+80F - BH+180F are packed on a pallet protected by carton and tied in place using plastic straps.
- Page 25 Provide suitable lighting around the appliance for the worker using the meat mixer. 3.3.1 Installing BH+25T To move the package use a fork-lift truck or similar means. If the package is to be moved manually at least two workers are required given its weight of 55 kg.
- Page 26 The mixer is provided with a 2.5 m power supply cable. This cable has a 4x1 mm sec- tion (thickness) for model BH+25T and a 4x1,5 mm section (thickness) for models BH+50F - BH+80F - BH+180F. Connect the power cable to a three-phase electricity supply and connect a suitable thermo-magnetic differential switch.
- Page 27 Controls and indicators List of controls and indicators Fig. 4.1.1 1 - Push-button “on” Press it to start the machine. 2 - Stop push-button Press it to stop the machine. 3 - Reverse push-button Press it to invert the rotation sense of the propeller screw Wall mouned power board ATTENTION: the wall mounted power board must be set near the machine.
- Page 28 “1”. Fig. 5.1.1 5.2 Checking protections and safety features and their efficiency BH+50F - BH+80F - BH+180F BH+25T Fig. 5.2.1 1 - Rotor Protection grille (Fig. 5.2.1) Visually check that the protection grille is intact.
- Page 29 With the on/off switch in position "0" fill the mixer . The food product to be mixed must be contained within the mixing drum and must not exceed the consented weight. Close the grille and start the mixer (refer to chap. 5). BH+50F - BH+80F - BH+180F BH+25T Fig. 6.2.1...
- Page 30 Emptying and cleaning BH+25T Switch the on/off switch to position "0". Raise the grille, unhook the three hinges "1" fig. 6.2.1, lift the front panel "5" fig. 6.2.1. Remove all the mixture and rotor "2" fig. 6.2.1. Carefully clean the appliance, please refer to paragraph.
- Page 31 7 Maintenance Rules ATTENTION! The mixer must always be off and the power plug removed from the power socket when servicing and cleaning. The maintenance area must always be clean, dry and well illuminated. Do not allow unauthorised staff to service the appli- ance.
- Page 32 Before setting to work: check that the power supply tension corresponds to the value given on the ID plate Check that there are all the warning and ID plates and that they are not damaged Check that the power supply cable is not damaged and is intact - Check that the safety features such as the magnetic sensors are intact and not damaged Functional checks with the appliance running:...
- Page 33 Greasing Model ME 30 mounts an oil lubricated reduction gear transmission unit. This oil is spe- cific for gear units and never needs to be changed. Whereas, the other models mount grease lubricated reduction units. This type of grease never needs to be changed. Out of service for scrapping Most of the appliance is manufactured in stainless steel which does not require spe- cific scrapping.
-
Page 34: Table Of Contents
Installation 3.3.1 - Installation BH+25T 3.3.2 - Installation BH+50F - BH+80F - BH+180F 3.3.3 - Beseitigung der Verpackung 3.3.4 - Fortbewegung des Modells BH+25T 3.3.5 - Fortbewegung des Modells BH+50F - BH+80F - BH+180F 3.4 - Elektroanschluss 3.4.1 - Drehstrommaschine zu da 400 volt 50/60 Hz e macchina trifase da 230 volt 50/60 Hz 3.4.2 - Einphasenmaschine 230 volt 50/60 Hz... - Page 35 Umschaltung Gebrauch der Maschine 6.1 - Vorschriften 6.2 - Bedienung der Maschine 6.3 - Entleerung und Reinigung BH+25T 6.4 - Entleerung und Reinigung BH+50F - BH+80F - BH+180F 6.5 - Werkzeugmontage BH+25T 6.6 - Werkzeugmontage BH+50F - BH+80F - BH+180F Wartung 7.1 -...
-
Page 37: Übergabe Und Garantie
1 Übergabe und Garantie Vorwort Die in diesem Handbuch benutzte Simbologie soll den Leser auf Operationen auf- merksam machen, die für die Operatoren gefährlich werden können und die Maschi- nen beschädigen können. Die Maschine nicht betätigen bevor man die Hinweise nicht vollkommen verstanden hat. -
Page 38: Beschreibung Der Maschine
Ausführung mit zwei Schrauben die zwar entgegengesetzt aber auf zwei parallelen Achsen drehen. Um die Entleerung der Wanne des Modells zu 25 kg (BH+25T), zu erleichtern, genügt es die Fronttür vollständig aufzuhalten und die Schraube nach dem Mischvorgang und bei ausgeschalteter Maschine herauszunehmen. -
Page 39: Unzweckmäßiger Gebrauch
Unzweckmäßiger Gebrauch Die Mischmaschine darf nur für den vom Hersteller vorgesehenen Zweck gebraucht werden und zwar: dürfen keine anderen Nahrungssmittel als Fleisch vermischt werden. die Maschine darf nicht benützt werden, wenn sie nicht korrekt installiert worden ist und wenn nicht alle Schutzvorrichtungen vollständig angebracht sind, um nicht dem Risiko, sich schwere Verletzungen zu- zuziehen, ausgesetzt zu werden. -
Page 40: Maschinendaten
Diese Angaben sind aus dem in Abb. 1.7.1. dargestellten Schild zu entneh- men. Um sich die Daten zu merken, können Sie Ihre Maschinendaten hier nachste- hend eintragen. BH+25T A = Modell der Maschine B = Kenn-nummer C = Motor Spannung Volt... -
Page 41: Hinweis-Und Gefahrenschilder
Auf der folgenden Abb. 1.10.1. ist die korrekte Arbeitsstellung des Operatoren, um mit der Mischmaschine optimal arbeiten zu können, dargestellt. 1.11 Umweltbedingungen Die Maschine funktioniert unter folgenden Umweltbedingungen: BH+25T - Min. Raumtemperatur: -5 °C; - Max. Raumtemperatur: +40 °C; - Relative Luftfeuchtigkeit: 50% bei 40 °C. -
Page 42: Vibrationen
Abb. 2.1.1 dargestellten Hauptbestandteile der Maschine aufgezählt. 1 -Elektromotor. 2 -Untergestell. 3 -Wanne 4 -Antriebswelle. 5 -Werkzeug (Schraube). 6 -Schutzgitter. 7 -Schalter. 8 -Treibriemen. Abb. 2.1.1 Technische Daten BH+25T BH+50F BH+80F BH+180F Spannung Watt/Hp 1460-2 1800-2,5 1850-2,5 2200-3 Becken abmessungen 300x390... -
Page 43: Schaltpläne
Schaltpläne... -
Page 44: Geräusch
Das Material wird vor Übergabe an den Speditionär sorgfältig überprüft. Falls nicht anders mit dem Kunden vereinbart oder es sich nicht um besondere Trans- porte handelt, wird die Maschine, Modell BH+25T mit Karton verpackt, die Modelle BH+50F - BH+80F - BH+180F. kommen auf eine Holzunterlage, werden dann mit Karton verpackt und mit Bändern festgebunden. -
Page 45: 1- Beiliegende Materialliste
Die Maschine muss rundherum genügend beleuchtet sein, damit der Opera- tor, der die Maschine benützt eine bessere Übersicht hat. 3.3.1 Installation BH+25T Die Verpackung besteht aus einer Kartonschachtel und sollte mit einem Stapler oder ähnlichem Fahrzeug fortbewegt werden. Sollte die Packung manuell fortbewegt wer- den, muss das durch mindestens zwei Operatoren geschehen, da ja die Packung etwa 55 kg wiegt. -
Page 46: Beseitigung Der Verpackung
Wird die Maschine in Ländern mit besonderen Vorschriften installiert, die jeweils gel- tenden Normen für die Abfallbeseitigung berücksichtigen. 3.3.4 Fortbewegung des Maschinentyps BH+25T ACHTUNG! Die Maschine mit geeignetem Stapler aufheben. Kontrollieren, ob das Gewicht auf den Gabeln richtig verteilt ist, vor allem auf holpri- gen, rutschigen oder steilen Fahrwegen. -
Page 47: Schaltung Und Anzeigen
4 Schaltung und Anzeigen 3.1 - Verzeichnis der Befehle und Anzeigen Fig. 4.1.1 1 - Einschaltdruckknopf (kontinuierlich) drücken um die Maschine einzuschalten 2 - Ausschaltdruckknopf drücken um die Maschine auszuschalten 3 - Druckknopf für Umschaltung (diskontinuierlich) damit kann man die Drehrichtung der Schraube ändern Wandschaltung ACHTUNG: stellen Sie die Wandschaltung in der Nähe der Maschine. - Page 48 Drehrichtung gegenüber der Drehrichtung des Fig. 5.1.1 Druck knopfs “1” umgekehrt ist. 5.2 Kontrolle der Schutzvorrichtungen BH+50F - BH+80F - BH+180F BH+25T Fig. 5.2.1 1 - Werkzeug-Schutzgitter (Abb. 5.2.1) Es wird augenscheinlich kontrolliert, ob das Schutzgitter unversehrt vorhanden ist 2 - Mikroschalter (Abb. 5.2.1) Bei eingeschalteter Maschine das Schutzgitter bis zum Einsetzen des Mikroschalters anheben, um zu kontrollieren, dass die Maschine dabei ausschaltet.
- Page 49 Der Differentialschalter muss bei der Füllung der Maschine auf “0” stehen. Die Maschine darf nicht überfüllt werden, das vorgeschriebene Füllgewicht darf nicht über- schritten werden Schutzgitter schließen und mit der Einschaltprozedur beginnen (Kap. BH+50F - BH+80F - BH+180F BH+25T Fig. 6.2.1...
- Page 50 Entleerung und Reinigung BH+25T 1 Differentialschalter auf "0" stellen. Schutzgitter aufheben, die drei Scharniere "1" Abb. 6.2.1 aushängen, Fronttür "5" Abb 6.2.1 aufheben. 2 Das bearbeitete Produkt und das Werkzeug (Schraube) "2" Abb. 6.2.1. herausnehmen. Die Maschine sorgfältig reinigen, siehe dazu Kap. 7.6.
- Page 51 7 Wartung Vorschriften ACHTUNG! Jeder Wartungs-und Reinigungseingriff muss bei abgeschalteter Maschine erfolgen, der Stecker muss gezogen werden. Der Platz, wo die Wartung- sarbeiten durchgeführt werden muss sauber gehalten werden, trocken und gut beleuchtet sein. Die Maschine darf nur von autorisiertem Personal gehandhabt wer- den.
- Page 52 Vor Inbetriebnahme: - Überprüfen, ob die Betriebsspannung mit dem Wert auf dem Identifizierschild der Maschine übereinstimmt. - Nachprüfen, ob alle Hinweis- und Gefahrenschilder vorhanden sind und in gutem Zustand sind. - Das Versorgungskabel darf nicht beschädigt sein - Den Zustand der Sicherheitsvorrichtungen und magnetischen Sensoren kontrollieren, sie dürfen nicht beschädigt sein.
- Page 53 Schmierung Im Antriebs-Untersetzungsgetriebe des Modells ME 30 befindet sich ein Spezialöl für Zahnräder, das nie gewechselt wird. Die anderen Modelle enthalten ein Langzeit- Schmierfett, das nie gewechselt werden muss. Außerbetriebnahme Die Maschine besteht hauptsächlich aus rostfreiem Stahl, ein Material das problemlos beseitigt werden kann.
- Page 54 3.3.1 - Installation BH+25T 3.3.2 - IInstallation BH+50F - BH+80F - BH+180F 3.3.3 - Elimination de l’emballage 3.3.4 - Déplacement de la machine modèle BH+25T 3.3.5 - Déplacement de la machine modèle BH+50F - BH+80F - BH+180F 3.4 - Raccordement à l’installation électrique 3.4.1 - Machine triphasée de 400 volt 50/60 Hz et machine triphasée de...
- Page 55 Utilisation de la machine 6.1 - Prescriptions 6.2 - Mode d’emploi du mélangeur 6.3 - Vidange et nettoyage de l’appareil BH+25T 6.4 - Vidange et nettoyage de l’appareil BH+50F - BH+80F - BH+180F 6.5 - Montage ustensile BH+25T 6.6 -...
- Page 57 1 Livraison et garantie Introduction Les symboles utilisés dans ce manuel servent à attirer l’attention du lecteur sur les points et les opérations dangereuses qui pourraient mettre en danger la sécurité per- sonnelle de l’opérateur ou endommager la machine même. Ne pas utiliser la machine si on n’est pas certain d’avoir compris parfaitement le con- tenu des encadrements intitulés: ATTENTION .
- Page 58 à l’autre mais sur deux axes parallèles. Pour faciliter la vidange de la cuve dans le modèle de 25 kg ((BH+25T), il suffit de lever complètement le bandeau, extraire l’hélice après avoir pétri le produit et éteint le moteur.
- Page 59 Usages non autorisés Le mélangeur doit être utilisé uniquement pour les usages prévus par le constructeur, et plus précisément: Ne pas utiliser la machine pour mélanger des produits alimentaires autres que la vi- ande. Ne pas utiliser la machine si toutes les protections n’ont pas été installées correcte- ment pour éviter tout risque de lésions graves aux personnes.
Need help?
Do you have a question about the BH+25T and is the answer not in the manual?
Questions and answers