
Related Manuals for Spin Master COOL MAKER


Summary of Contents for Spin Master COOL MAKER
- Page 1 AIRBRUSH STYLING STUDIO V I SI T: xA A www.coolmaker.com BATTERIES YEARS NOT INCLUDED...
-
Page 2: Battery Safety Information
IMPORTANT: For indoor dry locations use only. Requires 2 x AA 1.5 V (LR6) Clean the product with a dry cloth only. Do not batteries (not included). store or use product near heat, sparks or flame. Batteries or battery packs must be recycled or BATTERY SAFETY INFORMATION: Batteries are... -
Page 3: How To Install Batteries
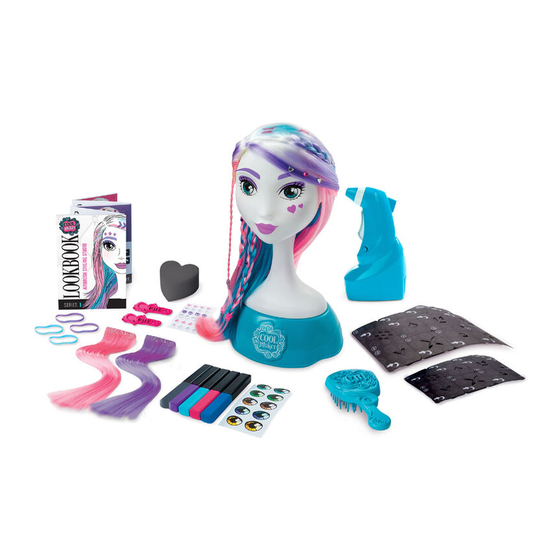
Battery *Requires 2 AA (LR6) Batteries Compartment: Not Included. HOW TO INSTALL BATTERIES: Ensure machine is in OFF position. 1. Open the battery door with a screwdriver. 2. If used batteries are present, remove these batteries from the unit by pulling up on one end of each battery. - Page 4 1 Cool Maker™ Styling Model 5 Style Sticks 5 x 0.03 oz (0.85g) 1 Cordless Airbrush 2 Clip in Extensions 2 Sheets of Makeup Stencils 2 Sheets of Hair Stencils 4 Hair Elastics 2 Hair Clips 1 Sheet of Eye Color Stickers...
- Page 5 *Requires 2 AA Diagram: (LR6) Batteries Not Included. Spray Nozzle Style Stick Start/Stop Trigger ON/OFF Switch AIRBRUSH Removeable MODEL base to store materials. DIRECTIONS FOR USE: Do not use markers with this product other than Cool Maker™ style sticks.
-
Page 6: How To Use
How to Use Airbrush: Push switch to turn ON and OFF. Keep switch OFF until ready to spray. Push style stick in until you feel a click. Hold the airbrush on an angle with the tip 2 finger widths away from a scrap piece of paper. -
Page 7: Tips & Techniques
* Remember, hold airbrush nozzle 2 finger widths from surface. DO NOT spray airbrush directly against surface. Tips & Techniques: • Before getting started, cover play surface to avoid mess. • Gently pull style stick out of airbrush and recap after use to avoid drying out. •... - Page 8 Hair Highlights TIP 1: Highlight white hair for best color results. TIP 2: Brush hair after highlighting for a softer, more natural look. Hold section of hair by Change colors ends, (away for different from model) sections of hair! and spray back and forth until Style hair.
- Page 9 Hair Brush all hair root to tip. Stencils Gently separate stencil on perforation and punch out shape. Please refer to page 6 for Airbrush setup. For best results, use hair clip to TIP: keep stencil area in place. Avoid Keep hand holding stencil using stencils on loose hair.
- Page 10 DO NOT spray airbrush directly against surface. Peel back sticker stencil ensuring full design is popped out. Save backing. OUTSIDE EDGE TIP: To reuse, place sticker stencil back on backing and wipe excess Gently spray short bursts two finger marker off stencil with papertowel. widths from stencil.
- Page 11 Makeup TIP: Stencils Apply eyeshadow stencil before eyebrow stencil. eyebrow eyebrow eye shadow eye shadow eyebrow eyebrow eye shadow eye shadow Customize with gems & eye * For best result, do not leave make-up color stickers. on model for more than 1 day. @coolmaker Check Out for How-To Videos!
- Page 12 Lookbook Learn to style like a Pro! Recreate your favorite looks on the models Recreate this hairstyle. Use the numbers to help you find the correct hair stencils. Use the letters to help you find the correct makeup stencils. Your color pallette.
- Page 13 Design your own styles on the blank templates in the Lookbook! Record which hair stencils you used. Fill in your lip color. Fill in your color palette. Record which makeup stencils Name your look. you used. ™ www.coolmaker.com...
- Page 14 Create Ombre Styles! When airbrushing with makeup or hair stencils, switch colors half way through spraying to Braid three different blend colors. colored highlights!
- Page 15 Advanced Dampen a lock of hair and Styling wrap around a pencil for tight curls. When doing makeup TIP: Make sure to apply best to spray in short eyeshadow before eyebrows bursts. to avoid smudging. When spraying a stencil next to another, be careful no to smudge the first stencil.
- Page 16 Hair Open hair extension clip by using both thumbs Extensions to bend to the ends of the clip. To make hair longer, hook the clip as high as possible on to the blue Apply extensions section of hair. to your own hair! TIP: To separate white and pink hair sections from the blue use elastics.
- Page 17 How to Clean: TIP: Shampoo and conditioner Remove can be used to model from freshen the hair base and periodically. rinse model under water warm. Use soap if needed. Use the hairbrush to comb the color Use a soft cloth to dry. out of hair.
- Page 18 PROBLEM: SOLUTION: Try removing the style stick and wiping the airbrush nozzle with a Uneven Spray paper towel. Hold a piece of paper behind or around the section of hair you’re Color In Wrong Area spraying, to shield from model’s face or hair. Leftover Ink In Airbrush Wipe the tip of the airbrush with a paper towel and do a test spray.
- Page 19 Cool Maker! ™ Be a Sew it with the SEW N’ STYLE MACHINE! Shape it with the POTTERY STUDIO! Style it with the AIRBRUSH STYLING STUDIO! Each sold separately.
- Page 20 Do not store or use product near heat, sparks or flame. a WARNING: CHOKING HAZARD – Small parts. Spin Master Ltd. reserves the right to discontinue use of the www.coolmaker.com website at a CAUTION : Stickers are not intended to be placed on skin.
Need help?
Do you have a question about the COOL MAKER and is the answer not in the manual?
Questions and answers