Table of Contents
Advertisement
Quick Links
YARDMAX�
Walk-Behind Blower
Operator
MODEL NUMBER
YF1565
SERIAL NUMBER
PURCHASE DATE
Both model number and serial
number may be found on the
main
label.
(See
Page 2, Figure
You should record both of them
in a safe place for future use.
READ AND UNDERSTAND THE ENTIRE MANUAL BEFORE OPERATING MACHINE. FAIL URE
TO COMPLY WITH THE SAFETY INSTRUCTIONS IN THE MANUAL MAY RESULT IN PERSONAL
1
s Manual
1)
INJURY.
Save This
Manual
for Future Reference
Tame the Great Outdoors·
Advertisement
Table of Contents

Subscribe to Our Youtube Channel
Related Manuals for YARDMAX YF1565

Summary of Contents for YARDMAX YF1565
- Page 1 Save This Manual for Future Reference YARDMAX� Walk-Behind Blower Operator s Manual MODEL NUMBER YF1565 SERIAL NUMBER PURCHASE DATE Both model number and serial number may be found on the main label. (See Page 2, Figure You should record both of them in a safe place for future use.
-
Page 2: Table Of Contents
YARDMAX� great outdoors? When looking for outdoor power equipment (OPE) to get the job done right, at the right price, YARDMAX delivers Up for the job? YARDMAX is. the perfect combination of performance and practicality. YARD MAX has a solution that's right for you. - Page 3 WARNING YARDMAX reserves the right to discontinue, change, c om p o n e nts c o n t a i n or emit chemicals known to the state and improve its products at any time without notice California to cause cancer and birth or obligation to the purchaser.
-
Page 4: Specifications
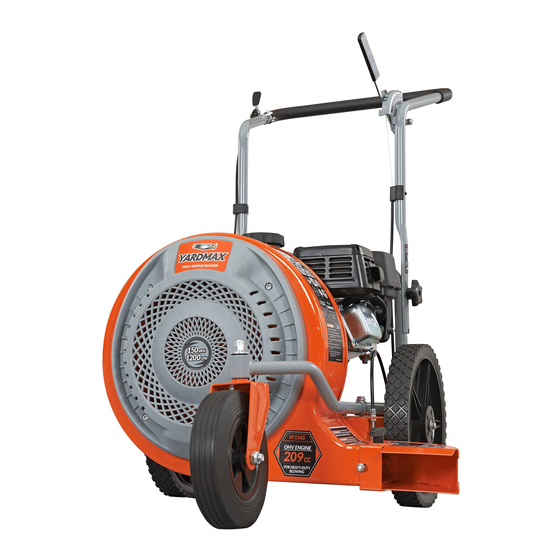
SUPPORT Have questions about your YARDMAX equipment? Call us at 847-327-0566 or 844-YARDMAX, email us at support@yardmax.com, or contact us via your favorite social media site. SPECIFICATIONS Model Number YF1565 Displacement 209cc Max. Air Volume 1200CFM Max. Air Speed 150 MPH Impeller Diameter 13"... -
Page 5: Symbols
Walk-Behind Blower » Operator's Manual SYMBOLS The rating plate on your machine may show symbols. These represent important information about the product or instructions on its use. & eo ... e 1 .. Keep children and bystanders at least 50 feet (15m) away. DANGER! WARNING! or CAUTION! •... -
Page 6: Safety
SAFETY The definitions below give the level of severity for each signal word. This symbol points out safety This symbol points out important instructions. Read and follow all safety instructions. This machine WARNING instructions before attempting to was built to be operated according operate this machine. - Page 7 Walk-Behind Blower » Operator's Manual Take precautions when using to reduce the chance of serious INSPECT YOUR MACHINE personal injury. Check your machine before starting it. Keep guards in place and in working order. Make sure all nuts, bolts, etc., are securely When refilling or draining the fuel tank, use an approved fuel tightened.
- Page 8 SPECIFIC SA.FETY RULES Identify hazards and take preventive steps to avoid accidents Never leave the operating position when the engine is running. and minimize risk. Possible hazards include, but are not limited Always shut down the engine, and ensure the engine is switched to, moving parts, thrown objects, weight of the machine and to "off"...
-
Page 9: Contents Supplied
Many accidents are caused by poorly maintained equipment. To maintain your machine, check for any misalignment of binding CONTENTS SUPPLIED Your YARDMAX walk-behind blower comes partially assembled and contains the following: � i '. � • �... -
Page 10: Assembly
ASSEIMBLY This walk-behind blower was partially assembled at the factory. To assemble your machine follow the below instructions. FRAME Insert the end of the front swivel caster tube into the opening of the frame tube, and align the holes. Attach the tubes to the engine deck with M8x40 bolt, arc washer, spring washer and lock nut in four places. - Page 11 Walk-Behind Blower Operator's Manual » UPPER HANDLE THROTTLE CONTROL LEVER Mount the throttle control lever onto the right upper handle with There are two positions which � NOTE the handle can be attached a high M5x25 screw and lock nut. Tighten securely using a 8mm wrench position and a lower position.
- Page 12 FLOW ANGLE ADJUSTMENT CONTROL CABLE FRONT DISCHARGE CHUTE Attach the Z type end of the cable into the lever as shown. (See The front discharge chute is used to Figure illustration � NOTE redirect the air flow to the front of the blower.
-
Page 13: Know Your Machine
Walk-Behind Blower » Operator's Manual KNOW YOUR MACHINE FEATURES ANID CONTROLS l•Hffi05«@® 3M§ •-------------- � ■ Upper Handle Frame Tube lift\Hi¥%i: Intake Guard Front Discharge Chute lii·lllftbtildi§ Discharge Chute Know Your Machine I... - Page 14 Air Cleaner Muffler Spark Plug ©Ni Plffltiii§ --4i•lif.iffiM=Mil .;:--___ "'"'----� Carburetor Fuel Filler Cap DMffliA, Oil Filler Cap/ Dipstick Oil Drain Plug Know Your Machine...
- Page 15 Walk-Behind Blower » Operator's Manual Flow Angle Adjustment Index Lever Throttle Control Lever Transits the movement from control lever to the air Regulates the speed of engine. Moving flow louver. FAST9 towards to speed up the engine. Moving towards LOW-A to lower the engine Recoil Starter Handle speed.
-
Page 16: Operation
STARTING AND OPERATING YOUR WALK-BEHIND BLOWER 1. The engine must be off and allowed to cool at least two minutes WARNING Keep all bystanders, especially before adding fuel. CHILDREN, away during operation. 2. Remove the fuel filler cap and fill the tank. (See engine manual Never start or run the engine inside for fuel capacity, fuel recommendation, and location of fuel cap.) a closed area or in poorly ventilated... - Page 17 Walk-Behind Blower » Operator's Manual Figure adjustment control lever (See 13) to move the air flow 3. Move the throttle control lever slightly louver. forward to about¼ of the way (slightly toward the fast position). • Move the lever upward (away from you) to direct airflow 4.
-
Page 18: Maintenance
STORAGE OF THE FRONT DISCHARGE CHUTE- When not in use, the front discharge chute can be stored under the frame at the rear of the blower. Take fol low steps to secure the attachment for storage. 1. Orient the attachment so the "THIS SIDE UP FOR STORAGE" is up. - Page 19 Walk-Behind Blower » Operator's Manual REGULAR MAINTENANCE CHECKLIST---- Refer to the engine manual packed separately with your unit for detailed NOTE The service intervals shown are the maximum under normal information and a maintenance operating conditions. Increase frequencies under extremely dirty schedule.
-
Page 20: Storage
STORAGE If the walk-behind blower will not be used for a period longer than Do not use strong detergents or 30 days, fol low the steps below to prepare your unit for storage. petroleum-based cleaners when CAUTION 1. Drain the fuel tank completely. Stored fuel contains ethanol or cleaning plastic parts. - Page 21 Walk-Behind Blower » Operator's Manual Connect and tighten spark plug wire Spark plug wire is loose Move choke lever to OPEN position Unit running with choke lever in Clean fuel line, and fill tank with clean, CLOSE position fresh gasoline Blocked fuel line or stale fuel Engine runs erratically Clear vent...
-
Page 22: Parts Diagram
PARTS DIAGRAM �� l��;;:jjV- 3� Parts Diagram... -
Page 23: Parts List
Walk-Behind Blower » Operator's Manual PARTS LIST Description Description Q TY . Q TY . Bolt M6x16 Frame Tube Flat Washer 6 Bolt M8x40 Intake Guard Arc Washer Bolt M8x1x30 Star Knob Flat Washer MB Flow Angle Control Cable Control Lever Handle Bolt M8x50 Control Lever Plate Fan Housing... - Page 24 Tame the Great Outdoors* 847-327-0566 or 844-YARDMAX info@yardmax.com...
Need help?
Do you have a question about the YF1565 and is the answer not in the manual?
Questions and answers