Honeywell Home VisionPRO 8000 Smart TH8321WF1001 User Manual
Hide thumbs
Also See for VisionPRO 8000 Smart TH8321WF1001:
- Manual (144 pages) ,
- User manual (76 pages)
Table of Contents
Advertisement
Available languages
Available languages
VisionPRO® 8000 Smart
User Guide
TH8321WF1001,
Read before installing
Features of your VisionPRO 8000 Smart thermostat
With your new thermostat, you can:
• Connect to the Internet to monitor and control your heating/cooling system.
• View and change your heating/cooling system settings.
• View and set temperature and schedules.
• Receive alerts via email and get automatic upgrades.
• View outdoor temperature and humidity.
• Download the free Total Connect Comfort app.
Once connected to Wi-Fi and registered to Total Connect Comfort, you can control
your thermostat from anywhere through your laptop, tablet, or smartphone with
the Total Connect Comfort app. The Total Connect Comfort free app is available
for Apple
iPhone
®
Android™ devices.
Search for local rebates: HoneywellHome.com/Rebates
, iPad
and iPod touch
®
®
GET IT ON
For assistance please visit www.resideo.com,
or call toll-free: 1-855-733-5465
devices at iTunes
®
Need Help?
or at Google Play
®
Download on
iTunes
for all
®
Advertisement
Chapters
Table of Contents

Subscribe to Our Youtube Channel
Related Manuals for Honeywell Home VisionPRO 8000 Smart TH8321WF1001


Summary of Contents for Honeywell Home VisionPRO 8000 Smart TH8321WF1001
- Page 1 VisionPRO® 8000 Smart User Guide TH8321WF1001, Read before installing Features of your VisionPRO 8000 Smart thermostat With your new thermostat, you can: • Connect to the Internet to monitor and control your heating/cooling system. • View and change your heating/cooling system settings. •...
-
Page 2: Table Of Contents
Table of contents Programming and Operation Setting preferences ......15 Cleaning the thermostat Quick reference ........1 screen ..........15 Connecting to Wi-Fi ......2 Security settings......16 Registering your Viewing dealer information ..16 thermostat online ......3 Advanced features ......17 Setting the time/date ...... 5 Disconnecting your Setting the fan ........ -
Page 3: Quick Reference
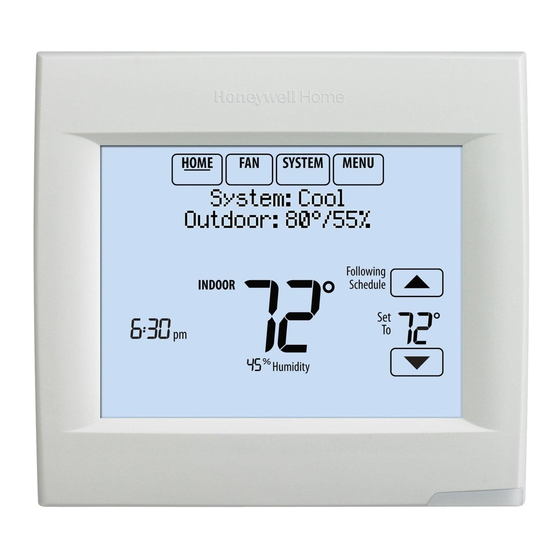
Quick reference: residential use The screen lights when you press any button. It stays lit for 45 seconds after you complete changes. Depending on how your thermostat was installed, the screen light may always be on. HOME. Touch to display Home screen. FAN. -
Page 4: Connecting To Wi-Fi
Connecting to Wi-Fi 1 Connect to the Wi-Fi network. 1.1 Touch MENU DoaIol Inrol Madorl 1.2 Select Wi-Fi Setup. Wi-Fi Setup The thermostat will scan for available Wi-Fi Installer Options networks. 1.3 The screen displays “Finding Networks M35352 Please Wait” after which it displays a list of all Wi-Fi networks it can find. -
Page 5: Registering Your Thermostat Online
Registering your thermostat online To view and set your Wi-Fi thermostat remotely, you must have a Total Connect Comfort account. Use the following steps. 1 Open the Total Connect Comfort web site. Go to mytotalconnectcomfort.com M31570 2 Login or create an account. If you have an account, click Login –... - Page 6 Registering your thermostat online 3 Register your Wi-Fi thermostat. Thermostat ID Card After you are logged in to your Use the MAC ID and CRC ID to register this product at mytotalconnectcomfort.com Total Connect Comfort account, Carte d’identification de thermostat Utilisez l’identification MAC et l’identification CRC pour enregistrer register your thermostat.
-
Page 7: Setting The Time/Date
Setting the time/date 1 Touch the current time. The screen displays Select Option. 2 Touch Time or Date, then touch Select. 3 Touch s or t until the proper time/date is displayed. MCR34092 4 Touch Done to save or Cancel to ignore changes. -
Page 8: Setting System Mode
Setting system mode 1 Touch SYSTEM to display system settings. 2 Touch desired option: MCR34098 Heat: Controls only the heating system. Cool: Controls only the cooling system. Heat Cool Auto Off: Heating/cooling systems are off. Auto: Selects heating or cooling depending on the indoor temperature. -
Page 9: Adjusting Program Schedules
Adjusting program schedules 1 Touch MENU. 2 Select Edit Schedule to display Use MCR34100 Scheduling Assistant? Touch Yes to create a schedule by • answering simple questions. Edit Schedule • Touch No to manually create a View Schedule program schedule. 3 Select the days to schedule, touch Next. - Page 10 Overriding schedules: residential use 1 Touch s or t to adjust the temperature (right side of screen) and the Hold Until Temporary Hold time (left side). The schedule will resume Permanent Hold when the Hold Until time expires. 2 Select Permanent Hold to keep the same temperature until you change it or resume the program schedule.
-
Page 11: Viewing Equipment Status
Viewing equipment status 1 Touch MENU. 2 Select Equipment Status. MCR34100 3 Touch s or t to view the status of all the equipment your thermostat is controlling. Depending on how your thermostat was Equipment Status installed, the Equipment Status screen Date/Time can report data about the following systems:... -
Page 12: Setting Holiday/Event Schedules: Commercial Use
Setting holiday/event schedules: commercial use This feature helps you conserve energy when the workplace is unoccupied for MCR34100 special events and holidays. 1 Touch MENU. 2 Select Holiday Schedule. Holiday Schedule Holiday Mode 3 Select the item you want to schedule and touch Next for further scheduling details. - Page 13 Setting holiday schedule: commercial use This feature lets you customize temperature settings to be maintained on specified Add / Edit Holidays national holidays. The thermostat resumes normal scheduling between selected holidays. MCR34119 1 Select US Holidays or Canadian Holidays from the Holiday Schedule menu.
- Page 14 Initiating occupancy mode: commercial use This feature keeps temperature at an energy-saving level until you touch Press Press HERE HERE to Start Occupancy. When you Start Occupancy arrive, touch the message to maintain a comfortable temperature while the room is occupied.
-
Page 15: Dehumidification
Adjusting dehumidification settings: residential use This feature can control a dehumidifier or use your air conditioner to reduce MCR34100 humidity. 1 Touch MENU and select Dehumidification. 2 Select Auto. Dehumidification Equipment Status 3 Touch s or t to select humidity level. 4 Touch Done to save your settings. - Page 16 Adjusting ventilation settings 1 Touch MENU, and select Ventilation. 2 Select Mode, Temporary Boost, or Lockout, MCR34100 then select appropriate options. (For options, see below.) 3 Touch Done to save your settings. Touch Ventilation Cancel to ignore changes. Equipment Status MCR34132 Mode Temporary Boost...
-
Page 17: Setting Preferences
Setting preferences Preference menu options let you select how the thermostat displays information or MCR34100 responds to certain situations. 1 Touch MENU and select Preferences. 2 Select an option and follow prompts: Preferences • Reminders to change filters Clean Screen •... -
Page 18: Security Settings
Adjusting security settings You can adjust security options to prevent unauthorized changes to system settings. MCR34100 1 Touch MENU and select Security Settings. 2 Select an option and follow prompts: Unlocked: Full access allowed. Security Settings Dealer Information Partially locked: Only temperature can be changed. -
Page 19: Advanced Features
Advanced features Adaptive Intelligent Recovery (residential use only)—Over time, the VisionPRO ® thermostat “learns” how long it takes your system to reach the temperature you want. It turns on the heating or cooling system earlier to make sure you’re comfortable at the time you expect. The thermostat displays “In Recovery” when it turns the system on early. -
Page 20: Reconnecting Your Wi-Fi Network
Reconnecting your Wi-Fi network 1 Touch MENU. Select Wi-Fi Setup. 2 Find the name of the network you want to use DoaIol Inrol Madorl Wi-Fi Setup by pressing the arrow buttons to scroll up/down Installer Options or left/right. Press the Wi-Fi network name, then press Select. -
Page 21: Checking Signal Strength
Checking signal strength You can check signal strength at any time after the thermostat is connected to the Wi-Fi Network: Wi-Fi network by pressing MENU then Wi-Fi YourNetwork Setup. M35365 Signal strength is 75%–100% Signal strength is 50%–75% Signal strength is 0%–50% Unsuccessful connection If you are unsuccessful in connecting the thermostat to the Wi-Fi network, you will see a Connection Failed screen. -
Page 22: Connecting To A Hidden Wi-Fi Network
Connecting to a hidden Wi-Fi network If the Wi-Fi network name is hidden and it doesn’t show up in the list in “Connecting to Wi-Fi” follow these steps to connect to it. 1 Press MENU, then Wi-Fi Setup. DoaIol Inrol Madorl Wi-Fi Setup Installer Options M35352... -
Page 23: Installer Options
Installer options Installer options require a password and should only be changed by a qualified MCR34100 technician. To prevent unintended changes or damage to your equipment, do not Installer Options change these options yourself. MCR33976 Enter password 0 0 0 MCR33977 Troubleshooting If you have difficulty with your thermostat, try these suggestions. -
Page 24: Regulatory Information
The Honeywell Home trademark is used under license from Honeywell International, Inc. This product is manufactured by Resideo Technologies, Inc. and its affiliates. Tous droits réservés. La marque de commerce Honeywell Home est utilisée avec l’autorisation d’Honeywell International, Inc. Ce produit est fabriqué par Resideo Technologies, Inc. - Page 25 VisionPRO® 8000 Smart Guide de l’utilisateur TH8321WF1001, Lire avant l’installation Caractéristiques de votre thermostat VisionPRO 8000 Smart Avec votre nouveau thermostat, vous pouvez : • Vous connecter à Internet pour surveiller et contrôler votre système de chauffage/ refroidissement. • Consulter et modifier les réglages de votre système de chauffage/refroidissement. •...
- Page 26 Table des matières Programmation et Réglages de sécurité .....16 Affichage des informations fonctionnement du distributeur .........16 Référence rapide ....... 1 Fonctions avancées .......17 Connexion au réseau Wi-Fi ... 2 Déconnexion du réseau Enregistrement de votre Wi-Fi .............17 thermostat en ligne ......3 Reconnexion au réseau Réglage de l’heure/la date ....
-
Page 27: Référence Rapide
Référence rapide : utilisation résidentielle L’écran s’allume lorsque vous appuyez sur n’importe quel bouton. Il reste allumé pendant 45 secondes une fois les modifications terminées. En fonction de l’installation du thermostat, l’écran peut rester allumer en permanence. HOME (ACCUEIL). Touchez pour afficher l’écran Accueil (Home). -
Page 28: Connexion Au Réseau Wi-Fi
Connexion au réseau Wi-Fi 1 Connectez-vous au réseau Wi-Fi. DoaIol Inrol Madorl 1.1 Touchez MENU Wi-Fi Setup Installer Options 1.2 Sélectionnez Wi-Fi Setup. Le thermostat détecte les réseaux Wi-Fi disponibles. M35352 1.3 L’écran affiche « Finding Networks Please Wait » (Recherche de réseaux, veuillez patienter) après lequel une liste de tous les Finding Networks réseaux Wi-Fi détectés s’affiche. -
Page 29: Enregistrement De Votre Thermostat En Ligne
Enregistrement de votre thermostat en ligne Pour visualiser et régler votre thermostat Wi-Fi à distance, vous devez posséder un compte Total Connect Comfort. Voici comment procéder. 1 Ouvrez le site web Total Connect Comfort. Allez à mytotalconnectcomfort.com M31570 2 Ouvrez une session ou créez un compte. Si vous possédez un compte, cliquez sur Login (Ouvrir une session) une session –... - Page 30 Enregistrement de votre thermostat en ligne 3 Enregistrez votre thermostat Wi-F. Thermostat ID Card Use the MAC ID and CRC ID to register Lorsque vous avec accès à votre this product at mytotalconnectcomfort.com Carte d’identification de thermostat compte Total Connect Comfort, Utilisez l’identification MAC et l’identification CRC pour enregistrer ce produit à...
-
Page 31: Réglage De L'heure/La Date
Réglage de l’heure/la date 1 Touchez l’heure courante. L’écran affiche Select Option (Sélectionner Option). 2 Touchez l’heure ou la date, puis Select (Sélectionner). 3 Touchez s ou t jusqu’à ce que l’heure/la date adéquates s’affichent. MCR34092 4 Touchez Done (Terminer) pour enregistrer ou Cancel (Annuler) pour ignorer les changements. -
Page 32: Réglage Du Mode Du Système
Réglage du mode du système 1 Touchez SYSTEM (SYSTÈME) pour afficher les réglages du système. MCR34098 2 Touchez l’option désirée : Heat (Chauffage) : commande uniquement le système de chauffage. Heat Cool Auto Cool (Refroidissement) : commande uniquement le système de refroidissement. Off (Arrêt) : les systèmes de chauffage et MCR34099 de refroidissement sont arrêtés. - Page 33 Réglage des horaires de programmation 1 Touchez MENU. 2 Sélectionnez Edit Schedule (Modifier MCR34100 programme) pour afficher Use Scheduling Assistant? (Utiliser l’Assistant de programmation?) Edit Schedule • Touchez Yes (Oui) pour créer un View Schedule programme en répondant à de simples questions.
- Page 34 Dérogation aux programmes : utilisation résidentielle 1 Touchez s ou t pour régler la température (côté droit de l’écran) et Temporary Hold l’heure Maintien jusqu’à (Hold Until) Permanent Hold (côté gauche). Le programme reprend lorsque l’heure Maintien jusqu’à (Hold Until) a expiré. 2 Sélectionnez Permanent Hold (Maintien permanent) pour maintenir la même température jusqu’à...
-
Page 35: Affichage Du Statut De L'équipement
Affichage du statut de l’équipement 1 Touchez MENU. 2 Sélectionnez Equipment Status (Statut de MCR34100 l’équipement). 3 Touchez s ou t pour afficher le statut de tout l’équipement contrôlé par le Equipment Status thermostat. En fonction de l’installation Date/Time du thermostat, l’écran de statut de l’équipement peut indiquer les données MCR34108 relatives aux systèmes suivants :... -
Page 36: Réglage Des Programmes Vacances/Jours Fériés : Utilisation Commerciale
Réglage des programmes vacances/jours fériés : utilisation commerciale Cette fonction permet de conserver de l’énergie lorsque personne ne se trouve sur MCR34100 le lieu de travail durant les jours fériés et les événements spéciaux. 1 Touchez MENU. Holiday Schedule 2 Sélectionnez Holiday Schedule (Programme jours Holiday Mode fériés). - Page 37 Réglage du programme jours fériés : utilisation commerciale Cette fonction vous permet de personnaliser les réglages de température à maintenir durant Add / Edit Holidays un jour férié national spécifique. Le thermostat reprend le programme normal entre les jours fériés sélectionnés. 1 Sélectionnez US Holidays (Jours fériés É.-U.) ou MCR34119 Canadian Holidays (Jours fériés Canada) dans le...
-
Page 38: Réglage De L'humidification
Lancement du mode Occupé : utilisation commerciale Cette fonction maintient la température à un niveau économique jusqu’à ce que vous Press HERE HERE touchez Press to Start Occupancy Start Occupancy (Appuyer ICI pour commencer la période Occupée). À l’arrivée, touchez le message pour maintenir une température confortable pendant que la pièce est occupée. - Page 39 Réglages de déshumidification : utilisation résidentielle Cette fonction permet de contrôler un déshumidificateur ou d’utiliser le MCR34100 climatiseur pour réduire l’humidité. 1 Touchez MENU et sélectionnez Dehumidification (Déshumidification). Dehumidification 2 Sélectionnez Auto (Automatique). Equipment Status 3 Touchez s ou t pour sélectionner le niveau d’humidité.
-
Page 40: Réglage De La Ventilation
Réglage de la ventilation 1 Touchez MENU et sélectionnez Ventilation. 2 Sélectionnez Mode, Temporary Boost MCR34100 (Suralimentation provisoire) ou Lockout (Verrouillage), puis sélectionnez les options appropriées. (Voir les options ci-dessous.) Ventilation Equipment Status 3 Touchez Done (Terminer) pour enregistrer vos réglages. Touchez Cancel (Annuler) pour ignorer les changements. -
Page 41: Réglage Des Préférences
Réglages des préférences Les options du menu Préférences vous permettent de sélectionner la façon dont MCR34100 le thermostat affiche les informations ou répond à certaines situations. 1 Touchez MENU et sélectionnez Preferences Preferences (Préférences). Clean Screen 2 Sélectionnez une option et suivez les invites : •... -
Page 42: Réglages De Sécurité
Réglages de sécurité Vous pouvez régler les options de sécurité pour éviter les modifications non autorisées MCR34100 des réglages du système. 1 Touchez MENU et sélectionnez Security Settings (Réglages de sécurité). Security Settings 2 Sélectionnez une option et suivez les invites : Dealer Information Unlocked (Déverrouillé) : Accès intégral permis. -
Page 43: Fonctions Avancées
Fonctions avancées Système de récupération intelligent adaptatif (utilisation résidentielle ® uniquement)—Avec le temps, le thermostat VisionPRO « apprend » à reconnaître le temps requis par le système à obtenir la température désirée. Il active préalablement le chauffage ou le refroidissement pour garantir une température confortable au moment voulu. -
Page 44: Reconnexion Au Réseau Wi-Fi
Reconnexion au réseau Wi-Fi 1 Touchez MENU. Sélectionnez Wi-Fi Setup (Configuration Wi-Fi). DoaIol Inrol Madorl Wi-Fi Setup 2 Trouvez le nom du réseau que vous désirez Installer Options utilisant en appuyant sur les boutons fléchés pour défiler vers le haut/bas ou à gauche/droite. Appuyez sur le nom du réseau Wi-Fi, puis sur M35352 Select (Sélectionner). -
Page 45: Vérification De La Puissance Du Signal
Vérification de la puissance du signal Vous pouvez contrôler la puissance du signal à tout moment une fois que le Wi-Fi Network: thermostat est connecté au réseau Wi-Fi YourNetwork en appuyant sur MENU puis sur Wi-Fi Setup (Configuration Wi-Fi). M35365 La puissance du signal est de 75 % –... -
Page 46: Connexion À Un Réseau Wi-Fi Masqué
Connexion à un réseau Wi-Fi masqué Si le nom du réseau Wi-Fi est masqué et ne s’affiche pas dans la liste dans « Connexion au réseau Wi-Fi » (Connecting to Wi-Fi), suivez ces étapes pour établir la connexion. 1 Appuyez sur MENU, puis sur Wi-Fi Setup DoaIol Inrol Madorl (Configuration Wi-Fi). -
Page 47: Options De L'installateur
Options de l’installateur Les options de l’installateur requièrent un mot de passe et ne doivent être modifiées MCR34100 que par un technicien qualifié. Pour éviter les changements accidentels et les dommages de l’équipement, ne Installer Options modifiez pas ces options vous-même. MCR33976 Enter password 0 0 0... -
Page 48: Informations Réglementaires
The Honeywell Home trademark is used under license from Honeywell International, Inc. This product is manufactured by Resideo Technologies, Inc. and its affiliates. Tous droits réservés. La marque de commerce Honeywell Home est utilisée avec l’autorisation d’Honeywell International, Inc. Ce produit est fabriqué par Resideo Technologies, Inc. - Page 49 VisionPRO® 8000 Smart Guía del usuario TH8321WF1001, Leer antes de instalar Características de su termostato inteligente VisionPRO 8000 Con el nuevo termostato, podrá realizar lo siguiente: • Conectarse a Internet para supervisar y controlar el sistema de calefacción/refrigeración. • Ver y modificar las configuraciones del sistema de calefacción/refrigeración. •...
- Page 50 Índice Programación y Configurar ventilación ....14 Configurar preferencias ....15 funcionamiento Limpieza de la pantalla Referencia rápida ......1 del termostato ........15 Conexión a una red WiFi ....2 Configuraciones Registro del termostato de seguridad ........16 en línea ..........3 Ver información Configurar la hora y el día .....
-
Page 51: Referencia Rápida
Referencia rápida: uso residencial La pantalla se ilumina cuando presiona cualquier botón. Permanece iluminada durante 45 segundos después de que efectúa cambios. Dependiendo de la forma como se instaló su termostato, la luz de la pantalla puede estar siempre encendida. HOME (INICIO). -
Page 52: Conexión A Una Red Wifi
Conexión a una red WiFi 1 Conéctese a la red WiFi. 1.1 Toque MENU DoaIol Inrol Madorl 1.2 Seleccione Wi-Fi Setup (Configuración de Wi-Fi Setup WiFi). El termostato buscará las redes WiFi Installer Options disponibles. 1.3 La pantalla muestra “Finding Networks Please M35352 Wait”... -
Page 53: Registro Del Termostato En Línea
Registro del termostato en línea Para ver y configurar el termostato con conexión WiFi de manera remota, debe tener una cuenta en Total Connect Comfort. Siga los siguientes pasos. 1 Abra el sitio web Total Connect Comfort. Vaya a mytotalconnectcomfort.com M31570 Registro del termostato en línea 2 Inicie sesión o cree una cuenta. - Page 54 Registro del termostato en línea 3 Registre su termostato con conexión Thermostat ID Card WiFi. Use the MAC ID and CRC ID to register this product at mytotalconnectcomfort.com Después de que haya iniciado Carte d’identification de thermostat Utilisez l’identification MAC et l’identification CRC pour enregistrer sesión en su cuenta Total ce produit à...
-
Page 55: Configurar La Hora Y El Día
Configurar la hora y el día 1 Toque la hora actual. La pantalla muestra Select Opcion (Seleccionar opción). 2 Toque la hora o la fecha, y seguidamente Select (Seleccionar). 3 Toque s o t hasta que se muestre la hora/ fecha adecuada. -
Page 56: Configurar La Modalidad Del Sistema
Configurar la modalidad del sistema 1 Toque SYSTEM (SISTEMA) para mostrar las configuraciones del sistema. MCR34098 2 Toque la opción deseada: Heat (Calefacción): controla solo el sistema de calefacción. Heat Cool Auto Cool (Refrigeración): controla solo el sistema de refrigeración. MCR34099 Off (Apagado): se apagan los sistemas de calefacción/refrigeración. -
Page 57: Ajustar Los Cronogramas Del Programa
Ajustar los cronogramas del programa 1 Toque MENU. 2 Seleccione Edit Schedule (Editar MCR34100 programación) para mostrar Use Scheduling Assistant? (¿Usar asistente de programación? ) Edit Schedule • Toque Yes (Sí) para crear una View Schedule programación respondiendo preguntas simples. MCR34101 •... -
Page 58: Anular Los Cronogramas Del Programa
Anular los cronogramas del programa: uso residencial 1 Toque s o t para configurar la temperatura (lado derecho de la Temporary Hold pantalla) y la hora indicada en Mantener Permanent Hold hasta (Hold Until) (lado izquierdo). La programación se reanudará cuando finalice el tiempo de “Mantener hasta”. -
Page 59: Ver El Estatus Del Equipo
Ver estatus del equipo 1 Toque MENU (MENÚ). 2 Seleccione Equipment Status (Estatus del MCR34100 equipo). 3 Toque s o t para ver el estatus de todos los equipos que controla su termostato. Equipment Status Dependiendo de la forma como se instaló Date/Time su termostato, la pantalla de estatus del equipo puede generar información sobre... -
Page 60: Configurar Programación De Días Festivos/Eventos: Uso Comercial
Configurar programación de días festivos/eventos: uso comercial Esta función contribuye a conservar energía cuando el lugar de trabajo está desocupado MCR34100 durante eventos especiales o días festivos. 1 Toque MENU (MENÚ). 2 Seleccione Holiday Schedule (Programación de Holiday Schedule días festivos). Holiday Mode 3 Seleccione la función que desea programar y toque Next (Siguiente) para más detalles sobre... - Page 61 Configurar programación de días festivos: uso comercial Esta función le permite personalizar configuraciones de temperaturas para Add / Edit Holidays mantenerlas durante eventos nacionales específicos. El termostato reanuda la programación normal entre uno y otro evento seleccionado. MCR34119 1 Seleccione US Holidays o Canadian Holidays (Días festivos de EE.
-
Page 62: Configurar Humidificación Y Deshumidificación
Iniciar la modalidad de ocupación: uso comercial Esta función conserva la temperatura a un nivel de ahorro de energía hasta que Press HERE HERE toque Press to Start Occupancy Start Occupancy (Presionar AQUÍ para iniciar el período de ocupación). Cuando usted llegue, toque el mensaje para mantener una temperatura confortable mientras la habitación esté... - Page 63 Ajuste de la configuración de deshumidificación: uso residencial Esta función puede controlar un deshumidificador o usar el aire MCR34100 acondicionado para disminuir la humedad. 1 Toque MENU (MENÚ) y seleccione Dehumidification Dehumidification (Deshumidificación). Equipment Status 2 Seleccione Auto (Automático). MCR34130 3 Toque s o t para seleccionar el nivel de humedad.
-
Page 64: Configurar Ventilación
Configuración de ajuste de la ventilación 1 Toque MENU (MENÚ) y seleccione Ventilation (Ventilación). MCR34100 2 Seleccione Mode (Modalidad), Temporary Boost (Refuerzo temporal), o Lockout (Bloqueo) y las opciones adecuadas. Ventilation (Para las opciones, consulte más abajo.) Equipment Status 3 Toque Done (Terminado) para guardar sus configuraciones. -
Page 65: Configurar Preferencias
Configurar preferencias Las opciones del menú de preferencias le permiten seleccionar cómo el termostato MCR34100 muestra la información o responde ante ciertas situaciones. 1 Toque MENU (MENÚ) y seleccione Preferences Preferences (Preferencias). Clean Screen 2 Seleccione una opción y siga las instrucciones: MCR34170 •... -
Page 66: Configuraciones De Seguridad
Ajuste de las configuraciones de seguridad Se pueden utilizar las opciones de seguridad para evitar cambios no autorizados en las MCR34100 configuraciones del sistema. 1 Toque MENU (MENÚ) y seleccione Security Settings (Configuraciones de seguridad). Security Settings 2 Seleccione una opción y siga las instrucciones: Dealer Information Unlocked (Desbloqueado): Acceso total permitido. -
Page 67: Funciones Avanzadas
Funciones avanzadas Función de Adaptive Intelligent Recovery (para uso residencial únicamente)— ® Con el tiempo, el termostato VisionPRO “sabe” cuánto demora el sistema en alcanzar la temperatura que desea. Activa el sistema de calefacción o refrigeración más temprano para que esté confortable a la hora que usted espera. -
Page 68: Reconexión De Su Red Wifi
Reconexión de su red WiFi 1 Toque MENU. Seleccione la Wi-Fi Setup. 2 Busque el nombre de la red que desea utilizar DoaIol Inrol Madorl Wi-Fi Setup presionando los botones de flecha para Installer Options desplazarse hacia arriba/abajo o a la izquierda/ derecha. -
Page 69: Verificar La Potencia De La Señal
Verificar la potencia de la señal Puede verificar la potencia de la señal en cualquier momento después de conectar el Wi-Fi Network: termostato a la red WiFi presionando MENU YourNetwork y, luego, Wi-Fi Setup (Configuración de WiFi). M35365 La potencia de la señal es de 75 % a 100 %. La potencia de la señal es de 50 % a 75 %. -
Page 70: Conexión A Una Red Wifi Oculta
Conexión a una red WiFi oculta Si el nombre de la red WiFi está oculto y no aparece en la lista en “Connecting to Wi-Fi” (Conexión a la red WiFi), siga los pasos a continuación para conectarlo. 1 Presione MENU y, luego, Wi-Fi Setup DoaIol Inrol Madorl (Configuración de WiFi). -
Page 71: Opciones Del Instalador
Opciones del instalador Las opciones del instalador requieren una contraseña y solo deben ser cambiadas MCR34100 por un técnico calificado. Para evitar cambios imprevistos o daños al equipo, no cambie estas opciones Installer Options usted mismo. MCR33976 Enter password 0 0 0 MCR33977 Localización y solución de problemas Si tiene dificultades con el termostato, intente poner en práctica estas... - Page 72 Poliza de garantia IMPORTADO EN MEXICO POR: INSTROMET MEXICANA S DE R L DE C V Avenida Insurgentes 2453, Piso 6, Tizapan, Alvaro Obregon, Ciudad de Mexico, CP 01090 Telefono: 01 (55) 800 00423 Instromet Mexicana S. de R.L. de C.V. garantiza que éste producto está libre de defectos en su mano de obra y materiales contra cualquier defecto de fabricación y funcionamiento, bajo uso normal, por el término de 5 años a partir de la fecha de la compra por el consumidor.
-
Page 73: Información De Reglamentación
Información reguladora Declaración de conformidad con las regulaciones • Vuelva a orientar y ubicar la antena receptora. FCC (Sección 15.19) (solo en los EE. UU.) • Aumente la distancia entre el equipo y el receptor. Este dispositivo cumple con la Sección 15 de las •... - Page 74 33-00066EFS—05...
- Page 75 33-00066EFS—05...
- Page 76 The Honeywell Home trademark is used under license from Honeywell International, Inc. This product is manufactured by Resideo Technologies, Inc. and its affiliates. Tous droits réservés. La marque de commerce Honeywell Home est utilisée avec l’autorisation d’Honeywell International, Inc. Ce produit est fabriqué par Resideo Technologies, Inc.
Need help?
Do you have a question about the VisionPRO 8000 Smart TH8321WF1001 and is the answer not in the manual?
Questions and answers
have replaced the air filter - where is the "reset timer" that needs to be "pressed" when done
The reset timer for the air filter reminder on the Honeywell Home VisionPRO 8000 Smart TH8321WF1001 thermostat can be accessed under "Preferences." You must go into the thermostat settings and navigate to the IAQ reminders section to reset the air filter timer after replacement.
This answer is automatically generated