
Related Manuals for W-Tec Dealan


Summary of Contents for W-Tec Dealan
- Page 1 USER MANUAL – EN IN 21998 E-scooter W-tec Dealan IN 22334 E-scooter W-tec Dealan II...
-
Page 2: Table Of Contents
CONTENTS SAFETY INSTRUCTIONS ........................3 PRODUCT DESCRIPTION ........................4 ASSEMBLY ............................. 5 UNFOLDING ............................7 FOLDING ..............................8 CHARGING ............................. 9 STARTING AND STOPPING ........................9 CONTROL PANEL ..........................11 SETTINGS ............................12 CRUISE CONTROL ........................... 13 REAR SHOCK ABSORBER ADJUSTMENT ..................13 BRAKE ADJUSTMENT ......................... -
Page 3: Safety Instructions
SAFETY INSTRUCTIONS • The scooter is designed to carry one person at the same time. • Wear a helmet and other protective equipment, incl. proper boots. • Do not ride on dangerous or ineligible roads. • Before the first ride, try to control the scooter in the open spaces. If you are not sure, ask a more experienced person for advice. -
Page 4: Product Description
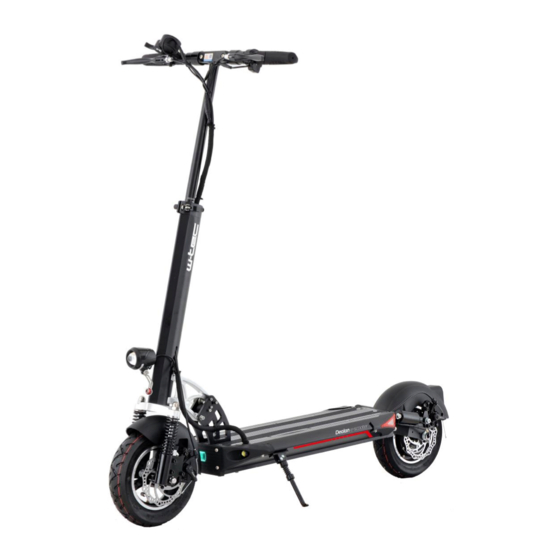
• Do not speed when riding down the hill. The breaking distance is longer and you can loose control of the scooter. • Weight limit: 120 kg PRODUCT DESCRIPTION LCD display Horn Accelerator Quick-release clamp for height adjustment Front brake lever The lower part of the handlebars Handles Front light... -
Page 5: Assembly
Lever for folding mechanism Rear fender Charging port Taillight On / off button Rear air shock absorber Pressure plate Engine Front side light Rear side lights Footrest Rear wheel 10 " Li-ion battery Stand Saddle location Handlebar mounting ASSEMBLY Check the contents of the package. The battery is already inserted in the scooter. - Page 6 Unfold the scooter by lifting the handlebars to a vertical position and then unfolding by grasping the footrest. Light position adjustment: Loosen the bolt with a 5 mm wrench Adjust the position of the light and tighten the bolt. Adjust the light angle.
-
Page 7: Unfolding
UNFOLDING Release the folding mechanism by pressing the button. Raise the handlebars, making sure the folding mechanism is locked. Release the quick release lever and set the desired handlebar height. Unfold the handles. -
Page 8: Folding
FOLDING Fold the handles in the direction of the arrows. Open the quick release lever and slide in the handlebars. Lock the quick release lever. After you have inserted the handlebars, press the button marked S and fold the handlebars towards the footrest. -
Page 9: Charging
CHARGING Open one of the charging ports and connect the charger. Then connect the charger to a wall outlet. The indicators are red (not charged) and green (charged). WARNING: • Do not use both ports at the same time, if you want to use two chargers you must use 2A chargers. - Page 10 Acceleration and slowing down are controlled by the accelerator and brakes. Carefully press the rear brake to decelerate. Sudden use of the front brake can cause loss of control. Use both brakes carefully to stop safely. If you have enabled electric braking in the setting, the braking force is significantly stronger.
-
Page 11: Control Panel
CONTROL PANEL Speed in km/h Speed units Battery charge indicator Speed mode Start button Accelerator Mode button Operation time To set the speed mode, when the display is on, press the button to display the current speed mode. Press buttonto set speed mode (L1 - low speed, L2 - medium speed, L3 - high speed). Press button to save and exit the settings. -
Page 12: Settings
Display Displayed values and their options 10 (cannot be changed) 430 (cannot be changed) 10 (cannot be changed) 0 (fixed value) Units: 0 – km/h 1 – mile/h Start mode 0 – with speed assistance 1 – using feet Cruise control 0 –... -
Page 13: Cruise Control
CRUISE CONTROL Cruise control allows you to automatically maintain a constant speed. You can start the function from: a) Settings b) By maintaining a constant speed for 7 seconds To end cruise control, press and release the brake. WARNING: For safety reasons, ride so that you can stop cruise control immediately. Cruise control cannot be controlled with the accelerator, turning off can only be done by pressing and releasing the brakes. -
Page 14: Brake Adjustment
BRAKE ADJUSTMENT Using the brakes wears the pads and the gap between the pads and the disc increases. If the brake is less effective, do the following: 1. Loosen the bolt with a 5 mm Allen key 2. The brake caliper is separated 3. - Page 15 5. Turn the bolt clockwise with a 5 mm wrench to bring the pads closer together, 6. In this position, turn clockwise. counterclockwise to move the pads away 8. The plates may not be at the correct 7. Insert back in the position shown. distance.
-
Page 16: Unusual Sounds During Braking
UNUSUAL SOUNDS DURING BRAKING If the brakes make unusual noises during braking, it is possible that they are only clogged with dirt. In this case, just clean the brakes. 1. Preview of plates and disk 2. Clean the area where the disc and pads touches with a cloth. -
Page 17: Baterry
• Check for proper tire pressure (45 psi) and condition. • Always wear personal protective equipment (helmet, protectors, etc.) • Beginners and older people must check the speed mode, always use the slow (ECO) driving mode. • Set the correct handlebar height. •... -
Page 18: Riding Technique
RIDING TECHNIQUE • Know the scooter before first use and test your ability to control this product. • Turn continuously and brake safely having enough free space. • Practice your first ride in an open area without obstacles. • Never let distract your mind during riding. Foot position –... -
Page 19: Technical Parameters
TECHNICAL PARAMETERS Engine type 52V 600W BLDC HUB motor, rear wheel drive Weight limit 120 kg Battery type EX plus, Li-polymer cells Battery capacity 26 AH (1347 Wh) Product weight approx. 23.7 kg (including battery) Charging time 11 - 12 hours (depending on battery condition) Range to charge 85 - 100 km * Maximal speed... - Page 20 According to valid legal regulations it depends whether the Buyer is the End Customer or not. “The Buyer who is the End Customer” or simply the “End Customer” is the legal entity that does not conclude and execute the Contract in order to run or promote his own trade or business activities. “The Buyer who is not the End Customer”...
- Page 21 The Seller shall settle the Warranty Claim within 30 days after the delivery of the defective Goods, unless a longer period has been agreed upon. The day when the repaired or exchanged Goods is handed over to the Buyer is considered to be the day of the Warranty Claim settlement. When the Seller is not able to settle the Warranty Claim within the agreed period due to the specific nature of the Goods defect, he and the Buyer shall make an agreement about an alternative solution.
Need help?
Do you have a question about the Dealan and is the answer not in the manual?
Questions and answers