Table of Contents
Advertisement
Quick Links
Advertisement
Table of Contents

Related Manuals for Atag OX6211B


Summary of Contents for Atag OX6211B
- Page 1 OX6211B manual...
-
Page 3: Table Of Contents
Contents Control Panel . . . . . . . . . . . . . . . . . . . . . . . . . . . . . . . . . . . . . . . . . . . . . . . . . . . . . . . . . . . . 4 Oven Features . -
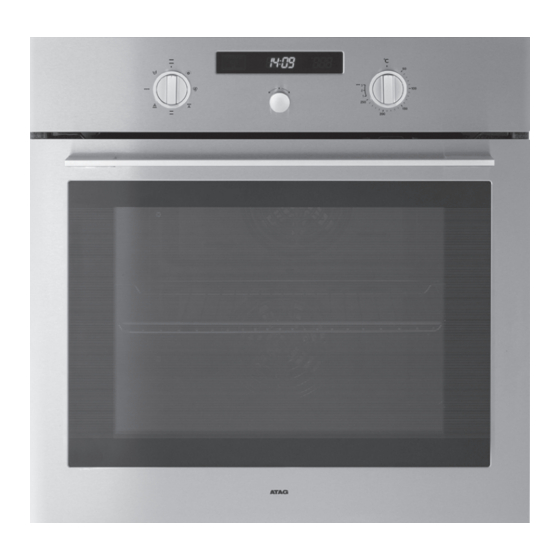
Page 4: Control Panel
Control Panel 1. FUNCTION SELECT KNOB 3. TEMP CONTROL KNOB 2. WINDOW DISPLAY 4. TIME SELECT KNOB... -
Page 5: Oven Features
Oven Features Control panel Top heating elements Level Level Level Level Level Oven light Glass door Door handle Note Shelf levels are numbered from the bottom up . ● The levels 4 and 5 are mainly used for the grill function . ●... -
Page 6: Accessories
Accessories The following accessories are provided with your oven: Front Baking tray Wire rack The baking tray could be used for the The wire rack should be used for preparation of cakes, cookies and dishes, cake tins, roasting and grilling other pastries . -
Page 7: Using This Manual
● In the event of a fault or damage to the appliance, do not attempt to operate it . ● Repairs should be performed by a licensed technician only . Improper repair may result in considerable danger to you and others . If your oven needs repair, contact the Atag Customer Service or your dealer . -
Page 8: Safety During Operation
Safety Instructions (Continued) Safety during operation ● This oven has been designed only for the cooking of household foods . ● During use, the oven interior surfaces become hot enough to cause burns . Do not touch heating elements or interior surfaces of the oven until they have had time to cool down . ● Never store flammable materials in the oven. -
Page 9: Installation And Connection
Installation and Connection Safety instructions for the installation This oven may be installed only by an approved electrician . The installer is responsible for connecting the appliance to the mains and in so doing for observing the relevant safety regulations . ● Ensure protection from live parts when installing the oven . -
Page 10: Connecting To The Mains Power Supply
Installation and Connection (Continued) ● Fix the oven on both sides using screws . ● After installation, remove the vinyl protective film from the door to the appliance and the protective film from the interior surfaces of the oven . Connecting to the mains power supply Electrical connections must be made as per the connection plate fixed to the back... -
Page 11: Settings
Settings Setting the Clock When power is first supplied to the oven, the display on the control panel will light briefly. After 3 seconds, you will see ‘12:00’ in the display. Press the Time Select Turn the Time Select Press the Time Select Knob, the hour figures Knob, set the desired Knob, the minute... -
Page 12: Oven Use
Oven Use Using the Fast Preheating( ) mode If you use the FAST PREHEATING option, you can increase the temperature up to the set value in no time . This will drastically shorten your waiting time until the preheating is done . Use the FAST PREHEATING option to increase the temperature to the set value until the preheating is completed . -
Page 13: Test Dishes
Oven Use (Continued) Test dishes According to standard EN 60350 1. Baking The recommendations for baking refer to preheated oven . Cooking Shelf Cooking Temp. Type of Food Dish & Notes time level Mode °C min. Small Cakes Baking tray Conventional 170-190 15-25 Fatless Baking tin on wire rack Conventional 160-180 25-35... -
Page 14: Cleaning And Care
Cleaning and Care Make sure the oven and accessories are cool before cleaning. Oven interior ● For cleaning the interior of the oven, use a clean cloth and a mild cleaning agent or warm soapy water . ● Do not hand-clean the door seal . ● Do not use scouring pads or cleaning sponges . ● To remove stubborn soil, use a special oven cleaner . -
Page 15: Door Removal
Cleaning and Care (continued) Door removal For normal use, the oven door must not be removed but if removal is necessary, for example, for cleaning purposes, follow these instructions . CAUTION: The oven door is heavy. Open the door and flip Close the door by approximately 70°. With both open the clips at both hands, grasp the sides of the oven door at its middle hinges completely . -
Page 16: Changing The Lamp
● Protect the oven light bulb and the glass cap by laying a cloth on the bottom of the oven compartment . ● Bulbs can be purchased from the ATAG Customer Service. Rear oven lamp 1. Remove the cap by turning anticlockwise and remove the metal ring, the sheet ring and clean the glass cap . -
Page 17: Troubleshooting
Troubleshooting If you have problems with your oven, try the solutions suggested below. They may save you the time and inconvenience of an unnecessary service call. What should I do if the oven doesn’t heat up? Check to see if one of the following actions resolves the issue: ● The oven may not be switched on . -
Page 18: Error And Safety Codes
. for the mode (see section “Using the Fast Preheating mode”, page 12) 1) * refers to all numbers or characters. Technical Specifications Model OX6211B Power Source 230 V ~ 50 Hz Output Rating max . 3400 W Dimensions (W x H x D) 598 x 595 x 566 mm... - Page 20 Het toestel-identificatieplaatje bevindt zich aan de binnenkant van het toestel. La plaque d’identification de l’appareil se trouve sur l’intérieur de l’appareil. Das Gerätetypenschild befindet sich an der Innenseite des Gerätes. The appliance identification card is located on the inside of the appliance. Plak hier het toestel-identificatieplaatje.
Need help?
Do you have a question about the OX6211B and is the answer not in the manual?
Questions and answers