Advertisement
Available languages
Available languages
Quick Links
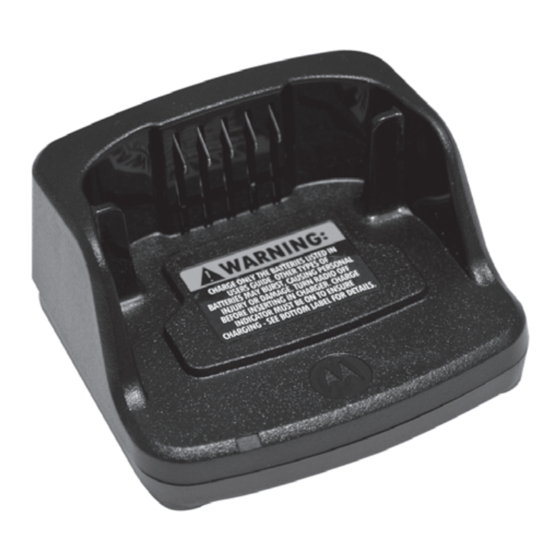
Single Unit Charger Kit
PMLN6392_
Quick Reference Guide
EN
LAS
*68012009060*
68012009060-B
Printed in
CHARGING A STAND-ALONE BATTERY
Insert the battery into the tray with the front of the battery (label) facing the front of
the charger as shown.
Align the
grooves on the
battery to the
rails in charger
IMPORTANT SAFETY INSTRUCTIONS
This document contains important safety and operating instructions. Please
read these instructions carefully and save them for future reference.
Before using the battery charger, read all the instructions and cautionary markings on
(1) the charger, (2) the battery, and (3) the radio using the battery.
1.
To reduce risk of damage to the electric plug and cord, pull the plug rather
than the cord when disconnecting the charger.
2.
An extension cord should not be used unless absolutely necessary. Use of
an improper extension cord could result in risk of fire and electric shock. If an
extension cord must be used, make sure that the cord size is 18 AWG for
lengths of up to 6.5 feet (2.0 m), and 16 AWG for lengths up to 9.8 feet
(3.0 m).
3.
To reduce risk of fire, electric shock, or injury, do not operate the charger if it
has been broken or damaged in any way. Take it to a qualified Motorola
service representative.
4.
Do not disassemble the charger – it is not repairable and replacement parts
are not available. Disassembly of the charger may result in risk of electric
shock or fire.
5.
To reduce risk of electric shock, unplug the charger from the AC outlet before
attempting any maintenance or cleaning.
OPERATIONAL SAFETY GUIDELINES
•
Turn off the radio when charging the battery.
•
This equipment is not suitable for outdoor use. Use only in dry locations/
conditions.
•
Connect equipment only to an appropriate power cord with the correct
voltage (as specified on the product).
•
Disconnect from line voltage by removing the power plug from the outlet.
•
The socket outlet to which this equipment is connected should be close and
easily accessible.
•
In equipment using fuses, replacements must comply with the type and
rating specified in the equipment instructions.
•
Maximum ambient temperature around the charger must not exceed 40 °C
(104 °F).
•
Output power from the power supply unit must not exceed the ratings stated
on the product label located on the bottom of the charger.
•
Make sure the cord is located where it will not be stepped on, tripped over, or
subjected to water, damage, or stress.
TROUBLESHOOTING
When troubleshooting, always observe the color of the LED:
Table 2: Charger LED Indicator
Status
LED Status
Power On
Green for approx. 1 sec
Charging
Steady red
Charge Complete
Steady green
Battery Fault (*)
Red fast flash
Waiting to charge (**)
Amber slow flash
Flash red 1 time
Flash amber 2 times
Battery Level Status
Flash green 3 times
(*) Normally, re-positioning the battery pack will correct this issue.
(**) Battery temperature is too warm or too cold or wrong power voltage is being
used.
If there is NO LED indication:
1.
Check if the radio with battery, or the battery alone, is inserted correctly.
2.
Ensure that the power supply cable is securely plugged into the charger
socket.
3.
Confirm that the battery used with the radio is listed in Table 1.
To reduce risk of injury, charge only the rechargeable Motorola
authorized batteries listed in Table 1. Other batteries may
explode, causing personal injury and damage. Use of
accessories not recommended by Motorola may result in risk of
C a u t i o n
fire, electric shock, or injury.
Table 1: Motorola Authorized Battery
Kit Number
PMNN4434_
PMNN4453_
OPERATING INSTRUCTIONS
CHARGING PROCEDURE
To charge the battery (with the radio attached), place it in a Motorola-approved
Drop-in Tray Single Unit Charger:
1.
Place the drop-in tray charger on a flat surface.
2.
Insert the connector of the power supply into the port on the side of the
drop-in tray charger.
3.
Plug the AC adaptor into a power outlet.
4.
Turn the radio "OFF".
5.
Insert the radio into the tray with the front of the radio facing the front of the
charger, as shown.
If your charger is defective, please contact your Motorola Partner where the unit was
purchased.
Motorola Solutions de México, S.A.
Bosques de Alisos 125
Col. Bosques de las Lomas CP 05120
México D.F.
Comments
México.
Tel: (5) 257-6700
Motorola Solutions de Colombia, Ltda.
Avenida Carrera 45 No. 108 - 27
Bogota - Colombia.
Tel: (571) 602-2111
For technicial support, visit:
http://www.motorolasolutions.com/Business/US-EN/Support/Support+Contacts/
Phone+Support
Battery low
For product-related questions, contact:
1-800-448-6686 in the USA
Battery medium
1-800-461-4575 in Canada
1-866-522-5210 on your TTY (Text Telephone)
Battery high
1-800-927-2744 (U.S. Dealer Support Line)
For Latin America, contact your distributor.
For product information, visit: www.motorolasolutions.com/RVseries
MOTOROLA, MOTO, MOTOROLA SOLUTIONS and the Stylized M logo are
trademarks or registered trademarks of Motorola Trademark Holdings, LLC and are
used under license. All other trademarks are the property of their respective owners.
© 2013 Motorola Solutions, Inc. All rights reserved.
Description
Standard Li-Ion Battery
High Capacity Li-Ion Battery
Advertisement

Related Manuals for Motorola PMLN6392 Series


Summary of Contents for Motorola PMLN6392 Series
- Page 1 To reduce risk of fire, electric shock, or injury, do not operate the charger if it PMNN4434_ Standard Li-Ion Battery has been broken or damaged in any way. Take it to a qualified Motorola service representative. PMNN4453_ High Capacity Li-Ion Battery Do not disassemble the charger –...
- Page 2 40 °C (104 °F). Nota SOLUCIÓN DE PROBLEMAS Si el cargador está defectuoso, póngase en contacto con el socio de Motorola donde adquirió la unidad. Cuando esté solucionando un problema, siempre observe el color del indicador LED: Motorola Solutions de México, S.A.
Need help?
Do you have a question about the PMLN6392 Series and is the answer not in the manual?
Questions and answers