Table of Contents
Advertisement
Quick Links
Advertisement
Table of Contents

Related Manuals for Keller ITS CellaCast PT 18 Series


Summary of Contents for Keller ITS CellaCast PT 18 Series
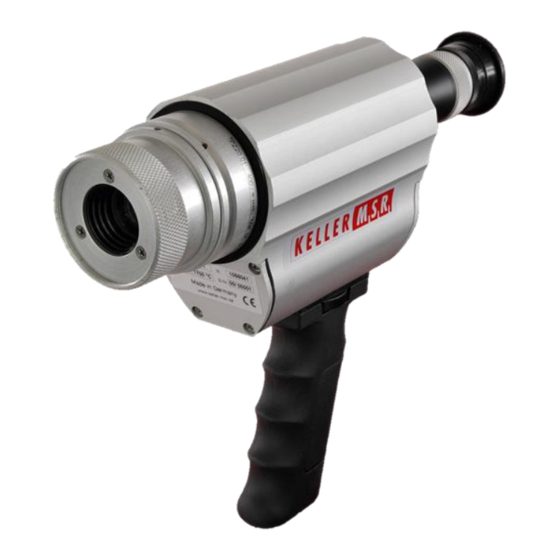
- Page 1 Operating Manual PT 18x Pyrometer CellaCast PT 18x Mat. No. 105 9957 10/2018...
- Page 2 Unless otherwise stated in this instruction manual, the instruments described herein are subject to change without prior notice, particularly modifications for the sake of technological advancement. 2013 KELLER HCW GmbH Carl-Keller-Straße 2 - 10 D - 49479 Ibbenbüren Germany www.keller.de/its/...
-
Page 3: Table Of Contents
Operating Manual PT 18x Contents Miscellaneous ..................1 About this manual ..................1 Explanation of symbols ................1 Liability and Warranty .................. 1 Copyright ..................... 2 Safety ....................2 Intended use ....................2 User’s responsibility..................2 Electromagnetic Compatibility ..............3 Quality Management Certification .............. - Page 4 Operating Manual PT 18x General Functions (Configuration layer: C011) ..........24 12.1.4 12.1.5 Displayed temperature readings/ Signal intensity ............24 Software CellaView ................25 PC Interface ..................25 Remote configuration ................ 26 15.1 Main Menu ....................27 15.2 View Current Configuration................ 27 15.3 Submenus ....................
-
Page 5: Miscellaneous
Operating Manual PT 18x 1 Miscellaneous 1.1 About this manual The Operating Manual shall enable the user to operate the pyrometer. Prior to initial use, be sure to read and understand this entire manual, in particular the chapter on safety! The instructions contained in this manu- al, especially those concerning safety, as well as site-specific regulations governing UV radiation must be complied with at all times! 1.2 Explanation of symbols... -
Page 6: Copyright
Operating Manual PT 18x 1.4 Copyright This Operating Manual should be treated as confidential. It is solely in- tended for use by persons involved with the instrument. This manual may not be made available to a third party without prior Manufacturer’s con- sent. -
Page 7: Electromagnetic Compatibility
The devices comply with the essential safety requirements of the Elec- tromagnetic Compatibility Directive 2014/30/EU (EMC Act). Quality Management Certification The KELLER HCW Quality Management System meets the DIN EN ISO 9001 standards for design, production, repairs and service for non- contact infrared temperature measuring equipment. -
Page 8: Scope Of Delivery
Operating Manual PT 18x Scope of delivery Make sure that all of the following components have been included with your shipment: Pyrometer Carrying case Battery charger Calibration certificate Software CellaView (Download Version) USB cable ... - Page 9 Operating Manual PT 18x Whenever the display shows a parameter, the F1 Parameter LED (yel- low) will light up. During a running measurement, the F2 Status LED (green) will light up. Parameter LED Status LED Okular Display Mode - key Parameter select /change LED charge indicator...
-
Page 10: Initial Setup
TAU.1 12.1.2, parameter Only use the wavelength-neutral lens protection glass supplied by KELLER. Do not use any commonly available camera lens accessory! Doing so will result in measurement errors. Charging the batteries Connect the battery charging socket of the CellaCast PT to the provided power supply. -
Page 11: Diopter Compensation
Operating Manual PT 18x The charger is only for charging the battery. The rechargeable battery is only charged when the pyrom- eter is switched off. Diopter compensation The pyrometer offers diopter compensa- tion to adjust the sighting device to the user’s vision. -
Page 12: Brightness Control To Protect The Eye
Operating Manual PT 18x Brightness control to protect the eye The CellaCast PT pyromter is equipped with an adjustable polarising filter to con- trol brightness and protect the user’s eye. Aiming at the target Direct the CellaPort to the object to be measured. The target marker in the through-the-lens sighting device indicates the size of the target. -
Page 13: Measurement
Operating Manual PT 18x Measurement Performing a measurement 1) Traffic light status indicator 2) Measurement area 3) Target object (molten stream) Press the ON-button to switch on the device. The pyrometer starts measuring as soon as you point it at the hot target. The target (metal stream) must remain within the rectangular measurement area as long as the display is blinking. -
Page 14: Setting Parameters At The Pyrometer (Basic Configuration)
Operating Manual PT 18x 7 Setting parameters at the pyrometer (basic configura- tion) Use the buttons ▲▼ and the „MODE" button on the rear panel to access and configure parameters. With these buttons you can view and adjust all settings required for operating the pyrometer. Hierarchy of manual configuration: Select Select... -
Page 15: Menu
Operating Manual PT 18x Menu Configuration layer C001... -
Page 16: Configuration Layer C011
Operating Manual PT 18x In the default configuration, certain parameter settings will be hidden. If required, you can have them shown. Configuration layer C011 Configuration layer C020 How to determine and set material constants In pyrometry, the specific radiation characteristics of the measured object will influence the generated temperature data. - Page 17 Operating Manual PT 18x Based on our experience, we recommend the following emissivity ratio settings: Grey cast iron: 101 (default) Spheroidal graphite iron: 103 -104 To determine the emissivity ratio of the material surface, you must conduct a comparison measurement using a thermocou- ple probe.
-
Page 18: Initialising Material Constants
Operating Manual PT 18x Ratio correction emissivity ratio Initialising material constants The CellaCast PT pyrometer lets you store up to 10 material constants. Before you perform a new measurement, simply use the ▲▼ control keys to select your preconfigured material constant for that specific ap- plication. -
Page 19: Select The Material Constant
Operating Manual PT 18x Temperature measurement two-colour/ratio mode (Configuration C001 layer: Parameter Function Explanation Enter a material con- E. 01 stant e.g. 103 % (spheroidal graphite iron) Enter a material E. 02 constant e.g. 101 % (grey cast iron) Enter a material E. -
Page 20: Threshold Limits
Operating Manual PT 18x 11.1.1 Threshold limits The start of a measuring cycle is determined automatically and is de- pendent on the following variables: Parameter Function Limit 1 Before beginning the measurement, the tem- LI. 1 perature reading must have been lower than Limit 1 at least once. -
Page 21: Display And Output Of Temperature Reading [Ano]
Operating Manual PT 18x Parameter Function Sampling time During the sampling time the temperature is T.ACT detected and stored as a temperature value. T.ACT Applies to parameter Sampling time = shortest pour time - time delay - 1 sec. Ideally, sampling should be finished before the end of the pour. -
Page 22: Cut-Off Interval [T.dis]
Operating Manual PT 18x Parameter Function Plausibility Upper threshold for permissible deviation, if TSP_) temperature reading > average value Plausibility Lower threshold for permissible deviation, if TSP~ temperature reading is < average value T.OUT If a measuring cycle does not start during the period the saved average will be deleted and reinitialized when the next cycle begins. -
Page 23: Li2 Check On Tact [Ch.l.2]
Operating Manual PT 18x Parameter Function A.RST Auto reset ( ): Auto reset on/off CH.L.2 11.1.6 Li2 check on tAct [ CH.L.2 When this parameter is set to ON ( =on), the detected tempera- TACT ture must exceed Limit 2 during the entire measuring time ( ) in order for the pyrometer to generate a valid temperature reading. - Page 24 Operating Manual PT 18x 12.1.1 Temperature measurement using two-colour/ratio mode C001 (Configuration layer: Parameter Function Explanation Define the no.of elements you would like the No. of material con- E.TB.Q array of material constants to contain. Max. stants (array length) array length is 10 (up to 10 constants). Direct setting of material constant as emissivi- EPS.Q Emissivity ratio...
-
Page 25: One-Colour (Single-Wavelength) Measurement
Operating Manual PT 18x Plausibility TSP_ For ATD function, see Chap. 11.1 Threshold ** Plausibility TSP~ For ATD function, see Chap. 11.1 Threshold ** show lower limit of temp. range dur- Display mode during ing running measurement Hold previous temp. reading during T.HLD Sampling time** running measurement... -
Page 26: Configuration I/O (Configuration Layer: C010)
Operating Manual PT 18x highest (max.) temperature, single DBL.M double maximum DIS.M ATD function MEM.T Hold time for Min/Max Hold time in sec. Smoothing filter for FIL.M min/max* FIL.T Smoothing time* Time t98 in sec. T.DEL time delay ** For ATD function, see Chap. - Page 27 Operating Manual PT 18x Signal intensity 1NTY. Triggered by ATD function Lambda 1** A.TR.1 A.TR.2 Triggered by ATD function Lambda 2** A.TR.Q Triggered by ATD function two- colour/ratio mode** DIRT Dirt Alert A.AC.1 Measuring time ATD Lamda 1** A.AC.2 Measuring time ATD Lamda 2 ** A.AC.9 Measuring time ATD two colour/ratio mode**...
-
Page 28: General Functions (Configuration Layer: C011)
Operating Manual PT 18x output inverted) Buzzer switching Switching threshold BU2.T (only available at function “Level”) threshold Buzzer signal Hysteresis +/- relative to signal threshold BU2.H (only available at function “Level”) threshold Buzzer lower limit of Lower limit of range for switch signal ... -
Page 29: Software Cellaview
You can download the CellaView software here: www.keller.de/its/ PC Interface The CellaPort features a USB port to enable data communication to a PC for remote device configuration and temperature monitoring. Either use the CellaView software or use another standard terminal program. -
Page 30: Remote Configuration
Operating Manual PT 18x Serial communication starts approximately 2 seconds after the data terminal ready (DTR) control signal is enabled at the inter- face. Activate this signal in the terminal program or device con- figuration. After enabling the interface and selecting parameter settings, the pyrom- eter will automatically transmit data via serial interface (autoprint activat- ed). -
Page 31: Main Menu
Operating Manual PT 18x 15.1 Main Menu After starting the terminal program or after entering „H“ the main menu will appear: ------------------------------------------------------------------ >H ------------------------------------------------------------------ Mainmenu ------------------------------------------------------------------ 0: [QUOTIENT] E: Quick access EPSILON 1: [LAMBDA 1] A: Quick access FILTER 2: [LAMBDA 2] T: Quick access TYPE of measure C: [I/O] K: [CALIBRATION]... -
Page 32: Submenus
Operating Manual PT 18x 15.3 Submenus 15.3.1 Configure two-colour/ratio mode Submenu QUOTIENT ------------------------------------------------------------------ Qu epsilon ratio ..101.0 % Qu check L2 rel.limit 5.00 % Qu abs.limit 650 C @ 50.00 % Qu linearization ..off Qu filter ..0.50 s Qu memory type .... -
Page 33: Lambda 2
Operating Manual PT 18x 15.3.3 Lambda 2 Press key „2“ to access all data logging parameters for Lambda 2 (L2). Configuration options are identical to Lamba 1. 15.3.4 Quick access to emissivity / signal smoothing / operating mode Use keys "E", "A" and "T" to access and change the emissivity setting, smoothing filter and measuring mode. -
Page 34: Automatic Temperature Data Output
Operating Manual PT 18x 11: Lambda 1 ATD Trigger 12: Lambda 2 ATD Trigger 13: Quotient ATD Trigger 14: Lambda 1 ATD tAct 15: Lambda 2 ATD tAct 16: Quotient ATD tAct ------------------------------------------------------------------ Your choice> In the submenu "Options" you can program a keylock. If keylock is acti- P100 vated and you wish to change a parameter setting, enter Code for full access. -
Page 35: User Recalibration
Operating Manual PT 18x Temperature data format 57600 Baud / 8 Data bits / odd parity / 1 stop bit / no hand- shake Two-colour/ratio – Lambda 1 – Lambda 2 (one cycle): Byte Negative Temperature Positive Temperature Temperature exceeds Temperature falls below measuring range measuring range... - Page 36 Operating Manual PT 18x ------------------------------------------------------------------ Submenu CALIBRATION ------------------------------------------------------------------ Name .."Pyrometer PT Series" Menu mode ..... default 0: [QUOTIENT CALIBRATION] 1: [LAMBDA 1 CALIBRATION] 2: [LAMBDA 2 CALIBRATION] A: Reset settings to factory default E: Set menu mode S: Set pyrometer name Z: End Calibration-Mode ESC: Back to MAIN-MENU ------------------------------------------------------------------...
- Page 37 Operating Manual PT 18x perature range, make sure that upper and lower temperatures you enter are compatible with the pyrometer’s actual working range. Use keys "B", "C" and "D" for direct access to enable adjustments to the Quotient (two-colour) channel. To recalibrate your CellaCast PT, you will require a calibration furnace and a reference standard.
-
Page 38: Maintenance
Operating Manual PT 18x Maintenance 16.1 Cleaning the pyrometer lens/protective glass A false temperature reading will be generated when the lens/protective glass is dirty. Therefore check the lens periodically and clean it, if neces- sary. Dust can be removed by simply blowing it away or by using a soft brush. A special lens cleaning cloth is ideal, but any soft, clean, lint-free cloth will be suitable. -
Page 39: General Technical Data
Operating Manual PT 18x General technical data Digital output: Permissible humidity Weight: Cyclical data output, 95% r.H. max. Approx.. 1.1 kg adjustable cycle time (non-condensing) Sighting Resolution Display: Ambient operating tempera- Through-the-lens sighting, par- ture: allax free imaging, target spot 0 - 50 °C indicator, diopter compensa- Resolution USB:... -
Page 40: Field Of View Diagrams Pt 180
Operating Manual PT 18x 19.1 Field of View Diagrams PT 180 Model Optics Focus range Distance ratio 0.4 m … ∞ PT 180 AF 4 PZ 20.01 D = 150:1 7.1° 1.2 m … ∞ PT 180 AF 6 PZ 20.06 D = 240:1 4.5°... -
Page 41: Cellacast Pt 180 Af 6
Operating Manual PT 18x 19.1.2 CellaCast PT 180 AF 6 Target diameter [mm] ∞) PZ 20.06 (1.2 m - 16.7 D = 240 :1 20.8 29.2 41.7 33.3 37.5 Target distance [m]... -
Page 42: Technical Data Pt 183
Operating Manual PT 18x Technical data PT 183 Temperature range: Response time t 98 : Repeatability: 10 ms (T> 750 °C) 650 - 1700 °C Sensor: Temperature coefficient: Measurement uncertainty: 0.05 %/K Double photodiode 1.5 % =1,0 and T = 23 °C) of temp. -
Page 43: Cellacast Pt 183 Af 1
Operating Manual PT 18x 20.2.1 CellaCast PT 183 AF 1 ∞) PZ 20.01 (0.4 m - target size [mm] target distance [m]... -
Page 44: Cellacast Pt 183 Af 3
Operating Manual PT 18x 20.2.2 CellaCast PT 183 AF 3 ∞) PZ 20.06 (1.2 m - target size [mm] target distance [m] [mm]... -
Page 45: Cellacast Pt 183 Af 13
Operating Manual PT 18x 20.2.3 CellaCast PT 183 AF 13 ∞) PZ 20.08 (0.3 m - target size [mm] target distance [m]... -
Page 46: Dimensions
Operating Manual PT 18x Dimensions... -
Page 47: Shipping, Packaging And Disposal
Should you discover a concealed loss or damage, report it to KELLER HCW and to the freight carrier immediately. If the period for filing claims has expired, you will no longer be able to make any claims for compen- sation of damage or loss. -
Page 48: Copyright
Operating Manual PT 18x Copyright Portions of avr-libc are Copyright (c) 1999-2010 Werner Boellmann, Dean Camera, Pieter Conradie, Brian Dean, Keith Gudger, Wouter van Gulik, Bjoern Haase, Steinar Haugen, Peter Jansen, Reinhard Jessich, Magnus Johansson, Harald Kipp, Carlos Lamas, Cliff Lawson, Artur Lipowski, Marek Michalkiewicz, Todd C. -
Page 49: Default Settings Pt 180
Operating Manual PT 18x Default Settings PT 180 23.1 Temperature measurement using two-colour/ratio mode (Co- C001 figuration layer: Parameter Function Default Customized configuration Define no. of mat. E.TB.Q constants in array EPS.Q Set emissivity ratio 101 % E.IDX Select constant Assign value to con- E. -
Page 50: General Functions (Configuration Layer: C011)
Operating Manual PT 18x Plausibility TSP~ 150 K Threshold Display mode during T.HLD sampling time CH.L.2 Auto reset Set Li2 check on A.RST tAct C011 23.2 General Functions (configuration layer: Parameter Function Default Customized con- figuration Automatic A.OFF 2 min Switch off Default Settings PT 183 24.1... -
Page 51: General Functions (Configuration Layer: C011)
Operating Manual PT 18x FIL.T Smoothing time 500 ms ATD Function MEM.Q Min/Max memory Hold time for MEM.T Min/Max Smoothing filter for FIL.M min/max FIL.T Smoothing time T.DEL Time delay T.ACT Sampling time T.DIS Cut-off interval T.OUT Timeout 1 min LI.
Need help?
Do you have a question about the ITS CellaCast PT 18 Series and is the answer not in the manual?
Questions and answers