Table of Contents

Related Manuals for TQC SP4300


Summary of Contents for TQC SP4300
- Page 1 TQC AUTOMATIC CUPPING TEST SP4300 IMPORTANT! Before taking this instrument in use we strongly advise you to read this manual carefully. Operating Instructions for the AUTOMATIC CUPPING TEST MICROPROCESSOR CONTROLLED v1.02 1014...
-
Page 2: Table Of Contents
This product complies to - Machinery Directive 2006/42 / EC - Low Voltage Directive 2006/95 / EC - EMC Directive 2004/108 / EC 1 General ................................4 1.1 Importance of operating manual ............................4 1.2 User-responsibility .................................. 4 1.3 Responsibility of personnel ..............................4 1.4 Dangers ...................................... - Page 3 7.4 Panel clamp .................................... 10 7.5 Moving the Sample holder ............................... 10 8 Menu display information and operation ..................... 10 8.1 TQC Start screens after switched on..........................10 8.2 MAIN MENU .................................... 11 8.3 RUN SETUP....................................11 8.3.1 RUN SETUP – Preset test............................11 8.4 LIGHT SETUP ..................................
-
Page 4: General
1.5 Designated purpose The TQC Automatic Cupping Tester is exclusively designed to perform cupping tests on painted and coated test panels as described within the specifications. Other applications constitute improper use. TQC will not be held liable for damage resulting from improper use. -
Page 5: Safety Instructions
2 SAFETY INSTRUCTIONS 2.1 Meaning of Symbols The following symbols for dangers are used in this instruction manual. Symbol Explanation Warning Possible immediate danger to the life or If this guideline is not noted it can lead to health of personnel severe danger to health, up to fatal injury Danger A dangerous situation could be caused... -
Page 6: Care, Maintenance, Repairs
Any modifications or additions or alterations to the instrument may solely be made with permission from • the manufacturer. All measures involving modifications require written confirmation of approval from TQC • • Instruments which are not in fault-free condition must immediately be switched off •... -
Page 7: Instrument Data
4 INSTRUMENT DATA 4.1 Name / Article TQC Automatic Cupping Test – Microprocessor Controlled Automatic Cupping test. 4.2 Scope of Supply TQC Automatic Cupping Test • • Power cord • Calibration plate • Loupe & Microscope fixture rod • Reference panel •... -
Page 8: Installation And Assembly
If it does not, the instrument must not be connected under any circumstances. This switch is located behind the esthetic Warning rear cover of the cupping test. Contact TQC or your local contact to correctly set the switch 5.3 Mains Connection The mains connection is located at the rear of the instrument. -
Page 9: Instrument Controls And Functions
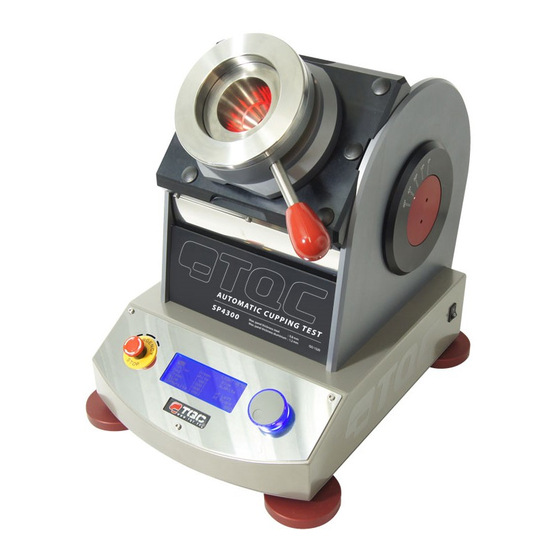
6 INSTRUMENT CONTROLS AND FUNCTIONS 1. Display with process information 2. Jog Shuttle 3. Emergency button 4. Acoustic alarm / Buzzer 5. Levelling supports 6. Panel clamp with LED ring 7. Brake and lock for Sample holder 8. Mains connection 9. -
Page 10: Instrument Preparations
The TQC Automatic cupping test is supplied with the CP4306 Cupping Test reference board. This specially designed calibration tool is stowed on the rear of the TQC Automatic Cupping test. This precision engineered reference board allows the user to calibrate the TQC Automatic Cupping Test at custom set intervals. -
Page 11: Main Menu
Jog shuttle. 8.3 RUN SETUP The TQC Automatic cupping test is able to operate in two modes. Manual test can be performed to determine when cracks start to appear and allow the user to start and stop the movement of the indenter at his or her discrepancy. -
Page 12: Instrument Setup - Indenter Speed
8.6 INSTRUMENT SETUP – INDENTER SPEED The TQC Automatic Cupping Test is able to operate at speeds from 0.01 mm/s up to 0.70mm/s. The speed can be set in 0.01 mm/s increments. The Nominal speed according to the ISO 1520 is 0.20 mm/s. To set the speed select the speed by pushing the Jog Shuttle and then set it by turning the Jog shuttle. -
Page 13: Instrument Setup - Calibration
Place the board from either side of the Sample holder into the panel slot until the stoppers at the TQC logo side. When the reference board is inserted lock it in place with the panel clamp handle. Select confirm to verify that the reference board is in place. -
Page 14: Instrument Setup - Optics Adj
“Run setup” selected type of run. Both run menu types will be explained in the next two paragraphs. 8.17 PRESET RUN In the first screen the TQC Automatic Cupping Test asks the user to place the test panel and close the clamp. When done select confirm to continue. -
Page 15: Manual Run
The actual position of the indenter is shown. Press run for the test to start. The top of the screen will show the set speed and depth. During the test “stop” can be selected to stop the test and have the indenter return to base position. After the test has been completed depending on the auto return setting the indenter automatically returns to base position or after conformation by pressing back. -
Page 16: Operation
Follow the local regulations. 10.3 Customer Service Customer service is provided on request by TQC - Molenbaan 19, 2908LL Capelle aan den IJssel - The Netherlands, T +31(0)10 7900 100, F +31 (0)10 7900 111 11 DISCLAIMER The right of technical modifications is reserved.
Need help?
Do you have a question about the SP4300 and is the answer not in the manual?
Questions and answers