Table of Contents
Advertisement
Quick Links
Advertisement
Table of Contents

Subscribe to Our Youtube Channel
Related Manuals for EasyRobotics PROFEEDER X


Summary of Contents for EasyRobotics PROFEEDER X
- Page 1 PROFEEDER X USER MANUAL...
-
Page 2: Table Of Contents
10 Declaration of incorporation of partly completed machinery (for CE-marking) . 15 Information contained herein is the property of EasyRobotics ApS and shall not be reproduced in whole or in part without prior written approval of EasyRobotics ApS. The information herein is subject to change without notice and should not be construed as a commitment by EasyRobotics ApS. -
Page 3: Introduction/Intended Use
The intension of this manual is to give a guideline of mounting a cobot at the ProFeeder X and this is not valid as a CE marking of the robot cell. A risk assessment most be full filled after the full installation is concluded. Including the robot, gripper and other equipment and installations at the workspace. -
Page 4: Installation
3 Installation The installation of the ProFeeder X must be carried out only by trained, skilled personnel with the relevant profession. It is crucial to the safety and function of the machine, that it is properly aligned and securely anchored. - Page 5 Dismantle the knobs holding the T-pad and mount these to the included holder. Locate the cable inside the hole and mount the T-Pad holder with the included M6x12 bolts. Revision: 2020-08 EasyRobotics ApS ProFeeder X User-Manual (en) Page 4 of 15...
- Page 6 3.3 Mounting the controller inside the ProFeeder X Place the control box inside the biggest console. Check that none of the cables are squeezed Revision: 2020-08 EasyRobotics ApS ProFeeder X User-Manual (en) Page 5 of 15...
- Page 7 Use the included cable tie mount to fix the robot cable along the machine. 3.5 Air connection Connect air to the ProFeeder X, use a maximum of 8 bar dry air supply. Pressure can be regulated by using the included air regulator. Revision: 2020-08...
- Page 8 3.6 Connect buttons with integraded light Connect the buttons as shown. Revision: 2020-08 EasyRobotics ApS ProFeeder X User-Manual (en) Manual (en) Page 7 of 15 Page 7 of 13...
-
Page 9: Adjustments
4.2 Adjusting the feet Loosen the lock nut, adjust the foot by turning, retighten the lock nut. The feet should be adjusted so: The ProFeeder X stands stable without rocking, use a bubble level. Revision: 2020-08 EasyRobotics ApS ProFeeder X User-Manual (en) -
Page 10: Using The Profeeder X
Status: Tray has not been worked on yet. Action needed: 5.3 ProFeeder X – Mechlock When the Profeeder X is setup with the Mechanical lock, calibrate the spring plungers before using the cell. Revision: 2020-08 EasyRobotics ApS ProFeeder X User-Manual (en) -
Page 11: Transport
160mm 410 mm 6 Transport 6.1 Fixation for transport The ProFeeder X is delivered in a wooden box if assembled by EasyRobotics ApS. Please reuse this box for any further transport. If the ProFeeder X should be moved without the wooden box, please remove the two side skirts to lift the machines with a pallet lifter or truck. -
Page 12: Dimensions
7 Dimensions Revision: 2020-08 EasyRobotics ApS ProFeeder X User-Manual (en) Page 11 of 15... - Page 13 7.1 Working area Weight: Max 480 kg. without robot. Revision: 2020-08 EasyRobotics ApS ProFeeder X User-Manual (en) Page 12 of 15...
-
Page 14: Pneumatic Diagram
8 Pneumatic Diagram Revision: 2020-08 EasyRobotics ApS ProFeeder X User-Manual (en) Page 13 of 15... -
Page 15: Optional Equipment
9 Optional equipment 1. AirLock Kit 2. Spare drawer 3. Spare tray Revision: 2020-08 EasyRobotics ApS ProFeeder X User-Manual (en) Page 14 of 15... -
Page 16: Declaration Of Incorporation Of Partly Completed Machinery (For Ce-Marking)
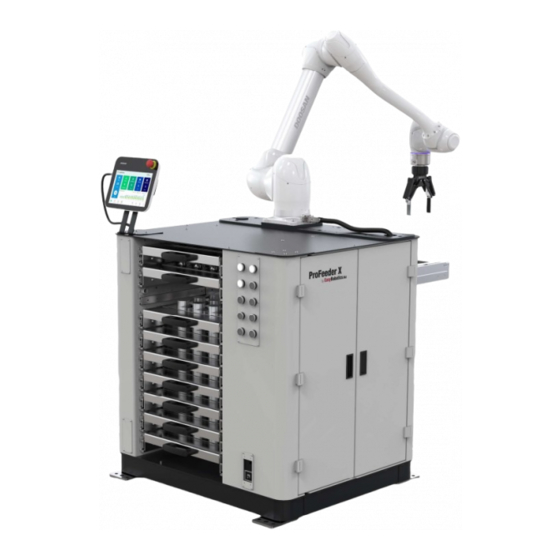
0063-00002 Commercial name ProFeeder X The ProFeeder X (when robot is installed) is to be used for automated feeding for CNC machines and other machines/workplaces. Function The ProFeeder X provides a framework for the robot's location and it contains both the processed and unprocessed parts.
Need help?
Do you have a question about the PROFEEDER X and is the answer not in the manual?
Questions and answers