Table of Contents
Advertisement
Quick Links
Safety Cautions
This information is essential to protect your safety and prevent property damage.
Make sure to read this thoroughly before using Carman Magic.
This information is subject to change or add without notice.
Please refer to Homepage of Carman IT Co., Ltd. for the latest version.
Grade A Equipment (Communication Equipment for business purpose) Pay attention that this is
electromagnetic compatibility equipment for business purpose (Grade A). It is permitted to use
except a house.
CASPIAN CARMAN IT CO., LTD
1
User Guide
Carman Magic
Advertisement
Table of Contents

Related Manuals for Carman Magic


Summary of Contents for Carman Magic
- Page 1 This information is subject to change or add without notice. Please refer to Homepage of Carman IT Co., Ltd. for the latest version. Grade A Equipment (Communication Equipment for business purpose) Pay attention that this is electromagnetic compatibility equipment for business purpose (Grade A). It is permitted to use except a house.
-
Page 2: Table Of Contents
Carman Magic Table of Contents Cautions in Use........................4 CHAPTER 1: General Descriptions..................6 1. Product Features....................6 2. Product Specifications...................8 3. Component List....................10 4. Basic Kit…………………………………………………………………………….….10 5. Component Figures and Descriptions..............11 6. Power Supply......................15 CHAPTER 2: Menu Configuration..................17 1. Diagnosis......................17 2. Repair…………………………………………………………………………………...19 3. - Page 3 Carman Magic 5. Special Function……………………………………………………………………….52 6. Resetting Adaptive Values...................52 7. EVAP. Leakage Test ...................52 8. PCM Lock(MEC) Setting..................52 9. Misfire Delay Reason ..................53 10. ECU Information....................53 Chapter 5: Program Download…………………………………...………………….....55 Chapter 6: Update Manual…...…………………………………...………………….....56 Certificate of Information and Communication Equipment..........80...
-
Page 4: Cautions In Use
Cautions in use Safety Instruction Cautions in Use Carman Magic mentioned in this User's Guide is designed for those who have basic qualifications for using this system. Users should follow the safety instructions for safe and efficient use of the product. - Page 5 Carman Magic Be sure to use the USB cable supplied by Carman IT only. Otherwise, your PC or product can be damaged. Wireless update or wireless communication requires no hurdle between scanner and wireless devices. Also, it is recommended to communicate within 10 km.
-
Page 6: Chapter 1: General Descriptions
▶ You can use saved data and upgrade the diagnosis program by connecting the product to your PC with wire or wireless. ▶You can change the sound effects and display unit of the Carman Magic. - Page 7 Carman Magic Chapter 1: General Descriptions ▶ You can check the latest data and update it automatically. ▶ Support Log Data function to save / send the data in the case of communication error so that fast customer support and newest communication is available.
-
Page 8: Product Specifications
Carman Magic Chapter 1: General Descriptions 2. Product Specifications Item Specification 215mm*100mm*35mm Dimension 350gr Weight ARM7 Diagnosis 8GB (Micro SD) Memory 16GB(Optional) 3.2” TFT Display Operating Temp 0~45℃ (32~113℉) Storage Temp -20~70℃(-4~158℉) All Flexibility Protocol - Dual CAN(2.0A,2.0B), Single wire CAN... - Page 9 Carman Magic Chapter 1: General Descriptions - Please note that if Carman Magic has been under 0℃(32F), it has to Warning stay in room temperature over 2 hours surely before using it over 0℃. -If Carman Magic moves from low temperature to room temperature, condensations inside the device can be generated and it can cause damage or malfunction.
-
Page 10: Component List
Carman Magic Chapter 1: General Descriptions 3.Component List: 1. Basic kit: Description picture Carman Magic Main Body DLC Main Cable (16P 2M) Cigarette Lighter Power Cable Power adapter (2A) USB Cable Carrying Case... -
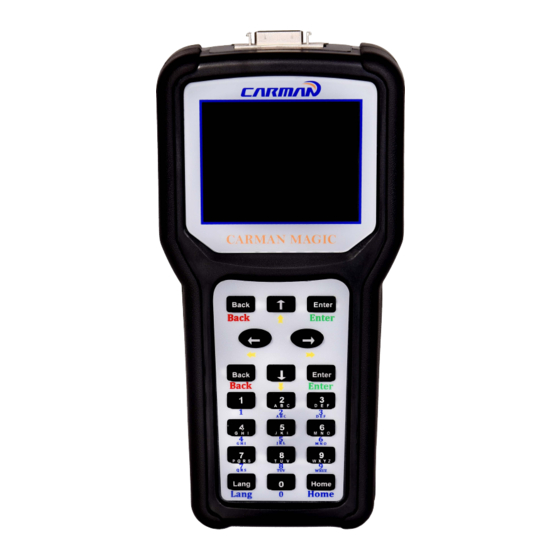
Page 11: Component Figures And Descriptions
Carman Magic Chapter 1: General Descriptions 4.Component Figures and Descriptions: Basic kit 4-1. Main Module -Carman Magic Main Module- * The exterior might be changed without any notice in advance. 4-2. Connectors and Key... - Page 12 1. Power connector: It is for a AC/DC power adaptor and a cigar jack. 2. USB Cable: USB port for updating. 3. DLC connector: It is for DLC communication cable to diagnose vehicles. 4-3. Carman Magic Carrying Case -Carman Magic Carrying Case-...
- Page 13 4-4. USB Cable -USB Cable- -The USB cable connects the USB ports of Carman Magic and your PC to update the diagnosis software or to use PC based software of AUTO-i Diag. Warning! - Please use a USB cable for Carman Magic only. Other USB cables can cause contact...
- Page 14 Chapter 1: General Descriptions 4-5. Cigarette Cable -Cigarette Cable- -This cigarette cable connects Carman Magic and a vehicle so that it can supply power. 4-6. DLC Cable -DLC Cable- -The DLC cable is also called the OBD-II cable. All vehicles released recently have built-in OBD-II connectors compatible to the OBD-II specification.
-
Page 15: Power Supply
Carman Magic Chapter 1: General Descriptions 4-7. AC/DC electrical power adapter -AC/DC electrical power adapter- -you can use this AC/DC electrical power adapter to feed power. 5. Power Supply: 1. Cigarette Lighter Power Cable -Power is fed through the cigarette lighter power cable. However, when the vehicle ignition switch is in the “OFF”... - Page 16 Carman Magic Chapter 1: General Descriptions 2. Vehicle Battery -Connect the red clip of the battery extension cable to the (+) battery terminal, and black clip to the (-) terminal. Connect the cigarette lighter power cable between the battery extension cable and the product. In this case, power is supplied anytime regardless of the ignition switch status or vehicle starting.
-
Page 17: Chapter 2: Menu Configuration
Carman Magic Chapter 2: Menu Configuration 1. Diagnosis -When turning ON Carman Magic, the main screen with the menu is displayed as follow: -Main Screen – 01. Maker -After pressing Enter key you will see the following page: -Maker- -This menu provides scanner's own functionality such as vehicle diagnosis, service... - Page 18 Carman Magic Chapter 2: Menu Configuration -Depending on your option, you can perform diagnosis on Asian, Korean, Indian, Japanese, European, Australian and USA vehicles by choosing your maker. 02.OBD II//EOBD -Move the highlighter by Left and Right keys. -OBD II//EOBD- -This menu is to diagnose and test some parts that are related with exhaust gas only if user’s vehicle has OBD II/EOBD.
-
Page 19: Repair
Carman Magic Chapter 2: Menu Configuration 2. Repair -This menu is available to help user diagnosis vehicles and access to common problems easily. 01. ECU Flash -ECU Flash- -This menu resets ECU to factory setup. - Page 20 Carman Magic Chapter 2: Menu Configuration 02. Read switch code from OBD -Read code- -This menu reads access code from immobilizer systems. 03. Download and Reprogram -This menu is used to clear and reprogram engine ECU. -Download and Reprogram-...
- Page 21 Carman Magic Chapter 2: Menu Configuration 04. Special Function -Special Function- -This menu is for changing access code and mileage set. 05. Application -In this menu you can use clips functions.
-
Page 22: Setting
Carman Magic Chapter 2: Menu Configuration 06. About: -About- -All information about your device is available here. 3. Setting -This menu helps users to change some options as explained below: -Setting-... - Page 23 Then press Enter again. 01. PC software -USB- -This menu is used to connect Carman Magic to PC in order to use PC based software (AUTO-i Diag). -Press “ENTER” to connect to PC. -Connect USB cable to PC and Carman Magic.
- Page 24 Carman Magic Chapter 2: Menu Configuration POWER USB Cable...
- Page 25 Carman Magic Chapter 2: Menu Configuration -Connect USB to PC- -Carman Magic is ready to connect to PC and use PC based program.
- Page 26 Carman Magic Chapter 2: Menu Configuration 02. Update -Update- -Connect USB to PC and Carman Magic. Tip! -Make sure that adaptor is connected to Carman Magic device. Power supply(Adaptor)
- Page 27 Carman Magic Chapter 2: Menu Configuration -Carman Magic is ready for Update. (Check update manual on chapter 6 for more information.) 03. Password -This menu is available to make your Carman Magic more secure. 03-1. Password change -Password-...
- Page 28 Carman Magic Chapter 2: Menu Configuration -Press Enter to continue. -The four-digit password must be entered in this menu using keypad buttons and press Enter. -Password change- -Input your password again to confirm. ---- ENTER: Continue ESC: Edit...
- Page 29 Carman Magic Chapter 2: Menu Configuration -Password will be available on first page after restarting. 03-2. Password activation -This menu is used to make password active by pressing “Enter”. -Active Password- -Press Enter to continue or Back to cancel.
- Page 30 Carman Magic Chapter 2: Menu Configuration -Input your password again to confirm. ENTER: Continue ESC: Edit...
- Page 31 Chapter 2: Menu Configuration -After activating password, it will appear on first page of Carman Tip! Magic when it is turned on. Input the password and continue. 03-3. Password Deactivation -This menu is used to make password deactive by pressing “Enter”.
- Page 32 Chapter 2: Menu Configuration -Press Enter to continue or Back to cancel. -Press Enter to inactive password. 04. Sound -Carman Magic produces a beep sound while pushing buttons, it can be active or Inactive in this menu by pressing “ENTER”.
- Page 33 Carman Magic Chapter 2: Menu Configuration -Sound- -Press Enter on Activation. -activation- -Press Enter to continue or Back to cancel. -Press Enter to activate sound.
- Page 34 Carman Magic Chapter 2: Menu Configuration -Activation- -Press Enter on Deactivation. -Deactivation- -Press Enter to continue or Back to cancel. -Press Enter to deactivate sound.
- Page 35 Carman Magic Chapter 2: Menu Configuration -Deactivation-...
-
Page 36: Chapter 3: Diagnosis Menu
Carman Magic Chapter 3: Diagnosis Menu 1. How to Connect Diagnostic Connector and Select Diagnosis Program (It is common to Asian, Korean, Japanese, European, Australian and USA vehicles) 1. Locate the diagnostic connector in the vehicle. - Most vehicles released after year 2002 conform to the OBD-II Protocol and have OBD-II diagnostic connectors. - Page 37 Carman Magic Chapter 3: Diagnosis Menu 2. Use the DLC main cable to connect the vehicle's diagnostic connector and Carman Magic.
- Page 38 Carman Magic Chapter 3: Diagnosis Menu 3. Select the maker of the vehicle to diagnose. -Maker- 4. Select a vehicle on diagnosis menu. -Vehicle menu- -Be careful to choose the correct year of the vehicle. Tip!
- Page 39 Carman Magic -Year menu- 5. Control Unit -Control unit-...
- Page 40 Carman Magic Chapter 3: Diagnosis Menu 6. Select the system to be diagnosed. -Vehicle’s systems-...
-
Page 41: Chapter 4: Vehicle Diagnosis
- In this menu, it is possible to check for any malfunction of the selected vehicle system through the communication with the ECU in the vehicle. As Carman Magic displays DTCs (Diagnostic Trouble Codes), you can easily check where malfunction occurs. - Page 42 Carman Magic Chapter 4: Vehicle Diagnosis 1. If a car and a system are selected correctly in the Vehicle Diagnosis menu and communication with vehicle is stable, the above picture will be shown. -If it does not show a menu like last picture and shows "Connection Failed"...
- Page 43 Carman Magic Chapter 4: Vehicle Diagnosis 3.DTC GUIDE -After pressing ENTER on a DTC you will see the full description. Home: picture Lang: text -Details- BUTTON Operation Home Picture: The picture of DTC location on vehicle Lang Text: Description of the probable causes and solution of the DTC...
- Page 44 Carman Magic Chapter 4: Vehicle Diagnosis >> -Picture1- << -Picture2-...
- Page 45 Carman Magic Chapter 4: Vehicle Diagnosis -The DTC might have more than one picture depend on a problem. Use Tip! “LEFT” and “RIGHT” buttons to change the picture. -Text- -You can use “UP” and “DOWN” buttons to scroll and see the rest of the Tip! text.
-
Page 46: Clear Faults
Carman Magic Chapter 4: Vehicle Diagnosis 2. Clear faults 1. If you select a car and a system correctly on the menu and if communication with a car works successfully, it shows the DIAG MENU like a picture below. choose the Clear faults menu. -
Page 47: Current Data
Carman Magic Chapter 4: Vehicle Diagnosis -DTC has been erased- -After erasing DTC Carman Magic starts reading DTC again. 3. Current Data In the Current Data menu, the module can communicate with the vehicle ECU to check data and control values of each sensor of the selected system and to check conditions of various switches and actuators. - Page 48 Carman Magic Chapter 4: Vehicle Diagnosis When selecting the correct vehicle model and system from the menu and communication with the vehicle is properly established, the menu appears as the picture above. Select Current 5 . Data and press the “ENTER” button.
-
Page 49: Actuator Test
Carman Magic Chapter 4: Vehicle Diagnosis -Current data list- -Use “UP” and “DOWN” buttons to see more parameters. 4. ACTUATOR TEST - In this menu, you can start and stop actuators and switches forcibly to diagnose them. - The actuation function is available depending on vehicle makers and models. - Page 50 Carman Magic Chapter 4: Vehicle Diagnosis 1. If a car and a system are selected correctly in the Vehicle Diagnosis menu and communication with vehicle is stable, the above picture will be shown Select an Actuator Test. 2. The screen as below appears.
- Page 51 Carman Magic Chapter 4: Vehicle Diagnosis Condition -Actuator’s details- -The actuation result is judged by noise from the running actuator or Tip! switch and vehicle RPM change. Therefore, it is recommended to perform the actuation test in a quiet area and use...
-
Page 52: Special Function
Carman Magic Chapter 4: Vehicle Diagnosis 5.Special Function -Special Function- Examples of special function: 5-1. Resetting Adaptive Values. - The resetting adaptive values initiates ECU by clearing values of sets in ECU. - The clearing learning values may be different depend on car makers and models. -
Page 53: Misfire Delay Reason
Carman Magic Chapter 4: Vehicle Diagnosis 5-4. Misfire Delay Reason - This function is to check the number of misfire in each cylinders. - System information differs from depend on car makers and models. 6.ECU Information -ECU Information shows information related with system such as system model and software version etc. - Page 54 Carman Magic Chapter 4: Vehicle Diagnosis -ECU Information’s list-...
-
Page 55: Chapter 5: Program Download
The following describes how to install the program. How to Install download program - Use the USB supplied by our company to connect the PC and Carman Magic. -Use the AC/DC Adaptor supplied by our company to turn on Carman Magic. -
Page 56: Chapter 6: Update Manual
After downloading the update file, follow the steps of this document to update your Carman Magic. 1. Go to download folder on your computer. You can see the version of the update in parenthesis 2. Right click on Carman Magic.exe and choose run as administrator. - Page 57 Carman Magic Chapter 6: Update Manual 3. Choose Next to continue. 4. Select “I agree” and the click Next.
- Page 58 Carman Magic Chapter 6: Update Manual 5. Choose the path that you want to install the Carman Magic program and click Next. 6. Choose Next to continue.
- Page 59 Carman Magic Chapter 6: Update Manual 7. Click Next to continue installing. 8. The Carman Magic update is installing.
- Page 60 Carman Magic Chapter 6: Update Manual 9. Carman Magic is installed. Click on OK. 10. Press Enter to install all the features.
- Page 61 Carman Magic Chapter 6: Update Manual 11. Installation is finished. Click on finish. 12. Now you can see the shortcut of this update on your desktop. 13. Right click on Carman Magic shortcut and choose run as administrator.
- Page 62 Carman Magic Chapter 6: Update Manual...
- Page 63 Carman Magic Chapter 6: Update Manual 14. Make sure that your device is connected to the computer and adaptor.
- Page 64 Carman Magic Chapter 6: Update Manual 15. Go to Update section on your Carman Magic and press ENTER. 16. Press ENTER.
- Page 65 Carman Magic Chapter 6: Update Manual 17. Before starting the update procedure, go to Device Manager on your PC. 18. Right click on USB<-> serial and choose Update driver...
- Page 66 Carman Magic Chapter 6: Update Manual...
- Page 67 Carman Magic Chapter 6: Update Manual 19. Choose Browse. 20. Choose Browse and choose the folder that is shown in the picture below and click on ok.
- Page 68 Carman Magic Chapter 6: Update Manual...
- Page 69 Carman Magic Chapter 6: Update Manual...
- Page 70 Carman Magic Chapter 6: Update Manual 21. This driver has been updated successfully.
- Page 71 Carman Magic Chapter 6: Update Manual 22. Right click on USB Serial Port and choose update driver. You will see Magic Box on your device manager. Right Click on Magic Box and choose Update driver again. Follow the steps exactly like previous driver update. But choose Carman...
- Page 72 Carman Magic Chapter 6: Update Manual 23. Pay attention to the location.
- Page 73 Carman Magic Chapter 6: Update Manual 24. The second driver is installed successfully. 25. Disconnect Carman Magic from power and USB completely and connect again.
- Page 74 Carman Magic Chapter 6: Update Manual 26. Open Carman Magic shortcut on PC and choose update. Wait until the end. Then click on OK.
- Page 75 Carman Magic Chapter 6: Update Manual 27. Disconnect Carman Magic from power and USB completely and connect again. Then choose OS. Wait until the end and then click on OK.
- Page 76 Carman Magic Chapter 6: Update Manual...
- Page 77 Carman Magic Chapter 6: Update Manual...
- Page 78 Carman Magic Chapter 6: Update Manual 28. Your Carman Magic is now up to date. If the updating process failed for any reasons, Choose Emergency OS and wait until the end. Then start updating process from step 26.
- Page 79 Carman Magic Chapter 6: Update Manual...
-
Page 80: Certificate Of Information And Communication Equipment
Equipment: Vehicle diagnosis device Model: Carman Magic COPYRIGHT ⓒby Carman IT Co., Ltd. All right reserved. No part of this publication may be reproduced, stored in a retrieval system, or in any form, or by any means, electronic, mechanical, photocopying,...
Need help?
Do you have a question about the Magic and is the answer not in the manual?
Questions and answers