Table of Contents
Advertisement
Quick Links
Safety Cautions
This information is essential to protect your safety and prevent property damage.
Make sure to read this thoroughly before using New Lite+.
This information is subject to change or add without notice.
Please refer to Homepage of Carman IT Co., Ltd. for the latest version.
Grade A Equipment (Communication Equipment for business purpose) Pay attention that this is
electromagnetic compatibility equipment for business purpose (Grade A). It is permitted to use
except a house.
CASPIAN CARMAN IT CO., LTD
1
User Guide
New Lite+
Advertisement
Table of Contents

Related Manuals for Carman New Lite+


Summary of Contents for Carman New Lite+
- Page 1 This information is subject to change or add without notice. Please refer to Homepage of Carman IT Co., Ltd. for the latest version. Grade A Equipment (Communication Equipment for business purpose) Pay attention that this is electromagnetic compatibility equipment for business purpose (Grade A). It is permitted to use except a house.
-
Page 2: Table Of Contents
New Lite+ Table of Contents Cautions in Use.........................4 CHAPTER 1: General Descriptions..................1. Product Features....................6 2. Product Specifications...................8 3. Component List....................11 4. Basic Kit…………………………………………………………………………….….12 5. Component Figures and Descriptions..............12 6. Power Supply......................17 CHAPTER 2: Menu Configuration..................18 1. Before getting started...................18 2. - Page 3 New Lite+ CHAPTER 4: Diagnosis Menu…..................34 CHAPTER 5: Vehicle Diagnosis.….………...…………………...………………….....39 Diagnostic Trouble Codes.................39 Erase/Reset DTC………………………………………………………………41 Parameter Data..................42 Actuator Test ....................46 Resetting Adaptive Values.................49 EVAP. Leakage Test .................50 PCM Lock(MEC) Setting................51 System Information..................51 CHAPTER 6: OBD-II/ EOBD Diagnosis Menu…...……………………...…………...53 CHAPTER 7: OBD-II/ EOBD Vehicle Diagnosis………………………...……...….....56 CHAPTER 8: Program Download………………………...…………….…......65 CHAPTER 9: Update Manual…...………………………...…...……….…......67 Certificate of Information and Communication Equipment..........79...
-
Page 4: Cautions In Use
New Lite+ Cautions in use Safety Instruction Cautions in Use New Lite+ mentioned in this User's Guide is designed for those who have basic qualifications for using this system. Users should follow the safety instructions for safe and efficient use of the product. Warning! The cautions of use are as follows: ... - Page 5 New Lite+ Be sure to use the USB cable supplied by Carman IT only. Otherwise, your PC or product can be damaged. Wireless update or wireless communication requires no hurdle between scanner and wireless devices. Also, it is recommended to communicate within 10 km.
-
Page 6: Chapter 1: General Descriptions
New Lite+ Chapter 1: General Descriptions 1. Product Features New Lite+ can check vehicle System Information and malfunction status through the OBD-II/EOBD and CAN communication. You can connect New Lite+ to the vehicle diagnostic connector with a diagnosis cable to check if any of the Engine, Automatic transmission, ABS, Airbag, Power steering and other devices has an error, view Parameter Data and use actuator drive features. - Page 7 New Lite+ Chapter 1: General Descriptions ▶ You can check the latest data and update it automatically. ▶ Support Log Data function to save / send the data in the case of communication error so that fast customer support and newest communication is available. ▶...
-
Page 8: Product Specifications
New Lite+ Chapter 1: General Descriptions 2. Product Specifications Item Specification 220mm*110mm*650mm Dimension 550gr Weight Cortex M3 120Mhz Diagnosis Cortex M3 120Mhz Main Memory 32GB (Micro SD) 3.5inch Touch LCD(320*240) Display Operating Temp 0~45℃ (32~113℉) Storage Temp -20~70℃(-4~158℉) All Flexibility Protocol - Dual CAN(2.0A,2.0B), Single wire CAN - ISO914-2, KWP2000, J1850P, J1587... - Page 9 New Lite+ Chapter 1: General Descriptions - Please note that if New Lite+ has been under 0℃(32F), it has to stay Warning in room temperature over 2 hours surely before using it over 0℃. -If New Lite+ moves from low temperature to room temperature, condensations inside the device can be generated and it can cause damage or malfunction.
- Page 10 New Lite+ Chapter 1: General Descriptions - Keep the battery pack away from touch of children or an animal. Warning - It may cause a fire or injury. - To prevent the battery pack from being discharged, always connect the power source before using the system. Screen captures, flight record and other information can be erased due to the discharged battery pack.
-
Page 11: Component List
New Lite+ Chapter 1: General Descriptions 4. Component List: Basic kit: Description picture New Lite+ Main Body DLC Main Cable (16P 2M) Power adapter (5A) USB Cable (B Type) Carrying Case... -
Page 12: Component Figures And Descriptions
New Lite+ Chapter 1: General Descriptions 4.Component Figures and Descriptions: Basic kit 4-0. User Guide Be sure to read the guide before using the product. 4-1. Main Module -New Lite+ Main Module-... - Page 13 New Lite+ Chapter 1: General Descriptions * The exterior might be changed without any notice in advance. 4-2. Connectors and Key -Connectors on right side 1. Power connector: It is for a AC/DC power adaptor and a cigar jack. 2. Reserved for future purposes. 3.
- Page 14 New Lite+ Chapter 1: General Descriptions 4. DLC connector: It is for DLC communication cable to diagnose vehicles. 4-3. New Lite+ Carrying Case -New Lite+ Carrying Case- -New Lite+ includes a number of adaptors and cables for diagnosing vehicles. When the product is not in use, store it in the supplied carrying case to prevent damage and loss.
- Page 15 Chapter 1: General Descriptions 4-5. USB Cable -USB Cable- -The USB cable connects the USB ports of Carman scan AT and your PC to download the diagnosis software or save captured files to your PC. Warning! - Please use a USB cable for New Lite+ only. Other USB cables can cause contact problem.
- Page 16 New Lite+ Chapter 1: General Descriptions -The DLC cable is also called the OBD-II cable. All vehicles released recently have built-in OBD-II connectors compatible to the OBD-II specification. It is possible to diagnose new model vehicles by directly connecting the DLC cable. It is not necessary to connect any additional power source as power is feed through the diagnostic connector.
-
Page 17: Power Supply
New Lite+ Chapter 1: General Descriptions 5. Power Supply: 1. DLC Cable -Where the vehicle satisfies the OBD-II communication convention and uses a certain manufacturer's diagnostic connector, the DLC main cable can supply power to the product directly without a separate power supply. 2. -
Page 18: Chapter 2: Menu Configuration
New Lite+ Chapter 2: Menu Configuration 1. Before Getting Started 1-1. Before using the system, check whether or not the battery is fully charged. If it is not charged, then connect external power supply or recharge the battery before using the system. - If you use the system by connecting it to a vehicle, you can also feed power to it through the vehicle diagnostic connector. -
Page 19: Menu Description
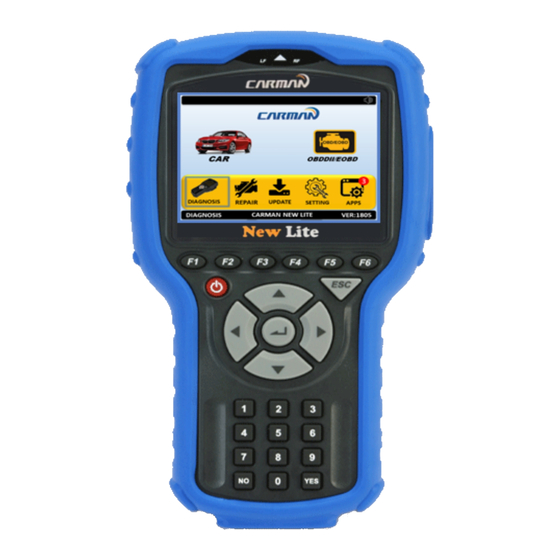
New Lite+ Chapter 2: Menu Configuration 2. Menu Description -When turning ON New Lite+, the main screen with the menu is displayed as follow: 1. Diagnosis 01-1. Car - This menu provides scanner's own functionality such as vehicle diagnosis, service data search, actuator activation, etc. - Depending on your option, you can perform diagnosis on Korean, Japanese, European, Australian and USA vehicles. - Page 20 New Lite+ Chapter 2: Menu Configuration 01-2. OBD II//EOBD - This menu is to diagnose and test some parts that are related with exhaust gas only if user’s vehicle has OBD II/EOBD. 01-3. Commercial - This menu provides scanner's own functionality such as vehicle diagnosis, service data search, actuator activation, etc.
- Page 21 New Lite+ Chapter 2: Menu Configuration 01-4. Bike - This menu provides scanner's own functionality such as vehicle diagnosis, service data search, actuator activation, etc. 2. Repair (Later, it will be supported on our website.)
- Page 22 New Lite+ Chapter 2: Menu Configuration 3. Config - In this menu, you can check the system display unit, graph setting, screen setting, activate password, time setting, Wi-Fi connection, and system information. 4. Update - In this menu, New Lite+ can connect to Wi-Fi so that it can upgrade software and download saved files etc.
-
Page 23: Icons On Main Screen
New Lite+ Chapter 2: Menu Configuration 3. Icons on Main Screen 3-1 Icons on main screen ① ② ③ 1. Clock - This displays the current time. 2. Sound - You can change sound status to “ON” or “OFF” in config menu. 3. -
Page 24: Chapter 3: Configuration
New Lite+ Chapter 3: Configuration 1. Display... - Page 25 New Lite+ Chapter 3: Configuration 1-1 Language Language can be selected according to a user by using “LEFT” and “RIGHT” buttons. 1-2 J2534 (Later, it will be supported on our website.) 1-3 SOUND Press the “LEFT” and “RIGHT” buttons to change the status of this feature to “ON” and “OFF”.
-
Page 26: Graph
New Lite+ Chapter 3: Configuration 2. Graph You can make some changes in your graphs by using this menu. 2-1 BG. Color: Change your graphs background’s color. 2-2 X-Grid: Change vertical lines’ color. 2-3 Y-Grid: Change horizontal lines’ color. 2-4 Cursor line: Change dashed lines’ color. 2-5 CH 1/2: Choose a channel to edit. -
Page 27: Time Set
New Lite+ Chapter 3: Configuration 3. Time Set - You can change the date and time stored in the internal memory. - The time stored in this menu is used when saving a file or executing other functions. - User can adjust time and date of the scanner. 3-1. -
Page 28: Wi-Fi
New Lite+ Chapter 3: Configuration Wi-Fi Choose the Wi-Fi which you want to connect to and enter the password. Then, return to update menu to make sure of Wi-Fi connection. -
Page 29: Lock
New Lite+ Chapter 3: Configuration Lock Enter your desired password and then confirm it. Press “F3” to edit or delete and “F4” to save your password. The password will appear on the first page after restarting your device. - Page 30 New Lite+ Chapter 3: Configuration You can activate or deactivate password using “LEFT” and “RIGHT” buttons and choosing ON and OFF. Press “F4” to save the changes. You can change your password by returning to Lock menu.
-
Page 31: Information
New Lite+ Chapter 3: Configuration Information The information is shown so you can check system and program. You can input your information or check system information. Switch between these menus by pressing “F1” button. - Page 32 New Lite+ Chapter 3: Configuration 5-1. User information is shown and you can edit (“F2” button) and save information (“F4” button). 5-2. In order to change the information. please select an item to edit, press “F1” to edit input information. 5-3.
-
Page 33: Chapter 4: Diagnosis Menu
New Lite+ Chapter 4: Diagnosis Menu 1. How to Connect Diagnostic Connector and Select Diagnosis Program (It is common to Asian, Korean, Japanese, European, Australian and USA vehicles) 1. Locate the diagnostic connector in the vehicle. - Most vehicles released after year 2002 conform to the OBD-II Protocol and have OBD-II diagnostic connectors. - Page 34 New Lite+ Chapter 4: Diagnosis Menu 2. Use the DLC main cable to connect the vehicle's diagnostic connector and New Lite+.
- Page 35 New Lite+ Chapter 4: Diagnosis Menu 3. Turn on New Lite+ -If power is not feed through the diagnostic connector and the New Lite+ battery is not fully charged, you need to connect an additional power supply (vehicle battery, etc.). 4.
- Page 36 New Lite+ Chapter 4: Diagnosis Menu 6. Select the maker of the vehicle to diagnose. 7. Select a vehicle on diagnosis menu.
- Page 37 New Lite+ Chapter 4: Diagnosis Menu 8. Select the system to be diagnosed.
-
Page 38: Chapter 5: Vehicle Diagnosis
New Lite+ Chapter 5: Vehicle Diagnosis 1.Diagnostic Trouble Codes - In this menu, it is possible to check for any malfunction of the selected vehicle system through the communication with the ECU in the vehicle. As New Lite+ displays DTCs (Diagnostic Trouble Codes), you can easily check where malfunction occurs. - Page 39 New Lite+ Chapter 5: Vehicle Diagnosis 1. If a car and a system are selected correctly in the Vehicle Diagnosis menu and communication with vehicle is stable, the above picture will be shown. -If it does not show a menu like last picture and shows "Connection Failed" Tip! or does not communicate stably, please check first status of the target car or connection of cables.
-
Page 40: Erase/Reset Dtc
New Lite+ Chapter 5: Vehicle Diagnosis 2. Erase/Reset DTC 1. If you select a car and a system correctly on the menu and if communication with a car works successfully, it shows the DIAG MENU like a picture below. Press the ERASE/RESET DTC button. -Erase/Reset DTC –... -
Page 41: Parameter Data
New Lite+ Chapter 5: Vehicle Diagnosis 7. You can see "Yes" & "No" buttons. If you choose the YES button, the DTC is deleted. If you choose the No button, it returns to previous step. 3. Parameter Data -In the Parameter Data menu, the module can communicate with the vehicle ECU to check data and control values of each sensor of the selected system and to check conditions of various switches and actuators. - Page 42 New Lite+ Chapter 5: Vehicle Diagnosis -It is important to select the vehicle specifications correctly for accurate Tip! sensor data measurement. Make sure to set the vehicle displacement, manufactured year, fuel, etc. correctly. The Parameter Data list can differ even with the same vehicle models. Note- The menu for Parameter Data selection, shown in the picture, can differ by vehicle makers and models.
- Page 43 New Lite+ Chapter 5: Vehicle Diagnosis If the message indicating a communication error is displayed instead Tip! of the menu like the figure above or communication cannot be established, check the vehicle condition and the connection status of the diagnostic connector again.
- Page 44 New Lite+ Chapter 5: Vehicle Diagnosis - Press “Enter” button to check live data in graphs. It is helpful to convert the current vehicle data to graphs for tendency analysis. - To convert live data to graphs, such data are need to be fixed. Then, only these fixed data change.
-
Page 45: Actuator Test
New Lite+ Chapter 5: Vehicle Diagnosis 4. ACTUATOR TEST - In this menu, you can start and stop actuators and switches forcibly to diagnose them. - The actuation function is available depending on vehicle makers and models. - Actuator Test- 1. - Page 46 New Lite+ Chapter 5: Vehicle Diagnosis If above picture is not shown, the communication error appears or Tip! communication does not work, check again the status of vehicle and connection of cables for diagnosis. 2. The screen as below appears. -Actuator list- 3.
- Page 47 New Lite+ Chapter 5: Vehicle Diagnosis The actuation result is judged by noise from the running actuator or Tip! switch and vehicle RPM change. Therefore, it is recommended to perform the actuation test in a quiet area and use Parameter Data values as a reference. Tip! If target system does not support sensor, actuator and dual display, it supports items of actuator without items of sensor.
-
Page 48: Resetting Adaptive Values
New Lite+ Chapter 5: Vehicle Diagnosis 5. Resetting Adaptive Values. - The resetting adaptive values initiates ECU by clearing values of sets in ECU. - The clearing learning values may be different depend on car makers and models. -
Page 49: Evap. Leakage Test
New Lite+ Chapter 5: Vehicle Diagnosis 6. Evap. Leakage Test -Choose this Special Function to check if there is leakage from an oil tank. -
Page 50: Pcm Lock(Mec) Setting
New Lite+ Chapter 5: Vehicle Diagnosis 7. PCM Lock(MEC) Setting - This function is to prevent data or programs from adjustment. - System information differs from depend on car makers and models. 8. System Information -System Information shows information related with system such as system model and software version etc. - Page 51 New Lite+ Chapter 5: Vehicle Diagnosis -System Information- - System Information differs from depend on car makers and models.
-
Page 52: Chapter 6: Obd-Ii/Eobd Diagnosis Menu
New Lite+ Chapter 6: OBD-II/EOBD Diagnosis Menu 1. OBD-II/EOBD Overview ■ Purpose of OBD-II/EOBD - OBD-II/EOBD is intended to find what caused the emission to increase, diagnose the part of the cause and light the warning lamp in order to provide faster and more precise repair. - Page 53 New Lite+ Chapter 6: OBD-II/EOBD Diagnosis Menu - Perform diagnosis when the PCV valve and the crankcase or the PCV valve and the intake manifold is disconnected. - Diagnose the thermostat when the coolant temperature fails to reach the specified temperature where the diagnosis can be made to other items in a given time after starting the engine.
- Page 54 New Lite+ Chapter 6: OBD-II/EOBD Diagnosis Menu please refer to Chapter 7 OBD-II Vehicle Diagnosis for more information. Whenever performing diagnosis, make sure that the ignition switch is in the Tip! "ON" position. If the ignition switch is placed in the "OFF" position, power cannot be feed to the ECU and the diagnosis with New Lite+ cannot be performed.
-
Page 55: Chapter 7: Obd-Ii/Eobd Vehicle Diagnosis
New Lite+ Chapter 7: OBD-II/EOBD Vehicle Diagnosis 1. READINESS TEST -The readiness test tries making communication with your vehicle to review general items of ECU modules that response. 1-1. If communication with the vehicle is established successfully, the menu above appears. - Page 56 New Lite+ Chapter 7: OBD-II/EOBD Vehicle Diagnosis *Results 1. NOT CMPLTD: The test has not been completed. - This appears when the test was not completed owing to the abnormal ECU or sensor required to display the test result. 2. COMPLETED: The test has been completed. 3.
- Page 57 New Lite+ Chapter 7: OBD-II/EOBD Vehicle Diagnosis 2. PARAMETER DATA -You can check the PARAMETER DATA specified by the OBD-II/EOBD standard in this menu. 2-1. If communication with the vehicle is established successfully, the above menu appears. Select the PARAMETER DATA. If no menu like above picture is displayed or communication cannot be Tip! established, check the vehicle condition and the connection status of the...
- Page 58 New Lite+ Chapter 7: OBD-II/EOBD Vehicle Diagnosis - Live data items in OBD-II communication may be different from live data items that are checked by selecting cars because live data items in OBD-II standard are provided. 4. Diagnostic Trouble Codes -Press this button to check trouble code of current vehicle.
- Page 59 New Lite+ Chapter 7: OBD-II/EOBD Vehicle Diagnosis 2-2. DTCs are listed on the screen as shown in above figure. You can check values of each sensor. You can erase DTCs by pressing “F3” button. - Refer to the description of "Chapter6 Vehicle Diagnosis" for each button`s Tip! function.
- Page 60 New Lite+ Chapter 7: OBD-II/EOBD Vehicle Diagnosis 2. If the YES & NO window is shown, Select the YES button to clear DTC or select the NO button to return back to previous step. There are current and old DTCs. When trying to clear old DTCs, they are Tip! cleared immediately and they are not set again.
- Page 61 New Lite+ Chapter 7: OBD-II/EOBD Vehicle Diagnosis 5. Monitoring Test Results - This menu displays the monitoring test results while the vehicle is being normally operated. - To test systems and units of different manufacturers, it is required to specify test IDs and component IDs.
- Page 62 New Lite+ Chapter 7: OBD-II/EOBD Vehicle Diagnosis 6. Bi-Directional Control - You can control and test functions related with OBD-II system. 6-1. If communication with the vehicle is established successfully, the menu above appears. Select BI-DIRECTIONAL CONTROL. If no menu like picture above is displayed or communication cannot be Tip! established, check the vehicle condition and the connection status of the diagnostic connector again.
- Page 63 New Lite+ Chapter 7: OBD-II/EOBD Vehicle Diagnosis 7-1. If communication with the vehicle is established successfully, the menu above appears. Select Vehicle Information. If no menu like picture above is displayed or communication cannot be Tip! established, check the vehicle condition and the connection status of the diagnostic connector again.
-
Page 64: Chapter 8: Program Download
New Lite+ Chapter 8: Program Download It is necessary to download the vehicle diagnosis program to your product in order to use it. if here is any update due to a new model, system or development, the program should be updated to the latest one. Also, the latest firmware and PIC data are provided for update to ensure the best performance of your product. - Page 65 New Lite+ How to register through website 1. Input http://www.carmanit.com into the address bar on browsers. 2. Refer to the JOIN page in our website. Q&A Q) Communication cannot be established. A) 1. Check the connection of the diagnostic cable. - Communication cannot be established if the diagnostic cable is not properly connected.
- Page 66 New Lite+ * If DLC cable, cigarette cable or AC/DC adapter cannot supply power and booting is not available, it is required to be repaired. Q) The touch screen does not function properly. A) 1. The touch screen coordinates may not be correctly aligned. - It is possible to test the touch screen coordinates by selecting the CONFIGURATION from the main menu and then selecting DISPLAY and Test Touch Coordinate menus in order.
-
Page 67: Chapter 9: Update Manual
New Lite+ Chapter 9: Update Manual To update your New Lite + follow the steps below: A) ONLINE UPDATE: 1. Go to UPDATE menu on your New Lite +. If you are updating your device for the first time, you have to activate your device. Make sure that you are connected to the internet during this procedure. - Page 68 New Lite+ Chapter 9: Update Manual 2. If your device is connected to internet successfully you will see the page below and the Wi-Fi sign will be green. If the Wi-Fi is not connected go to config menu and choose a proper Wi-Fi.
- Page 69 New Lite+ Chapter 9: Update Manual 3. If your device serial number is not valid you will see this message on this page. You may call your dealer or company.
- Page 70 New Lite+ Chapter 9: Update Manual Online updater is inactive in this situation. 4. If your device’s serial number is valid, the message will appear as below. Online updater is active in this situation. 5. Press “F1” to update online.
- Page 71 New Lite+ Chapter 9: Update Manual You can select desired groups to be updated by using “Up” and “Down” and “Enter” buttons. Press” F3” to see the details of active buttons in this menu. 6. Press “F4” to continue.
- Page 72 New Lite+ Chapter 9: Update Manual 7. Press “F4” to confirm. 8. Wait until the end.
- Page 73 New Lite+ Chapter 9: Update Manual 9. Your device is up to date now. Press “F1” to exit. 10. If you see the following page, the internet connection might be poor. Try again.
- Page 74 New Lite+ Chapter 9: Update Manual B) OFFLINE UPDATE 1. Connect your device to the computer by USB cable. And turn on your device.
- Page 75 New Lite+ Chapter 9: Update Manual 2. Copy the (update.eif) to the Update folder in your computer. 3. Disconnect the USB cable. 4. Go to UPDATE menu in New Lite+. 5. You do not need to be connected to the internet for this procedure. 6.
- Page 76 New Lite+ Chapter 9: Update Manual 7. If the [update.eif] file has been copied successfully the process will continue as follow: 8. Press “F4” to continue.
- Page 77 New Lite+ Chapter 9: Update Manual *If the file is unavailable the update procedure will fail.
- Page 78 New Lite+...
-
Page 79: Certificate Of Information And Communication Equipment
Equipment: Vehicle diagnosis device Model: New Lite+ COPYRIGHT ⓒby Carman IT Co., Ltd. All right reserved. No part of this publication may be reproduced, stored in a retrieval system, or in any form, or by any means, electronic, mechanical, photocopying,... - Page 80 3. Repairs not covered by this warranty will be performed at the current cost for parts and labor. In no event will Carman International Co. Ltd.’s liability exceed the price paid for the product from direct, indirect, special, incidental or, consequential damages resulting from the use of this product, its accompanying software, or its documentation without obligation to notify any individual or entity.
- Page 81 New Lite+ Warranty Period & Software update 1. Free Software update for Carman International products is fifteen (15) months from date of purchase. After fifteen (15) months from purchase date, software updates will be optional and will require separate payment per request.
Need help?
Do you have a question about the New Lite+ and is the answer not in the manual?
Questions and answers