Table of Contents
Advertisement
Quick Links
Advertisement
Table of Contents

Related Manuals for Atid AT907


Summary of Contents for Atid AT907
- Page 1 AT907 USER GUIDE ATID Co.,Ltd Ver 1.0...
- Page 2 Revision History Date of Reason of Version Revision History Writer Revision Revision V0.1 2021-08-02 Draft Initial Release Hak-Joo Lee AT907 User Guide...
-
Page 3: Table Of Contents
YSTEM ............................23 ARCODE PPLICATION ..................... 26 EVELOPING ARCODE FUNCTION PPLICATIONS INTRODUCTION TO UHF RFID FEATURES .................... 27 UHF RFID D ........................... 27 PPLICATION UHF RFID F ..................27 EVELOPMENT OF UNCTIONAL PPLICATIONS KEYBOARD WEDGE ..........................29 AT907 User Guide... - Page 4 ..................29 PPLICATION PERATION CREEN KEYBOARD WEGE A ......................29 SING THE PPLICATION PRODUCT WARRANTY ..........................30 AT907 P ............................. 30 RODUCT ETAILS SDK D ................................30 OWNLOAD ........................30 ARRANTY AND ECHNICAL UPPORT ................................30 ERTIFICATIONS AT907 User Guide...
-
Page 5: Before The Beginning
Before the Beginning The objective of user guide is to pass the basic contents related with AT907`s maintenance and smooth uses. User guide inclusive of text, images, logos, product name may not be distributed, modified, displayed, reproduced (in whole or in part) without the prior written permission of ATID Co,.Ltd. -
Page 6: Product Overview
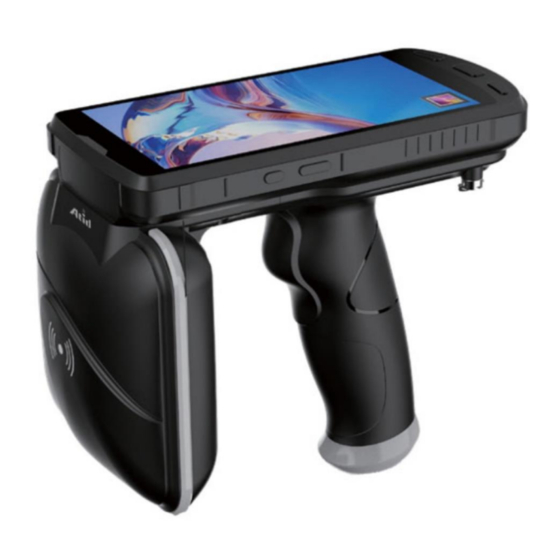
Product Overview 1. Product Overview Welcome to use AT907 portable reader. This portable reader is a new portable reader developed by our company in combination with the needs of IOT application scenarios. This product is an intelligent and multi-functional UHF RFID tag reader with fast processing speed, good portability and high functional integration. -
Page 7: Performance Parameters
US / FCC : 902MHz ~ 928MHz (UHF) EU / CE : 865MHz ~ 868MHz Frequency Range KR / KC : 917MHz ~ 921MHz JP / TELEC : 916MHz ~ 921MHz (1W) : 916MHz ~ 924MHz (0.25W / Optional) AT907 User Guide... - Page 8 FDD-LTE (Band 1 / 2 / 3 / 4 / 7 / 17 / 20) User Environment Operating Temp -20°C to 50°C Storage Temp -20°C to 70°C Charging Temp 0°C to 45°C Humidity 5~95% (non-condensing, +25°C Drop Spec 1.5m Sealing IP65 AT907 User Guide...
-
Page 9: Structural Characteristics And Operation Principle
RFID module part is equipped with UHF Antenna and UHF RFID module. Battery The battery can be removed only by removing the rear cover integrated with the handle. When the battery is removed, slots for installing SIM and TF cards are located. AT907 User Guide... -
Page 10: Installing And Removing The Battery
The USB Type-C interface is used as a power input port for charging, but can also be used for data transfer between other devices or mobile devices. The AT907 also supports OTG (On-The-Go) function that works as a Host Device. -
Page 11: Power On/Off / Standby / Restart
3. Power ON/OFF / Standby / Restart Startup With the device turned off, press and hold the power key on the right side of the AT907 handheld reader for 3 seconds. The boot screen turns on and the system returns to a normal state. -
Page 12: Common Functions And Settings
2. USB Driver Installation and Data Synchronization between PC The AT907 portable reader automatically installs the driver after connecting to a PC with Windows 7 or higher using a USB cable and completes communication preparation. For Windows XP, user must manually install the driver. -
Page 13: Display Settings
User can change settings related to the screen display in the display menu in settings. Menu → Settings → Display 1) Brightness level When user touches the menu, a slide bar icon appears. User can adjust the brightness level of the LCD screen by moving this bar icon. AT907 User Guide... - Page 14 Display size : Reduces or enlarges items displayed on the screen. The position of some apps on the screen may change. • Screen Saver : User can set a screensaver. • Lock screen display : User can set whether to display notifications or messages on the lock screen status. AT907 User Guide...
-
Page 15: Sound Settings
Set the anti-ringing function to be set between “Vibrate” and “Mute” when the power and volume up buttons are pressed together. Phone ringtone User can specify the phone ringtone. 6) Default Notification Sound User can specify a default notification sound. AT907 User Guide... -
Page 16: Mobile Network Connection Settings
If a valid SIM card is not installed, “No SIM card” is displayed. If a valid SIM card is installed, you • can turn on the mobile network function by clicking the “Mobile data” icon. AT907 User Guide... -
Page 17: Wi-Fi Settings
If user press and hold the Wi-Fi icon, user can enter the settings. User can enter through the path below through the setting menu. Menu → Setting → Network & internet → Wi-Fi When entering the Wi-Fi setting mode, a list of accessible APs (Access Points) is displayed. AT907 User Guide... -
Page 18: Bluetooth Settings
If there is a device nearby that is requesting pairing, it will be displayed in the “Available Devices” menu. If user clicks the device user wants to connect to, the connection procedure will proceed, and if there is no problem, the pairing permission screen will appear. AT907 User Guide... -
Page 19: Other Settings
The device name that requests pairing shown as an example differs depending on the device to be connected. 8. Other Settings Apps & notifications User can check information about apps installed on the device and configure app notifications. User can also check information about recently launched apps. AT907 User Guide... - Page 20 User can check the charging status of the device's battery and set the operation. Storage User can check the usage status of the internal storage space of the device. Privacy User can set the permissions of the app to protect the information stored on the device. AT907 User Guide...
- Page 21 User can configure the device's location information usage. User also can check and set permissions for apps with location information. Security User can check and change settings related to device security. Accounts User can check the account information registered on the device and register a new account. AT907 User Guide...
-
Page 22: Camera
• 9. Camera AT907 is equipped with a 13-megapixel rear camera and a 5-megapixel front camera. User can take photos and videos through the built-in camera app. User can change settings such as brightness and resolution when shooting, and it also supports auto-focusing and flash functions. -
Page 23: Introduction To Barcode Features
MicroQRcode, Aztec, MaxiCode, PostalCodes, USPostNet, USPlanet, UKPostal, AustralianPostal, JapanPostal, DutchPostal, etc. 2. Barcode Aiming System AT907 outputs LED beams and clear reference spots to aim and capture the barcode user wants to read accurately during barcode reading. 3. Barcode Demo Application Running the barcode demo program Run the “Scan0Service”... - Page 24 User can change various settings related to barcode scanning behavior. Voice : User can set whether or not a beep occurs when reading a barcode. • Vibrate : User can set whether or not a vibration occurs when reading a barcode. • AT907 User Guide...
- Page 25 Scanning Interval(ms) : If "Continuous Scan" option is enabled, user can set this option up. Sets • the action interval for continuous actions. The set value can be set in “ms” unit. AT907 User Guide...
-
Page 26: Developing Barcode Function Applications
4. Developing Barcode function Applications It is also possible for users to develop their own applications to collect barcode data. For more information, refer to the "Barcode Programming Guide" included in the SDK. AT907 User Guide... -
Page 27: Introduction To Uhf Rfid Features
Introduction to UHF RFID Features The AT907 features a UHF RFID module with powerful Impinj's R2000 chip and 4 dBi Circular Polarization Antenna. User can use the built-in demo application to collect UHF tag data, or user can develop own application to collect barcode data. - Page 28 2) ATID provides SDK (Software Development Kit) to support application development. The development environment of the SDK and the included items are as follows. SDK Development Details Environment Development Tool Andorid Studio Development Language JAVA SDK Package Details Configuration Demo Application apk.
-
Page 29: Keyboard Wedge
2. Using the KEYBOARD WEGE Application To use the KEYBOARD WEGE function, user needs to set the keyboard of the device to the KEYBOARD WEGE application. For more information, see the document "User Guide for Keyboard Wedge" included in the SDK. AT907 User Guide... - Page 30 If you need an AT907 SDK, please contact us or the place of purchase. Warranty and Technical Support All ATID products can be repaired free of charge for one year based on the product manufacturing date. However, in principle, any defects caused by customer carelessness in use shall be repaired even during the free repair period.
Need help?
Do you have a question about the AT907 and is the answer not in the manual?
Questions and answers