
Related Manuals for Bresser TNS1


Summary of Contents for Bresser TNS1
- Page 1 Thermal Night Vision Wärmebildkamera TNS1 Art. No. 9630900 BEDIENUNGSANLEITUNG INSTRUCTION MANUAL MODE D’EMPLOI HANDLEIDING INSTRUCCIONES DE USO MANUAL DE INSTRUÇÕES...
- Page 2 BEDIENUNGSANLEITUNG ...4 INSTRUCTION MANUAL .....8 MODE D’EMPLOI ...... 12 HANDLEIDING ......16 INSTRUCCIONES DE USO ..20 MANUAL DE UTILIZAÇÃO ..24...
- Page 4 ZU DIESER ANLEITUNG Diese Bedienungsanleitung ist als Teil des Ge- Während des Betriebs des Geräts ist alle paar Se- rätes zu betrachten. Lesen Sie vor der Benut- kunden ein leises Klickgeräusch zu hören. Das ist zung des Geräts aufmerksam die Sicherheitshin- ganz normal und bedeutet, dass das Objekt das weise und die Bedienungsanleitung.
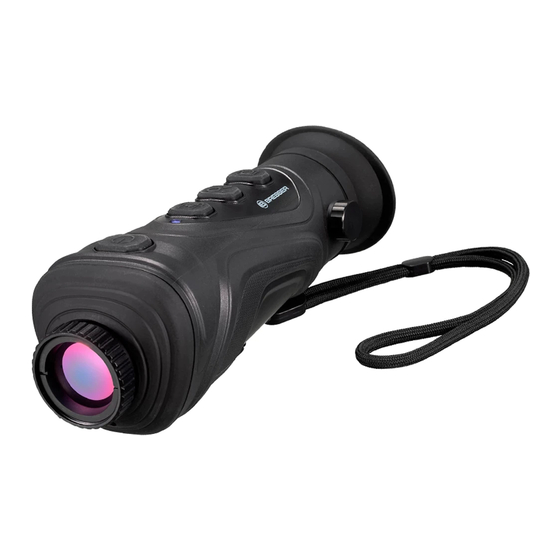
- Page 5 TEILEÜBERSICHT Einstellbares Vergrößern/ Status-LED Dioptrienein- Objektiv Verkleinern stellknopf Infrarot-Wärme- Modusauswahl Okularschutz Ein-/Aus- Aufnahme bildsensor Schalter Anschluss für CVBS- USB-Anschluss Laserlicht Videoausgabe ANLEITUNG ZUM AUFLADEN DES AKKUS BEDIENUNG Verwenden Sie zum Aufladen das USB-Datenka- AUFLADEN bel: Dieses Gerät verfügt über einen integrierten wiederaufladbaren Akku.
- Page 6 FOKUSSIERBARES OBJEKTIV von [ ] bestätigt, dass ein Bild aufgenommen Drehen Sie zum Fokussieren die Objektivfassung wurde. nach links und rechts. Drehen im Uhrzeigersinn fokussiert im Nahbereich; Drehen gegen den Uhr- BILDER ANZEIGEN zeigersinn fokussiert im Fernbereich. Drücken Sie nach dem Einschalten kurz auf die Taste [ ], um in den Bildbetrachtungsmodus zu STATUS-LED...
-
Page 7: Eg-Konformitätserklärung
Eine „Konformitätserklärung“ in Übereinstim- Auflösungsverhältnis 384 x 288 Infrarot- mung mit den anwendbaren Richtlinien und ent- Fokusebene sprechenden Normen ist von der Bresser GmbH LCD-Auflösung 720 x 540 erstellt worden. Der vollständige Text dieser EG- Konformitätserklärung ist unter folgender Inter- Brennweite 19 mm;... -
Page 8: General Warnings
ABOUT THIS INSTRUCTION MANUAL When the product works, slight click will be given These operating instructions are to be consid- out every several seconds. This is the normal phe- ered a component of the device. nomenon that the lens captures the image. Please read the safety instructions and the operat- ing instructions carefully before use. -
Page 9: Battery Charging Instructions
PARTS OVERVIEW Indicator light Adjustable Dioptric Zoom in / focus lens adjustment knob zoom out switch Infrared thermal Eyepiece patch Mode switch Capture image sensor CVBS video output USB interface Laser light interface BATTERY CHARGING INSTRUCTIONS OPERATING Use USB data line to charge: CHARGING This product has a built-in rechargeable battery. -
Page 10: Indicator Light
IMAGE CAPTURE INDICATOR LIGHT Press [ ] key to capture the image. The screen Status Not being Fully will show [ ] prompt, indicating that image cap- charged charging charged ture is successful. Power on Blue Red blue Blue (purple) IMAGE REVIEW After powering on, short press the [ ] key to... -
Page 11: Technical Data
Rise temperature EC DECLARATION OF CONFORMITY of the under-floor heating for detection after Bresser GmbH has issued a „Declaration of Con- the floor reduces to normal temperature. formity“ in accordance with applicable guidelines and corresponding standards. The full text of the... -
Page 12: Risque D'électrocution
À PROPOS DE CE MANUEL D’INSTRUCTIONS extrême ou une humidité élevée, ce qui pourrait Ce manuel d’instructions doit être considéré entraîner un dysfonctionnement, une réduction comme un composant de l’appareil à part en- de la durée de vie des composants électroniques, tière. - Page 13 VUE D’ENSEMBLE DES PIÈCES Lentille de Zoom avant / Témoin Bouton du mise au point zoom arrière lumineux réglage de la réglable dioptrie Capteur d’image Changement de Patch oculaire Commutateur Capture thermique infra- mode rouge Interface de sortie Interface USB Lumière laser vidéo composite INSTRUCTIONS RELATIVES AU CHARGEMENT DE...
-
Page 14: Témoin Lumineux
LENTILLE DE MISE AU POINT photo. L’écran affichera [ ] immédiatement, ce Faites tourner le bouton de la lentille de mise au qui indique que la capture d’image a fonctionné. point vers la gauche et vers la droite pour effec- tuer la mise au point. - Page 15 DÉCLARATION DE CONFORMITÉ CE Résolution LCD 720 x 540 La société Bresser GmbH a rédigé une « Déclara- tion de conformité » conformément aux directives Distance focale 19 mm ; 25 mm ; applicables et aux normes correspondantes. Le 35 mm texte intégral de la déclaration de conformité...
- Page 16 OVER DEZE GEBRUIKSAANWIJZING Als het product werkt, is om de paar seconden een Deze gebruiksaanwijzing moet worden be- lichte klik hoorbaar. Dit is de normale indicatie dat schouwd als een onderdeel van het apparaat. de lens het beeld vastlegt. Lees de veiligheidsinstructies en de gebruiksaan- wijzing zorgvuldig door voordat het apparaat in INLEIDING gebruik wordt genomen.
- Page 17 ONDERDELENOVERZICHT Indicatielampje Instelbare Inzoomen/ Dioptrie- scherpstellens uitzoomen instelknop Oogkap Schakelaar Infrarood thermische Modusschakelaar Vastleggen beeldsensor Interface CVBS- USB-interface Laserlicht video-uitgang INSTRUCTIES VOOR HET OPLADEN VAN DE BAT- WERKING TERIJ Gebruik de USB-datakabel om op te laden: OPLADEN Dit product heeft een ingebouwde oplaadbare Het product is voorzien van een ingebouwde batterij.
- Page 18 BEELDVASTLEGGING DIOPTRIE INSTELLEN Draai de dioptrie-instelknop naar links en rechts Druk op de toets [ ] om het beeld vast te leg- om de dioptrie in te stellen. gen. Het scherm toont [ ], wat aangeeft dat de beeldvastlegging is gelukt. SCHERPSTELBARE LENS Draai de scherpstellensknop naar links en rechts BEELDWEERGAVE...
-
Page 19: Eu Conformiteits Verklaring
De volledige LCD-resolutie 720 X 540 tekst van de EU-conformiteitsverklaring is beschik- baar op het volgende internetadres: www.bresser. Scherpstellengte 19 mm; 25 mm; 35 mm de/download/9630900/CE/9630900_CE.pdf Oogkap Weergave enkele... -
Page 20: Incluido En La Entrega
ACERCA DE ESTE MANUAL DE INSTRUCCIONES fallos de funcionamiento, acortar su vida útil y cau- Estas instrucciones operativas deben conside- sar daños en la batería o en las piezas. rarse parte del dispositivo. Lea atentamente las instrucciones de seguridad Cuando el producto está en funcionamiento, se y las instrucciones operativas antes de utilizar el emite un leve clic cada pocos segundos. -
Page 21: Encendido Y Apagado
RESUMEN DE LAS PIEZAS Lente con Acercar/ Luz indicadora Botón de enfoque alejar zoom ajuste de ajustable dioptrías Sensor de imágenes Interruptor de Visor Interruptor Captura térmicas infrarrojas modo Interfaz de salida Interfaz USB Luz láser de vídeo CVBS INSTRUCCIONES PARA CARGAR LA BATERÍA FUNCIONAMIENTO Utilice la línea de datos USB para cargar: CARGA... - Page 22 CAPTURA DE IMAGEN LENTE ENFOCABLE Gire el botón de la lente de enfoque hacia la dere- Pulse la tecla [ ] para capturar la imagen. La cha y la izquierda para enfocar. Gire en el sentido pantalla mostrará [ ], lo que indica que la ima- de las agujas del reloj para acercar el enfoque y gen se ha capturado correctamente.
-
Page 23: Declaración Ce De Conformidad
Resolución LCD 720 × 540 DECLARACIÓN «CE» DE CONFORMIDAD Bresser GmbH ha emitido una «Declaración de Distancia de enfoque 19 mm; 25 mm; 35 mm conformidad» de acuerdo con las directrices apli- Visor Pantalla de un solo cables y los estándares correspondientes. - Page 24 SOBRE O PRESENTE MANUAL DE INSTRUÇÕES Quando o produto está a funcionar, fazem-se ou- Estas instruções de funcionamento devem ser vir leves cliques a cada vários segundos. Este é o consideradas como um componente do dis- fenómeno normal indicando que a lente capta a positivo.
- Page 25 VISTA GERAL DAS PEÇAS Luz indicadora Lente de Botão de ajuste Aumentar focagem dióptrico Zoom / ajustável diminuir zoom comutar Captura Sensor de ima- Peça ocular Interruptor de gem térmica modo infravermelha Interface de saída Interface USB Luz laser de vídeo CVBS INSTRUÇÕES DE CARREGAMENTO DA BATERIA FUNCIONAMENTO Utilizar a linha de dados USB para carregar:...
- Page 26 CAPTURAR IMAGEM LENTE COM FOCO AJUSTÁVEL Rodar o botão da lente de focagem para a esquer- Pressionar o botão [ ] para capturar a imagem. da e para a direita para focar. Rodar no sentido O ecrã irá mostrar pronto [ ], indicando que a dos ponteiros do relógio para focar perto e no captura da imagem foi bem sucedida.
- Page 27 384x288 plano focal infravermelho DECLARAÇÃO DE CONFORMIDADE DA CE Resolução LCD 720X540 A Bresser GmbH emitiu uma "Declaração de Con- formidade" em conformidade com as diretrizes Comprimento do foco 19mm; 25mm; 35mm aplicáveis e as normas correspondentes. O texto Óculo Visor ocular único (a...
- Page 28 E-Mail: service@bresser.de E-Mail: sav@bresser.fr Telefon*: +49 28 72 80 74 210 Téléphone*: 00 800 6343 7000 BRESSER GmbH BRESSER France SARL Kundenservice Pôle d’Activités de Nicopolis Gutenbergstr. 2 314 Avenue des Chênes Verts 46414 Rhede 83170 Brignoles Deutschland France *Lokale Rufnummer in Deutschland (Die Höhe der Gebühren je...
Need help?
Do you have a question about the TNS1 and is the answer not in the manual?
Questions and answers