Advertisement
Quick Links
Advertisement

Subscribe to Our Youtube Channel
Related Manuals for Murata SprIoT 6UL


Summary of Contents for Murata SprIoT 6UL
- Page 1 SprIoT 6UL Development Platform for Android Things Quick Start Guide...
-
Page 2: Hardware Requirement
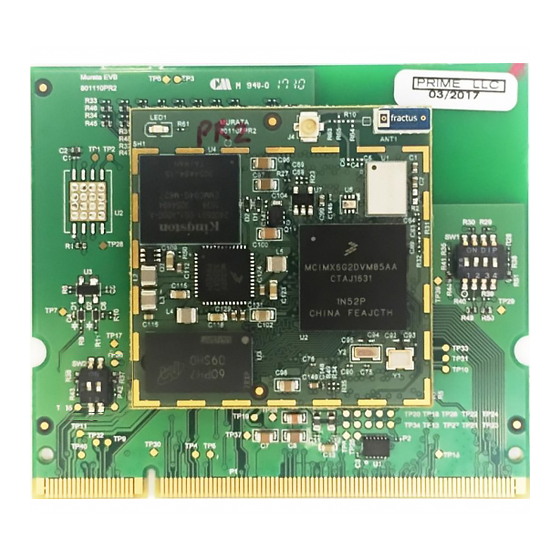
1. Overview This tutorial helps new developers get started with the NXP based development platform for Android Things – SprIoT 6UL board, and software support. Specifically, it walks through the hardware setup, Android Things image build and board booting process. - Page 3 Micro USB connector which is used for USB to Serial Console convertor for debugging. Audio jack. USB OTG interface. Optional WiFi and BT antenna with U.FL interface. Figure 1. Top view of the SprIoT 6UL SOM and EVK6UL-BB...
- Page 4 Take a close look at the switch on the top view of the board. There are two different setups for download mode and boot mode. Continue reading for further details. Figure 2a. Switch Setup (Download Mode S1:2’b01)
- Page 5 Figure 2b. Jumper Setup (Boot Mode S1:2’b10) 4. Connect the board and host computer 1. Connect the Micro USB to USB type-A wire’s Micro USB end to the USB to UART interface (Number 4 in Figure 1). Connect the type-A end to the host PC. 2.
- Page 6 b. With the serial port driver installed, run your favorite terminal application to view the serial output from i.MX6UL microprocessor's UART. Recommended tools for serial communication terminal: Putty and Minicom Serial port configuration: 115200 baud rate, 8 data bits, 1 stop bit, no parity. Set up serial communication terminal in Putty as below: Figure 7a.
- Page 7 6. Download Mode and Boot Mode The board is designed as booting from the internal eMMC. There are two modes for the SprIoT 6UL board. One is the download mode in which the board will receive the instructions from MFG Tools to flash images to boot storage such as eMMC.
- Page 8 Image Name Image Description Target Parition u-boot.imx The u-boot bootloader image, The first boot partition of SprIoT 6UL which is the first code run after the SprIoT 6UL board hardware reset. It will load and jump to the boot.img either from Slot a’s boot partition or...
- Page 9 The GUID Partition Table gpt partition(Slot a’s boot partition) for image, which define the SprIoT 6UL partitions in the SprIoT 6UL boot.img The Android Things boot image boot_a partition(Slot a’s boot partition) which is composed by Linux for SprIoT 6UL kernel zImage, linux kernel boot_b(Slot b’s boot partition) for...
- Page 10 9 Flash Android Things Images By default, a valid bootloader binary has been flashed into the SprIoT 6UL board. It will make the board into FASTBOOT mode if Android Things Images are not been flashed yet. Please refer “11. Instructions to make board into FASTBOOT mode”...
- Page 11 5. Power off, set the board is in Boot Mode. 9.2 Provision Android Things images with FASTBOOT mode 1. Download Android Things images package for SprIoT 6UL from https://developer.android.com/things/preview/download.html, and unzip it. 2. Refer “11. Instructions to make board into FASTBOOT mode” to make the board into FASTBOOT mode.
- Page 12 partition-table.img $fastboot flash gpt partition- table.img boot.img boot_a/boot_b $fastboot flash boot_a boot.img $fastboot flash boot_b boot.img system.img system_a/system_b $fastboot flash system_a system.img $fastboot flash system_b system.img userdata.img userdata $fastboot flash userdata userdata.img gapps.img gapps_a/gapps_b $fastboot flash gapps_a gapps.img $fastboot flash gapps_b gapps.img oem.img oem_a/oem_b...
- Page 13 11. Instructions to make board into FASTBOOT mode FASTBOOT mode is a state in which the board will respond the commands from host PC FASTBOOT commands to flash Android Things images or query board information. The board should connect with your host PC through USB type-A to micro USB cable.
- Page 14 To get the device out of FASTBOOT mode, run command “fastboot reboot” from your PC. 12. Useful Links http://developer.android.com/tools/help/adb.html https://www.kingoapp.com/help/fastboot-mode.htm...
Need help?
Do you have a question about the SprIoT 6UL and is the answer not in the manual?
Questions and answers