
Related Manuals for SOMFY AXOVIA MULTIPRO


Summary of Contents for SOMFY AXOVIA MULTIPRO
- Page 1 AXOVIA MULTIPRO Manuel d'installation Installation instructions Installationsanleitung Manuale d’installazione...
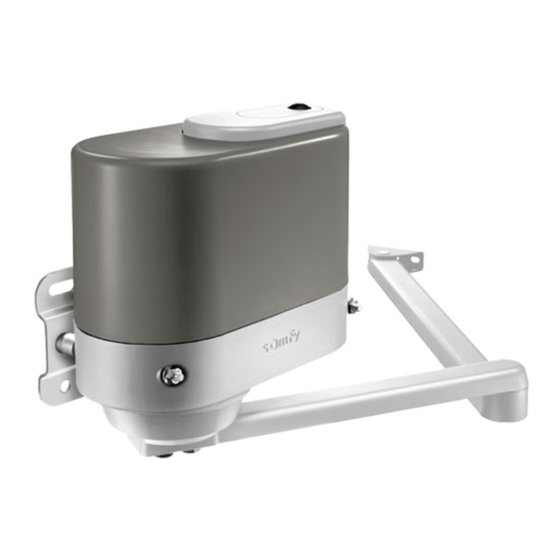
- Page 3 ÉCLATÉ DU PRODUIT Rep. Quantité Désignation Rep. Quantité Désignation Clé sur-capot Tube entretoise Vis sur-capot Rondelle plate Sur-capot Écrou Vis capot Bras moteur moyen aluminium Capot Bague bras moteur/bras portail Vis butées et bras moteur Bras portail moyen aluminium Butée ouverture haute Rondelle Butée fermeture basse Vis bras moteur/bras portail...
-
Page 4: Table Of Contents
être remis à l’utilisateur final. L’installateur doit explicitement expliquer à l’utilisateur final que l’installation, le réglage et la maintenance de la motorisation doivent être réalisés par un professionnel de la motorisation et de l’automatisation de l’habitat. Copyright © 2017 SOMFY ACTIVITES SA. All rights reserved. -
Page 5: Introduction
(voir paragraphe «Domaine d’application» du manuel Zones à risque : quelles mesures prendre pour les d’installation). éliminer ? L’utilisation de tout accessoire ou de tout composant non préconisé par Somfy est interdite - la sécurité des RISQUES SOLUTIONS personnes ne serait pas assurée. ZONE 1 Détection d’obstacle intrinsèque... -
Page 6: Installation Électrique
Les câbles enterrés doivent être équipés d’une gaine de 1.7. Réglementation protection de diamètre suffisant pour passer le câble du Somfy déclare que le produit décrit dans ces instructions moteur et les câbles des accessoires. lorsqu’il est utilisé conformément à ces instructions Les câbles basse tension soumis aux intempéries doivent être... -
Page 7: Description Du Produit
Contact à clé ou clavier à code 3.4. Serrure électrique Pour un vantail de grande taille (supérieur à 2 m) ou dans une zone ventée, Somfy préconise l’installation d’une serrure électrique. 230 V Copyright © 2017 SOMFY ACTIVITES SA. All rights reserved. -
Page 8: Installation Du Kit Standard
5) Marquer les points de perçage et percer. Nota : Pour un meilleur ajustement, utiliser les trous ronds pour faire le marquage, percer, puis retourner la plaque de fixation et fixer en utilisant les trous oblongs. Copyright © 2017 SOMFY ACTIVITES SA. All rights reserved. -
Page 9: Déverrouillage Du Moteur
Déverrouiller les moteurs à l’aide du bouton situé sur le dessus du moteur : • cadenas fermé : bras verrouillés • cadenas ouvert : bras déverrouillés, fonctionnement manuel Attention En position déverrouillée, les bras doivent être manoeuvrés lentement pour éviter la détérioration des moteurs. Copyright © 2017 SOMFY ACTIVITES SA. All rights reserved. -
Page 10: Fixation Des Bras Aux Vantaux
Axovia Multipro 4.5. Fixation des bras aux vantaux Position de l’Axovia MultiPro sur le pilier en zone ventée 4.5.1. Installation en zone pas ou peu ventée • Cote B comprise entre 200 mm et 350 mm La position de la motorisation sur le pilier est déterminante pour le bon Mettre le bras en position de fermeture fonctionnement de l’installation. - Page 11 Cette étape est importante pour assurer un bon plaquage des Monter la butée haute d’ouverture vantaux. 10) Ouvrir le vantail suivant l’angle souhaité. 11) Placer la butée haute d’ouverture contre le butoir (côté plaque de fixation pilier). Copyright © 2017 SOMFY ACTIVITES SA. All rights reserved.
-
Page 12: Câblage Des Moteurs
Le raccordement des moteurs doit être inversé par rapport aux kits bras standard. 5. MISE EN SERVICE 100 mm Se reporter au manuel d’installation de la Control Box 3S Axovia pour la 90° mise en service de l’installation. Cote B Copyright © 2017 SOMFY ACTIVITES SA. All rights reserved. -
Page 13: Bras Rotule Pour Ouverture Sur Pente Jusqu'à 20
Bras moteur moyen + bras rotule SERRURE CONSEILLEE 6.2.2. Recommandations de montage Longueur L Cote B 90° 450 mm mini Ecoinçon Copyright © 2017 SOMFY ACTIVITES SA. All rights reserved. -
Page 14: Bras Glissière Pour Ouverture Jusqu'à 150° Ou Écoinçon Réduit
6.3.2. Position de la plaque de fixation Une mesure de la force d’impact à l’issue de l’auto-apprentissage doit être réalisée afin de vérifier la conformité aux normes de sécurité. 15 mm Copyright © 2017 SOMFY ACTIVITES SA. All rights reserved. -
Page 15: Dimensions Spéciales Portail Ou Pilier / Ouverture Jusqu'à
2200 2400 2500 Bras moteur long + bras portail moyen Bras moteur moyen + bras portail court C mini = 800 mm C mini = 650 mm SERRURE SERRURE CONSEILLEE OBLIGATOIRE Copyright © 2017 SOMFY ACTIVITES SA. All rights reserved. - Page 16 La cote A d’implantation est identique à celle du kit standard (voir "4.1. Montage du moteur"). 68 mm Une mesure de la force d’impact à l’issue de l’auto-apprentissage doit être réalisée afin de vérifier la conformité aux normes de sécurité. Copyright © 2017 SOMFY ACTIVITES SA. All rights reserved.
- Page 17 EXPLODED DIAGRAM OF THE PRODUCT Quantity Description Quantity Description Upper cover key Spacer tube Upper cover bolt Flat washer Upper cover Cover bolt Medium aluminium motor arm Cover Motor arm/gate arm ring Butted bolts and motor arm Medium aluminium gate arm Top opening stop Washer Bottom closing stop...
- Page 18 The installer must explain clearly to the end user that installation, adjustment and maintenance of the drive must be performed by a professional motor- isation and home automation installer. Copyright © 2017 SOMFY ACTIVITES SA. All rights reserved.
-
Page 19: Preliminary Checks
Somfy is prohibited, on safety grounds. RISK SOLUTION Any failure to comply with the instructions given in this guide shall exclude Somfy from all liability and invalidate the Somfy ZONE 1 Obstacle detection built into the warranty. drive. Obstacle detection must be Risk of crushing dur- confirmed as being compliant with... -
Page 20: Electrical Installation
1.7. Regulations It is recommended that you fit a lightning conductor (maxi- mum residual voltage 2 kV). Somfy declares that the product described in these instruc- tions, when used in accordance with these instructions, com- 1.5.1. Cable feed plies with the essential requirements of the applicable Euro-... -
Page 21: Product Description
Aerial Key lock or code keypad 3.4. Electric lock For a large gate leaf format (larger than 2 m) or in a windy area, Somfy recommends installing an electric lock. 230 V Copyright © 2017 SOMFY ACTIVITES SA. All rights reserved. -
Page 22: Installing The Standard Kit
5) Mark the drilling points and drill. Note: For improved adjustment, use the round holes for the marking, drill, then turn the mounting plate over and secure using the oblong holes. Copyright © 2017 SOMFY ACTIVITES SA. All rights reserved. -
Page 23: Unlocking The Motor
Unlock the motors using the button located on the top of the motor: • padlock closed : arms locked • padlock open : arms unlocked, manual operation Attention In unlocked position, move the arms slowly to avoid damaging the motors. Copyright © 2017 SOMFY ACTIVITES SA. All rights reserved. -
Page 24: Fastening The Arms To The Gate Leaves
Axovia Multipro 4.5. Fastening the arms to the gate leaves Position of the Axovia MultiPro on the pillar in a windy zone 4.5.1. Installing in a zone with little or no wind • Dimension B between 200 mm and 350 mm... - Page 25 Assembling the upper opening stop it as required. 10) Open the gate leaf to the desired angle. 11) Place the upper opening stop against the buffer (on the pillar mounting plate side). Copyright © 2017 SOMFY ACTIVITES SA. All rights reserved.
-
Page 26: Wiring The Motors
The motor connections must be reversed in relation to the standard arm kits. 5. COMMISSIONING 100 mm Refer to the installation guide for the 3S Axovia control box to commission 90° the installation. Dimension B Copyright © 2017 SOMFY ACTIVITES SA. All rights reserved. -
Page 27: Ball-Joint Arm For Opening On A Slope Of Up To
Medium motor arm + ball-joint arm LOCK RECOM- MENDED 6.2.2. Assembly recommendations Length L Dimension B 90° min. 450 mm Side room Copyright © 2017 SOMFY ACTIVITES SA. All rights reserved. -
Page 28: Runner Arm For Opening Up To 150° Or Reduce Side Room
6.3.2. Position of the mounting plate A measurement of the force of impact a er the auto-programming pro- cess must be taken to check compliance with the safety standards. 15 mm Copyright © 2017 SOMFY ACTIVITES SA. All rights reserved. -
Page 29: Special Gate Or Pillar Dimensions / Opening Up To
2500 Long motor arm + medium gate arm Medium motor arm + short gate arm Min. C = 800 mm Min. C = 650 mm LOCK RECOM- LOCK OBLIGA- MENDED TORY Copyright © 2017 SOMFY ACTIVITES SA. All rights reserved. - Page 30 Installation dimension A is identical to that of the standard kit (see “4.1. Assembling the motor”). 68 mm A measurement of the force of impact a er the auto-programming pro- cess must be taken to check compliance with the safety standards. Copyright © 2017 SOMFY ACTIVITES SA. All rights reserved.
- Page 31 BESTANDTEILE DES PRODUKTS Pos. Menge Bezeichnung Pos. Menge Bezeichnung Schlüssel für obere Abdeckung Distanzhülse Schraube für obere Abdeckung Unterlegscheibe Obere Abdeckung Mutter Schraube für Antriebsabdeckhaube Antriebsarm, mittel (Aluminium) Antriebsabdeckhaube Hülse Antriebsarm/Torarm Schrauben für Stopper und Antriebsarm Torarm, mittel (Aluminium) Oberer Öffnungsstopper Unterlegscheibe Unterer Schließstopper Schraube Antriebsarm/Torarm...
- Page 32 übergeben werden. Der Monteur muss den Endnutzer explizit darauf hinweisen, dass Installation, Einstellung und Wartung des Antriebs von einer fachlich qualifizierten Person für Antriebe und Gebäudeautomati- on ausgeführt werden müssen. Copyright © 2017 SOMFY ACTIVITES SA. All rights reserved.
-
Page 33: Einleitung
Zone 5 der Montageanleitung). Zone 4 Die Verwendung von Zubehör oder Komponenten, die nicht von Somfy genehmigt sind, ist untersagt, da in ei- nem solchen Fall nicht für die Sicherheit der Personen Gefahrenzonen: Wie können sie beseitigt werden? garantiert werden kann. -
Page 34: Elektrische Installation
Bitte zögern Sie nicht, sich an uns zu wenden: Unsere Spezialis- ten stehen Ihnen gern zur Verfügung. Internet: www.somfy.com Behalten Sie das Tor im Auge, während es sich bewegt, und halten Sie alle Personen bis zum Abschluss der Installation fern. Copyright © 2017 SOMFY ACTIVITES SA. All rights reserved. -
Page 35: Produktbeschreibung
Torflügelgabeln vorzusehen. Antenne Schlüsselschalter oder Codetastatur 3.4. Elektrische Verriegelung Bei größeren Toren (> 2 m) bzw. in windigen Regionen schreibt Somfy den Einbau einer elektrischen Verriegelung vor. 230 V Copyright © 2017 SOMFY ACTIVITES SA. All rights reserved. -
Page 36: Montage Des Standardkits
3) Die Befestigungsplatte Antrieb/Pfosten im Abstand von 54 mm ober- halb von AH anbringen. Hinweis: Für Anlagen mit Sonderarmen siehe „6. Montage der Spezial- arme“. 4) Prüfen, ob die Komponente waagerecht ausgerichtet ist. Copyright © 2017 SOMFY ACTIVITES SA. All rights reserved. -
Page 37: Entriegeln Des Antriebs
: Arme sind verriegelt. • Schloss auf : Arme sind entriegelt - Schloss auf Handbetrieb Achtung In der entriegelten Stellung müssen die Arme langsam bewegt werden, um Schäden an den Antrieben zu vermeiden. Copyright © 2017 SOMFY ACTIVITES SA. All rights reserved. -
Page 38: Befestigung Der Arme An Den Torflügeln
Axovia Multipro 4.5. Befestigung der Arme an den Torflügeln Axovia MultiPro in einer windigen Region am Pfosten posi- tionieren 4.5.1. Installation in einer windarmen Region • Maß B zwischen 200 mm und 350 mm Arm in Schließposition bringen Die Position des Antriebs am Pfosten ist für den einwandfreien Betrieb 1) Tor in die geschlossene Stellung bringen: Die Torflügel müssen am... - Page 39 Dieser Schritt ist wichtig, um die genaue Ausrichtung der Torflügel zu gewährleisten. Oberen Öffnungsstopper montieren 10) Den Torflügel im gewünschten Winkel öffnen. 11) Den oberen Öffnungsstopper an der festen Arretierung anbringen (auf der Seite der Befestigungsplatte Pfosten). Copyright © 2017 SOMFY ACTIVITES SA. All rights reserved.
-
Page 40: Verkabelung Der Antriebe
Die Antriebe werden mit umgekehrter Polung im Vergleich zu den standardmäßigen Armen angeschlossen. 5. INBETRIEBNAHME 100 mm Siehe Installationsanleitung der Control Box 3S Axovia mit genaueren An- 90° gaben zur Inbetriebnahme der Anlage. Maß B Copyright © 2017 SOMFY ACTIVITES SA. All rights reserved. -
Page 41: Kugelgelenkarm Für Die Hangöffnung (Bis Zu 20 %)
Die Aufprallkra muss beim automatischen Einlernen gemessen werden, um sicherzustellen, dass die Vorgaben der Sicherheitsnormen erfüllt sind. Mittlerer Antriebs- arm + Kugelgelen- karm VERRIEGELUNG EMPFOHLEN 6.2.2. Montagetipps Länge L Maß B 90° min. 450 mm Eckbauweise Copyright © 2017 SOMFY ACTIVITES SA. All rights reserved. - Page 42 75 mm über der Achse AH montiert werden. VERRIEGELUNG PFLICHT 6.3.2. Position der Befestigungsplatte Die Aufprallkra muss beim automatischen Einlernen gemessen werden, um sicherzustellen, dass die Vorgaben der Sicherheitsnormen erfüllt sind. 15 mm Copyright © 2017 SOMFY ACTIVITES SA. All rights reserved.
-
Page 43: Besondere Abmessungen Von Tor Oder Pfosten/Öffnung Bis Zu
1400 1600 1800 2000 2200 2400 2500 Langer Antriebarm + mittlerer Torarm Antriebsarm mittel + kurzer Torarm Min. C = 800 mm Min. C = 650 mm VERRIEGELUNG VERRIEGELUNG EMPFOHLEN PFLICHT Copyright © 2017 SOMFY ACTIVITES SA. All rights reserved. - Page 44 Das Maß A für die Montage stimmt mit dem des Standardkits überein (sie- he „4.1. Montage des Antriebs“). 68 mm Die Aufprallkra muss beim automatischen Einlernen gemessen werden, um sicherzustellen, dass die Vorgaben der Sicherheitsnormen erfüllt sind. Copyright © 2017 SOMFY ACTIVITES SA. All rights reserved.
- Page 45 VISTA ESPLOSA DEL PRODOTTO Rep. Quantité Désignation Rep. Quantité Désignation Chiave coperchio superiore Tubo distanziatore Vite coperchio superiore Rondella piatta Coperchio superiore Dado Vite coperchio Braccio motore medio alluminio Coperchio Boccola braccio motore/braccio cancello Viti dei finecorsa e braccio motore Braccio cancello medio alluminio Finecorsa apertura alto Rondella...
- Page 46 finale. Il tecnico deve spie- gare in modo chiaro all’utente finale che l’installazione, la regolazione e la manutenzione della motorizzazione devono essere eseguite da un professionista specializ- zato nel settore della motorizzazione e dell’automazione domestica. Copyright © 2017 SOMFY ACTIVITES SA. All rights reserved.
-
Page 47: Introduzione
(vedere paragrafo “Campo di applicazione” del manuale d’installazione). Zone a rischio: quali misure adottare per eliminarle? È vietato l’uso di accessori o componenti non autorizzati da Somfy, in quanto la sicurezza delle persone non sa- RISCHI SOLUZIONI rebbe garantita. ZONA 1... -
Page 48: Impianto Elettrico
I cavi a bassa tensione esposti agli agenti atmosferici devono 1.7. Normativa essere almeno di tipo H07RN-F. Somfy dichiara che il prodotto descritto in queste istruzioni, Per i cavi non interrati, utilizzare un passacavi in grado di resi- quando viene utilizzato in conformità con le presenti istruzio- stere al passaggio dei veicoli (art. -
Page 49: Descrizione Del Prodotto
Contatto a chiave o tastiera a codice 3.4. Serratura elettrica In caso di battenti di grandi dimensioni (superiori a 2 m), o in zone par- ticolarmente ventose, Somfy raccomanda l’installazione di una serratura elettrica. 230 V Copyright © 2017 SOMFY ACTIVITES SA. All rights reserved. -
Page 50: Installazione Del Kit Standard
3) Posizionare la piastra di fissaggio motore/pilastro ad una distanza di 54 mm al di sopra di AH. Nota: Per le installazioni con bracci speciali, vedere “6. Installazione dei bracci speciali”. 4) Verificarne l’orizzontalità. Copyright © 2017 SOMFY ACTIVITES SA. All rights reserved. -
Page 51: Sblocco Del Motore
• lucchetto chiuso : bracci bloccati • lucchetto aperto : bracci sbloccati, funzionamento manuale Attenzione In posizione sbloccata, i bracci devono essere manovrati lentamen- te, per evitare il danneggiamento dei motori. Copyright © 2017 SOMFY ACTIVITES SA. All rights reserved. -
Page 52: Fissaggio Dei Bracci Ai Battenti
Axovia Multipro 4.5. Fissaggio dei bracci ai battenti Posizione dell’Axovia MultiPro sul pilastro in zone ventose 4.5.1. Installazione in zone non ventose o poco ventose • Quota B compresa tra 200 mm e 350 mm La posizione della motorizzazione sul pilastro è determinante per il buon Posizionare il braccio in posizione di chiusura funzionamento dell’installazione. - Page 53 Questa fase è importante per assicurare una buona chiusura dei battenti. Montare il finecorsa alto dell’apertura 10) Aprire il battente all’angolo desiderato. 11) Posizionare il finecorsa alto di apertura contro il paracolpi (lato piastra di fissaggio pilastro). Copyright © 2017 SOMFY ACTIVITES SA. All rights reserved.
-
Page 54: Cablaggio Dei Motori
Il collegamento dei motori deve essere invertito rispetto ai kit con braccio standard. 5. MESSA IN SERVIZIO 100 mm Consultare il manuale di installazione della Control Box 3S Axovia per la 90° messa in servizio dell’installazione. Quota B Copyright © 2017 SOMFY ACTIVITES SA. All rights reserved. -
Page 55: Braccio Snodato Per Apertura Su Pendenze Fino Al 20
Braccio motore medio + braccio snodato SERRATURA CONSIGLIATA 6.2.2. Raccomandazioni di montaggio Lunghezza L Quota B 90° 450 mm min. Luce Copyright © 2017 SOMFY ACTIVITES SA. All rights reserved. -
Page 56: Braccio Con Guida Per Apertura Fino A 150° O Luce Ridotta
OBBLIGATORIA 6.3.2. Posizione della piastra di fissaggio Al fine di verificare la conformità alle norme di sicurezza, al termine dell’autoapprendimento va portata a termine una misurazione della forza d’impatto. 15 mm Copyright © 2017 SOMFY ACTIVITES SA. All rights reserved. -
Page 57: Dimensioni Speciali Cancello O Pilastro / Apertura Fino A
2200 2400 2500 Braccio motore lungo + braccio cancello Braccio motore medio medio + braccio cancello corto C min. = 800 mm C min. = 650 mm SERRATURA SERRATURA CONSIGLIATA OBBLIGATORIA Copyright © 2017 SOMFY ACTIVITES SA. All rights reserved. - Page 58 La quota di montaggio A è identica a quella del kit standard (vedere “4.1. Montaggio del motore”). 68 mm Al fine di verificare la conformità alle norme di sicurezza, al termine dell’autoapprendimento va portata a termine una misurazione della forza d’impatto. Copyright © 2017 SOMFY ACTIVITES SA. All rights reserved.
- Page 60 SOMFY ACTIVITES SA 50 avenue du Nouveau Monde 74300 Cluses FRANCE www.somfy.com 5136471A...
Need help?
Do you have a question about the AXOVIA MULTIPRO and is the answer not in the manual?
Questions and answers