Table of Contents
Advertisement
Quick Links
Advertisement
Table of Contents

Subscribe to Our Youtube Channel
Related Manuals for WEEDO F100


Summary of Contents for WEEDO F100
-
Page 2: Table Of Contents
Directory WELCOME Security attention About 3d printer ASSEMBLY Open package Assembly step Cura_WEEDO_V1.4.0 install cura set cura Control box Main menu Adjust Plate Level Load/unload filament Start printing Display content description TROUBLE SHOOTING Specification... -
Page 3: Welcome
Welcome Let’s start Please read this manual,even you had use other desktop 3D printer before. Trust me, you will get much surprise from... -
Page 4: Security Attention
SECURITY ATTENTION Security mark in this manual Warning: Nozzle is about 200℃, please don’t touch it before it’s cold Warning: Please don’t put your hand inside the 3D printer when it’s working. Warning: Please assemble or knock down the machine, when the power adaptor is disconnected Warning: Don’t keep the machine unsupervised when it is working. -
Page 5: About 3D Printer
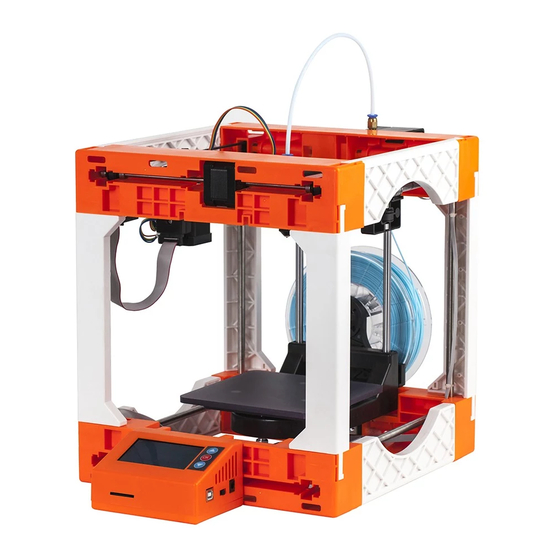
About 3D printer Structure of 3D printer Control box Build plate Filament tube X axis movement Connect line assy 3 Welcome, let’s start... - Page 6 About 3D printer SD card socket Socket of Power line Down button connect line socket Power switch LCD screen Confirm button Up button Filament holder Filament loader Print platform 4 Welcome, let’s start...
-
Page 7: Assembly
Assembly Please be patient and careful when you assemble this 3D printer. -
Page 8: Open Package
Open package 1 Open carton Open carton and take out all parts. 2 Take out all parts Take out all parts and tool bag from carton, Put all of them on the desk. Assembly... - Page 9 Assembly step. There is a assembly tutorial video in SD card Attention: Please press the support bar to max depth by small hammer, or it may lead the printer unstable Assembly...
-
Page 10: Assembly Step
Assembly step Assembly... - Page 11 Assembly step Attention: Please press the support bars to max depth by small hammer, or it may lead the printer unstable Assembly...
- Page 12 Assembly step Match build plate with platform a. Pick out build plate from box b. Match the build plate with the platform by three magnet points c. The build plate will combine with the platform by magnetism. Attention: Three red points are magnet points on the build plate and the platform Three blue points in are calibration knobs on the bottom of the platform to adjust the levelness of build plate Assembly...
- Page 13 CURA Cura is a free 3D print software ,All your 3D print will begin from Cura, You can through the USB cable online printing or copy to SD card and insert control box for printing, these two ways all can be printing.
-
Page 14: Install Cura
Print from Cura Prepare for 3D print Each 3d print begin from 3D model file. If you have 3D model file, please transfer it to STL format. You also could download 3d model file from internet. Install Cura Find Cura_WEEDO_V1.3.9.exe in SD card •... - Page 15 14 Cura 13 Cura...
- Page 16 14 Cura...
- Page 17 15 Cura...
- Page 18 16 Cura...
- Page 19 “ Load file and save to sd Note: We suggest that the first operation. Please load the file named 20mm_calibration_box .stl lament 1. Add file Click “File” /“Load model file” • You could load any STL file in your computer to software •...
- Page 20 Print parameter setting Print setting You could change print setting in Cura such as print speed and layer thickness. You also could use default setting to print. Move the mouse to the above options, there will be explained 1. Support type Choose it makes printed object have support.
-
Page 21: Control Box
CONTROL BOX You can use this machine by the control box . This chapter introduce how to use. -
Page 22: Main Menu
Main menu You could do this by control box: Prepear for next print • Adjust in XYZ axis. • Load/unload filament • Change the nozzle temp and other setting related to 3d print • 1.Card menu: show the gcode format files in sd card and print which you selected. 2. -
Page 23: Adjust Plate Level
Adjust Plate Level We should keep the about 0.5mm distance between build plate and nozzle for print request. We could adjust this distance with three calibration knobs on the bottom of the platform. Process: Select “ok>control>Adjust Plate Level”, wait till printer stop work. Use gage and knob on the bottom of platform to adjust the distance between nozzle and build bed to 0.5mm. -
Page 24: Load/Unload Filament
Load/ unload filament Load filament operation: 1. Select the ““ok>control>filament in” 2. Waiting for nozzle heating and extruder start work 3. Cut about 3cm at the end of filament 4. Feed the filament in the entrance of extruder from down to up,till filament into the white tube , press the clamp of extruder to release the filament to go through tube to nozzle. -
Page 25: 23 Start Printing
Printing Calibration printing If there is no display “card menu”, click the last option “Init.SD-Card”or restart the control box. We suggest that the first operation. Please load the file named 20mm_calibration_box 1. Insert SD card, select “card menu”in menu, Use up/down button to select file 2. -
Page 26: Display Content Description
DISPLAY CONTENT DESCRIPTION PRINT In print process, the used time, nozzle current/target temp and XYZ coordinate will be shown in LCD panel, you also can change the print speed by up/down button Click “OK” button, it will show below option: Info screen:... -
Page 27: Trouble Shooting
Trouble shooting You maybe meet different problem during printing. Below is a trouble shooting sheet for your reference. 控制面板... - Page 28 Fault Trouble shooting Unload the filament and reload again. Can’t load the filament. Check the filament tube is locked on loader or not. Try load the filament and extrude filament Can’t unload the filament from nozzle more than 20 seconds, then try unload the filament.
-
Page 29: Specification
Specification 3D printer Specification Name: 3D printer Type: FDM Max printing size: 125x130x160mm Printer size 280x300x320mm Location precision:XY axis:0.011mm,Z axis:0.0025mm Print speed: 15-40mm/s (Slow speed, high quality) Nozzle: Single Nozzle diameter: 0.4mm Software ... - Page 30 Power Working temperature: 15-32℃ Storage temperature: 0-32℃ Power: input AC 100-240V,~2amps,50-60Hz 12V DC @ 6.25amps Other Control panel: LCD screen,English manual Control button: Three Feed method: Long distance feeding Connection: SD card Support material: Automatic created, easy break away ...
Need help?
Do you have a question about the F100 and is the answer not in the manual?
Questions and answers