Hunter Rain-Clik Owner's Manual
Wireless sensor
Hide thumbs
Also See for Rain-Clik:
- Installation manual ,
- Product information (40 pages) ,
- Owner's manual & installation instructions (20 pages)

Related Manuals for Hunter Rain-Clik


Summary of Contents for Hunter Rain-Clik
- Page 1 Wireless Rain-Clik Sensor ® OWNER'S MANUAL CLIK RECEIVER For use with WR-CLIK Rain and WRF-CLIK Rain/Freeze Sensors...
-
Page 2: Table Of Contents
Innovation, Science and Economic Development Wireless Receiver Canada (ISED) Compliance Notice Mounting the Receiver Notes Wiring the Receiver to Hunter Controllers Wiring the Receiver to Other Controllers: Normally Closed Sensor Applications Wiring the Receiver to Other Controllers: Normally Open Sensor Applications... -
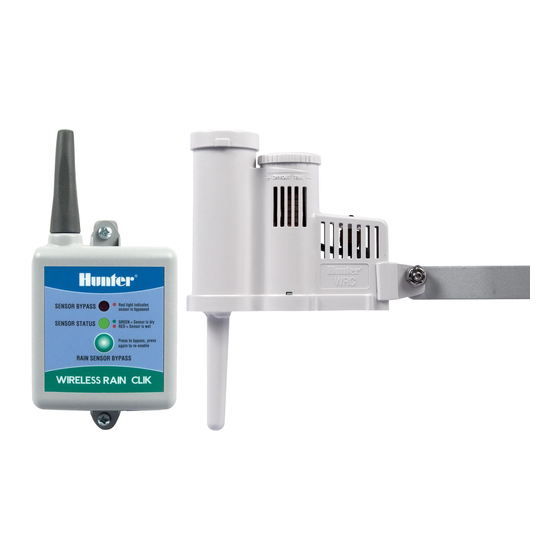
Page 3: Wireless Rain-Clik Features
3. Wireless Operation Up to 800' (243 m): No wires are required between the rain sensor and controller. 4. Wireless Rain-Clik Sensor (WR-CLIK): Acts as a switch to deactivate automatic watering of your irrigation controller when it rains. Once rain has stopped and the sensor has dried out, automatic irrigation will resume. -
Page 4: Wireless Rain-Clik Components
Wireless Rain-Clik Components Wireless Rain-Clik Sensor ② 1. Manual Test Spindle: Press and hold the manual test spindle to confirm proper operation of your transmitter. ➊ 2. Vent Ring: Used to adjust the reset rate or dry out time for the sensors. Opening the vents will decrease the reset rate, while closing the vents will increase the time it takes for the discs to dry out. -
Page 5: Wireless Receiver
Wireless Rain-Clik Components Wireless Receiver ➍ 1. Bypass Button: Allows automatic or manual watering when the sensor is active. 2. Receiver Status LED: Used to indicate the status of the sensor. 3. Receiver Bypass LED: Indicates when sensor has been bypassed. -
Page 6: Mounting The Receiver
Mounting the Receiver Wiring the Receiver to Hunter Controllers 1. Remove the sensor jumper across the two SEN 24VAC terminals in the controller. SENSOR 1 SENSOR 2 2. Attach the two yellow wires to the 24 VAC terminals. COMMON 3. Attach the blue wire to one SEN terminal and the white X2™... -
Page 7: Wiring The Receiver To Other Controllers: Normally
Mounting the Receiver Wiring the Receiver to Other Controllers: Normally Closed Sensor Applications 1. Attach the two yellow wires to the 24 VAC terminals. 2. Attach the blue and white wires to the sensor terminals (if available) or in-line with the valve common wire. P/MV AC Wiring the Receiver to Other Controllers: Normally Open Sensor Applications... -
Page 8: Surface Mounting
Mounting the Sensor Surface Mounting Gutter Mounting Using the screws provided with your sensor, mount the The SGM allows the transmitter to be mounted transmitter on any surface where it will be exposed to directly to the edge of a gutter. Install the SGM on unobstructed rainfall, but not in the path of sprinkler the transmitter by removing the metal extension arm spray. -
Page 9: Adjustments And Operation
Adjustments and Operation Tips for Mounting the Sensor Receiver Operation • Choose a location such as the side of a building or post. The receiver has two LED lights that The closer the transmitter is to the receiver, the better indicate the state of the system. -
Page 10: Bypassing The Sensor
Adjustments and Operation Bypassing the Sensor 1. Prior to applying power (yellow wires) to the receiver, press and hold the bypass button on the receiver. The sensor can be bypassed by using the built-in bypass 2. While the bypass button is depressed, apply power to feature on the receiver. -
Page 11: Battery Life
Adjustments and Operation Battery Life If you are experiencing problems with your Wireless Rain-Clik Sensor, follow these simple checks first before The Wireless Rain-Clik Transmitter is designed to operate assuming the unit is defective and replacing it. for at least 5 years with its sealed, maintenance-free battery. - Page 12 Replacement Parts and User-Installed Options REPLACEMENT PARTS USER-INSTALLED OPTIONS Part Number Description Part Number Description WR-CLIK-TR WS-GUARD Wireless Rain-Clik Transmitter Assembly Vandal-resistant Wireless Sensor WRF-CLIK-TR Wireless Rain/Freeze-Clik Transmitter Guard for flat Assembly surfaces or pole mounting (order 505900SP Cap and Spindle Assembly...
- Page 13 Industries could void the user’s authority to operate this device. interference to radio communications. However, there is If necessary, consult a representative of Hunter Industries Inc. no guarantee that interference will not occur in a particular or an experienced radio/television technician for additional installation.
- Page 14 Notices Innovation, Science and Economic Development Canada (ISED) Compliance Notice Hereby, Hunter Industries declares that the radio This device contains licence-exempt transmitter(s)/ equipment type models WR-CLIK-TR are in compliance receiver(s) that comply with Innovation, Science and with Directive 2014/53/EU. Economic Development Canada’s licence-exempt RSS(s).
- Page 15 Notes...
- Page 16 1940 Diamond Street, San Marcos, CA 92078 USA hunterindustries.com © 2021 Hunter Industries Hunter, the Hunter logo, and all other trademarks are ™ property of Hunter Industries, registered in the U.S. and other countries. P/N 715182 23-594 I EN 5/21...
Need help?
Do you have a question about the Rain-Clik and is the answer not in the manual?
Questions and answers