
Subscribe to Our Youtube Channel
Related Manuals for Avonic AV-REC200


Summary of Contents for Avonic AV-REC200
- Page 1 Recorder & Encoder with HDMI & SDI input AV-REC200 www.avonic.com User Manual | Version 1..1...
-
Page 2: Table Of Contents
Operating Instructions: WebGui ................11 1. Powering up and Initialization of the AV-REC200 ..........11 2.1 Operating the webinterface ................11 2.2 Live Service/ Streaming Setting. -
Page 3: Introduction
For any questions or suggestions, contact your reseller or the local distributor of Avonic. Find the local distri- butor on the website of Avonic. For the most recent version of the manual or datasheet, look at the Avonic website: www.avonic.com. -
Page 4: Safety Notes
Installation Set up this Product on a hard, stable surface or mount it to a wall or ceiling. Only use an Avonic mount for mounting to a wall or ceiling. Ensure the mounting construction is capable of supporting four times the weight of the equipment downwards. - Page 5 Power adapter To operate the Avonic power adapter safely and reduce the possibility of heat-related injury or damage, plug the power adapter directly into a power outlet. Don’t use the power adapter in wet locations, and don’t connect or disconnect the power adapter with wet hands. Stop using the power adapter and any cables if any of the following conditions exist: •...
-
Page 6: Package Contents And Accessories
AV-PSU200 PRODUCT OVERVIEW The Avonic AV-REC200 is the ideal standalone USB/SD Card recorder and web streaming device. Users can simply connect an HDMI or SD/HD/3G-SDI input and in a few simple steps, they will be streaming and/ or recording. With support for UDP/HLS/RTMP/RTSP live output and USB/SD card recording the AV-REC200 enables corporate streaming, live streaming to various platforms and live high bitrate full HD 1080P60 re- cording. -
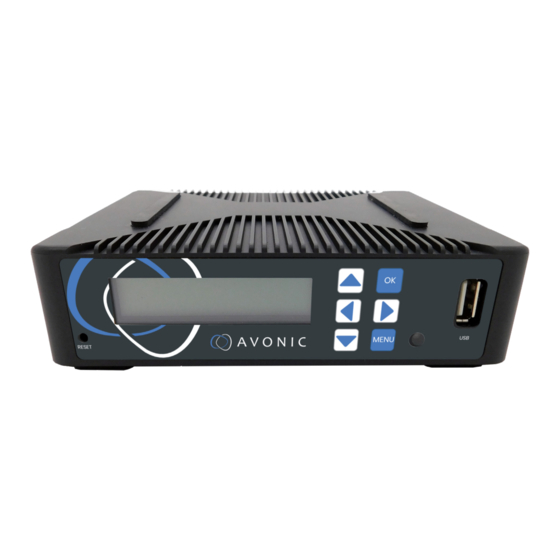
Page 7: Installation
Navigation buttons, for navigating through front panel display. Ok button Menu button Power and status indicator, changes color on basis of operational status of the REC200. USB storage input for use with playback and/ or recording features www.avonic.com... -
Page 8: Operating Instructions: Lcd Display
Youtube or Facebook. Live Setting Live Playing/paused Encoding Video Source HDMI/SDI ON/OFF Video Profile 480p - 1080p ON/OFF Audio Source HDMI/SDI, Audio IN ON/OFF Live Output Youtube, Facebook, UDP, RTMP, RTSP, HLS ON/OFF Select Item [OK] Enter [Menu] Exit www.avonic.com... -
Page 9: Playback
UDP, RTMP, RTSP, HLS ON/OFF Select Item [OK] Enter [Menu] Exit 4. Record Choose “Setting”. Click [OK] to start recording. Click again [OK] to pause or stop the recording. The record is ready when you see the image below. www.avonic.com... -
Page 10: System
Choose “Recovery” and “Reboot” to recover or reboot REC200 fabrique settings. System Network Host IP, 192.168.1.100 Host Gateway 192.168.1.1 Host Mask, 255.255.255.0 Host DNS 192.168.1.1 Net Mode DHCP Disable/Enable Static/Dynamic Version Software/hardware version Select Item Recovery Recover Yes/No Reboot Reboot Yes/No [OK] Enter [Menu] Exit www.avonic.com... -
Page 11: Operating Instructions: Webgui
Connect the supplied power transformer to the unit and wait until it is booted up. This process takes approxi- mately 35 seconds to 1 minute to complete. All of the features of the AV-REC200 can be accessed through the webinterface, in the now following part of this manual we will explain how to use it. -
Page 12: Live Service/ Streaming Setting
After logging in, you will be directed to the status page of the AV-REC200, with a live preview of the incoming video signal on top and information about the incoming signal, recording status and streaming status: Image 4 2.2 Live Service/ Streaming Setting... -
Page 13: Live Service / Streaming Setting Basic Options
REC200 is live and streaming to the platform. On the REC200 itself the light next to the “menu” button will turn orange when streaming is active. www.avonic.com... - Page 14 Your Device”, you will get the Live Authorization pictures below. Follow the steps, click on conti- nue and then on “Start Streaming”. Image 8 authorization Image 9 authorization success Image 10 authorized and streaming Image 11 youtube dashboard www.avonic.com...
-
Page 15: Live Service / Streaming Alternative (Automatic Authorisation Fail)
Select Mode Manual Select output: RTMP/RTMPS Paste the Youtube Stream key in the uploading Node field of the REC200 Video Profile 1080p-6000Kbps is the preferred seting for Youtube. You can also set up these settings manual according to your preferences. www.avonic.com... - Page 16 Image 14 12. Apply these settings and start streaming to Youtube. Youtube should now give you a preview of your stream: Image 15 www.avonic.com...
-
Page 17: Live Service / Streaming Setting Advanced Options
Video Mode Constant Bitrate (CBR), Variable Bitrate (VBR). Buffer Enable/Disable AUDIO: Audio Type MPEG1_Layer2 (MP2), AAC, AC3, EAC3 Audio Sampling Rate (KHz) Audio Bit Rate (kbps) 32, 48, 64, 80, 96, 112, 128, 160, 192, 224, 256, 320, 384 www.avonic.com... - Page 18 Image 16 The last step on this page is to press Apply and after that the green “Start streaming” button to start broadcasting your stream. www.avonic.com...
-
Page 19: Record/ Ftp Upload Settings
YOU DO NOT, IT MAY CORRUPT THE LAST RECORDING! NOTE: YOU CAN ONLY USE FAT32 USB/SD DRRIVES AND RECORD A MAX OF 4 GB FILE SIZE. AFTER THAT THE REC200 WILL RECORD A NEW FILE WITH A GAP OF 2 SECONDS BETWEEN THE TWO FILES. www.avonic.com... - Page 20 4 Gb .MOV 1080p - 720p, 6000 kbps 4 Gb Upload/ Download time Speed (bit rate) File size Hour Minutes 1.5 Mbps 4 Gb 5 Mbps 4 Gb 6 Mbps 4 Gb 8 Mbps 4 Gb 10 Mbps 4 Gb www.avonic.com...
-
Page 21: Ftp Upload
2.2.3.1. FTP Upload The Avonic REC200 has been equipped with an FTP client to upload recordings to an FTP server. The now following steps will describe how to install and use this functionality. In this example the target for the REC200 to upload its recordings to, is FTP://192.168.178.64/ on port 21 (standard FTP port). -
Page 22: Playback Settings
If you choose “Mode: Youtube”, you can set the privacy status of your recorded file according to your Youtube page (public, private, unlisted). Authorize Your Device as is described under chapter 2.2.1 and click on Apply and Start Play Back. www.avonic.com... -
Page 23: Overlay Settings
2.2.5. Overlay Settings The Avonic REC200 has the possibility to put a text and/or picture on its output as an overlay over the video output. Note that this option is only intended for setting this one time before streaming! Modifying this option during streaming will cause a hick-up in the stream (video and audio), because the REC200 will build up the stream again after a change to its settings. -
Page 24: How To Create Transparent Bmp File For Overlay
Select your imagefile in the layers windows holding the CTRL button Go to the channel window and save your selection as channel Uncheck the colors, leaving only the alpha channel selected Save the file as 32 bit Bitmap with alpha channel www.avonic.com... -
Page 25: System Settings
Only HTTP, Only HTTPS, or HTTP and HTTPS Select one of these options TLS (Transport Layer Security) Protocol TLS version Allowed SSL ciphers Enable/ Disable Cipher List Recommendation1, Recommendation2 Certificate, Private Key, Certificate chain Upload possibility Click now on “Apply” to save the settings Image 23 www.avonic.com... - Page 26 Static, or DHCP IP Address Fill in IP Address Subnet Mask Fill in Subnet Mask Default Gateway Fill in Default Gateway Dynamic DNS Disable/ Enable Primary DNS Fill in Primary DNS Secondary DNS Fill in Secondary DNS Image 25 www.avonic.com...
- Page 27 Choose if you want or not to synchronize automatically the time. Select enable or disable. Sync Frequency(min) When Auto Sync is enabled, you can set the Sync Frequency. Image 26 6. Language Select the language (English, or Chinese) Image 27 www.avonic.com...
- Page 28 7. System operation Upgrade, import or export license if available. Import or export a configuration file Image 28 8. Other Operation Reboot, Restore Factory Settings, Export logfile and Clear all logs. Image 29 www.avonic.com...
-
Page 29: Maintenance
- Check the net power - Check the power supply WebGUI • Cannot enter WebGUI - Check network cable - Check if PC is in the same subnet as the recorder • Firmware update failed - Check firmware file integrity, download it again. www.avonic.com... -
Page 30: Api Data
Reboot the running system System Display system information of product InputSrc Select HDMI or SDI as input source, and display input source status Syntax InputSrc X Parameter Description Range Value ON, OFF, sta Example Feedback InputSrc sta InputSrc HDMI AudioSw Enable/disable audio, and display audio status Syntax AudioSw X Parameter Description Range Value ON, OFF, sta Example Feedback AudioSw ON AudioSw ON www.avonic.com... - Page 31 ON, OFF, sta Example Feedback StreamSw ON StreamSw ON OverlayPicSw Enable/disable picture overlay, and display picture overlay status Syntax OverlayPicSw X Y Parameter Description Range Value ON, OFF, sta Select which picture 1~20 Example Feedback OverlayPicSw ON 2 OverlayPicSw ON 2 www.avonic.com...
- Page 32 Set the content of overlay text and display content of overlay text Syntax OverlayTxt X Parameter Description Range Text content String (<30Bytes), sta Example Feedback OverlayTxt Avonic OverlayTxt Avonic Network Display status of network Syntax Network X Parameter Description Range Status...
Need help?
Do you have a question about the AV-REC200 and is the answer not in the manual?
Questions and answers