Table of Contents
Advertisement
Available languages
Available languages
Quick Links
Advertisement
Chapters
Table of Contents

Subscribe to Our Youtube Channel
Related Manuals for Uwatec X-Tek SIDEMOUNT


Summary of Contents for Uwatec X-Tek SIDEMOUNT
- Page 1 ® X-Tek SIDEMOUNT SYSTEM...
- Page 2 SUBSIDIARIES SCUBAPRO AMERICAS SCUBAPRO ASIA PACIFIC SCUBAPRO AUSTRALIA Johnson Outdoors Diving LLC 1208 Block A, MP Industrial Center Unit 21 380 Eastern Valley Way 1166-A Fesler Street 18 Ka Yip St. Chatswood NSW 2067- El Cajon, CA 92020 - USA Chai Wan - Hong Kong Australia SCUBAPRO FRANCE...
-
Page 3: Table Of Contents
12. AFTER THE DIVE .............................. 13 Inspection and Service Interval ..........................13 13. TRANSPORT OF THE X-TEK SYSTEMS ......................13 Storage ................................14 14. GENERAL SPECIFICATIONS ........................... 14 Shelf life ................................14 Operating temperature range..........................14 15. X-TEK SIDEMOUNT BC ........................... 14 Wings .................................. 14... -
Page 4: Important Warnings
WARNING This information is for your safety. Please read the entire instruction manual before using your X-TEKbuoyancy compensator and equipment for the ð rst time! IMPORTANT WARNINGS WARNING This manual must be read and understood entirely before using the product. It is advised that you keep this manual in your possession during the entire life of your BC. -
Page 5: General Information
WARNING SCUBAPRO refuses all responsibility for damages caused by non-compliance with the instructions contained in this manual. These instructions do not extend the warranty or the responsibilities stated by SCUBAPRO terms of sales and delivery. WARNING Always perform a pre-dive and post-dive inspection of the BC. GENERAL INFORMATION Primary purpose of the Buoyancy Compensator The primary purpose of a Buoyancy Compensator is to make you more comfortable by enabling you to maintain neutral... -
Page 6: Valve Set Up
To attach the optional weight pockets system please refer to page 12. WARNING The Removable Pocket and pouch must be secured with the quick release buckle fully and correctly engaged. The loss of the pocket during diving may causes positive buoyancy and an uncontrolled ascent that could result in serious injury or death. -
Page 7: Over Pressure Valve Operation
WARNING With all deñ ation methods, only keep the valve open as long as needed. This helps prevent excess water from entering the BC. Over Pressure Valve Operation The Over Pressure Valve prevents over-ink ation of the BC. If the internal pressure exceeds the spring pressure in the Over Pressure Valve, the valve automatically opens and releases air to prevent damage to the BC. -
Page 8: Important Sidemount Diving Information
WARNING Special Instruction in cold water diving methods, and the specið c use of this product in cold water, is required prior to cold water diving (temperatures below 10°C/50° F). This instruction is beyond the scope of this manual. 10. IMPORTANT SIDEMOUNT DIVING INFORMATION Sidemount diving is different to normal sport diving and has to be trained. -
Page 9: Assembling Of Your X-Tek Sidmeount Bc Parts
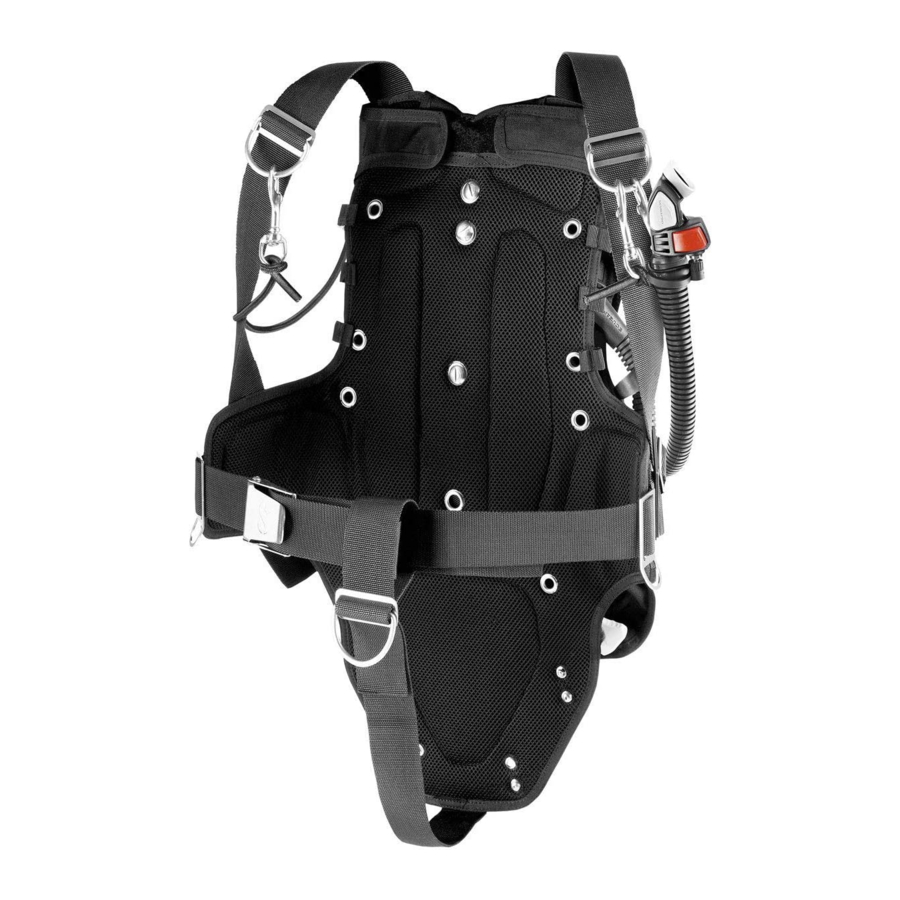
11. ASSEMBLING OF YOUR X-TEK SIDMEOUNT BC PARTS: Assembled system Front view: 1. Shoulder D-ring (01.085.052) with belt-stopper (21.726.105) (left & right shoulder, upper tank attachment point) 2. Bungee for tank alignment with bolt snap (21.726.109) (left & right side) 3. -
Page 10: Assembled System Back View (With Top Cape)
Assembled system back view (with top cape): Assembling of the crotch strap: 1) Thread the D-ring on the strap which is attached to the 2) Thread the webbing through the buttplate’s lower loop wing 3) Adjust the strap to sit j rmly 4) Assembling of the crotch strap –... -
Page 11: Assembling The Harness Straps/Belts And Assembly Of The Wing
5) Insert the belt throug the D-ring 6) Thread the strap through the second eye of the belt stopper 7) Form a loop and thread the strap back through the 8) Thread the strap back through the j rst eye of the belt second eye of the belt stopper stopper 9) The loop should look like this now. -
Page 12: Assembling The Shoulder Straps On The Plates
3) Thread the belt through the second loop 4) Pull the belt to make the wing sit j rmly on the harness 5) Insert the belt through the j rst eye of the shoulder strap 6) Thread the belt through the second eye of the shoulder attachment plate strap attachment plate and pull the belt to sit j rmly 7) Attach the waist belt D-ring to the belt... -
Page 13: Threading The Bungees On The Wing
3) Thread the strap back through the j rst eye of the belt stopper to ensure a safe attachment 4) Repeat this procedure on the other side of the harness Threading the bungees on the wing: 1) Attach the beginning of the bungee to the small plastic D-ring below the waist strap using the knot on picture B 2) Thread the bungee through the loops on the wing and the harness in turns and j x the bungees end on the small plastic D-ring sitting on the top of the harness 3) FINAL VIEW OF THE SIDE BUNGEES:... -
Page 14: Attaching The Wing To The Harness With The Lower Screws
Threading the bungees on the wing: 1) Thread the bungee through the loop on the top of the 2) Thread the bungee through the upper grommet of the wing’s back harness 3) Now attach the bolt snaps to the bungee using the knot in pic. -
Page 15: Assembling The Optional Cape(Top)
Assembling the optional cape(top): 1) Secure the top cap with the j rst leash around the 2) Repeat on the other side shoulder strap Assembling the optional cap (bottom): 1) Thread the lower strap of the top cap through the loop 2) Secure the top cap lower strap with the Velcro on it´s on the back of the wing inside... -
Page 16: Storage
+40°C 28°F 104°F 15. X-TEK SIDEMOUNT BC Diving with a sidemount BC is different from a standard BC. The sidemount BC uses a wing styled bladder. Wings: 1) 25 lbs Wing, 120N lift (PN 21.726.200), designed for use in warm water with up to to 2 x 80 CUFT Aluminum Tanks. - Page 17 12. NACH DEM TAUCHEN ............................. 29 Inspektions- und Serviceintervall: ......................... 29 13. TRANSPORT DER X-TEK SYSTEME: ......................30 Lagerung ................................30 14. ALLGEMEINE SPEZIFIKATIONEN ........................30 Lagerfähigkeit ..............................30 Betriebstemperaturen ............................30 15. X-TEK SIDEMOUNT TARIERJACKET ......................30 Wings: ................................. 30...
-
Page 18: Wichtige Warnungen
WARNUNG Diese Informationen wurden zu Ihrer Sicherheit entwickelt. Bitte lesen Sie das komplette Anleitungshandbuch bevor Sie Ihr X-TEK Tariermittel und Ausrüstung das erste Mal benutzen! WICHTIGE WARNUNGEN WARNUNG Bevor Sie das Produkt verwenden, muss dieses Handbuch gelesen und verstanden werden. Es wird empfohlen, dass Sie dieses Handbuch während der gesamten Lebensdauer Ihres Tarierjackets aufbewahren. -
Page 19: Allgemeine Informationen
Bleigurt nicht direkt abwerfen können, kann es zu schwerwiegenden Verletzungen oder zum Tod kommen. Zubehör Bleitaschensystem (SN 23.803.000) Das abwerfbare Bleitaschensystem (Bild 1) wurde entwickelt, um an der Taillenbebänderung des X-Tek Sidemount Systems befestigt zu werden. Die Bilder unten zeigen, wie man die Bleitaschen richtig befüllt und sichert. -
Page 20: Vorbereitung Des Ventils
Befestigung des optionalen Bleitaschensystems (siehe Seite 12). WARNUNG Die abnehmbare Tasche und der Beutel müssen mit der Schnellverschluss-Schnalle, vollständig und richtig eingerastet/gesichert werden. Der Verlust der Taschen während des Tauchens kann zu einem positiven Auftrieb und zu einem unkontrollierten Aufstieg führen, was Verletzungen oder den Tod verursachen kann. VORBEREITUNG DES VENTILS SCUBAPRO X-TEK-Tarierjackets werden mit dem BPI-System (balancierter Power-Ink ator) ergänzt. -
Page 21: Funktion Des Überdruckventils
vergewissern Sie sich mit dem Blick, dass Luft aus dem Mundstück strömt. Zur besten Kontrolle lassen Sie die Luft in einer Reihe von kurzen, mäßigen Stößen ab und beobachten Sie dabei Ihren Auftrieb. WARNUNG Halten Sie bei allen Methoden des Entleerens das Ventil nicht länger offen, als es erforderlich ist. Dadurch kann das Eindringen von zu viel Wasser in das Tarierjacket verhindert werden. -
Page 22: Wichtige Information Zum Sidemount-Tauchen
WARNUNG TAUCHEN SIE NIE mit einem Tarierjacket, das beschädigt ist, Luft verliert oder nicht korrekt funktioniert. Brechen Sie einen Tauchgang so sicher und so schnell wie möglich ab, wenn Ihr Tarierjacket beschädigt wird, Luft verliert oder nicht korrekt funktioniert. Vermeiden Sie längere oder wiederholte Einwirkungen von chlorhaltigem Wasser, wie es in Schwimmbecken verwendet wird. -
Page 23: Zusammenbau Der Einzelteile Ihres X-Tek Sidmount Tarierjackets
11. ZUSAMMENBAU DER EINZELTEILE IHRES X-TEK SIDMOUNT TARIERJACKETS: Vorderansicht des zusammengebauten Systems: 1. Schulter D-Ring (01.085.052) mit Gurtstopper (21.726.105) (linke und rechte Schulter, oberer Befestigungspunkt für die Tauchk asche) 2. Bungee mit Bolt Snap (21.726.109) zur Tauchk aschen-Ausrichtung (linke und rechte Seite) 3. -
Page 24: Rückansicht Des Zusammengebauten Systems (Mit Schutzabdeckung)
Rückansicht des zusammengebauten Systems (mit Schutzabdeckung): Zusammenbau des Schrittgurtes: 1. Fädeln Sie den D-Ring auf den Gurt, der am Wing 2. Fädeln Sie das Gurtband durch die untere Schlaufe der befestigt ist. Buttplate. 3. Passen Sie den Gurt für einen straffen Sitz an. 4. -
Page 25: Zusammenbau Des Tragesystems Riemen/Gurte Und Der Zusammenbau Des Wing-Systems
5. Stecken Sie den Gurt durch den D-Ring. 6. Fädeln Sie den Gurt durch den zweiten Schlitz des Gurtstoppers. 7. Bilden Sie eine Schlaufe und fädeln Sie den Gurt 8. Fädeln Sie den Gurt zurück durch den ersten Schlitz zurück durch den zweiten Schlitz des Gurtstoppers. des Gurtstoppers. -
Page 26: Zusammenbau Der Schultergurte An Den Befestigungsplatten
3. Fädeln Sie den Gurt durch die zweite Schlaufe. 4. Ziehen Sie am Gurt, sodass das Wing fest auf dem Tragesystem sitzt. 5. Stecken Sie den Gurt durch den ersten Schlitz der 6. Fädeln Sie den Gurt durch den zweiten Schlitz der Schultergurt-Befestigungsplatte. -
Page 27: Einfädeln Der Bungee Am Wing
3. Fädeln Sie den Gurt zurück durch den ersten Schlitz des Gurtstoppers, um eine sichere Befestigung zu gewährleisten. 4. Wiederholen Sie diesen Vorgang auf der anderen Seite des Tragesystems. Einfädeln der Bungee am Wing: 1. Befestigen Sie den Anfang des Bungee an dem kleinen Plastik D-Ring unterhalb des Bauchgurtes, unter Verwendung des Knotens aus Abbildung B. -
Page 28: Befestigen Des Wings Am Tragesystem Mit Der Unteren Schraube
Einfädeln der Bungee am Wing: 1. Fädeln Sie das Bungee durch die obere Schlaufe auf 2. Fädeln Sie den Gurt durch die obere Durchführung des der Rückseite des Wings. Tragesystems. 3. Befestigen Sie nun den Bolt Snap am Bungee, unter Verwendung des Knotens aus Abbildung B. -
Page 29: Zusammenbau Der Optionalen Schutzabdeckung - Top Cape (Oben)
Zusammenbau der optionalen Schutzabdeckung - Top Cape (oben): 1. Sichern Sie die Schutzabdeckung mit der ersten 2. Wiederholen Sie dies auf der anderen Seite. Schlaufe um die Schultergurte. Zusammenbau der optionalen Schutzabdeckung - Top Cape (unten): 1. Fädeln Sie den unteren Gurt der Schutzabdeckung 2. -
Page 30: Transport Der X-Tek Systeme
-2 °C +40 °C 28 °F 104 °F 15. X-TEK SIDEMOUNT TARIERJACKET Das Tauchen mit einem Sidemount Tarierjacket unterscheidet sich von dem mit einem Standard-Tarierjacket. Das Sidemount Tariersystem verwendet eine Wing-Blase. Wings: 1. Wing 11 kg, 120 Lift N (SN 21.726.200), entworfen für den Gebrauch in warmen Gewässern für max. 2 x 12l Aluminium-Flasche. - Page 31 LATÉRALE (SIDEMOUNT) ..........................36 Flexible de basse pression / ink ateur pneumatique ....................36 11. MONTAGE DES PIÈCES DE VOTRE GILET STABILISATEUR X-TEK SIDEMOUNT ........37 Vue avant du système monté : ..........................37 Vue arrière du système monté (sans la cape supérieure) ..................37 Vue arrière du système monté...
-
Page 32: Avertissements Importants
AVERTISSEMENT Ces informations sont destinées à votre sécurité. Veuillez lire tout l'ensemble du manuel d'utilisation avant d'utiliser votre gilet stabilisateur X-TEK et votre matériel pour la première foisb! AVERTISSEMENTS IMPORTANTS AVERTISSEMENT Vous devez entièrement lire et comprendre ce manuel avant d'utiliser le produit. Il vous est conseillé de conserver de manuel en votre possession pour la vie entière de votre gilet stabilisateur. -
Page 33: Informations Générales
Le système amovible Buckle Weight Pocket (BW) (image 1) est conçu pour être utilisé avec la sangle de ceinture de la plaque dorsale du système pour montage latéral X-Tek Sidemount. La photo ci-dessous illustre la bonne façon de charger et d'arrimer les poches de lest dans leurs housses. -
Page 34: Réglage De L'inflateur
Pour j xer le système de poches de lest optionnelles, reportez-vous à la page 12. AVERTISSEMENT La poche amovible et la housse doivent être ð xées avec la boucle à déclenchement rapide entièrement et correctement engagée. La perte des poches de lest au cours de la plongée provoquerait une ñ ottabilité positive et une remontée incontrôlée pouvant aboutir à... -
Page 35: Fonctionnement De La Soupape De Surpression
AVERTISSEMENT Quelle que soit la méthode de déñ ation, ne maintenez pas l'inñ ateur ouvert plus longtemps que nécessaire. Cela prévient les entrées d'eau excessives à l'intérieur du gilet stabilisateur. Fonctionnement de la soupape de surpression La soupape de surpression empêche un gonk age excessif du gilet stabilisateur. Si la pression interne dépasse la pression du ressort de la soupape de surpression, celle-ci s'ouvre automatiquement et relâche de l'air pour empêcher tout dommage sur le gilet. -
Page 36: Informations Importantes Pour La Plongée Avec Bouteilles En Configuration Latérale (Sidemount)
AVERTISSEMENT NE PLONGEZ PAS avec un gilet stabilisateur qui serait endommagé, présenterait des fuites d'air ou ne fonctionnerait pas correctement. Mettez ð n de manière aussi sûre et rapide que possible à une plongée au cours de laquelle le gilet stabilisateur serait endommagé, fuirait de l'air ou ne fonctionnerait pas correctement. -
Page 37: Montage Des Pièces De Votre Gilet Stabilisateur X-Tek Sidemount
11. MONTAGE DES PIÈCES DE VOTRE GILET STABILISATEUR X-TEK SIDEMOUNT Vue avant du système monté : 1. Anneau forme « D » (01.085.052) avec bloqueur (21.726.105) (épaules droite et gauche, point de j xation du haut de la bouteille) 2. Sangle élastique pour l'alignement du bloc avec mousqueton (21.726.109) (côtés droit et gauche) -
Page 38: Vue Arrière Du Système Monté (Avec La Cape Supérieure)
Vue arrière du système monté (avec la cape supérieure) Montage de la sous-cutale : 1) Enj lez la sangle j xée à la bouée dans l'anneau forme 2) Faites-la passer par la boucle inférieure de la plaque « D » lombaire 3) Réglez la sangle pour qu'elle soit fermement en place 4) Montage de la sous-cutale À... -
Page 39: Montage Des Sangles Et Des Ceintures Du Harnais, Et Montage De La Bouée De Type " Wing
5) Faites passer la sangle par l'anneau forme « D » 6) Puis faites-la passer par le deuxième trou du bloqueur 7) Formez une boucle puis faites repasser la sangle par le 8) Puis faites-la repasser par le premier trou du bloqueur deuxième trou du bloqueur 9) La boucle devrait alors ressembler à... -
Page 40: Montage Des Sangles D'épaule Sur Les Plaques
3) Faites passer la ceinture par le deuxième passant 4) Tirez la ceinture pour que la bouée soit fermement j xée au harnais 5) Insérez la ceinture dans le premier trou de la plaque de 6) Faites passer la ceinture par le deuxième trou de la j xation de la sangle d'épaule plaque de j xation de la sangle d'épaule, puis tirez-la pour qu'elle soit bien positionnée... - Page 41 3) Puis faites-la repasser par le premier trou du bloqueur pour garantir que la j xation est sûre 4) Répétez l'opération de l'autre côté du harnais Enk lage des sangles élastiques sur la bouée : 1) Fixez l'extrémité de la sangle élastique sur le petit anneau forme « D » en plastique situé sous la sangle abdominale, à...
-
Page 42: Fixation De La Bouée Au Harnais Avec Les Vis Inférieures
Enk lage des sangles élastiques sur la bouée : 1) Enj lez la sangle élastique dans la boucle située sur le 2) Enj lez la sangle élastique dans l'œillet en haut du haut au dos de la bouée harnais 3) Fixez maintenant les mousquetons à la sangle élastique à... -
Page 43: Mise En Place De La Cape Optionnelle (Partie Haute)
Mise en place de la cape optionnelle (partie haute) : 1) Fixez la cape en passant le premier rabat autour de la 2) Refaites la même chose de l'autre côté sangle d'épaule Mise en place de la cape optionnelle (partie basse) : 1) Enj lez la sangle inférieure de la cape à... -
Page 44: Transport Des Systèmes X-Tek
à 104 °F 104°F 15. GILET STABILISATEUR X-TEK SIDEMOUNT Plonger avec un gilet stabilisateur avec bouteilles en conj guration latérale (sidemount) est différent de plonger avec un gilet normal. Le gilet Sidemount utilise une vessie de type « wing ». - Page 45 10. INFORMAZIONI IMPORTANTI SULL’IMMERSIONE CON SISTEMI SIDEMOUNT ........50 Frusta di bassa pressione / valvola di gonj aggio pneumatica ................50 11. ASSEMBLAGGIO DEI COMPONENTI DEL SISTEMA X-TEK SIDEMOUNT:..........51 Sistema assemblato: vista frontale: ........................51 Sistema assemblato, vista posteriore (senza mantellina): ..................51 Sistema assemblato, vista posteriore (con mantellina):..................
-
Page 46: Avvertenze Importanti
ATTENZIONE Queste informazioni riguardano la sicurezza dell’utente. Si prega di leggere l’intero manuale di istruzioni prima di utilizzare l’equilibratore e le attrezzature X-TEK per la prima volta! AVVERTENZE IMPORTANTI ATTENZIONE Questo manuale deve essere letto e compreso interamente prima di utilizzare il prodotto. Si consiglia di conservarlo durante l’intera durata dell’equilibratore. -
Page 47: Informazioni Generali
Il sistema di zavorra integrata (Buckle Weight Pocket System - BW) con tasche estraibili e j bbie a sgancio rapido (j gura 1) è progettato per l’utilizzo con la cintura del sistema X-Tek Sidemount. Nelle j gure che seguono viene mostrato il modo corretto di caricare e j ssare le tasche dei pesi negli appositi scomparti. -
Page 48: Configurazione Delle Valvole
Per j ssare il sistema opzionale di zavorra integrata consultare pag.12. ATTENZIONE Le tasche estraibili devono essere inserite completamente e correttamente negli appositi scomparti e ð ssate con la ð bbia a sgancio rapido. La perdita delle tasche durante l’immersione può provocare l’instaurarsi di un assetto molto positivo e una risalita incontrollata che possono condurre a gravi lesioni o alla morte. -
Page 49: Funzionamento Della Valvola Di Sovrappressione
ATTENZIONE Con tutti i metodi di sgonð aggio mantenere la valvola aperta solo per il tempo necessario. Questo aiuta a prevenire l’entrata eccessiva di acqua all’interno dell’equilibratore. Funzionamento della valvola di sovrappressione La valvola di sovrappressione impedisce il gonj aggio eccessivo dell’equilibratore. Se la pressione interna supera quella della molla dentro la valvola di sovrappressione, questa si apre automaticamente e scarica l’aria per evitare danni all’equilibratore. -
Page 50: Informazioni Importanti Sull'immersione Con Sistemi Sidemount
ATTENZIONE È necessario un addestramento speciale sui metodi di immersione e sull’uso specið co di questo prodotto in acque fredde prima di immergersi in questo tipo di condizione (temperature inferiori ai 10 °C). Tale addestramento va oltre lo scopo di questo manuale. 10. -
Page 51: Assemblaggio Dei Componenti Del Sistema X-Tek Sidemount
11. ASSEMBLAGGIO DEI COMPONENTI DEL SISTEMA X-TEK SIDEMOUNT: Sistema assemblato: vista frontale: 1. Anello a D spallaccio (01.085.052) con ferma- nastro (21.726.105) (spallaccio destro e sinistro, punto di aggancio superiore per la bombola) 2. Elastico per allineamento della bombola con il moschettone (21.726.109) (lato destro e sinistro) -
Page 52: Sistema Assemblato, Vista Posteriore (Con Mantellina)
Sistema assemblato, vista posteriore (con mantellina): Assemblaggio del cinghiaggio inguinale: 1) Inj lare l’anello a D sulla cintura cucita sul jacket 2) Inj lare il nastro attraverso i passanti inferiori della piastra posteriore 3) Regolare il cinghiaggio in modo che resti saldamente fermo 4) Assemblare l’anello a D frontale sul nastro inguinale: passare il nastro attraverso una fessura del passante ferma-nastro... -
Page 53: Assemblaggio Della Bardatura Nastri/Cinture Ed Assemblaggio Del Sacco
5) inserire l’anello a D sul nastro 6) passare il nastro attraverso la seconda fessura del passante ferma-nastro 7) creare un anello e passare il nastro di nuovo nella 8) passare il nastro ancora una volta attraverso la prima seconda fessura del passante ferma-nastro fessura del passante ferma-nastro 9) l’anello deve quindi apparire come in j gura. -
Page 54: Assemblaggio Degli Spallacci Sulle Piastre
3) passare la cintura attraverso il secondo passante sulla 4) tirare la cintura per fare in modo che il sacco sia bardatura saldamente j ssato sulla bardatura 5) inserire la cintura attraverso il primo passante della 6) passare la cintura attraverso il secondo passante della piastra di j ssaggio degli spallacci, come in j gura piastra e tirare la cintura per j ssarla saldamente 7) montare l’anello a D sulla cintura in vita... -
Page 55: Passaggi Degli Elastici Sul Jacket
3) passare il nastro dello spallaccio nuovamente attraverso il primo passante del ferma-nastro per garantire un montaggio sicuro 4) ripetere questa procedura sull’altro lato della bardatura Passaggi degli elastici sul jacket: 1) Collegare l’inizio degli elastici al piccolo anello a D in plastica posizionato sotto la cintura in vita usando il nodo in j gura B 2) Passare l’elastico attraverso i passanti del sacco e della bardatura alternativamente come mostrato dalla foto e j ssare l’estremità... -
Page 56: Passaggio Degli Elastici Sul Sacco
Passaggio degli elastici sul sacco: 1) Passare l’elastico attraverso il passante sulla parte 2) Passare l’elastico attraverso l’occhiello superiore della superiore del retro del sacco bardatura 3) Collegare il moschettone all’elastico usante il nodo in j gura B Collegamento del sacco alla bardatura con le viti inferiori: 1) Inserire la vite attraverso il punto di collegamento inferiore del sacco e passare attraverso il piccolo occhiello sulla parte inferiore della bardatura... -
Page 57: Assemblaggio Della Mantellina Opzionale (Parte Superiore)
Assemblaggio della mantellina opzionale (parte superiore): 1) Assicurare la mantellina superiore con il primo lembo 2) Ripetere sull’altro lato passando sotto lo spallaccio Assemblaggio della mantelina opzionale (parte inferiore): 1) Passare il nastro inferiore della mantellina attraverso il 2) Assicurare il nastro della mantellina utilizzando il velcro passante sul retro del sacco Assemblaggio della mantellina opzionale (k ssaggio laterale): 1) Collegare le piccole clip in plastica sull’elastico che... -
Page 58: Conservazione
+50°C Acqua da -2°C +40°C 15. JACKET X-TEK SIDEMOUNT L’immersione con sistemi sidemount è differente dalle normali immersioni con jacket “standard”. Il jacket Sidemount utilizza un sacco posteriore. Sacchi: 1) 25 libbre, 120N di spinta (PN 21.726.200), progettato per uso in acque calde con bombole d’alluminio j no a 2x80 CUFT. - Page 59 ÍNDICE ADVERTENCIAS IMPORTANTES ........................60 CERTIFICACIÓN CE ............................60 PRECAUCIONES IMPORTANTES ........................60 INFORMACIÓN GENERAL ..........................61 Objetivo principal del chaleco hidrostático ......................61 CONFIGURACIÓN INICIAL ............................61 SISTEMA DE LASTRE ............................61 Cinturón de lastre tradicional ..........................61 Sistema accesorio de bolsillos de lastre (N.º pieza: 23.803.000) ................61 AJUSTE DE LA VÁLVULA ..........................
-
Page 60: Advertencias Importantes
ADVERTENCIA Esta información es para su seguridad. ¡Lea todo el manual de instrucciones antes de utilizar su equipo de ñ otabilidad y chaleco hidrostático X-TE por primera vez! ADVERTENCIAS IMPORTANTES ADVERTENCIA Debe leer y comprender completamente este manual antes de utilizar el producto. Le aconsejamos que guarde este manual durante todo el tiempo que tenga su chaleco hidrostático. -
Page 61: Información General
para los cuales fue diseñado especíj camente, la responsabilidad por la utilización correcta y segura se transj ere al dueño/ usuario. 6) El contenido de este manual está basado en la última información disponible en el momento de la impresión. SCUBAPRO se reserva el derecho a realizar cambios en cualquier momento. -
Page 62: Ajuste De La Válvula
Para conectar el sistema opcional de bolsillos de lastre, consulte la página 12. ADVERTENCIA El bolsillo y la bolsa desmontables se deben asegurar con la hebilla de desenganche rápido y deben conectarse correctamente. La pérdida del bolsillo durante la inmersión podría provocar una ñ otabilidad positiva y un ascenso sin control a la superð... -
Page 63: Cómo Desink Ar El Chaleco Hidrostático
1 Primero, exhale una pequeña cantidad de aire en la boquilla de la válvula para retirar el agua que pueda haber quedado allí. 2 Con la misma respiración, continúe exhalando mientras presiona el botón de la válvula de ink ado oral. 3 Libere el botón de la válvula de ink ado oral cuando inhale aire. -
Page 64: Información Importante En Inmersiones Con Montaje Lateral
6. Verij que los bolsillos para lastre de desconexión rápida u otros sistemas de retención de lastre (si su chaleco hidrostático los tiene). Asegúrese de que sus sistemas de retención estén totalmente conectados y ajustados. Conj rme que se puedan desenganchar rápidamente y que el lastre se pueda quitar libremente del sistema. 7. -
Page 65: Latiguillo De Baja Presión / Válvula Neumática De Ink Ado
Latiguillo de baja presión / Válvula neumática de inl ado Presión operativa del latiguillo de baja presión y la válvula 6,5 – 13,8 bares neumática de ink ado Roscas de enganche para el latiguillo de baja presión 3/8 – 24 UNF Junta tórica - Sellado EPDM –... -
Page 66: Vista Posterior Del Sistema Montado (Con Tapa Superior)
1. Conexión de la correa superior para el hombro (21.726.105) (izquierda y derecha) 2. Ala, 25 lb (21.726.200) o 45 lb (21.726.400) 3. Asa (21.726.104) (izquierda y derecha, punto de conexión inferior de la botella) 4. Anilla D-rings de la placa trasera (01.085.051) con tope del cinturón (21.726.105) 5. -
Page 67: Montaje De Las Correas Y Cinturón Del Arnés Y Montaje Del Ala
5) Introduzca el cinturón por la anilla D-rings 6) Pase la correa por el segundo ojal del tope del cinturón 7) Forme un bucle y vuelva a pasar la correa por el 8) Vuelva a pasar la correa por el primer ojal del tope del segundo ojal del tope del cinturón cinturón 9) El bucle debería tener este aspecto. -
Page 68: Montaje De Las Correas Para Los Hombros En Las Placas
3) Pase el cinturón por el segundo pasador 4) Tire del cinturón para que el ala quede j rmemente j jada sobre el arnés 5) Introduzca el cinturón por el primer ojal de la placa de 6) Pase el cinturón por el segundo ojal de la placa de conexión de la correa para el hombro conexión de la correa para el hombro y tire del cinturón para que quede j rmemente j jado... -
Page 69: Cómo Pasar Las Correas Elásticas Por El Ala
3) Vuelva a pasar la correa por el primer ojal del tope del cinturón para asegurarse de que quede bien conectada 4) Repita este proceso para el otro lado del arnés Cómo pasar las correas elásticas por el ala: 1) Conecte el inicio de la correa elástica con la pequeña anilla D-rings de plástico situada bajo la correa de la cintura, realizando el nudo de la Fig. -
Page 70: Cómo Pasar Las Correas Elásticas Por El Ala
Cómo pasar las correas elásticas por el ala: 1) Pase la correa elástica por el ojal situado en la parte 2) Pase la correa elástica por el ojal superior del arnés superior del dorso del ala 3) Ahora, conecte los mosquetones a la correa elástica realizando el nudo de la Fig. -
Page 71: Montaje De La Tapa Opcional (Superior)
Montaje de la tapa opcional (superior): 1) Asegure la tapa superior con el primer pasador 2) Repita en el otro lado alrededor de la correa para el hombro Montaje de la tapa opcional (inferior): 1) Pase la correa inferior de la tapa superior a través del 2) Asegure la correa inferior de la tapa superior con el ojal de la cara posterior del ala velcro interior... -
Page 72: Transporte De Los Sistemas X-Tek
13. TRANSPORTE DE LOS SISTEMAS X-TEK: Manipule los sistemas XTEK de modo que ningún objeto aj lado o pesado (cuchillos, botellas, linternas, lastre, etc.) dañen el arnés, la vejiga o los ink adores. ¡IMPORTANTE! Evite exponer el chaleco repetida o prolongadamente al agua clorada, como en el caso de piscinas. Lave su chaleco hidrostático inmediatamente después de usarlo en agua clorada. - Page 73 INHOUD BELANGR KE WAARSCHUWINGEN: ......................74 CE-GOEDKEURING ............................74 BELANGR KE WAARSCHUWINGEN ......................74 ALGEMENE INFORMATIE ..........................75 Primair doel van het trimjacket ..........................75 VÓÓR HET EERSTE GEBRUIK..........................75 LOODSYSTEEM: ............................... 75 Gewone loodgordel ............................75 Systeem met loodzakken (PN 23.803.000) ......................75 INFLATORMECHANISME..........................
-
Page 74: Belangr Ke Waarschuwingen
WAARSCHUWING Deze informatie wordt verstrekt met het oog op uw veiligheid. Lees de handleiding volledig vóór u uw X-TEK- trimjacket en de apparatuur in gebruik neemt! BELANGR KE WAARSCHUWINGEN: WAARSCHUWING U dient deze handleiding goed door te lezen en het product pas in gebruik nemen als u de inhoud begr pt. Aanbevolen wordt deze handleiding te bewaren zolang u het trimjacket in uw bezit heeft. -
Page 75: Algemene Informatie
gecertij ceerd personeel of indien de apparatuur op een andere w ze of voor een ander doel wordt gebruikt dan specij ek aangegeven, ligt de aansprakel kheid voor de juiste en veilige werking van de apparatuur volledig b de eigenaar/gebruiker. 6) De inhoud van deze handleiding is gebaseerd op de informatie zoals deze bekend was toen de handleiding ter perse ging. -
Page 76: Inflatormechanisme
Hoe u extra loodzakken plaatst, leest u op pagina 12. WAARSCHUWING De afneembare zakken moeten worden vastgezet met de gesp met snelsluiting. Let op dat deze goed dicht zit. Als u t dens de duik uw lood verliest, kunt u ineens positief dr fvermogen kr gen en maakt u mogel k een ongecontroleerde opst ging, wat ernstig letsel of de dood tot gevolg kan hebben. -
Page 77: Overdrukventiel
de hoeveelheid lucht die ontsnapt, des te beter controleren als u steeds een klein beetje lucht uit het jacket laat stromen en k kt wat dit met uw dr fvermogen doet. WAARSCHUWING Hoe u het trimjacket ook ontlucht, zorg dat de ventielen niet langer open bl ven dan nodig is. Anders kan er water in het trimjacket lopen. -
Page 78: Belangr Ke Informatie Over Sidemountduiken
Stel het trimjacket niet langdurig of herhaaldel k bloot aan chloorwater, zoals in zwembaden. Spoel het trimjacket onmiddell k nadat u het in chloorwater heeft gebruikt. Als gevolg van chloorwater kunnen de materialen van het trimjacket oxideren, waardoor het minder lang meegaat en de kleuren (in het b zonder de neonkleuren) verbleken. Schade en verkleuring als gevolg van langdurige blootstelling aan chloorwater is expliciet van de garantiedekking uitgesloten. -
Page 79: Onderdelen Van Uw X-Tek Sidmeount-Trimjacket Monteren
11. DE ONDERDELEN VAN UW X-TEK SIDMEOUNT-TRIMJACKET MONTEREN: Vooraanzicht van het gemonteerde systeem: 1. D-ring op de schouder (01.085.052) met riemstopper (21.726.105) (linker- & rechterschouder, bovenste aanhechtingspunt voor k es) 2. Elastiek om de k es b de sluithaak te houden (21.726.109) (links &... -
Page 80: Achteraanzicht Gemonteerd Systeem (Met Bovenste Beschermkap)
Achteraanzicht gemonteerd systeem (met bovenste beschermkap): Montage van de kruisband: 1) R g de D-ring op de riem die aan de wing is 2) R g de band door de onderste lus van de onderrugk ap vastgemaakt 3) Pas de riem aan zodat h strak zit 4) Montage van de kruisband –... -
Page 81: De Banden/Riemen Van Het Harnas Monteren En Montage Van De Wing
5) Steek de riem door de D-ring 6) R g de riem door de tweede opening van de riemstopper 7) Maak een lus en steek de riem weer door de tweede 8) Steek de riem opnieuw door de eerste opening van de opening van de riemstopper riemstopper 9) De lus zou er nu zo moeten uitzien. -
Page 82: De Schouderriemen Op De Platen Monteren
3) Steek de riem door de tweede lus 4) Trek de riem aan zodat de wing strak op het harnas vastzit 5) Steek de riem door het eerste oog van de 6) Steek de riem door het tweede oog van de aanhechtingsplaat op de schouderriem aanhechtingsplaat op de schouderriem en trek de riem aan zodat h strak zit... -
Page 83: De Elastieken Aan De Wing Vastmaken
3) Steek de riem opnieuw door de eerste opening van de riemstopper zodat h veilig is vastgemaakt 4) Herhaal deze handeling aan de andere kant van het harnas De elastieken aan de wing vastmaken: 1) Maak het begin van het elastiek vast aan de kleine plastic D-ring onder de tailleriem en maak daarb de knoop die op foto B wordt getoond 2) Steek het elastiek beurtelings door de lussen op de wing en het harnas en maak het uiteinde van het elastiek vast aan de kleine plastic D-ring aan de bovenkant van het harnas... -
Page 84: De Elastieken Aan De Wing Vastmaken
De elastieken aan de wing vastmaken: 1) Steek het elastiek door de lus aan de bovenkant op de 2) Steek het elastiek door het bovenste oogje van het rugz de van de wing harnas 3) Maak de sluithaken vervolgens vast aan het elastiek met behulp van de knoop die wordt getoond in afb. -
Page 85: De Optionele Beschermkap (Bovenaan) Monteren
De optionele beschermkap (bovenaan) monteren: 1) Maak de bovenste beschermkap met de eerste band 2) Doe hetzelfde aan de andere kant vast rond de schouderriem De optionele beschermkap (onderaan) monteren: 1) Steek de onderste band van de kap door de lus op de 2) Maak de onderste riem van de bovenste kap vast met rugz de van de wing de klittenband aan de binnenkant ervan... -
Page 86: Het X-Tek-Systeem Vervoeren
13. HET X-TEK-SYSTEEM VERVOEREN: Zorg dat het X-TEK-systeem niet in aanraking komt met scherpe of zware voorwerpen (zoals mes, k es, lamp, lood). Hierdoor kan het harnas, de wing of de ink ator beschadigd raken. BELANGR K! Stel het trimjacket niet langdurig of herhaaldel k bloot aan chloorwater, zoals in zwembaden. Spoel het trimjacket onmiddell k nadat u het in chloorwater heeft gebruikt. - Page 87 ®...
Need help?
Do you have a question about the X-Tek SIDEMOUNT and is the answer not in the manual?
Questions and answers