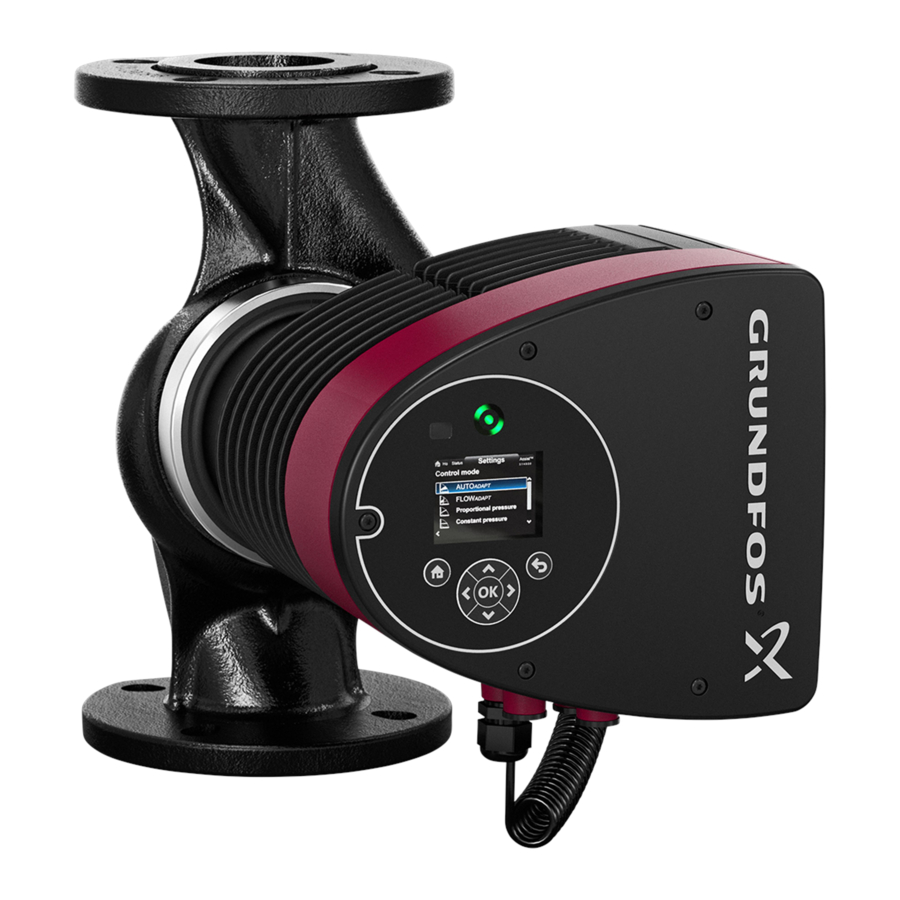
Grundfos MAGNA3 50-40 F N Installation And Operating Instructions Manual
Hide thumbs
Also See for MAGNA3 50-40 F N:
- Installation and operating instructions manual (62 pages) ,
- Installation and operating instructions manual (76 pages)
Table of Contents
Advertisement
Advertisement
Table of Contents

Related Manuals for Grundfos MAGNA3 50-40 F N


Summary of Contents for Grundfos MAGNA3 50-40 F N
- Page 1 GRUNDFOS INSTRUCTIONS MAGNA3 Installation and operating instructions...
- Page 2 GB: EC declaration of conformity BG: EC декларация за съответствие We, Grundfos, declare under our sole responsibility that the products Ние, фирма Grundfos, заявяваме с пълна отговорност, че продуктите MAGNA3, to which this declaration relates, are in conformity with these MAGNA3, за...
- Page 3 GR: ∆ήλωση συμμόρφωσης EC ES: Declaración CE de conformidad Εμείς, η Grundfos, δηλώνουμε με αποκλειστικά δική μας ευθύνη ότι Nosotros, Grundfos, declaramos bajo nuestra entera responsabilidad τα προϊόντα MAGNA3 στα οποία αναφέρεται η παρούσα δήλωση, que los productos MAGNA3, a los cuales se refiere esta declaración, συμμορφώνονται...
- Page 4 PT: Declaração de conformidade CE My, Grundfos, oświadczamy z pełną odpowiedzialnością, że nasze A Grundfos declara sob sua única responsabilidade que os produtos wyroby MAGNA3, których deklaracja niniejsza dotyczy, są zgodne MAGNA3, aos quais diz respeito esta declaração, estão em z następującymi wytycznymi Rady d/s ujednolicenia przepisów prawnych...
- Page 5 Toto prehlásenie o konformite ES je platné iba vtedy, ak je zverejnené ETSI EN 301 489-17 (2009-05) in EN 62209-2:2010. ako súčasť montážnych a prevádzkových pokynov Grundfos (publikácia ES izjava o skladnosti velja samo kadar je izdana kot del Grundfos číslo 98091805 0812). instalacije in navodil delovanja (publikacija številka 98091805 0812).
- Page 6 こ のEC適合宣言は、 グルン ド フ ォ ス取扱説明書 (出版番号 98091805 0812) の一部に掲載 さ れる場合のみ有効です。 KO: EC 적합성 선언 Bjerringbro, 1st February 2012 Grundfos 에서는 자사의 단독 책임에 따라 이 선언과 관련된 MAGNA3 제 품이 EC 회원국 법률에 기반한 다음 이사회 지침을 준수함을 선언합니다 : – 기계류 지침 (2006/42/EC).
-
Page 7: Table Of Contents
13.5 Description of control mode 13.6 Assisted fault advice 13.7 Wireless GENIair 13.8 Multi-pump function Selection of control mode Fault finding 15.1 Grundfos Eye operating indications 15.2 Signalling communication with remote control 15.3 Fault finding Sensor 16.1 Sensor specifications Accessories 17.1 Grundfos GO Remote... -
Page 8: General Information
-10 °C. The pump has a power-limiting function that protects against overload. The Grundfos MAGNA3 is a complete range of circulator pumps The pumping of glycol mixtures will affect the max. curve and with integrated controller enabling adjustment of pump reduce the performance, depending on the water/ethylene glycol performance to the actual system requirements. -
Page 9: Operating Conditions
2.3 Operating conditions 2.5 Insulating shells Insulating shells are available for single-head pumps only. Limit the heat loss from the pump housing and Note pipework. The heat loss from the pump and pipework can be reduced by insulating the pump housing and the pipework. See figs 3 and 4. •... -
Page 10: Radio Communication
Intended use This product incorporates a radio for remote control. The product can communicate with the Grundfos Go Remote and with other MAGNA3 pumps of the same type via the built-in radio. Only Grundfos-approved external antennae may be connected to this product, and only by a Grundfos-approved installer. -
Page 11: Mechanical Installation
Step Action Illustration To ensure adequate cooling, the control box must be in horizontal position with the Grundfos logo in vertical position. See fig. 8. Arrows on the pump housing indicate the liquid flow direction through the pump. The liquid... -
Page 12: Changing The Control Box Position
Position the control box in ordered separately. horizontal position so that the Grundfos logo is in vertical position. The motor shaft must be horizontal. Due to the drain hole in the stator housing, position the gap of the clamp as shown in step 4a, 4b, 4c or 4d. -
Page 13: Electrical Installation
4. Electrical installation Connect the cable gland to the control box. Carry out the electrical connection and protection according to local regulations. Check that the supply voltage and frequency correspond to the values stated on the nameplate. Warning Switch off the power supply before making connections. -
Page 14: Connection Diagram
4.3 Connection diagram External switch ELCB Fuse (min. 10 A, time lag) Fig. 9 Example of typical connection, 1 x 230 V ± 10 %, 50/60 Hz 4.4 Connection to external controllers Max. Max. 24 V DC 250 V AC 22 mA 2 A AC1 Signal... - Page 15 The function of the signal relay can be set to "Alarm", "Ready" or If no external on/off switch is connected, the jumper between "Operation" on the pump control panel or with the Grundfos GO terminals Start/Stop (S/S) and frame ( ) should be maintain ed.
- Page 16 If the pump is installed in the return pipe of the system, the built-in temperature sensor can be used. The selection of sensor type (0-10 V or 4-20 mA) can be changed on the pump control panel or with the Grundfos GO Remote. signal signal...
-
Page 17: Priority Of Settings
4.6 Priority of settings The external forced-control signals will influence the settings available on the pump control panel or with the Grundfos GO Remote. However, the pump can always be set to max. curve duty or to stop on the pump control panel or with the Grundfos GO Remote. -
Page 18: First Start-Up
5. First start-up Do not start the pump until the system has been filled with liquid and vented. Furthermore, the required minimum inlet pressure must be available at the pump inlet. See section 18. Technical data. The system cannot be vented through the pump. The pump is self-venting. -
Page 19: Settings
6. Settings 6.1 Overview of settings All settings can be made on the pump control panel or with the Grundfos GO Remote. Menu Submenu Further information Setpoint Setpoint See section 12.1 Operating mode Operating mode See section 12.2 • Normal •... -
Page 20: Menu Overview
7. Menu overview Status Settings Assist Operating status Setpoint Assisted pump setup Operating mode, from Operating mode Setting of pump Control mode Control mode Setting of date and time Pump performance Date format, date and time FLOW LIMIT Max. curve and duty point Enable FLOWLIMIT function Date only Resulting setpoint... -
Page 21: Control Panel
8. Control panel 10. "Home" menu Warning At high liquid temperatures, the pump housing may be so hot that only the control panel should be touched to avoid burns. Navigation Home Press to go to the "Home" menu. "Home" menu (factory setting) •... -
Page 22: Settings" Menu
12.2 Operating mode 12. "Settings" menu Navigation Navigation Home > Settings > Operating mode Home > Settings Operating mode Press and go to the "Settings" menu with Normal (control mode) • "Settings" menu Stop • This menu offers the following setting options: Min. -
Page 23: Control Mode
12.3 Control mode Original duty point. Lower registered head on the max. curve. New duty point after AUTO control. ADAPT Original setpoint setting. set1 New setpoint after AUTO control. set2 ADAPT MAGNA3 xx-40: 2.5 m fac. MAGNA3 xx-60: 3.5 m MAGNA3 xx-80: 4.5 m MAGNA3 xx-100: 5.5 m MAGNA3 xx-120: 6.5 m... - Page 24 12.3.4 Constant pressure 12.3.6 Constant curve The pump maintains a constant pressure, irrespective of water The pump can be set to operate according to a constant curve, demand. See fig. 22. like an uncontrolled pump. See fig. 24. The desired speed can be set in % of maximum speed in the range from 25 to 100 %.
-
Page 25: Flow Limit
12.5 Automatic Night Setback 12.4 FLOW LIMIT Navigation Navigation Home > Settings > FLOW Home > Settings > Automatic Night Setback LIMIT Automatic Night Setback FLOW LIMIT Enable FLOWLIMIT function • To enable the function, select "Active" with and press [OK]. -
Page 26: Setpoint Influence
Alarm • The signal relay is activated together with the red indicator light on the pump. Operation • The signal relay is activated together with the green indicator light on the pump. 100 % 12.7 Setpoint influence actual 30 % T [°C] actual Fig. -
Page 27: General Settings
12.9 General settings 12.9.3 Units 12.9.1 Language Navigation Home > Settings > General settings > Units Navigation Units Home > Settings > General settings > Language SI or US units • Language Customised units. • The display can be shown in any of the following languages: Select whether the display should shows SI or US units or select GB, BG, CZ, DK, DE, EE, GR, ES, FR, HR, IT, LV, LT, HU, NL, the desired units for the parameters below. - Page 28 12.9.5 Delete history The selected parameters will be shown as illustrated below. The arrow icon indicates that the parameter links to the "Settings" menu and works as a shortcut for quick settings. Navigation Home > Settings > General settings > Delete history 1.
-
Page 29: Assist" Menu
The pump is designed for multi-pump connection via the wireless GENIair connection or wired via a bus system (Building Management System). The built-in wireless GENIair module enables communication between pumps and with the Grundfos Go Remote without the use of add-on modules: • Multi-pump function. -
Page 30: Selection Of Control Mode
14. Selection of control mode Select this control System application mode Recommended for most heating systems, especially in systems with relatively large pressure losses in the AUTO ADAPT distribution pipes. See description under proportional pressure. In replacement situations where the proportional-pressure duty point is unknown. The duty point has to be within the AUTO operating range. -
Page 31: Fault Finding
Grundfos GO Remote. 15.2 Signalling communication with remote control The centre indicator light in the Grundfos Eye will indicate communication with the Grundfos GO Remote. The table below describes the desired function of the centre indicator light. Case Description... -
Page 32: Fault Finding
No water at the pump inlet or Dry running (57) Check that the pump is operating correctly. If not, the water contains too much Alarm replace the pump, or call GRUNDFOS SERVICE air. for assistance. Internal fault (72, 84, 155, 157) Internal fault in the pump... -
Page 33: Sensor
16. Sensor Nose downwards 5 Nm Fig. 29 Correct position of sensor During maintenance and replacement of the sensor, it is important that the sealing cap is fitted correctly on the sensor housing. Tighten the screw holding the clamp to 5 Nm. Warning Before replacing the sensor, make sure that the pump is stopped and that the system is not... -
Page 34: Accessories
Note the Grundfos GO Remote is encrypted to protect against misuse. The Grundfos GO Remote app is available from Apple AppStore and Android market. The Grundfos GO Remote concept replaces the Grundfos R100 remote control. This means that all products supported by the R100 are supported by the Grundfos GO Remote. -
Page 35: Insulating Kits For Air-Conditioning And Cooling Systems
17.3 Insulating kits for air-conditioning and cooling systems Single-head pumps for air-conditioning and cooling systems can be fitted with insulating shells. A kit consists of two shells made of polyurethane (PUR) and a self-adhesive seal to ensure tight assembly. The dimensions of the insulating shells for pumps in air-conditioning and cooling systems Note differ from those of the insulating shells for... -
Page 36: Fitting The Cim Module
17.4 Fitting the CIM module Warning Before fitting the module, switch off the power supply. Make sure that the power supply cannot be accidentally switched on. Step Action Illustration Remove the front cover from the control box. Fit the CIM module as illustrated and click it on. Fit and tighten the screw holding the CIM module and secure the earth connection. -
Page 37: Technical Data
The pump mains filter will cause a discharge current to earth during operation. I < 3.5 mA. leakage Consumption when the pump is stopped 1 to 10 W, depending on activity, i.e. reading the display, use of Grundfos GO Remote, interaction with modules, etc. - Page 38 Appendix Dimensions Fig. 32 Dimensions, single-head pumps Dimensions [mm] Pump type MAGNA3 50-40 F N 240 203.9 83.6 164 72.3 70.5 303.6 374.1 110/125 14/19 MAGNA3 65-40 F N 340 203.9 83.6 164 72.3 311.5 385.5 93.4 68.8 130/145 14/19 MAGNA3 80-40 F N 360 203.9 83.6 164 72.3...
- Page 39 Fig. 33 Dimensions, twin-head pumps Dimensions [mm] Pump type MAGNA3 D 50-40 F N 204 84 515 294 221 130 260 304 378 102 110/125 165 14/19 MAGNA3 D 65-40 F N 340 218 204 84 522 294 228 130 260 312 389 119 130/145 185 14/19 MAGNA3 D 80-40 F N...
- Page 41 GRUNDFOS Hellas A.E.B.E. Минске Turkey 20th km. Athinon-Markopoulou Av. New Zealand 220123, Минск, GRUNDFOS POMPA San. ve Tic. Ltd. Sti. P.O. Box 71 ул. В. Хоружей, 22, оф. 1105 GRUNDFOS Pumps NZ Ltd. Gebze Organize Sanayi Bölgesi GR-19002 Peania Тел.: +(37517) 233 97 65,...
- Page 42 Thinking ahead makes it possible Innovation is the essence 98091805 0812 The name Grundfos, the Grundfos logo, and the payoff be think innovate are registered trademarks ECM: - owned by Grundfos Holding A/S or Grundfos A/S, Denmark. All rights reserved worldwide. www.grundfos.com...
Need help?
Do you have a question about the MAGNA3 50-40 F N and is the answer not in the manual?
Questions and answers