
Related Manuals for RCF SWM-BR VSA II


Summary of Contents for RCF SWM-BR VSA II
- Page 1 USER MANUAL MANUALE D’USO SWM-BR VSA II - PAIR OF SWIVEL BRACKETS FOR VSA 2050 II, VSA 1250 II, VSA 850 II - COPPIA DI STAFFE ORIENTABILI PER VSA 2050 II, VSA 1250 II, VSA 850 II...
- Page 3 DESCRIPTION Each kit includes a pair of swivel brackets for wall mounting of a single RCF VSA 2050 II - VSA 1250 II - VSA 850 II ‘Digitally steerable array speaker system’ with a horizontal angle pointing (up to 60°).
-
Page 4: Installation
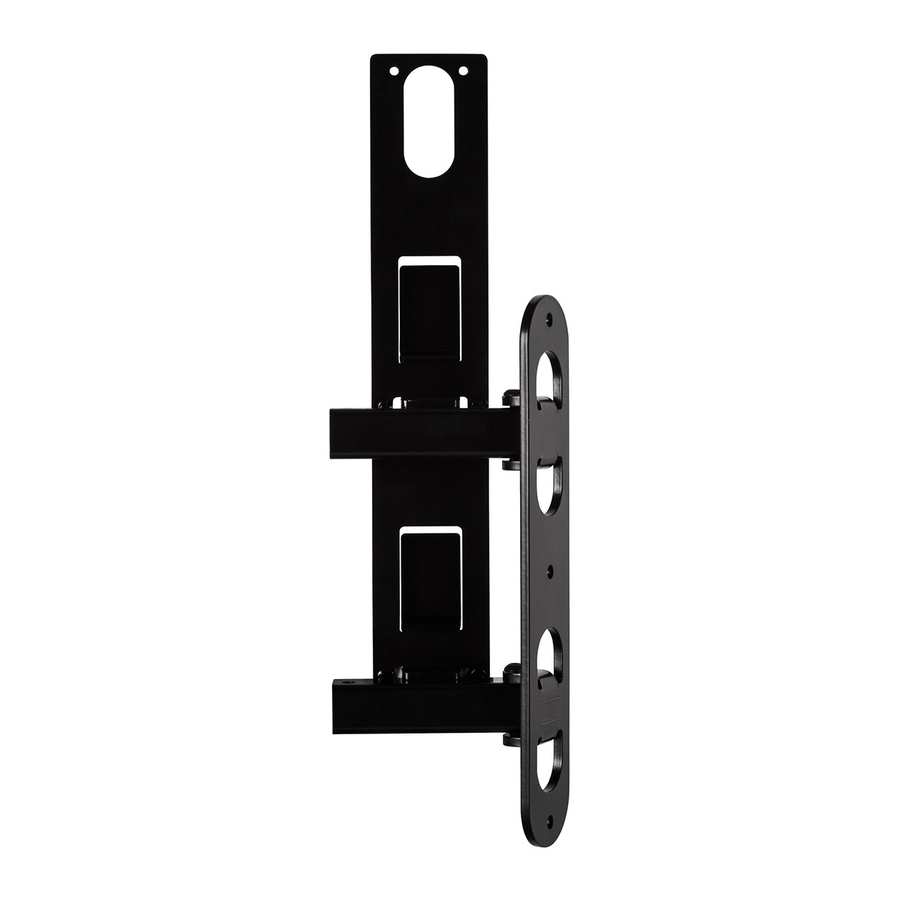
1 m from the floor (suggested height: from 1.5 to 3 m). SpeAker wood pAckAge lid cAn AlSo be uSed AS drilling TemplATe See picTure The Six SWM-br VSA II ArrowS indicATe The Six holeS To be drilled for The brAckeTS of The [mm] picTure 1... - Page 5 Choose the direction to which the VSA speaker may be pointed, then (for each bracket) picTure 3 insert (without tightening completely) the two bolts with nuts (acting as pivots that join the two parts) into one of the two holes of the bracket front part (as shown in picture 3). As soon as the two brackets (upper and lower, necessary for a single VSA speaker) are fixed to the wall, put the VSA speaker on their mounting points as shown in pictures 4a and 4b.
- Page 6 It is possible to turn the VSA speaker horizontally (max. angle: 60°) to the direction previously chosen when inserting the two bolts with nuts (picture 3). After pointing the VSA speaker with a proper angle, tighten the two bolts to secure it. picTure 5 5°...
- Page 7 IMPORTANTE: IL PRESENTE MANUALE SI AGGIUNGE A QUELLO DEI DIFFUSORI ACUSTICI RCF VSA 2050 II - VSA 1250 II - VSA 850 II, IL QUALE È DA LEGGERE IN QUANTO FUNGE DA RIFERIMENTO PER LE NOTE DI SICUREZZA ED IL COLLEGAMENTO.
-
Page 8: Installazione
SerVe Anche come dimA di forATurA del muro Vedere lA figurA le Sei frecce indicAno i fori dA prATicAre per le STAffe del kiT SWM-br VSA II) ! [mm] figurA 1 figurA 2 1910 (VSA 2050 II), 1202 (VSA 1250 II), 848 (VSA 850 II) - Page 9 Scegliere la direzione verso la quale il diffusore VSA potrebbe essere orientato, quindi figurA 3 (per ciascuna staffa) inserire (senza stringere completamente) i due bulloni coi dadi, che fungono da perni di rotazione per unire le due parti, in uno dei due fori della parte anteriore della staffa (come mostrato in figura 3).
- Page 10 È possibile orientare orizzontalmente il diffusore VSA (con un angolo fino a 60°) nella direzione scelta tramite il precedente inserimento dei bulloni coi dadi (figura 3). Dopo aver puntato correttamente il diffusore VSA, stringere i bulloni per fissarlo definitivamente. figurA 5 5°...
- Page 12 Salvo eventuali errori ed omissioni. RCF S.p.A. si riserva il diritto di apportare modifiche senza preavviso. Except possible errors and omissions. RCF S.p.A. reserves the right to make modifications without prior notice. www.rcf.it RCF S.p.A. Italy Via Raffaello Sanzio, 13...
Need help?
Do you have a question about the SWM-BR VSA II and is the answer not in the manual?
Questions and answers