Table of Contents
Advertisement
Quick Links
PAS Colt Series
Combination escape SCBA/airline SAR respiratory protection equipment
1
For your safety
1.1
General safety statements
●
Before using this product, carefully read the Instructions for Use.
●
Strictly follow the Instructions for Use. The user must fully understand and strictly
observe the instructions. Use the product only for the purposes specified in the
Intended Use section of this document.
●
Do not dispose of the Instructions for Use. Ensure that they are retained and
appropriately used by the product user.
●
Only fully trained and competent users are permitted to use this product.
●
Comply with all local and national rules and regulations associated with this product.
●
Only trained and competent personnel are permitted to inspect, repair and service
the product. Dräger recommends a Dräger service contract for all maintenance
activities and that all repairs are carried out by Dräger.
●
Properly trained service personnel must inspect and service this product as detailed
in the maintenance section of this document.
●
Use only genuine Dräger spare parts and accessories, or the proper functioning of
the product may be impaired.
●
Do not use a faulty or incomplete product, and do not modify the product.
●
Notify Dräger in the event of any component fault or failure.
●
Before occupational use of this respirator a written respiratory protection
program must be implemented meeting all the local government requirements.
In the United States employers must comply with OSHA 29 CFR 1910.134 which
includes medical evaluation, training, and fit testing.
1.2
Definitions of alert icons
Alert icons are used in this document to provide and highlight text that requires a greater
awareness by the user. A definition of the meaning of each icon is as follows:
WARNING
!
Indicates a potentially hazardous situation which, if not avoided, could result in
death or serious injury.
CAUTION
!
Indicates a potentially hazardous situation which, if not avoided, could result in
physical injury or damage to the product or environment. It may also be used to
alert against unsafe practices.
NOTICE
i
i
Indicates additional information on how to use the product.
2
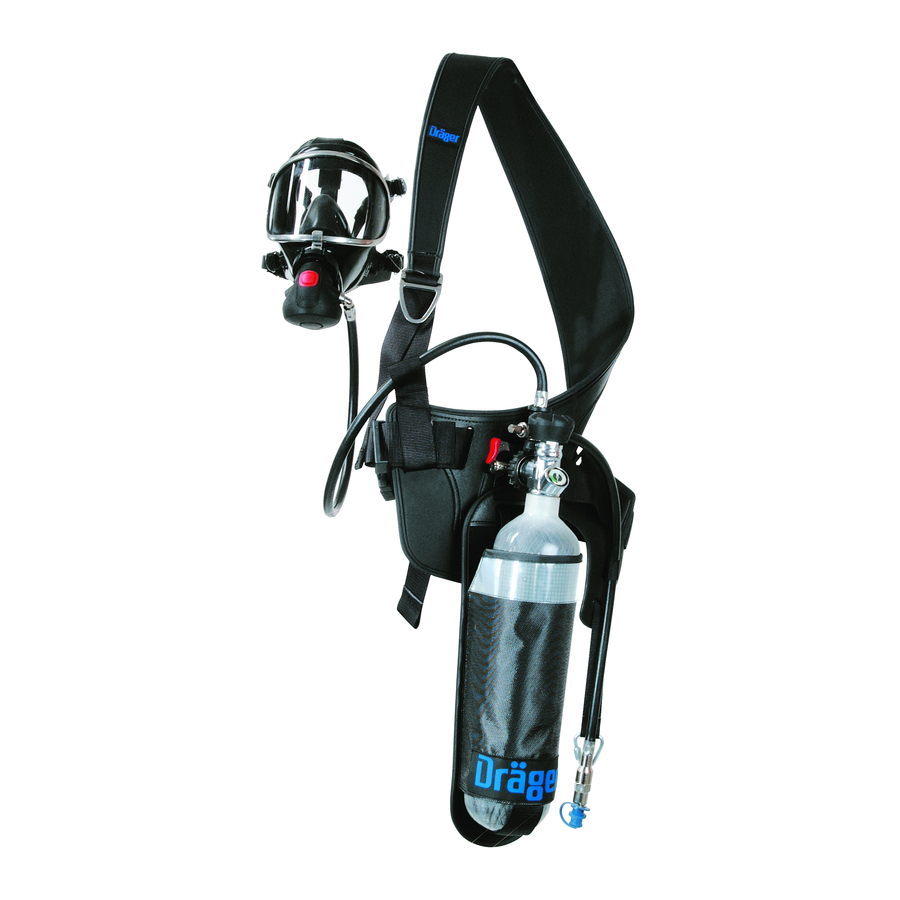
Description
2.1
Product overview
This variant of the Dräger PAS Colt Series provides respiratory protection for working
in a contaminated environment using an airline (supplied airline respirator – SAR),
or escaping from a contaminated environment using the air cylinder (self-contained
breathing apparatus – SCBA).
During airline use, the PAS Colt is connected to a breathing-quality independent air
supply and the cylinder valve is closed. If the independent air supply falls below the
required pressure, the wearer opens the cylinder valve, disconnects the independent air
supply and then escapes to a safe area breathing air from the cylinder. The time available
for the escape is dependent on the capacity (volume) of the cylinder and the breathing
rate of the wearer.
The features of the equipment are:
●
The carrying system is a bandolier shoulder harness and waist belt.
●
The lung demand regulator (LDR) has a reset button (Fig 1, Item 1) that switches
off the air flow through the regulator, and a purge button (Fig 1, Item 2) that can be
used to deliver an additional airflow into the face mask when required by the wearer
during airline use. The holder (Fig 2, Item 1) provides a stowage point to protect the
regulator coupling and O-ring against damage when it is not fitted in the face mask.
●
The first-stage regulator (Fig 2, Item 2) has an anti-vibration strap fitted that is used
to prevent loosening of the connector handwheel.
●
The airline connector (Fig 2, Item 3) is a male coupling that is used to connect an
independent air supply for supplied airline respirator (SAR) use.
●
A low-pressure whistle is fitted on some variants of this product (see Section 2.1.1).
●
The hip-mounted cylinder holster has a dropdown facility that can assist wearer
movement by making the cylinder and holster more manoeuvrable (in a confined
space for example).
●
The remaining pressure in the air cylinder is shown on a contents indicator on the
cylinder.
●
A thigh strap is available as an accessory.
2.1.1
Low-pressure whistle (optional)
If the PAS Colt is fitted with a low-pressure whistle, it operates as follows:
●
During airline use, the whistle sounds to warn the wearer that the independent air
supply has fallen below the required pressure.
NOTICE
i
i
During an escape (when the wearer is breathing from the air cylinder), the
whistle sounds when the cylinder pressure is very low. This is not an end-of-
service-time indicator (EOSTI).
See the technical data (Section 9) for the whistle operating pressures.
2.2
Intended use
When this product is used with an approved face mask, air cylinder and independent
air supply, it provides the wearer with respiratory protection for working in, or
escaping from, contaminated or oxygen-deficient conditions. It is intended for use in
applications where a high level of respiratory protection is required, including IDLH
(immediately dangerous to life and health) atmospheres.
The air cylinder, face mask and other accessories used with this product must be
certified Dräger components, assembled in an approved configuration; otherwise the
operation of the device may be impaired. It is essential that flushing and non-flushing
face masks and lung demand regulators should not be mixed (i.e. only a flushing-
type face mask should be used with a flushing-type lung demand regulator). Contact
Dräger for further information.
2.3
Limitations on use
This product is not approved for use in CBRN applications.
2.4
Approvals
The PAS Colt Series of combination escape/airline respiratory protection equipment
conforms to the requirements of NIOSH. This product is approved for use as a supplied
airline respirator (SAR) and as a self-contained escape respirator, and must only be used
in conjunction with compressed-air cylinders approved by NIOSH.
3
Use
WARNING
!
The time required to allow the wearer to escape to a safe area must be within
the capacity (volume) of the cylinder selected, taking into account the breathing
rate of the wearer. When selecting the type and duration of escape equipment
it is essential to consider the potential hazards and probable escape routes.
The cylinder and airline air quality shall meet the requirements for breathing air
according to CGA G-7.1 Grade D or higher quality.
Before using airline equipment, ensure that the independent air supply meets
the air quality requirements and complies with pressure, flow and hose length
requirements in the technical data (see Section 9), and has been issued with a
permit for use if necessary.
If using a PAS Colt without an integral low-pressure whistle, Dräger recommend
that a low-pressure warning device is fitted to the independent air supply.
1
2
1
3629
1
2
3
2
3628/3627
3
3630
4
3631
NOTICE
i
i
After storage at temperatures below 32 °F (0 °C) leakage may be observed
when the cylinder valve is initially opened due to ice formation.
●
I f leakage is observed from the lung demand regulator: Press the purge
button (Fig 1, Item 2) to allow a rush of air to pass through the lung demand
regulator and then quickly press the reset button (Fig 1, Item 1) to switch
off the positive pressure. Resume normal operation.
●
I n the event that leakage still occurs, remove the breathing apparatus from
service and report the fault to trained service personnel or contact Dräger.
3.1
Preparation for use
3.1.1
Visual inspection
Carry out a visual inspection, checking the full breathing apparatus including all
component parts and accessories. Check that the equipment is clean and undamaged,
paying particular attention to pneumatic components, hoses and connectors. Typical
signs of damage that may affect the operation of the breathing apparatus include impact,
abrasion, cutting, corrosion and discoloration. Report damage to service personnel and
do not use the apparatus until faults are rectified.
3.1.2
Fitting the cylinder
1. Ensure that the cylinder is fully charged, with the pointer of the cylinder pressure
indicator inside the green area.
2. Check that the threads of the valve port and the regulator handwheel are
undamaged, and the O-ring is in position and undamaged.
3. Fully insert the cylinder into the carrying holster.
CAUTION
!
To prevent damage, ensure that the cylinder remains clear of the handwheel of
the first-stage regulator while inserting the cylinder.
4. Align the cylinder with the regulator and tighten the handwheel hand tight (Fig 3).
5. Pull the anti-vibration strap over the top of the cylinder valve (Fig 4).
3.1.3
Functional testing
WARNING
!
If breathing apparatus fails to meet any of the standards or parameters
described in the functional tests, or if an immediate leak is evident, there is a
system fault. Report the fault to trained service personnel or contact Dräger. Do
not use the breathing apparatus until the fault condition is rectified.
Leak test
1. Ensure that the pointer of the cylinder pressure indicator is inside the green area.
2. Press the reset button (Fig 1 Item 1) of the lung demand regulator to switch off the
positive pressure.
3. Open the cylinder valve slowly, but fully, to pressurize the system and then close the
valve. There should be no audible leak. If there is any leak, investigate and repair
the leak before use. If necessary, use a soapy solution to locate the leak.
4. Press the purge button (Fig 1, Item 2) to vent the system.
Airline flow test (only required for airline use)
1. Press the reset button (Fig 1, Item 1) of the lung demand regulator, and then check
that the cylinder valve is closed.
2. Connect the independent air supply to the male coupling (Fig 2, Item 3). If the
independent air supply has a shut-off valve, open the valve.
WARNING
!
Do not direct the airflow on to the face, eyes or skin.
3. Press the purge button (Fig 1, Item 2) for 3 to 5 seconds. An unobstructed airflow
should flow from the outlet of the lung demand regulator.
4. Isolate and disconnect the independent air supply.
5. Press the purge button (Fig 1, Item 2) to vent the system and then press the reset
button (Fig 1, Item 1) to switch off the positive pressure.
i
Instructions for Use
3.1.4
Putting on the PAS Colt (ready position)
Refer also to Fig 2 which shows the PAS Colt worn in the ready position.
1. Ensure that the pointer of the cylinder pressure indicator is inside the green area.
2. Open the waist belt buckle and fully extend the waist and shoulder strap.
3. Place the left arm through the shoulder harness, taking the harness over the head
and on to the right shoulder, positioning the strap diagonally across the body with the
cylinder positioned against the left hip.
4. Loop the waist belt around the waist and fasten the buckle – do not tighten.
5. Grip the cylinder valve with the left hand and lift until the waist belt is in line with the
5
waist. Then tighten the waist belt strap until the equipment is secure and comfortable
on the waist. Pull down to adjust the shoulder strap.
3625
6. Inspect the face mask as defined in the relevant Instructions for Use.
7. Check that the face mask port and the regulator O-ring are clean and undamaged.
3
8. Remove the lung demand regulator from the holder and press it into the port of the
2
face mask until it latches in position. Check the attachment by gently attempting to
pull the coupling apart.
9. Put the neck strap of the face mask over the head, and then insert the neck strap
stud into the hole in the centre strap of the head harness.
3.2
During use
1
This variant of the PAS Colt Series can be used for combination (escape/airline) use or
6
purely for escape use. For combination use the face mask is worn during the task; and
for escape use the PAS Colt is worn in the ready position until an escape is necessary.
Depending on the intended use, refer to the relevant procedures from the following:
3626
●
For combination (escape/airline) use, see Section 3.2.1
●
For escape use only, see Section 3.2.2
3.2.1
Combination (escape/airline) use
Putting on the face mask
1. Press the reset button (Fig 1, Item 1) of the lung demand regulator to switch off the
positive pressure.
2. Connect the independent air supply to the male coupling (Fig 2, Item 3). If the
independent air supply has a shut-off valve, open the valve.
7
WARNING
!
3632
Correct fit of the face mask can only be achieved if the complete face mask
seal makes contact with skin. Head hair, facial hair (including beard stubble and
sideburns), earrings, other facial piercings and normal spectacles will interfere
with the face mask seal and are not permitted in the sealing area. Additionally,
head hair that could affect the face mask fit (buns, pony-tails, hairpieces, etc.)
is not permitted.
NOTICE
i
i
Refer also to the face mask Instructions for Use.
3. Detach the neck strap stud from the center strap of the head harness.
8
4. Spread the head harness (Fig 5). Place the chin into the chin cup of the face mask
and pull the harness over the head locating the harness center plate on back of the
3633
head.
5. Referring to Fig 6, tighten both lower (1) and then upper straps (2) evenly towards
back of the head. If necessary, tighten the center strap (3). The wearer's first
inhalation after achieving a face seal will automatically switch on the air supply into
the face mask.
6. Check that the head has a full range of movement without pulling against the
regulator hose. If any resistance to movement is felt, readjust the hose routing
and then recheck. If resistance is still felt, do not use the breathing apparatus and
contact Dräger.
Function check
9
1. Isolate the independent air supply (close the valve or disconnect) and breathe
normally to empty the system of air. When empty, the face mask should hold on to
3634
the face to indicate a positive seal.
2. Immediately reapply the independent air supply and breathe normally.
3. Inhale and hold your breath – there should be no audible leak. If a leak is detected,
readjust the head harness and retest.
4. Recommence breathing – exhaled air should flow easily out of the exhalation valve.
5. Momentarily press the purge button (Fig 1, Item 2) to check for additional airflow.
When the function check has been satisfactorily completed, breathe normally and
proceed to the working area.
Escape procedure (independent air supply failure)
WARNING
!
During supplied airline respirator (SAR) use, the PAS Colt cylinder valve must
remain closed. The escape duration starts from the time of opening the cylinder
valve and disconnecting the airline supply.
Dräger strongly advise that the purge button (Fig 1, Item 2) is not used during
an escape. Using the purge button would use air from the cylinder and reduce
the time available for escape.
NOTICE
i
i
If the PAS Colt is fitted with a low-pressure whistle, during airline use the whistle
sounds to indicate that the independent air supply has fallen below the required
pressure. If the whistle sounds and then stops before the escape procedure is
started, the air supply pressure could have been restored. The wearer must
confirm that the correct pressure (87 to 125 psi) is available, or escape as
described below.
If the independent air supply fails, breathe normally and immediately proceed as follows:
1. Open the cylinder valve (counterclockwise) slowly, but fully, and continue to breathe
normally.
2. Disconnect the independent air supply from the PAS Colt.
3. Immediately leave the hazardous area by the shortest and safest escape route.
The wearer must be in a safe area before the air cylinder is empty. When in a safe area,
remove the lung demand regulator from the face mask if necessary and continue to
breathe normally.
NOTICE
i
i
If the PAS Colt is fitted with a low-pressure whistle, during an escape the whistle
would sound when the cylinder pressure was in the range 72.5 to 58 psi. This
is not an end-of-service-time-indicator (EOSTI).
3.2.2
Escape use only (putting on the face mask and escaping)
WARNING
!
Correct fit of the face mask can only be achieved if the complete face mask
seal makes contact with skin. Head hair, facial hair (including beard stubble and
sideburns), earrings, other facial piercings and normal spectacles will interfere
with the face mask seal and are not permitted in the sealing area. Additionally,
head hair that could affect the face mask fit (buns, pony-tails, hairpieces, etc.)
is not permitted.
NOTICE
i
i
Refer also to the face mask Instructions for Use.
1. Press the reset button (Fig 1, Item 1) of the lung demand regulator to switch off the
positive pressure.
2. Open the cylinder valve (counterclockwise) slowly, but fully, to pressurize the
system.
3. Detach the neck strap stud from the center strap of the head harness.
4. Spread the head harness (Fig 5). Place the chin into the chin cup of the face mask
and pull the harness over the head locating the harness center plate on back of the
head.
5. Referring to Fig 6, tighten both lower (1) and then upper straps (2) evenly towards
back of the head. If necessary, tighten the center strap (3). The wearer's first
inhalation after achieving a face seal will automatically switch on the air supply into
the face mask.
3352429 (A3-D-P)
Advertisement
Table of Contents

Related Manuals for Dräger PAS Colt Series


Summary of Contents for Dräger PAS Colt Series
- Page 1 PAS Colt Series Instructions for Use Combination escape SCBA/airline SAR respiratory protection equipment For your safety 3.1.4 Putting on the PAS Colt (ready position) Refer also to Fig 2 which shows the PAS Colt worn in the ready position. General safety statements 1. Ensure that the pointer of the cylinder pressure indicator is inside the green area. ● Before using this product, carefully read the Instructions for Use. 2. Open the waist belt buckle and fully extend the waist and shoulder strap. ● Strictly follow the Instructions for Use. The user must fully understand and strictly 3. Place the left arm through the shoulder harness, taking the harness over the head observe the instructions. Use the product only for the purposes specified in the and on to the right shoulder, positioning the strap diagonally across the body with the Intended Use section of this document.
- Page 2 PAS Colt Series Instructions for Use Combination escape SCBA/airline SAR respiratory protection equipment Cleaning and disinfecting WARNING The duration of the cylinder air begins from the time of the first-breath activation of the lung demand regulator. Dräger strongly advise that the purge button (Fig 1, Item 2) is not used during an escape. Using the purge button would use air from the cylinder and reduce the time available CAUTION for escape. Cleaning agents and disinfectants listed below are not manufactured by Dräger and have been reviewed only for compatibility when used to clean or disinfect the subject Dräger product(s). Read and comply with all instructions 6. Immediately leave the hazardous area by the shortest and safest escape route. for use provided by the manufacturers of such agents and disinfectants. Dräger expressly disclaims all responsibility for any damage, personal injury or loss The wearer must be in a safe area before the air cylinder is empty. When in a safe area, remove the lung demand regulator from the face mask if necessary and continue to breathe resulting from the use of such agents or disinfectants. normally.
Need help?
Do you have a question about the PAS Colt Series and is the answer not in the manual?
Questions and answers