Table of Contents
Advertisement
Available languages
Available languages
Quick Links
HAZET-WERK
HÖCHSTE TECHNOLOGIE IN DER WERKZEUGFERTIGUNG SEIT 1868
HIGHEST TECHNOLOGY IN TOOL MANUFACTURE SINCE 1868
Sicherheits-Innen-Federspanner
Safety Inside Spring Vice
Compresseur de ressort intérieur
de sécurité
Compresor de muelles interior
de seguridad
Binnenveerspanner
Tendimolle interno di sicurezza
4902/6
Betriebsanleitung
+
Prüf-Zertifikat
Operating Instructions
+
Safety Certificate
Mode d'emploi
+
Certificat de sécurité
Instrucciones de uso
+
Certificado de seguridad
Gebruiksaanwijzing
+
Veiligheidscertificaat
Istruzioni per l'uso
+
Certificato di collaudo
Advertisement
Table of Contents

Related Manuals for Hazet 4902/6


Summary of Contents for Hazet 4902/6
- Page 1 HAZET-WERK HÖCHSTE TECHNOLOGIE IN DER WERKZEUGFERTIGUNG SEIT 1868 HIGHEST TECHNOLOGY IN TOOL MANUFACTURE SINCE 1868 4902/6 Sicherheits-Innen-Federspanner Safety Inside Spring Vice Compresseur de ressort intérieur de sécurité Compresor de muelles interior de seguridad Binnenveerspanner Tendimolle interno di sicurezza Betriebsanleitung Prüf-Zertifikat...
- Page 2 .......... 21...26 .......... 27...32 .......... 33...38 .......... ª HAZET-WERK • 10 04 61 • D-42804 Remscheid • Germany º ¬ ø © +49 (0) 21 91 / 7 92-0 • +49 (0) 21 91 / 7 92-200 • hazet.com •...
- Page 3 Ihrem HAZET-Innen-Federspanner auf. Hersteller und/oder seine Bevollmächtigten • Dieses Werkzeug wurde für bestimmte An- wegen Schäden aus nicht bestimmungs- wendungen entwickelt. HAZET weist aus- gemäßer Verwendung des Gerätes sind drücklich darauf hin, dass dieses Werkzeug ausgeschlossen. nicht verändert und/oder in einer Weise ein- •...
-
Page 4: Zu Ihrer Sicherheit
1. Allgemeines des Gerätes allgemein gültigen Sicherheits-, Unfallverhütungs- und Umweltschutz-Vor- schriften zu beachten und einzuhalten. • Der HAZET Innen-Federspanner dient zur • Das Gerät ist zum Zeitpunkt seiner Ent- Demontage und Montage von geraden wicklung und Fertigung nach geltenden, Schraubenfedern an Pkw. Die Benutzung... - Page 5 Zu Ihrer Sicherheit • Für alle Schäden bei nicht bestimmungs- 5. Gefahren die vom Gerät gemäßer Verwendung haftet allein der ausgehen Betreiber. 4. Aufbewahrung / Lagerung Das Gerät ist unter folgenden 1. Vor jeder Benutzung ist der Innen- Bedingungen zu lagern und Federspanner auf seine volle Funktions- aufzubewahren: fähigkeit zu überprüfen.
-
Page 6: Aufbau Und Funktion
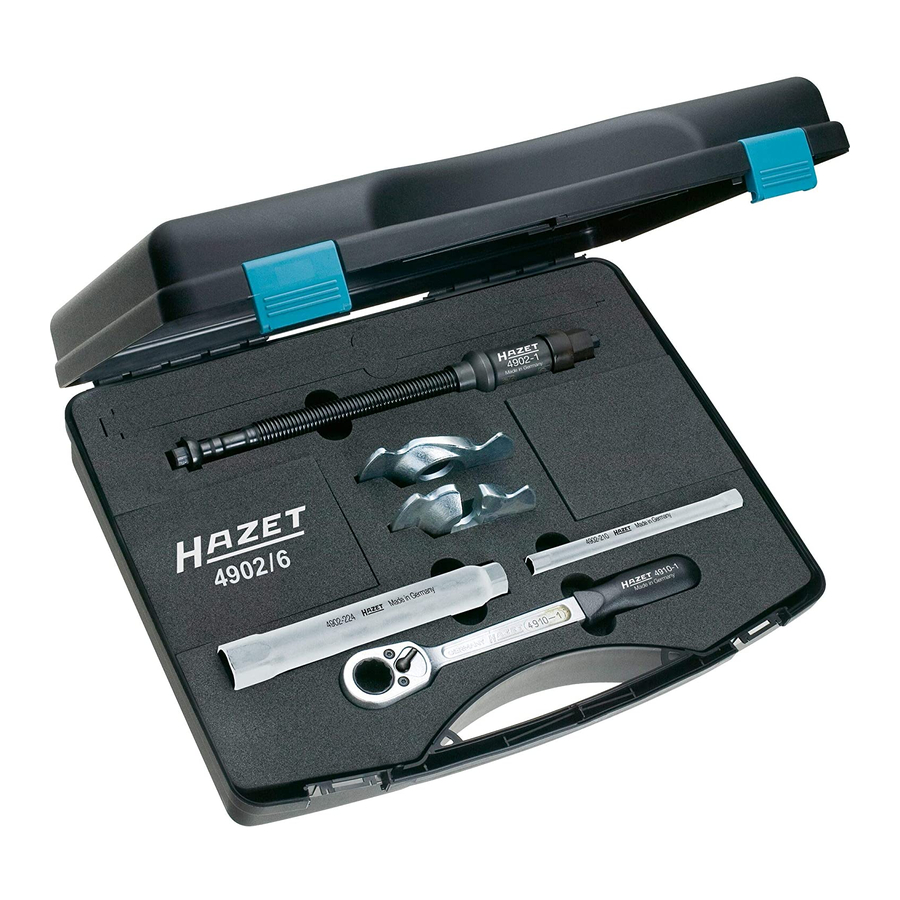
Aufbau und Funktion Spindel Obere Spannplatte 4902-10 Rohr-Doppelsteckschlüssel s 24 Druckstück Antrieb Rohr-Doppelsteckschlüssel s 10 Untere Spannplatte 4902-11 Madenschraube Umschaltknarre 1. Geräteelemente 2. Technische Daten Grundgerät 4902-1 Grundgerät: 4902-1 Max. Druckkraft: 22000 N Spindel Max. Antriebsmoment: 100 Nm Antrieb Spindellänge: 340 mm Druckstück Spannweg:... -
Page 7: Wartung Und Pflege
Aufbau und Funktion 3. Wartung und Pflege 4. Anwendung • Gerät stets sauber halten. Keine entfet- Demontage und Montage der tenden Mittel oder Wasser verwenden, da Schraubenfedern an der Hinterachse folgen- sonst Korrosion entsteht. der Fahrzeuge: • Bei allen Rückfragen und Ersatzteilbestel- •... - Page 8 Aufbau und Funktion • Untere Spannplatte von der Seite in die Feder einführen Bild 1. • Spindel inklusive Druckstück und Antrieb von unten durch den Querlenker und die Feder nach oben bis zur Backe schieben. • Obere Spannplatte auf die Spindel auf- fädeln Bild 2.
- Page 9 • Unsuitable or defective spare parts • HAZET will not be liable for any injuries to may cause damage, malfunction persons or damages to property that are or the device’s total failure.
-
Page 10: For Your Safety
1. General aspects pected, too. • The HAZET Inside Spring Vice is designed for installing and removing straight coil springs on passenger cars. For conical coil springs, the Inside Spring Vice must only •... - Page 11 For Your Safety 4. Storage 5. Dangers emanating from the device The device has to be stored according to the following conditions: • The device must not be stored outdoors. 1. Before each use, check the Inside Spring • Store the device in a dry and dust-free Vice for full operatability.
-
Page 12: Design And Function
Design and Function Spindle Upper Tensioning Jaw 4902-10 Tubular Double Box-End Wrench s 24 Thrust Piece Drive Tubular Double Box-End Wrench s 10 Bottom Tensioning Jaw 4902-11 Headless Set Screw Reversible Ratchet 1. Components of the Device 2. Technical Data Basis Appliance4902-1 Basic Appliance: 4902-1... -
Page 13: Maintenance And Cleaning
Design and Function 3. Maintenance and Cleaning 4. Application • Always keep the Inside Spring Vice clean. Installing and removing of the coil springs at Do not use degreasing agents or water the rear axle of the following vehicles: because they produce corrosion. •... - Page 14 Design and Function • Insert bottom tensioning jaw from the side into the coil spring (figure 1) • Push spindle, thrust piece and drive from below through the suspension arm and the spring upwards until reaching the bottom the tensioning jaw. •...
- Page 15 à sa fonction prévue sont • N’utilisez que les pièces de strictement interdites. rechange originales du fabricant. • HAZET décline toute responsabilité quant • L’utilisation des pièces de re- aux dommages matériels et corporels qui change inappropriées ou défectu- feraient suite à...
-
Page 16: Pour Votre Sécurité
Tout de même, il y a bles pour le champ d’application du dispositif. des dangers qui peuvent émaner de l’ap- • Le compresseur de ressort intérieur HAZET pareil s’il est utilisé non conformément aux est prévu pour le montage et le démontage instructions ou de manière détournée par... - Page 17 Pour votre sécurité tion inappropriée de l’appareil est exclue. 5. Dangers émanant de • D’éventuelles blessures et/ou dommages l’appareil matériels entraînés par une utilisation inap- propriée relèvent de la responsabilité exclusive de l’opérateur et/ou de l’utilisa- teur. 1. Vérifiez le bon fonctionnement du com- 4.
-
Page 18: Eléments De L'appareil
Design et fonctionnement Broche Coupelle supérieure 4902-10 Clé tubulaire s 24 Pièce de pression Entraînement Clé tubulaire s 10 Coupelle inférieure 4902-11 Goupille filetée Cliquet réversible 1. Eléments de l’appareil 2. Informations techniques Appareil de base 4902-1 Appareil de base : 4902-1 Compression max. - Page 19 Design et fonctionnement 3. Entretien et maintenance 4. Application • Maintenez l’appareil propre. N’utilisez pas Montage et démontage des ressorts héli- de dégraissant ou d’eau parce qu’ils coïdaux de l’essieu arrière des véhicules sui- peuvent entraîner l’apparition de corrosion. vants : •...
- Page 20 Design et fonctionnement • Insérez la coupelle inférieure latérale- ment dans le ressort (figure 1). • Poussez la broche ensemble avec la pièce de pression et l’entraînement d’en bas par le bras vers le haut jusqu’à la coupelle. • Placez la coupelle supérieure sur la broche (figure 2).
-
Page 21: Informaciones Generales
Usted ha hecho una buena ciones importantes, las condiciones elección, tiene delante de sí un peligrosas, los riesgos de seguridad producto HAZET de alta calidad o bien las indicaciones de seguri- que le permitirá optimizar el dad. flujo de trabajo. -
Page 22: Para Su Seguridad
No obstante, pueden proce- tivo. der peligros del dispositivo si es utilizado • El compresor de muelles interior HAZET de manera no debida o no conforme a las sirve para el montaje y el desmontaje de instrucciones por un personal no especia- muelles helicoidales rectos de los ejes tra- lizado. - Page 23 Para su seguridad • Toda utilización del dispositivo que no sea 5. Peligros procedentes del conforme a las instrucciones y/o toda uti- aparato lización para cualquier otro fin se consi- derará como uso indebido. • Cualquier tipo de reclamación contra el fabricante y/o sus agentes autorizadas por el uso indebido del dispositivo quedará...
-
Page 24: Diseño Y Funcionamiento
Diseño y funcionamiento Husillo Copela superior 4902-10 Llave tubular dos bocas s 24 Pieza de presión Accionamiento Llave tubular dos bocas s 10 Copela inferior 4902-11 Espiga roscada Carraca reversible 1. Componentes del aparato 2. Datos técnicos Aparato básico 4902-1 Aparato básico: 4902-1 Fuerza de compresión máx.:... -
Page 25: Conservación Y Mantenimiento
Diseño y funcionamiento 3. Conservación y 4. Aplicación mantenimiento Montaje y desmontaje de los muelles helicoi- dales de los ejes traseros en los turismos • Mantenga el aparato siempre limpio. No siguientes: utilice ni detergentes ni agua, ya que pro- •... - Page 26 Diseño y funcionamiento • Inserte lateralmente la copela inferior el muelle (figura 1). • Empuje el husillo junto con la pieza de pre- sión y el accionamiento de abajo por el brazo oscilante transversal hacia arriba hasta alcanzar la copela. •...
- Page 27 • Dit gereedschap is ontwikkeld voor bepaal- van het apparaat dat niet overeenkomstig de toepassingen. HAZET wijst er uitdrukke- het bedoelde gebruik is, zijn uitgesloten. lijk op dat dit gereedschap niet gewijzigd • Voor alle schade bij gebruik dat niet over-...
-
Page 28: Voor Uw Veiligheid
Het appa- schriften worden aangehouden. raat kan echter toch gevaren opleveren, • De HAZET binnenveerspanner dient voor wanneer het door onvoldoende getraind de demontage en montage van rechte personeel ondeskundig of niet overeen- schroefveren van personenwagens. - Page 29 Voor uw veiligheid • Claims van welke aard dan ook tegen de 5. Gevaren die van het apparaat producent en/of zijn zaakgelastigden van- uitgaan wege schade die voortvloeit uit het gebruik van het apparaat dat niet overeen- komstig het bedoelde gebruik is, zijn uit- gesloten.
-
Page 30: Constructie En Werking
Constructie en werking Spindel Veerhouder boven 4902-10 Dubbele steeksleutel s 24 Drukstuk Aandrijving Dubbele steeksleutel s 10 Veerhouder onder 4902-11 Stifttap Omschakelratel 1. Componenten 2. Karakteristieke gegevens Basisapparaat 4902-1 Basisapparaat: 4902-1 Max. drukkracht: 22000 N Spindel Max. aandrijfmoment: 100 Nm Aandrijving Lengte spindel: 340 mm... - Page 31 Constructie en werking 3. Onderhoud 4. Gebruik • Houd het apparaat steeds schoon. Demontage en montage van schroefveren op Gebruik geen ontvettingsmiddelen of de achteras van de volgende voertuigen: water, omdat anders corrosie optreedt. • Spanplaten: 4902-10 boven • Vermeld bij correspondentie en bij het 4902-11 onder bestellen van reserveonderdelen altijd het - BMW 1-serie;...
- Page 32 Constructie en werking • Onderste spanplaat van de zijkant in de veer plaatsen Fig. 1. • Spindel inclusief drukstuk en aandrijving van onderen door de wieldraagarm en de veer naar boven tot aan de klem schuiven. • Bovenste spanplaat op de spindel draai- en Fig.
- Page 33 Lei ha fatto un’ottima scelta; ha descrizioni importanti, situazioni davanti a Sé un prodotto di qua- rischiose, pericoli o indicazioni rela- lità HAZET, che le permetterà di tivi alla sicurezza. ottimizzare il Suo ciclo di lavoro. 1. Informazioni generali ATTENZIONE! Questo simbolo contraddistingue le •...
-
Page 34: Per La Vostra Sicurezza
1. Cenni generali tutela ambientale generalmente valide per il campo d'impiego dell'apparecchio. • Il tendimolle interno HAZET serve per smontare e rimontare molle elicoidali diritte su autovetture. L'uso del tendimolle interno • L'apparecchio è stato progettato e fabbri- su molle coniche è... - Page 35 Per la vostra sicurezza 4. Magazzinaggio / Stoccaggio 5. Pericoli non derivanti dall’apparecchio Provvedere al magazzinaggio e allo stoccaggio dell'apparecchio nelle seguenti condizioni: • il magazzinaggio dell'apparecchio non 1. Prima di ogni utilizzo, controllare che il deve avvenire all'aperto tendimolle interno funzioni perfettamente. •...
-
Page 36: Struttura E Funzionamento
Struttura e funzionamento Albero filettato Piastra di compressione superiore 4902-10 Chiave a tubo doppia s 24 Listello di spinta Azionamento Chiave a tubo doppia s 10 Piastra di compressione inferiore 4902-11 Vite di fermo Chiave a cricchetto 1. Elementi del dispotivo 2. - Page 37 Struttura e funzionamento 3. Manutenzione e assistenza 4. Utilizzo • Mantenere constantemente pulito il appa- • Piastre di compressione: 4902-10 recchio. Non utilizzare acqua o detersivi superiore 4902-11 inferiore perché questi agenti possono provocare - BMW 1a serie; E87: 116i; 118d; 120i; la corrosione dell’apparecchio.
- Page 38 Struttura e funzionamento • Inserire lateralmente nella molla la pia- stra di compressione inferiore Fig 1. • Spingere dal basso verso l'alto l'albero filettato unitamente al listello di spinta e all'azionamento, facendoli passare attra- verso il braccio trasversale e la molla, fino alla ganascia.
Need help?
Do you have a question about the 4902/6 and is the answer not in the manual?
Questions and answers