
Related Manuals for Proscenic M8 PRO


Summary of Contents for Proscenic M8 PRO
- Page 1 The expert for robots in your home With one click to the online shop myRobotcenter.eu myRobotcenter.co.uk myRobotcenter...
- Page 2 Instruction manual Bedienungsanleitung Notice d’instructions Manuale di istruzioni Manual de instrucciones ユーザーガイド M8 PRO Proscenic Technology Co., Ltd. Service support Web:www.proscenic.com E-mail:support@proscenic.com...
- Page 4 CONTENTS Product description ........1 Descrizione del Prodotto .
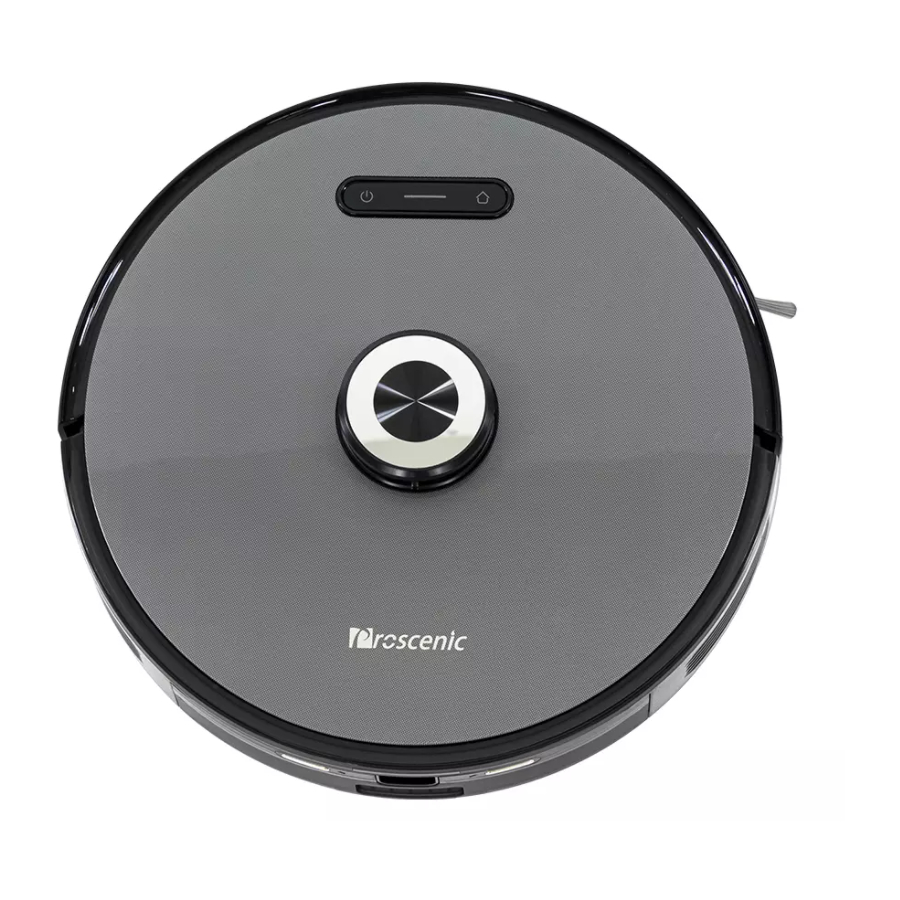
- Page 6 Product description Robot Laser ranging sensor Button Speaker Infrared recharge/anticollision sensor Wall-mounted TOF sensor / infrared Anti-collision sensor auxiliary recharge sensor Laser head cover pressure sensor Charging pole piece Dust box release button Infrared auxiliary recharge sensor Dust collection port Air outlet 2-in-1 Dust bin &...
- Page 7 Robot Start/Stop Button • Extended press to turn on / off • Short press to start / pause cleaning Recharge button • Short press to start/pause recharging • Solid blue light: Normal working/pause/standby • Blue light flash: Is powering on/configuring network/ upgrading firmware •...
- Page 8 Host and sensor Universal wheel Side brush Charging pole piece Cliff sensor Left drive wheel Right drive wheel Rolling-Brush Middle sweep cover...
- Page 9 2-in-1 Dust bin & water tank Dust bin buckle Water inlet Dust box release button Release button Dust bin buckle Dust collection port Dust box Filter mesh bracket Mop cloth Primary filter Filter sponge HEPA filter Paste area Charging pole piece Dust box flip Mop cloth holder Dust collection port...
- Page 10 Dust collector unit Flip cover Dust collection duct cover Control panel Air outlet Power interface Infrared lens Charging/Dust collection clips Dust collector port Flip cover sealing ring Dust bag handle Fan filter Dust bag...
- Page 11 Dust collector unit Start/Stop Button • Short press: Start auto cleaning / pause cleaning • Press and hold for 3s: Start spot cleaning Home button • Short press: Return to collect dust and charge • Press and hold for 3 seconds: Return to collect dust and then continue to clean from the place where it left off last time Fan indicator •...
- Page 12 Installation Notes Install dust collector 1. The dust collector should be placed on flat ground more than 6cm away from the wall. 6cm from the wall 2. Ensure there is a space of more than 1.2m at the front, and more than 0.5m on both sides of the dust collector. About your Dust Collector The dust collector unit is designed to collect dust and charge the robot cleaner.
- Page 13 Instructions for use Instructions for robot Power on / off Charging Press and hold the “ ” button to power on, and the host enters the standby Automatic recharge: The host will automatically return to the dust collector unit state. After booting, press and hold the “ ”...
- Page 15 Remote control Recharge button Arrow key Start/Pause button Mopping mode Spot cleaning Mute button Gear reduction Gear plus Max button Note: 1. To ensure remote control effectively, it is recommended to use it in the front area of the host; 2.
- Page 16 Install 2-in-1 Dust bin & water tank ① Open the rubber cover of the water tank and fill the water ② Install the water tank into the robot according to the direction tank with water, then fasten the rubber cover; shown in the figure, and make sure that the buckle is in place;...
- Page 17 Routine maintenance 2-in-1 Dust bin & water tank (recommended weekly) ① Press the dust box release button and take out the dust box; ② Open the dust box and dump the garbage in the dust box; ③ Take out the primary filter, sponge and HEPA filter, clean the ④...
- Page 18 Universal wheel (recommended monthly cleaning) ⑤ Pour out the remaining water in the water tank and dry the water tank; Flip the main unit and pull out the universal wheel upwards; Clean the hair and dust on the wheel, axle and support; Reinstall the universal wheel and press it tight.
- Page 21 Host and sensor (recommended monthly cleaning) Wipe the sensor on the main unit with a soft, dry cloth, including: ① 4 cliff sensors at the bottom of the main unit ② Wall sensor on the right side of the host Cliff sensor ③...
- Page 23 Cleaning the dust collector infrared lens and Cleaning the fan filter screen bracket the charging/dust collector clips Check the infrared lens and charging / dust collection clips of the dust Check whether there is any lint or debris accumulation on the filter collection unit for dirt.
- Page 24 Basic parameters Dust collector unit Robot Name Parameters Name Dimension/Rating φ350mmxφ350mmx98mm Dimensions Overall Dimensions 282mmx361mmx202mm ≈ 3.6kg Product weight Power Rating 1050W 14.4V 100-240V ~50/60Hz Rated voltage Input Rating DC24V 1.2A Rated power Output Rating Battery capacity 5200mAh FCC Statement 1.
- Page 25 Common problem Question type Solution The battery is low, please charge it before using it Can not boot Ambient temperature is too low (less than 0° C) or too high (higher than 50° C) Unable to start cleaning The battery is low, please charge it before starting it There are too many obstacles near the dust collector.
- Page 26 Troubleshooting Robot Fault prompt Solution Abnormal 1. Please confirm that the laser radar is Please check or remove foreign objects around the lidar or move the device to a new not blocked location to restart Abnormal 2. Please wipe the cliff sensor and Wipe the main power cliff...
- Page 27 Dust collector unit This product will prompt you the current product status through the indicator light on the top of the body: Indicator light Common error Solution 1. Frequent dust collection leads to fan overheating protection or fan malfunction. It is recommended to try to collect dust after 30 minutes;...
- Page 28 Produktbeschreibung Saugroboter Laser-Entfernungsmesser Taste Lautsprecher Infrarot-Ladesensor / Infrarot-Antikollisionssensor An der Wand montierter TOF-Sensor / Kollisionssensor Infrarot-Zusatzladesensor Drucksensor für Laserkopfhaube Ladekontakte Entriegelungstaste für Staubbehälter Infrarot-Zusatzladesensor Staubsammelanschluss Luftaustritt 2-in-1-Staubbehälter mit Wassertank...
- Page 29 Saugroboter Start/Stopp-Taste • Langes Drücken zum Einschalten / Kurzes Drücken zum Ausschalten • Reinigung starten / anhalten Aufladen-Taste • Kurzes Drücken Rückladung starten/anhalten • Blaues Licht leuchtet: Normaler Betrieb / Pause / Standby • Blaues Licht blinkt: beim Einschalten / Netzwerkkonfiguration / Firmware-Aktualisierung •...
- Page 30 Saugroboter und Sensor Omnidirektionales Rad Seitenbürste Ladekontakte Klippensensor Linkes Rad Rechtes Rad Hauptbürste/rotierende Bürste Mittlere Kehrabdeckung...
- Page 31 2-in-1-Staubbehälter mit Wassertank Staubbehälter Schnalle Wasserzulauf Entriegelungstaste Entriegelungstaste für Staubbehälter Staubbehälter Schnalle Staubsammelanschluss Staubbehälter Filtergitterhalterung Wischtuch Primärfilter Filterschwamm HEPA-Filter Bereich zum Einfügen Ladekontakte Staubbehälterklappe Wischtuchhalter Staubsammelanschluss Schnappen...
- Page 32 Staubsammler/Absaugstation Abdeckung Deckel vom Staubkanal Schalttafel Luftauslass Stecker Infrarot linse Lade-/Staubsammelkontakt Saugmund Abdeckung Dichungsring Staubbeutelgriff Lüfterfilter Staubbeutel...
- Page 33 Staubsammler/Absaugstation Start-Stopp-Taste • Kurz drücken: Automatische Reinigung starten / Reinigung anhalten • 3s gedrückt halten: Spotreinigung starten Home-Taste • Kurz drücken: Rückkehr zum Staubsammeln und Ladung • Drücken und 3s halten: Zurück zum Staubsammeln, Aufladen und Fortsetzen Lüfteranzeige • Grünes Licht leuchtet: Im Staubsammeln •...
- Page 34 Installationshinweise Inbetriebnahme des Staubsammler 1. Der Staubsammler sollte mehr als 6 cm von der Wand entfernt auf ebenem Boden aufgestellt werden. 6cm von der Wand entfernt 2. Stellen Sie sicher, dass an der Vorderseite ein Abstand von mehr als 1.2 m und an beiden Seiten des Staubsammlers ein Abstand von mehr als 0.5 m vorhanden ist.
- Page 35 Gebrauchsanweisung Verwendung des Saugroboters Ein- / Ausschalten Aufladen Halten Sie die Taste ( ) gedrückt, um das Gerät einzuschalten. Der Saugroboter A u t o m a t i s c h e s A u f l a d e n : D e r S a u g r o b o t e r f ä h r t a u t o m a t i s c h z u r wechselt in den Standby-Modus.
- Page 37 Fernbedienung Aufladen-Taste Pfeiltaste Start / Pause-Taste Wischmodus Fester-Bereich Reinigung Stummschalttaste Weniger Antrieb Mehr Antrieb Max-Taste Hinweis: Um die bestmögliche Wirkung der Fernbedienung zu erzielen, wird empfohlen, diese im vorderen Bereich des Hauptgeräts zu verwenden. Die effektive Entfernung der Fernbedienung beträgt 3-6 Meter. Innerhalb des Bereich 3-6 Meter...
- Page 38 2-in-1-Staubbehälter mit Wassertank ① Öffnen Sie die Gummiabdeckung des Wassertanks, füllen ② Installieren Sie den Wassertank gemäß der in der Abbildung Sie den Wassertank mit Wasser und befestigen Sie die gezeigten Richtung im Host und vergewissern Sie sich, dass die Gummiabdeckung;...
- Page 39 Routinewartung 2-in-1-Staubbehälter mit Wassertank (Es wird empfohlen, jede Woche zu reinigen) ① Drücken Sie den Entriegelungsknopf des Staubbehälters und ② Öffnen Sie den Staubbehälter und entsorgen Sie den Staub nehmen Sie den Staubbehälter heraus; des Staubbehälters; ③ Nehmen Sie den Primärfilter, den Schwamm und den HEPA- ④...
- Page 40 Omnidirektionales Rad (empfohlene monatliche Reinigung) ⑤ Gießen Sie das restliche Wasser in den Wassertank und trocknen Sie den Wassertank; Drehen Sie die Haupteinheit um und ziehen Sie das Omnidirektionalen Rad nach oben heraus; Reinigen Sie die Haare und Schmutz an Rad, Achse und Halterung;...
- Page 43 Saugroboter und Sensor (monatlich empfohlen) Wischen Sie den Sensor an der Haupteinheit mit einem weichen, trockenen Tuch ab, einschließlich: ① 4 Klippensensoren an der Unterseite der Haupteinheit ② Wandsensor auf der rechten Seite des Hosts Klippensensor ③ Infrarot-Zusatzladesensor ④ Das Ladestangenstück auf der Rückseite des Hauptgeräts Infrarot- Ladekontakte An der Wand montierter TOF-Sensor...
- Page 45 Reinigen der Infrarotlinse des Staubsammlers Reinigung der Luftfilter-Siebhalterung und die Lade- / Staubsammelkontakt Überprüfen Sie die Infrarotlinse und die Lade- / Überprüfen Sie sie Filtersiebhalterung des Lüfters auf Fussel und Staubsammelkontrollleuchte auf Schmutz.Wischen Sie sie mit einem Ablagerungen. Falls solche vorhanden sind, benutzen Sie bitte die trockenen, sauberen Tuc ab, um sicherzustellen, dass sie sauber und Reinigungsbürste des Saugers oder ein trockenes, sauberes Tuch um schmutzfrei sind.
- Page 46 Grundlegende Parameter Staubsammler/Absaugstation Saugroboter Name Parameters Name Maße/Bemessungsdaten φ350mmxφ350mmx98mm Abmessungen Abmessungen 282mmx361mmx202mm ≈ 3.6kg Produktgewicht Nennleistung 1050W 14.4V 100-240V ~50/60Hz Nennspannung Eingangsleistung DC24V 1.2A Nennleistung Ausgangsleistung Akkukapazität 5200mAh...
- Page 47 Häufige Probleme Problem Lösung Der Akku ist fast leer. Laden Sie ihn auf Kann nicht saugen Die Umgebungstemperatur ist zu niedrig (unter 0 ° C) oder zu hoch (über 50 ° C) Reinigung kann nicht gestartet werden Der Akku ist fast leer. Laden Sie ihn auf In der Nähe der Staubauffanggerät befinden sich zu viele Hindernisse.
- Page 48 Fehlerbehebung Saugroboter Fehlermeldung Lösung Anormal 1. Bitte versichern Sie sich, dass das Überprüfen oder entfernen Sie Fremdkörper im Bereich des Lidars oder bringen Sie Laserradar nicht blockiert ist das Gerät zum Neustart an einen neuen Ort Anormal 2. Bitte Klippensensor abwischen und Wischen Sie den Hauptstromklippensensor ab und versuchen Sie es erneut (Position zur neuen Position bringen, um zu starten des Sensors siehe Handbuch)
- Page 49 Staubsammler/Absaugstation Dieses Produkt zeigt Ihnen den aktuellen Produktstatus über die Anzeigelampe oben am Gehäuse an: häufiger Fehler IKontrollleuchte Lösung 1. Häufiges Sammeln von Staub führt zu einem Überhitzungsschutz des Lüfters oder einem Ausfall des Lüfters. Es wird empfohlen, dass Benutzer versuchen, nach 30 Minuten Staub zu sammeln. Überhitzung des Lüfters / Ausfall 2.
- Page 50 Description du produit Hôte et capteur Capteur laser de mesure de distance Bouton Haut-parleur Capteur de recharge infrarouge / Capteur infrarouge anti-collision Capteur TOF mural / Capteur de collision capteur de recharge auxiliaire infrarouge Capteur de pression Pièce de pôle de charge pour couvercle de tête laser Bouton de dégagement du bac à...
- Page 51 Hôte Bouton Marche/Arrêt • Appui long pour allumer / Appui bref pour éteindre • Démarrer/pause nettoyage Bouton de recharge • Appui bref pour démarrer/pause pour retourner à la charge • Voyant bleu allumé : Fonctionnement normal/pause/veille • Voyant bleu clignotant : En cours de démarrage / configuration réseau / mise à...
- Page 52 Hôte et capteur Roue universelle Brosse latérale gauche Pièce de pôle de charge Capteur cliff Roue motrice gauche Roue motrice droite Brosse Roulante Couvercle de balayage central...
- Page 53 Réservoir d'eau et boîte à poussière 2 en 1 Boucle du bac à poussière Port d'injection d'eau Bouton de déblocage Bouton de libération du bac à poussière Boucle Port de collecte de poussière Bac à poussière Support de maille de filtre Vadrouille Filtre primaire Éponge filtre...
- Page 54 Collecteur de poussière Couvercle rabattable Couvercle du canal à poussière Panneau de contrôle Sortie d’air Interface d'alimentation Capteur infrarouge Attaches de charge / collecte de poussière Bouche de collecte de poussière Joint d'étanchéité du couvercle rabattable Poignée du sac à poussière Filtre de ventilateur Sac à...
- Page 55 Collecteur de poussière Bouton d'alimentation / pause • Appui court: démarrer / interrompre le nettoyage • Appui long pendant 3 secondes: nettoyage dans la zone attribuée Bouton d'appel (appeler le robot) • Appui court: appel (robot) pour la collecte de poussière et la recharge •...
- Page 56 Instructions d'installation Installez le collecteur de poussière 1. Le capteur de poussière doit être posé sur un sol plat et à plus de 6 cm des murs. À 6cm du mur 2. Assurez-vous qu'il y a un espace de plus de 1,2 m devant le collecteur de poussière et de plus de 0,5 m de chacun de ses côtés. À...
- Page 57 Instructions d’utilisation L'opération de l'aspirateur robot Mise en marche/arrêt Charge Appuyez sur le bouton et maintenez-le enfoncé pour allumer ; l'hôte passe en Recharge automatique : L'hôte retourne automatiquement sur le socle pour se recharger une fois le nettoyage t erminé ou lorsque la batterie est insuffisante. mode veille.
- Page 59 Télécommande Bouton de recharge Touche directionnelle Bouton Marche/Pause Mode balayage Nettoyage fixe Bouton muet Réduction des vitesses Augmentation des vitesses Bouton Max Note: Pour obtenir le meilleur effet de commande à distance, il est recommandé de l’utiliser à l’avant de l’unité principale; La distance effective de la télécommande est de 3-6 mètres.
- Page 60 Réservoir d'eau et boîte à poussière 2 en 1 ① Ouvrez le couvercle en caoutchouc du réservoir d'eau et ② Installez le réservoir d'eau dans le robot selon la direction remplissez le réservoir d'eau avec de l'eau, puis fixez le couvercle indiquée sur la figure et assurez-vous que la boucle est en place;...
- Page 61 Maintenance quotidienne Réservoir d'eau et boîte à poussière 2 en 1 (nettoyage hebdomadaire recommandé) ① Appuyez sur le bouton de libération de boîte à poussière pour ② Ouvrez la boîte à poussière et évacuez la saleté de la boîte à retirer la boîte à...
- Page 62 Roue universelle (nettoyage mensuel recommandé) ⑤ Versez l'eau restante du réservoir d'eau et séchez le réservoir; Retournez l'unité principale et tirez la roue universelle vers le haut; Nettoyez les cheveux et les ordures sur le corps de r oue, l’ axe de roue et le support;...
- Page 65 Hôte et capteur(recommandé tous les mois) Essuyez le capteur de l'unité principale avec un chiffon doux et sec, notamment : ① 4 capteurs cliff au bas de l'unité principale ② Capteur mural sur le côté droit de l'hôte Capteur cliff ③...
- Page 67 Nettoyage du capteur infrarouge et des Nettoyage du support de la grille du filtre du attaches de charge/collecte de poussière ventilateur Vérifiez s'il y a des objets sales sur la lentille infrarouge et sur les Vérifiez qu'il n'y a pas d'accumulation de peluches ou de débris sur pièces de collecte de poussière du collecteur, essuyez avec un chiffon le support de la grille du ventilateur.
- Page 68 Paramètres de base Collecteur de poussière Hôte Paramètres Paramètres φ350mmxφ350mmx98mm Dimensions Dimensions 282mmx361mmx202mm ≈ 3.6kg Poids du produit Puissance nominale 1050W 14.4V 100-240V ~50/60Hz Tension nominale Entrée nominale DC24V 1.2A Puissance nominale Sortie nominale Capacité de la batterie 5200mAh...
- Page 69 Problèmes courants Types de questions Solution La batterie est faible, veuillez la recharger avant de rallumer Impossible de démarrer Température ambiante trop basse (inférieure à 0° C) ou trop élevée (supérieure à 50° C) Impossible de commencer le nettoyage La batterie est faible, veuillez la recharger avant de rallumer IIl y a trop d’obstacles à...
- Page 70 Dépannage Hôte Invite d’erreur Solution Anomalie 1. Veuillez confirmer que le radar laser Veuillez vérifier ou enlever les corps étranges autour du radar ou déplacez l'appareil à n'est pas bloqué un nouvel endroit pour le redémarrer Anomalie 2. Essuyez le capteur Cliff et passez à Essuyez le capteur cliff...
- Page 71 Collecteur de poussière Ce produit vous indiquera l'état actuel du produit via le voyant lumineux situé sur le dessus du corps: Voyant Erreur Solutions 1. Une collecte fréquente de poussière entraîne une protection contre la surchauffe du ventilateur ou une panne Erreur du ventilateur / surchauffe du ventilateur.Il est recommandé...
- Page 72 Descrizione del Prodotto Corpo principale e sensori Sensore di distanza laser Pulsanti Altoparlante Sensore di ricarica infrarosso/ Sensore di anticollisione infrarosso Sensore TOF a parete/ Sensore di anticollisione Sensore ricarica ausiliario infrarosso Sensore di pressione Contatto di ricarica della copertina testina laser Pulsante per rilascio del contenitore Sensore infrarosso di ricarica ausiliario Ingresso della polvere roccolta...
- Page 73 Corpo principale Pulsante di accensione/spegnimento • Tienere premuto a lungo per accendere/premere • Brevemente per spegnere Pulsante di ricarica • Pulsante di ricarica • Premere brevemente per avvio/pausa Ricarica • La luce blu è accesa fissa: Funzionamento normale/Pausa/Standby • La luce blu lampeggia: In avvio/In configurazione di rete/In aggiornamento di firmware •...
- Page 74 Corpo principale e sensori Ruota omnidirezionale Spazzola laterale sinistra Contatto di ricarica Sensore di livelli Ruota sinistra Ruota destra Spazzola a rullo Copertina della spazzola centrale...
- Page 75 Serbatoio dell'acqua e polvere 2-in-1 Fibbia del contenitore della polvere Ingresso dell' acqua Pulsante per rilascio del contenitore Pulsante di rilascio della polvere Pulsante sgancio Fibbia del contenitore della polvere Ingresso della polvere roccolta Contenitore della polvere Staffa rete del filtro Straccio Filtro primario Spugna filtro...
- Page 76 Macchina principale raccoglitore della polvere Copertina ribaltabile Coperchio del canale di polvere Pannello di controllo Uscita dell'aria Interfaccia di alimentazione Lente a infrarossi Pezzi di ricarica/ induzione della polvere raccolta Porto di aspirazione Anello di tenuta per copertina ribaltabile Maniglia per il sacchetto Filtro del ventilatore Sacchetto della polvere...
- Page 77 Macchina principale raccoglitore della polvere Pulsante Accensione/Pausa • Pressa breve: Avviare/pausare la pulizia • Pressa lunga per 3s: Pluzia a punti Pulsante di richiamo(richiamare il robot) • Pressa breve: Richiamare (robot) per roccolta della polvere e ricarica • Pressa lunga per 3s: Un tasto per raccogliere la polvere e continuare a pulire il punto interrotto Indicatore del ventilatore •...
- Page 78 Istruzioni dell’Installazione Installare il raccoglitore della polvere 1. Il raccoglitore della polvere deve essere posizionato su un terreno piano a più di 6 cm dalla parete. 6cm dal parete 2. Assicurarsi che ci sia uno spazio di più di 1.2m nella parte anteriore e più di 0.5m su entrambi i lati del raccoglitore della polvere. Informazioni sul raccoglitore della polvere Il raccoglitore della polvere è...
- Page 79 Istruzioni per Uso Istruzioni del robot aspirapolvere Accensione/Spegnimento Ricarica Tenere premuto il pulsante , Il robot va in standby. Dopo l'avvio, tenere premuto Ricarica automatica: il robot torna automaticamente alla base per caricare una il pulsante per spegnere. volta terminata la pulizia o quando la batteria è quasi scarica. Ricarica manuale: premere il pulsante per iniziare la ricarica;...
- Page 81 Telecomando Pulsante di ricarica Pulsante di direzione Pulsante accensione/pausa Modalità di lavapavimenti Pulizia fissa Pulsante muto Riduzione del livello Aumento del livello Pulsante Max Nota: Per garantire il miglior effetto del telecomando, si consiglia di utilizzarlo nella parte anteriore dell'unità principale; La distanza effettiva del telecomando è...
- Page 82 Serbatoio dell'acqua e polvere 2-in-1 ① Aprire il tappo di gomma del serbatoio dell'acqua e riempire il ② Installare il serbatoio dell'acqua nell'unità principale del robot serbatoio dell'acqua con acqua, fissare il tappo di gomma; secondo la direzione indicata nel diagramma e assicurarsi che la clip sia in posizione;...
- Page 83 Routinewartung Serbatoio dell'acqua e polvere 2-in-1 (pulizia settimanale consigliata) ① Premere il pulsante di rilascio della cassetta per rimuovere la ② rompere la scatola della polvere e scaricare i rifiuti del cassetta; contenitore della polvere; ③ Rimuovere il filtro preliminare, la spugna e il filtro HEPA, pulire ④...
- Page 84 Ruota Universale (Pulizia consigliata mensile) ⑤ Versare l'acqua rimanente dal serbatoio dell'acqua e asciugare il serbatoio; Capovolgere il corpo principale ed estrarre verso sù la ruota universale; Pulire i capelli e la spazzatura sulla ruota, sull'asse, sul supporto; Reinstallare la ruota universale e premere saldamente. Nota: lavare la ruota con acqua, asciugarla e rimetterla.
- Page 87 Corpo macchina e sensore (raccomandato mensile) Ulire il sensore sull’unità principale con un panno morbido asciutto, inclusi: ① 4 sensori dislivelli sul fondo dell’unità principale ② Sensore parete sulla parte destra dell’unità Sensore dislivello ③ Sensore di ricarica ausiliario infrarosso ④...
- Page 89 Pulizia della lente a infrarossi e pezzi di Pulizia del supporto del filtro del ventilatore ricarica/induzione della polvere raccolta del raccoglitore Controllare se ci sia sporco sulla lente a infrarossi e sui pezzi di Controllare se il supporto del filtro del ventilatore ha accumuli di ricarica/induzione della polvere raccolta del raccoglitore, pulirli con un lanugine o detriti.
- Page 90 Paramètres de base Macchina Macchina principale raccoglitore della polvere Nome Parametri Nome Parametri φ350mmxφ350mmx98mm Dimension Dimension 282mmx361mmx202mm ≈ 3.6kg Valutazione di potenza Peso del prodotto 1050W 14.4V Valutazione di ingresso 100-240V ~50/60Hz Tensione nominale Valutazione di uscita DC24V 1.2A Potenza nominale Capacità...
- Page 91 Problemi & Soluzioni Tipo di domanda Soluzione Solution La batteria è quasi scarica, ricaricare prima dell’accensione Impossibile accendere La temperatura dell’ambiente è bassa (inferiore a 0 ° C) o troppo alta (superiore a 50 ° C) Impossibile avviare la pulizia La batteria è...
- Page 92 Soluzione del malfuzionante Macchina Messaggio di errore Soluzione Anormale 1. Confermare che il radar laser non sia Controllare o rimuovere oggetti estranei attorno al coperchio o spostare il dispositivo bloccato in una nuova posizione e riavviare Anormale 2. Pulire il sensore dislivello spostare in Pulire il sensore dislivello e riprovare (vedi manuale per posizione sensore) una nuova posizione per iniziare Anormale 3.
- Page 93 Macchina principale raccoglitore della polvere Questo prodotto indicherà lo stato attuale del prodotto attraverso l'indicatore luminoso sulla parte superiore dell'unità principale del robot: Stato Guasti comuni Risoluzioni dell’Indicatore 1. La frequente raccolta della polvere porta alla protezione dal surriscaldamento del ventilatore o al malfunzion- Surriscaldamento del ventilatore / amento del ventilatore, si raccomanda di provare di nuovo la raccolta della polvere dopo 30 minuti.
- Page 94 Descripción del producto Anfitrión y sensor Sensor de alcance láser Botón Altavoz Sensor de recarga por infrarrojos/ Sensor infrarrojo anticolisión Sensor TOF montado en la pared Sensor de anticolisión / sensor de recarga auxiliar Sensor de presión Pieza de polo de carga de la cubierta del cabezal láser Botón de liberación de la caja de polvo...
- Page 95 Host Botón de inicio / parada • Presione prolongadamente para encender / Presione brevemente para apagar • Iniciar / pausar limpieza Botón de recarga • Presione brevemente inicio / pausa para volver a cargar • Luz azul iluminada: funciona correcto/ pausa / espera •...
- Page 96 Anfitrión y sensor Rueda universal Cepillo lateral izquierdo Pieza de polo de carga Sensor de acantilado Rueda del lado izquierdo Rueda del lado derecha Cepillo rodante Cubierta de barrido central...
- Page 97 Depósito de agua y polvo 2 en 1 Fibbia del contenitore della polvere Entrada de agua Botón de liberación Botón de liberación Fibbia del contenitore Entrada de polvo della polvere Caja de polvo Soporte de malla de filtro Mopa Filtro primario Esponja de filtro Filtro HEPA Área de pegar...
- Page 98 Unidad de recolección de polvo Cubierta abatible Cubierta del canal de polvo Panel de control Salida de aire Conector de alimentación Lente infrarroja Cargar/Clips de collector de polvo Colector de polvo Anillo sellable de cubierta abatible Asa de bolsa de polvo Filtro de ventilador Bolsa de polvo...
- Page 99 Unidad de recolección de polvo Botón de encendido / pausa • Pulsación corta: inicio / pausa de limpieza • Pulsación larga durante 3 segundos: Limpieza en área asginada Botón de llamada (llame al robot) • Pulsación breve: llamada (robot) para la recolección y recarga de polvo •...
- Page 100 Instrucciones de Instalación Instalar el colector de polvo 1. El colector de polvo debe colocarse en un suelo plano a más de 6 cm de distancia de la pared. 6 cm de la pared 2. Asegúrese de que haya un espacio de más de 1,2 m en la parte delantera y más de 0,5 m en ambos lados del colector de polvo. Acerca de su colector de polvo La unidad del colector de polvo está...
- Page 101 Instrucciones de uso Instrucción de robot aspirador Encendido / apagado Cargando Presione y mantenga presionado el botón para encender y el anfitrión pasa al Recarga automática: El anfitrión volverá automáticamente a la horquilla a la estado de espera. Después de arrancar, mantenga presionado el botón para carga después de que se termine la limpieza o cuando la batería es escasa.
- Page 103 Control remoto Botón de recarga Tecla de adelante Botón de inicio / pausa Modo de fregar Limpieza fija Botón de silencio Reducción de engranaje Engranaje plus Botón Max Nota: Para garantizar el mejor uso de control remoto, se recomienda usarlo en el área frontal de la unidad principal; La distancia efectiva del control remoto es de 3-6 metros.
- Page 104 Depósito de agua y polvo 2 en 1 ① Abra la tapa de goma del tanque de agua y llene el tanque de ② Instale el tanque de agua en la unidad principal del robot agua con agua, fije la tapa de goma; de acuerdo con la dirección que se muestra en el diagrama y asegúrese de que el clip esté...
- Page 105 Mantenimiento de rutina Depósito de agua y polvo 2 en 1 (se recomienda una limpieza semanal) ① Presione el botón de liberación del cassette para extraer el ② Abra el contenedor de polvo y descargue la suciedad del cassette; contenedor de polvo; ③...
- Page 106 Rueda universal (limpieza mensual recomendada) ⑤ Vierta el agua restante del tanque de agua y seque el tanque; Voltee la unidad principal y extraiga la rueda universal hacia arriba; Limpie los pelos y las basuras de las ruedas y el eje de soporte;...
- Page 109 Anfitrión y sensor (recomendado mensualmente) Limpie el sensor de la unidad principal con un paño suave y seco, que incluya: ① 4 sensores de acantilados en la parte inferior de la unidad principal ② Sensor de pared en el lado derecho del anfitrión Sensor de acantilado ③...
- Page 111 Limpieza de la lente infrarroja del colector de Limpieza del soporte de la rejilla del filtro del polvo y los clips de carga / colector de polvo ventilador Verifique la lente infrarroja y los clips de carga / recolección de polvo Verifique si hay acumulación de pelusa o escombros en el soporte de de la unidad de colección de polvo para ver si hay suciedad.
- Page 112 Parámetros básicos Anfitrión Unidad de recolección de polvo Nombre Parámetro Nombre Parámetro φ350mmxφ350mmx98mm Dimensiones Dimensiones 282mmx361mmx202mm ≈ 3.6kg Peso del producto Consumo de energía 1050W 14.4V 100-240V ~50/60Hz Tensión nomina Entrada de energía DC24V 1.2A Potencia nominal Salida de energía Capacidad de la batería 5200mAh...
- Page 113 Problema común Tipo de pregunta Solución La batería está baja, cárguela antes de cargarla No puede arrancar La temperatura ambiente es demasiado baja (menos de 0 ° C) o demasiado alta (más de 50 ° C) No se puede comenzar a limpiar La batería está...
- Page 114 Solución de problemas Anfitrión Mensaje de error Solución Anormal 1. Confirme que el radar láser no está Verifique o elimine los objetos extraños alrededor de la unidad o mueva el dispositivo bloqueado a una nueva ubicación para reiniciar Anormal 2. Limpie el sensor de acantilado y Limpie el sensor principal del acantilado e intente nuevamente muévase a la nueva posición para comenzarco- (consulte el manual de usuario para conocer la ubicación del sensor)
- Page 115 Unidad de recolección de polvo Este producto indicará el estado actual del producto a través de la luz indicadora en la parte superior de la unidad principal del robot: Estado del Fallas comunes Resoluciones indicador 1. La recolección de polvo frecuente conduce a la protección contra el sobrecalentamiento o el mal funciona- Sobrecalentamiento del ventilador miento del ventilador, se recomienda intentar la recolección de polvo nuevamente después de 30 minutos.
- Page 116 製品紹介 本体とセンサー レーザー測距センサー ボタン スピーカー レーザーヘッドカバー圧力セン サー 赤外線補助充電センサー 壁認識 TOF センサー / 衝突センサー 赤外線補助充電センサ レーザーヘッドカバー圧力センサー 充電端子 ダストボックス取り外しボタン 赤外線補助充電センサー ゴミ排出口 排気口 2-in-1 ダストボックスと水タンク...
- Page 117 本体 開始 / 停止ボタン • オンにするには長押し、オフにするには短押し • クリーニングの開始 / 一時停止 充電ボタン • オンにするには短押し、掃除停止し充電にするには長押し • ブルーライトは常に点灯:正常稼働中 / 停止中 / 待ち状態フ ル充電 • ブルーライトは点滅:起動中 / ネットワーク設定中 / ソフト ウェアセットアップ中 • 黄色ライトは常に点灯:電力低下 / 自動ゴミ収集機に戻り中 • 緑ライトは常に点滅:充電中 • 緑ライトは常に点灯:充電完了 • 赤ライドは点滅:異常 / 故障 • ライドオフ:シャットダウン / スリップ中 ネットワーク設定...
- Page 118 本体とセンサー ユニバーサルホイール 左サイドブラシ 充電端子 崖センサー 左ホイール 右ホイール ローラーブラシ ローラーブラシカバー...
- Page 119 2-in-1 ダストボックスと水タンク ダストボックスバック ル 注水口 ダストボックス取り外しボタン ダストボックス取り外 しボタン ダストボックスバックル ゴミ排出口 ダストボックス メッシュフィルター モップ 一次フィルター フィルタースポンジ HEPA フィルター 貼り付けエリア 充電端子 ダストボックスフリップ 雑巾ホルダー ゴミ排出口 バックル...
- Page 120 自動ゴミ収集機本体 容器のカバー ゴミの配送管のカバー コントロールパネル 排気口 電源コネクター 赤外線レンズ 充電 / ゴミ収集用接続部 吸込口 カバーのシールリング 紙パックのハンドル ファンフィルター 紙パック...
- Page 121 自動ゴミ収集機 スタート / ストップボタン • 短押し:お掃除の開始 / お掃除の一時停止 • 3秒以上長押し:定点クリーニングをオンにする ホームボタン • 短押し:掃除機を呼び戻してゴミを収集すると自動充電する • 3秒以上長押し:ワンクリックでゴミを収集して、自動的に充電する前の場所 に戻り、清掃を再開する ファンインジケーター • 緑色のライトが点滅:ゴミを収集中 • 赤色のライトがすばやく点滅:ファンが過熱している / ファンが故障している / カバーが適切に閉じられていない 充電インジケーター • 緑色のライトが点滅:充電中 • 緑色のライトが点灯:充電が完了 ダストバッグインジケーター • 緑色のライトが点灯:ダストバッグが満杯 / ゴミの配送管がブロックされてい る • 赤色のライトがすばやく点滅:ダストバッグがない、または所定の位置に正し く取り付けられていない...
- Page 122 インストールガイド 自動ゴミ収集機の取り付け方法 1. 自動ゴミ収集機が壁から 6 cm 以上離れており、平らな地面に置かれてください 。 壁までの距離 6cm 2. 自動ゴミ収集機の両側に 0.5 メートル、前方に 1.2 メートルのスペースがあることを確認してください。 自動ゴミ収集機について 自動ゴミ収集機はゴミ収集と充電二つの機能を備えています; 工場出荷時、紙パック1個が装着されています; お掃除が完了すると、ロボット掃除機は自動的に自動ゴミ収集機に戻り、ゴミを空にして充電します。...
- Page 123 使用説明 ロボット掃除機使用方法 電源オン / オフ 充電 電源スイッチを長押しすると電源が入り、本体はスタンバイモードになります。 自動充電:お掃除が完了または清掃中で、本体の充電残量が少なくなると自動で充 電源を入れた後、 電源スイッチを長押しして電源を切ります。 自動ゴミ収集機へ戻り、充電します。 手動充電: ホームポタンを短押して自動充電になります。 ご注意:ロボット掃除機が自動ゴミ収集機で置いて充電する時、自動的にオンにな 本体の電量がなくなると、手動で自動ゴミ収集機に置きて充電することができます。 ります。充電中で電源を切ることができない。 ご注意:充電ポールピースとの接触が良好であることを確認してください。 清掃 / 一時停止 スタンバイモード 電源を入れた状態で、 ポタンを短押すとグローバルクリーニングが開始します。 清掃中に任意のボタンを押して、一時停止になります 。 何も操作せずに 20 分以上スタンバイすると、本体は自動的にスタンバイモードに なります。 ご注意:ロボット掃除機は自動ゴミ収集機から掃除を開始することをお勧めします。 パッテリー残量が低すぎると、お掃除ができないので一回充電してください。清掃 ご注意:本体は充電中にスタンバイモードにはなりない。スタンバイモードで電量 中でバッテリー残量が少なくなると、自動で自動ゴミ収集機に戻って充電します。 がなくなると自動に電源を切ります。 充電後は、残りのエリアを清掃します。 自動ゴミ収集機使用方法 スタート / ストップボタン ホームボタン 短押し:お掃除の開始...
- Page 125 リモコン 充電 方向 開始 / 一時停止ボタン モップモード 固定クリーニング 消音ボタン 強 弱 MAX ボタン 注意: 1. 最高のリモコン効果を確保するために、ホストの前の領域で使用 することをお勧めします。 2. リモコンの有効距離は 3—6 メートルです。 エリア≤ 3-6 メートル...
- Page 126 安装 2-in-1 ダストボックスと水タンク ① 水タンクのゴムキャップを開けて水を注ぎ、ゴムキャップを締 ② 水タンクを図の方向に沿って本体に取り付け、バックルが所定 めます ; の位置にあることを確認してください ; ③ モップを雑巾ホルダーに取り付けてマジックテープで固定しま ④ 雑巾ホルダーの両サイドのバックルを手で押して、本体底面に す ; 図の方向に水平に押し込みます。 * 初清掃にはモップを使用することがおすすめしない。 * 自宅にカーペットがある場合は、アプリ内の禁止エリアを設定してください。...
- Page 127 日常のメンテナンス 2-in-1 ダストボックスと水タンク(週一回の清掃することをお勧めします) ① ダストボックスリリースボタンを押してダストボックスを取り ② ダストボックスを開き、中のゴミを捨てます ; 出します ; ③ 予備フィルター、スポンジ、フィルターを取り出し、クリーニ ④ モップを外し、水で洗い流してしっかり乾かします; ングブラシで表面を清掃します。フィルターとダストボックスを 水で洗い、乾燥させます ;...
- Page 128 ユニバーサルホイール(お手入れの頻度:1 か月に 1 回) ⑤ 水タンクの残りの水を捨てて、水タンクを乾燥させます ; 本体を裏返し、 ユニバーサルホイールを上方に引き出します。 ユニバーサルホイールを掃除し、絡まった髪の毛やゴミを取 り除きます。 ユニバーサルホイールを再度取り付け、 しっかりと押します。 注:水で洗浄し、乾燥させて元に戻します。 ワットヒール本体 車軸 ⑥ フィルター、ダストボックス、モップ、水タンクがすべて乾い たら、元に戻して使用します。 サポート...
- Page 131 本体とセンサー ( 定期的な清掃をお勧めします ) 本体のセンサーを、やわらかい乾いた布で拭きます。 ① 本体下部の 4 つの崖センサー ② 本体の右側にある壁センサー 崖センサー ③ 赤外線補助充電センサー ④ 本体充電端子 赤外線補助充電セ 充電端子 壁認識 TOF センサー / ンサー 赤外線補助充電センサ...
- Page 133 赤外線レンズと充電 / ゴミ収集用接続部の清掃 ファンフィルターのお手入れ 赤外線レンズと充電 / ゴミ収集用接続部汚れがないか点検し、ラシか清 ファンフィルターに糸くずやゴミが溜まっていないか確認してください。 潔な乾いた布で異物を取り除きます。月に一度の拭き掃除がおすすめで 溜まった場合は、ロボット掃除機のクリーニングブラシまたは清潔な乾 す。 いた布で異物を取り除きます。 月に一度は拭き取ることをお勧めします。 ファンフィルター 赤外線レンズ 充電 / ゴミ収集用接続部...
- Page 134 基本的なパラメーター 本体 自動ゴミ収集機 名前 パラメーター 名前 パラメーター 寸法 φ350mmxφ350mmx98mm 寸法 282mmx361mmx202mm 製品重量 ≈ 3.6kg 定格電力 1050W 定格電圧 14.4V 定格入力 100-240V ~50/60Hz 定格電力 定格出力 DC24V 1.2A バッテリー容量 5200mAh...
- Page 135 一般的な問題 問題 解決策 バッテリーが少なくなっています。充電してください。 ボタンを押しても作動しない 周囲温度が低すぎる(0° C 未満)または高すぎる(50° C を超える)。 クリーニングを開始できない バッテリーが少なくなっています。充電する前に充電してください。 自動ゴミ収集機の近くに障害物が多すぎます。 自動ゴミ収集機を空いている場所に置いてください。 自動充電できない 本体が 自動ゴミ収集機から離れすぎています。本体を 自動ゴミ収集機の近くに配置してください。 異常な行動 シャットダウン後に再起動する。 ロール ブラシ、サイドブラシまたは右 / 左車輪に異物が絡まっているかもしれない。電源を切り確認して 清掃中に異音がする 異物があれば取り除いてください。 ダストボックスがいっぱいです。ダストボックスのごみを捨ててください。 清掃能力の低下 フィルターが目詰まりしています。お手入れしてください。 ローラーブラシにごみがたまっています。メインブラシを清掃してください。 Wi-Fi 電波が悪くで、本体が電波信号の有効範囲内にあることを確認してください。 Wi-Fi に接続できない 接続が異常で、 wifi をリセットし、 最新のアプリをダウンロードしてください。 もう一度接続してください。 本体がサイレントモードになっていないことを確認してください。 掃除が中断されてしまう...
- Page 136 トラブルシューティング 本体 障害プロンプト 解決策 異常1.レーザーレーダーが遮られていないことを確 LIDARの周囲の異物を確認または除去するか、デバイスを新しい場所に移動して再起動し 認してください。 てください。 異常2.クリフセンサーを拭き、新しい位置に移動し メインパワークリフセンサーを拭いて、もう一度試してください(センサーの位置につい て開始してください。 ては、マニュアルを参照してください) 異常3.強い磁気が検出されました。新しい場所に移 本体を新しい場所に移動して、もう一度試してください。 動してから再試行します。 異常4.衝突センサーの異物を確認してきれいにして 衝突センサーを押して異物を取り除き、再起動してみてください。 ください。 異常5.本体の温度が異常です。温度が正常に戻るま 本体の温度が高すぎるか低すぎます。使用前に温度が正常に戻るまでお待ちください。 でお待ちください。 異常6.充電が異常です。充電接点部分を清掃してく 付属の電源アダプターが使用されているかどうかを確認してください。 ださい。 自動ゴミ収集機が水平になっていることを確認してください。...
- Page 137 自動ゴミ収集機 この製品は、本体上部のディスプレイとアプリを通じて現在の製品ステータスをお知らせします。 インジケーターラ 一般的なエラー 解決 イト 1. 頻繁的にゴミを収集すると、ファンの過熱保護またはファンの故障原因になります。お客様が 30 分後にもう一度 ファンが過熱している / ファンが故 ゴミを収集することをお勧めします。 障している / ゴミの排出口がブロッ 2. ロボット掃除機底部のゴミ収集の吸い込み口と自動ゴミ収集機のゴミを清掃します。 赤色のライトが クされている / カバーが適切に閉じ 自動ゴミ収集機のプラグを抜き、逆さにして、カバーの底面に異物が詰まっていないか確認し、ドライバーでネジを 点滅 られていない 外し、カバーを開けて異物を取り除きます。 1. 新たなダストバッグを交換します。 2. ダストバッグの漏れがないか確認し、漏れている場合はダストバッグを設置します。 ダストバッグがいっぱい / ダストバ 3. ダストバッグが正しく取り付けられ、所定の位置にあることを確認してください。 ッグが取り付けられていない / ダス 4. 自動ゴミ収集機の蓋が完全に閉まっていること、密閉されていること、ロボット掃除機が自動ゴミ収集機の上に置 トバッグが所定の位置に取り付けら...
- Page 139 Proscenic Technology Co., Ltd. (Authorized) Customer Service Shenzhen Proscenic Technology Co., Ltd. (Manufacturer) Email: support@proscenic.com Customer service hotline: Address: 10F No. 112, Wende Rd., Zhongli Dist., Taoyuan City 320, Taiwan Web: www.proscenic.com PROSCENIC TECHNOLOGY(UK) LTD Address: 71-75 Shelton Street, Covent Garden, London, WC2H 9JQ...
- Page 140 M8 PRO 六国语言说明书 材质:封面封底 157g 铜版纸 + 哑膜,内页 80g 书纸 封装要求:胶装 其他:书脊黑色 尺寸:A5...
Need help?
Do you have a question about the M8 PRO and is the answer not in the manual?
Questions and answers