berlinger Fridge-tag 3 Quick Info, Set Up
Hide thumbs
Also See for Fridge-tag 3:
- Operation manual (40 pages) ,
- User manual (10 pages) ,
- Manual (5 pages)
Advertisement
Quick Links
Packaging content
1
External sensor
Fridge-tag
Note:
Place the external sensor in its predetermined location, before
activating the device. See chapter 3 for more information.
Inserting the SIM Card?
See user manual in chapter
(Only necessary if the SIM card has not been pre-installed at the factory.)
Activation of the device
4
Note:
Once the device has been activated, operation can neither be interrupt-
ed nor paused.
To activate the device, press the SET and
READ buttons simultaneously for more
than 3 seconds. The following calendar
format will appear: dd.mm.yyyy.
If you want to activate the device and the display shows "un def",
the device is not configured.
Need help with initial device configuration?
See user manual in chapter
Note:
Depending on the version used, after setting the calendar format, the
first digit of the date will start flashing to set date and time.
The READ button is used to adjust the numbers. Each time you press the
READ button, the digit that is flashing will increase by 1.
3
The SET button is used to save the number. After pressing the SET but-
ton, the next digit will start flashing.
3
As soon as the last digit of the time setting is confirmed, the activation is com-
plete.
Need to correct or change settings?
See user manual in chapter
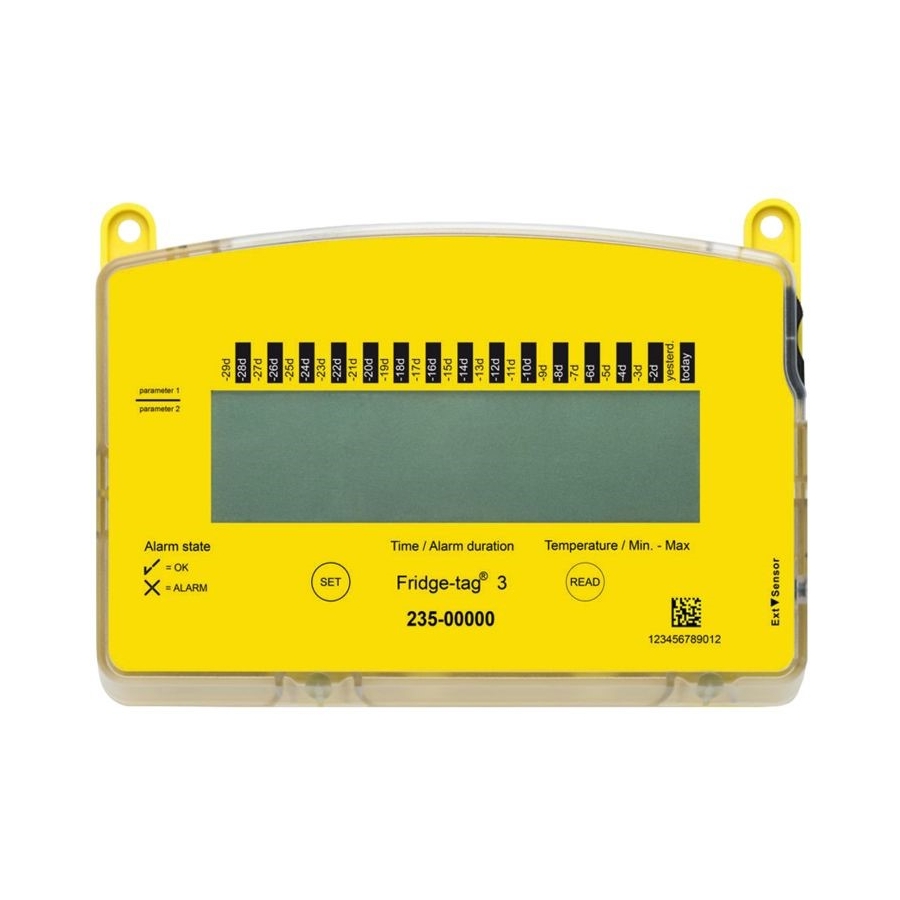
Fridge-tag information
7
Temperature
status
Profile
(alarm zones)
Set button
USB power
Velcro closures
supply
(2 pcs)
Cable channel
USB cable (3 m)
«Learn
More»
3
«Learn
More»
«Learn
More»
30 days
history
Temperature
Int.Sensor
measured
max.
1
05
0 32
0
°C
Port to insert
external sensor
Logger ID
Read button
QUICK INFO – SET UP
Fridge-tag 3
State of delivery
2
You receive the Fridge-tag in sleep mode. The display
(LCD) is blank.
Note:
If required, note the date of activation on the back of the Fridge-tag.
Placing the External Sensor
3
Two hours before activating the device the external sensor
must be positioned in its predetermined location. It is impor-
tant to place the external sensor in the center of the refriger-
ator for optimal temperature observation and to avoid any
incorrect measurements when starting the device.
Note:
After approx. 60 seconds without pressing any buttons on the Fridge-
tag the device goes back into sleep mode. Start from the beginning.
Setting the calendar format
5
Press READ to change the calendar format.
d
d
__
y
y
y
y
_
_
dd
y
d
d
__
un
y
y
y
y
dEF
After you have made your selection, press SET to save the calendar
format.
Activation completed
6
Setting date
and time
Change
settings
Option 1
Setting the calendar
format to: dd.mm.yyyy
y
y
y
The activated Fridge-tag must be placed immedi-
ately in its predetermined location. Connect the
device with the external sensor. For max. 1 minute
after activation no temperature is displayed on the
screen.
Connect included USB cable with the Fridge-tag and
the power supply.
Placing the Fridge-tag or connection error?
See user manual in chapter
Learn More
Device
Insert SIM Card
configuration
Connection
Placing the
error
Fridge-tag
3
3
Option 2
Setting the calendar
format to: mm.dd.yyyy
«Learn
More»
Scan the QR code
or click on
www.berlinger.com/
support/fridge-tag3
Berlinger & Co. AG
Switzerland
www.berlinger.com
Advertisement

Related Manuals for berlinger Fridge-tag 3


Summary of Contents for berlinger Fridge-tag 3
- Page 1 Profile Temperature (alarm zones) Int.Sensor measured max. 0 32 °C Port to insert Change Connection Placing the external sensor settings error Fridge-tag Logger ID Berlinger & Co. AG Switzerland Read button Set button www.berlinger.com...
- Page 2 More» SMS status query Cloud Version Log in to your Data Management Software (Berlinger Smart- Sending an SMS to the device with the mes- Conversation with +31 123456789 Thu., 09:26 View etc.) to check the configuration status and the data.
Need help?
Do you have a question about the Fridge-tag 3 and is the answer not in the manual?
Questions and answers