Table of Contents
Advertisement
Quick Links
Ropewalker
Electric projection screen with cable drop
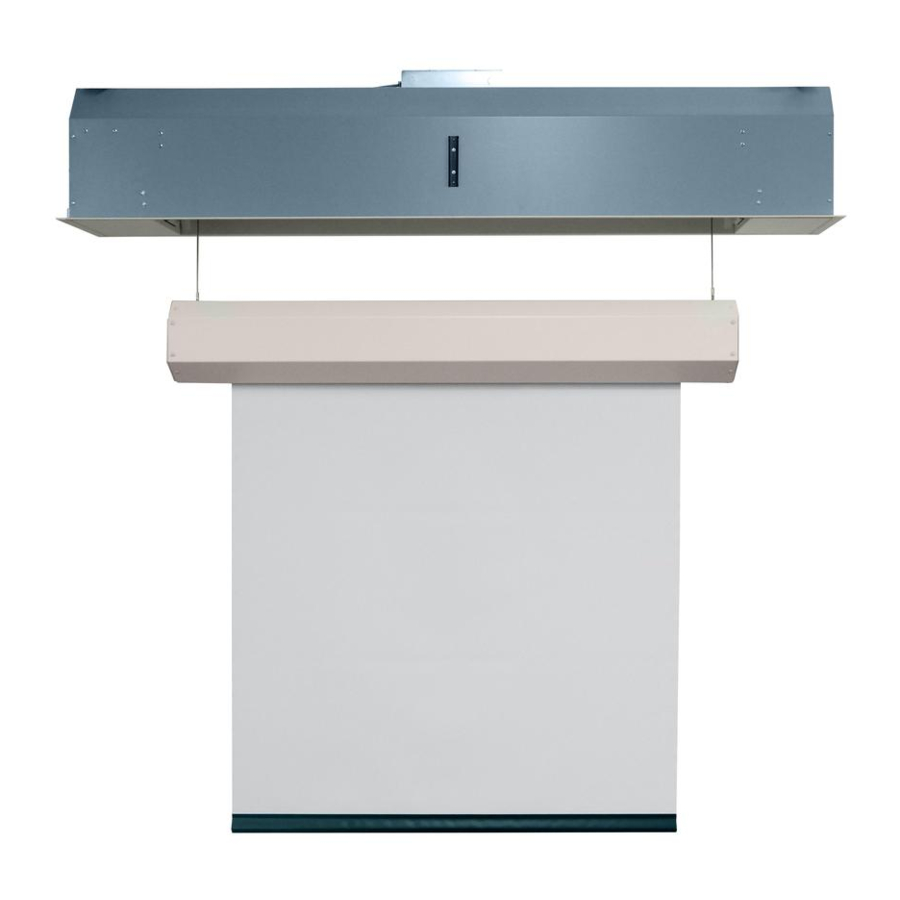
Overview - Components
g
n t i n
M o u
4 )
k e t (
B r a c
Read and understand all warnings
before beginning installation.
Contents
Overview - Components .......................................................................................1
PLEASE READ - Safety Information ....................................................................2
Section 1 - Preparation ........................................................................................2
Section 2 - Mounting Ropewalker to Building Structure ................................3
Section 3 - Electrical Connections .....................................................................3
Section 4 - Removing Shipping Bracket ............................................................3
Section 5 - Ropewalker Wiring ............................................................................4
Case support brackets
NOT for use in supporting
weight of case.
l i n g
L e v e
2 )
C a s e
k e t (
g
n t i n
B r a c
M o u
4 )
k e t (
B r a c
CAUTION
(Page 2 of this document)
INSTRUCTIONS
INSTALLATION & OPERATION
g
n t i n
( 4 )
M o u
k e t s
B r a c
PERSONNEL REQUIRED
1
Section 6 - Leveling Viewing Surface ................................................................5
Section 7 - Limit Switch Adjustments................................................................6
Section 8 - Inspecting Cables for Signs of Excess Wear................................7
Section 9 - Cable Arresters .................................................................................7
Section 10- Dimensions .......................................................................................8
Section 11 - 220V Wiring Diagrams ....................................................................8
If you have any difficulties installing or servicing your
Draper, Inc. | 411 S. Pearl St. Spiceland, IN 47385
draperinc.com | 765.987.7999 | 800.238.7999
© 2021 All Rights Reserved
TOOLS
REQUIRED
PENCIL
POWER DRILL
LEVEL
WRENCH
Lifting Cables (2)
Safety Cables (2)
attached to fall arresters
inside Ropewalker case
TAPE MEASURE
Screen
Leveler
Endcap
SCREWDRIVER
SCREWDRIVER
HARDWARE
2
WORK GLOVES
RECOMMENDED
Ropewalker, call your dealer or Draper, Inc.
|
FORM: Ropewalker_Inst_21
(by others)
Advertisement
Table of Contents

Related Manuals for Draper Ropewalker


Summary of Contents for Draper Ropewalker
- Page 1 Section 7 - Limit Switch Adjustments..............6 Section 1 - Preparation ..................2 Section 8 - Inspecting Cables for Signs of Excess Wear........7 Section 2 - Mounting Ropewalker to Building Structure ........3 Section 9 - Cable Arresters .................7 Section 3 - Electrical Connections ..............3 Section 10- Dimensions ..................8...
- Page 2 Important Safety Information Improper installation and use of the Ropewalker can result in serious injury or death. Primarily, injuries can occur if the unit falls due to imprecise installation, mishandling of the unit during installation, or installation on an insufficient wall or ceiling structure. Please use extreme care.
- Page 3 Ropewalker page 3 of 8 Section 2 - Mounting Ropewalker to Building Structure Threaded Rod Please Note: It is recommended that heavy items be hoisted up to the work area using appropriate machinery, i.e. hoisting lifts, block and tackle, etc.
- Page 4 Low-Voltage Control. The connections between the key switch and the terminal block (located should be made per Figure 6. on the outside of the receiver housing) Key or contact closure must be held closed to operate Ropewalker to lower limit or closed position. Terminal Strip Inside...
- Page 5 5 of 8 Section 6 - Leveling Viewing Surface (NOTE: This step may not be needed. Contact Draper.) WARNING: Do not adjust the jackscrews that connect the cables to the screen case without consulting Draper technical support! ® The Ropewalker case must be installed level .
- Page 6 6 of 8 Section 7 - Limit Switch Adjustments WARNING: Screen case must be engaged or retracted inside the Ropewalker case when adjusting the limits. 1. Refer to Figure 8 for the proper adjustment procedures. 2. Position of screen can be adjusted using the white down limit setting screw: - Turning the white screw counter clockwise will cause the screen position to move farther down.
- Page 7 3. A certain amount of tension must remain on the cable at all times to ensure proper operation of the internal brake. CAUTION: Do not allow the cable to become slack. If the cable becomes slack, remove the Ropewalker from service for inspection.
- Page 8 8 " (213mm) Inner Case Length Determined by Viewing Surface Selected 7 " (191mm) Section 11 - 220V Wiring Diagrams Single Station Control Low-Voltage Control for 220V Ropewalker Low-Voltage Wiring Ropewalker Wiring Internal Screen Wiring Blue (Common) Black Yellow Red (Up)
Need help?
Do you have a question about the Ropewalker and is the answer not in the manual?
Questions and answers