Table of Contents
Advertisement
Quick Links
User's Manual
Welcome to use DSPPA public address system. For the better use of this product, please read this instruction carefully
prior to use.
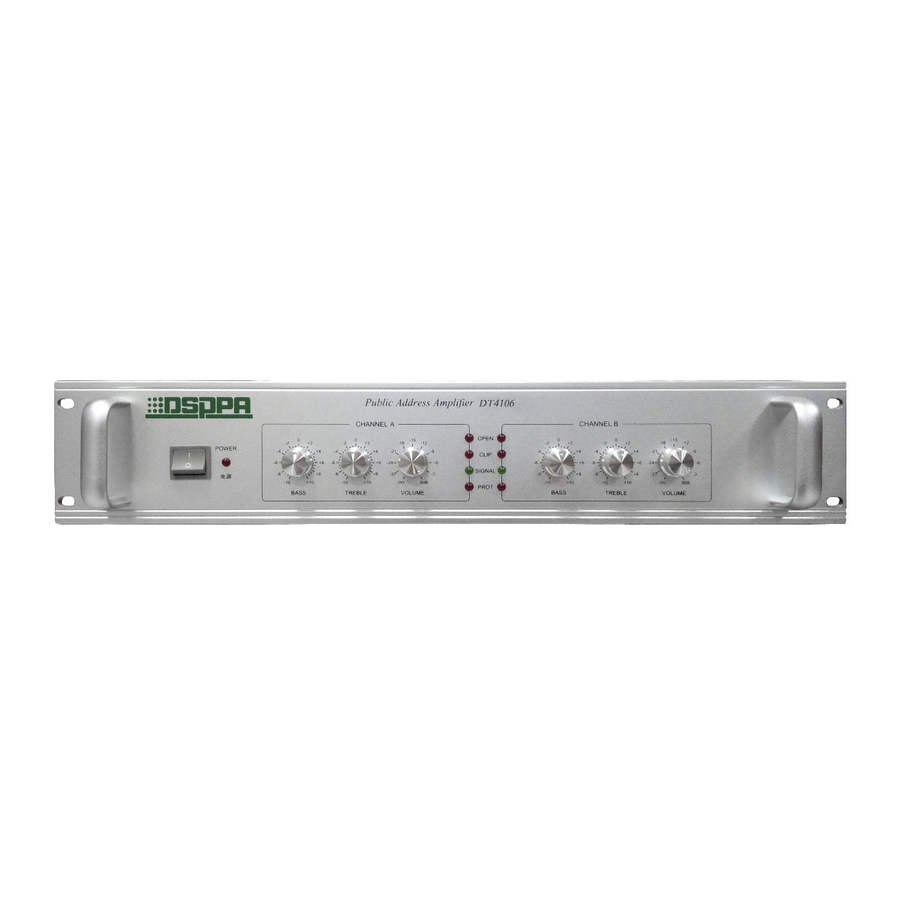
Public Address Amplifier DT4106
CHANNEL A
0
0
-2
+2
-2
+2
POWER
-4
+4
-4
+4
I
-6
+6
-6
+6
O
-8
+8
-8
+8
电源
-10
+10
-10
+10
BASS
TREBLE
Public Address System
Dante System
OPEN
-15
0
-18
-12
-2
+2
-21
-9
-4
+4
CLIP
-24
-6
-6
SIGNAL
-27
-3
-8
+8
∞
0dB
-10
+10
PROT
VOLUME
BASS
CHANNEL B
0
-15
-2
+2
-18
-12
-4
+4
-21
-9
+6
-6
+6
-24
-6
-8
+8
-27
-3
∞
-10
+10
0dB
TREBLE
VOLUME
Guangzhou DSPPA Audio Co., Ltd
http://www.dsppatech.com
DT4106
DT4112
DT4125
DT4135
Advertisement
Table of Contents

Related Manuals for DSPPA DT4106


Summary of Contents for DSPPA DT4106
- Page 1 电源 ∞ ∞ PROT BASS TREBLE VOLUME BASS TREBLE VOLUME User's Manual Welcome to use DSPPA public address system. For the better use of this product, please read this instruction carefully prior to use. Guangzhou DSPPA Audio Co., Ltd http://www.dsppatech.com...
- Page 2 Dante Network System Caution To assure the finest performance, please use or operate the product in accordance with corresponding instructions. This symbol indicates "forbidden content" This symbol indicates "compulsory content" ■ Please make sure that the ■ When the equipment is in use, DO NOT block the air power wire is NOT damaged.
-
Page 3: Table Of Contents
Dante Network System Contents Product Introduction ............................1 1.1 Brief Introduction ............................1 1.2 Features................................. 1 Description of Appearance ..........................1 2.1 Description of front panel ..........................1 2.2 Description of rear panel ..........................2 3. Connection Diagram ............................... 3 3.1 System connection ............................ -
Page 4: Product Introduction
1) Product Introduction 1.1 Brief Introduction DT4106/4112/4125/4135 is a two-channel amplifier of Dante PA system. Volume and tune of each channel can be adjusted individually. It has compulsory input interface (short circuit available). Three-wire output design makes it easier to connect. Dual network interface design makes it possible to cascade with other amplifiers. Signals of 2×2, 4×4, and 16×16 Dante network interfaces and Dante MIC could be transferred to this device through network. -
Page 5: Description Of Rear Panel
9. Channel B treble adjustment 10. Channel B volume adjustment 2.2 Description of rear panel 4 5 6 保险丝规格 DT4106 F4AL250V DT4112 F6AL250V 请勿打开,以免触电 DT4125 F8AL250V DT4135 F10AL250V RISK OF ELECTRIC SHOCK DO NOT OPEN! OUTPUT OUTPUT ~220V/50Hz/10A AUDIO IN AUDIO IN 广州市迪士普... -
Page 6: Connection Diagram
DT4125 F8AL250V DT4135 F10AL250V RISK OF ELECTRIC SHOCK DO NOT OPEN! OUTPUT OUTPUT ~220-240V/50-60Hz/10A AUDIO IN AUDIO IN 广州市迪士普 PRIMARY SECONDARY 音响科技有限公司 EMC IN EMC IN OUTPUT VOLTAGE Guangzhou DSPPA Audio Co.,Ltd. E HOT E HOT Dante Amplifier (DT4106) Speaker... -
Page 7: Device Connection
3.2 Device connection 4. Operation Instruction 4.1 PC interface operation instruction of Dante control system After installing software, right-click it and choose “Run as administrator” to enter initial interface. Click “Register” or “Try” to enter interface. Then input password (original password: 123456. You can check “remember password”.) and click “Log in”. - Page 9 1. Operation interface After longing in successfully, you will enter operation interface. Please make sure that all devices have been connected then you can follow steps in the following picture. Menu Click to enter system setting interface 2. System setting You need to enter password before entering “System setting”...
- Page 10 3. Binding IP address Please binding IP address before operating. Steps are as follows: 1) Click on the right corner of your computer and open Network and Sharing Center 2) Click “Local connection”...
- Page 11 3) Click “Details” to see your IP address. 4) IPv4 address is the IP address of your computer...
- Page 12 5) Double click “Other setting” and copy IP address to “Binding IP”. Then click binding and you will see “The change will take effect after rebooting.”. Next, restart the software. After restarting, please pay attention whether the IP is the same as that of your computer. Note: you can also set language in this interface.
- Page 13 点 击 对 话 框 的倒三角。 4. Channel naming Double click “Channel naming” to name channels. Beforehand, you need to select corresponding device and click “change”. After that, click “Save” to save changes. If you click “ Cancel”, your change will not be saved. ○...
- Page 14 CH1 of DT4300 in the following picture) and then choose corresponding device name of output channel (DT4106 in the following picture). Next, click audio output CH1 to export the audio of CH1 of DT4300 to output channel CH1 of DT4106.
- Page 15 Both red and green indicate that the channel is open. Red specially represents all matching output channel of current input channel. Open...
- Page 16 To choose device type Open status of matching channel 6. Software update 16×16 network interface: please make sure that there is newest update package under “……\update\16x16”. Step: choose 16×16 network interface and check devices that need to be updated. Then click “Update”. Other devices: please make sure that there is newest update package under “……\update\16x16”.
- Page 17 7. Mixing setting Choose device unit and check the channel need to be set up. Click “Mix” to open 16 channel. Note: only 16×16 network interface has mixing function. 8. Change password Double click “Change password” to enter the interface. Password is 6-bit.
- Page 18 2) Select the amplifier or speaker recognized by LAN and click to select device to the right side. Then you can adjust the volume of DT4106. Note: is to make all device on the left to be volume adjustable.
- Page 19 right and make its volume adjustable. is to move selected device to the left and make its volume not adjustable. is to move all selected devices to the left and make their volume not adjustable. 3) Then go back to operation interface and click “Amplifier audio adjustment” to adjust volume of devices read by LAN.
-
Page 20: Pc Dante Id Setting
4) As is shown in the following picture, if you choose other devices instead of DT4106, you can check DT4106 on the right list. Then click and the volume of DT4106 will not be adjustable. - Page 21 Step2: Copy local IP address to dialog box of “Binding IP” (IP acquisition method please refer to text above). Next, click “Binding” and you need to restart software to make the change effective. When you open the software again, please check whether the IP of software is the same as that of your computer. Setp3: IP of device should be in the same network segment with IP of PC.
- Page 22 (2) ID setting You can only change ID of devices that are connected successfully. Two devices cannot use the same ID address. You can change ID after the device is detected by software. First, place your mouse in the dialog box. Next, input ID and then click “Set”.
-
Page 23: Connection Instruction
Audio source should be imported through XLR interface on rear panel (picture 1) or 6.35mm (TRA) interface. Alarm input (EMC IN terminal) can only receive short circuit signal (compatible with DSPPA Dante devices). It could convert analog signal collected by signal interface to digital signal then transmit digital signal to this amplifier by Dante protocol through Ethernet. -
Page 24: Safety Precautions
For issues and precautions not mentioned in this User Manual, if required, please contact the distributor or visit our website at http://www.DSPPA.com In case of any failure in the warranty period, please contact service personnel (or distributor) of our company for service. -
Page 25: Packing List
Cross Recessed Countersunk Flat Head Screws White /5×19 Wooden box of Control Software CD of Conference System Conference System Disk Specification Note: The performance specifications are subject to changes without further notification. Specification DT4106 DT4112 DT4125 DT4135 Rated output power 120W... - Page 26 ● This is connected to power source via the plug and any failure or danger occurs, the user can disconnect the device from power source by pulling out the plug out from the socket, therefore, it is required that the power socket should be located somewhere with easy access. Guangzhou DSPPA Audio Co., Ltd...
Need help?
Do you have a question about the DT4106 and is the answer not in the manual?
Questions and answers