Table of Contents
Advertisement
Not approved for use in explosive atmospheres or hazardous locations.
For portable airless spraying of architectural paints and coatings.
Not approved for use in explosive atmospheres or hazardous locations.
For portable airless spraying of architectural paints and coatings.
Important Safety Instructions
Not approved for use in explosive atmospheres or hazardous locations.
For portable airless spraying of architectural paints and coatings.
Read all warnings and instructions in this manual, related manuals, and on the unit.
Important Safety Instructions
Be familiar with the controls and the proper usage of the equipment. Save these
instructions.
Read all warnings and instructions in this manual, related manuals, and on the unit.
IMPORTANT SAFETY INSTRUCTIONS
Be familiar with the controls and the proper usage of the equipment. Save these
Read all warnings and instructions in this manual and related manuals. Be familiar with the
controls and the proper usage of the equipment. Save these instructions.
instructions.
Electric Airless Sprayer
OWNERS MANUAL
Project Painter
FIRE AND EXPLOSION HAZARD
•
Use only non-flammable or water-based
FIRE AND EXPLOSION HAZARD
materials, or non-flammable paint thinners.
•
Do not use materials having flash points
Use only non-flammable or water-based
lower than 100° F (38° C). This includes, but
materials, or non-flammable paint thinners.
is not limited to, acetone, xylene, toluene, or
Do not use materials having flash points
naphtha. For more information about your
lower than 100° F (38° C). This includes, but
material, request Safety Data Sheet (SDS)
is not limited to, acetone, xylene, toluene, or
from the supplier.
naphtha. For more information about your
•
Spraying flammable or combustible materi-
material, request Safety Data Sheet (SDS)
als in a factory or fixed location must comply
from the supplier.
•
with NFPA 33 and OSHA 1910.94(c) require-
Spraying flammable or combustible materi-
ments in the USA and with all similar local
als in a factory or fixed location must comply
regulations in other countries.
with NFPA 33 and OSHA 1910.94(c) require-
ments in the USA and with all similar local
regulations in other countries.
Plus
™
3A3582B
3A3582B
EN
3A3582B
EN
EN
Advertisement
Table of Contents

Related Manuals for Graco Project Painter Plus


Summary of Contents for Graco Project Painter Plus
- Page 1 Electric Airless Sprayer OWNERS MANUAL Project Painter Plus ™ 3A3582B 3A3582B 3A3582B FIRE AND EXPLOSION HAZARD • Use only non-flammable or water-based FIRE AND EXPLOSION HAZARD materials, or non-flammable paint thinners. • Do not use materials having flash points Use only non-flammable or water-based lower than 100°...
-
Page 2: Before You Spray
Review Warnings for Important Safety Information Important! Read carefully and practice good safety habits. Review Manual & Watch Videos Scan QR code for Operational Video or go to magnum.graco.com/p3op Related Manuals Gun: 312830 (SG2) Model 2800 psi (193 bar, 19.3 MPa) Maximum Working Pressure... -
Page 3: Important User Information
Important User Information Important User Information Thank You for Your Purchase! Before using your sprayer read this Owners Manual for complete instructions on proper use and safety warnings. This sprayer is designed to provide superior spray performance with water-based and oil-based (mineral spirit-type) architectural paints and coatings. -
Page 4: Extension Cords
Warnings Warnings The following warnings are for the setup, use, grounding, maintenance, and repair of this equipment. The exclamation point symbol alerts you to a general warning and the hazard symbols refer to procedure-specific risks. When these symbols appear in the body of this manual or on warning labels, refer back to these Warnings. - Page 5 Use Graco conductive or grounded high-pressure airless paint sprayer hoses. •...
- Page 6 • Check hoses and parts for signs of damage. Replace any damaged hoses or parts. • This system is capable of producing 2800 psi. Use Graco replacement parts or accessories that are rated a minimum of 2800 psi. • Always engage the trigger lock when not spraying. Verify the trigger lock is functioning properly.
- Page 7 Warnings MOVING PARTS HAZARD Moving parts can pinch, cut, or amputate fingers and other body parts. • Keep clear of moving parts. • Do not operate equipment with protective guards or covers removed. • Pressurized equipment can start without warning. Before checking, moving, or servicing equipment, follow the Pressure Relief Procedure and disconnect all power sources.
-
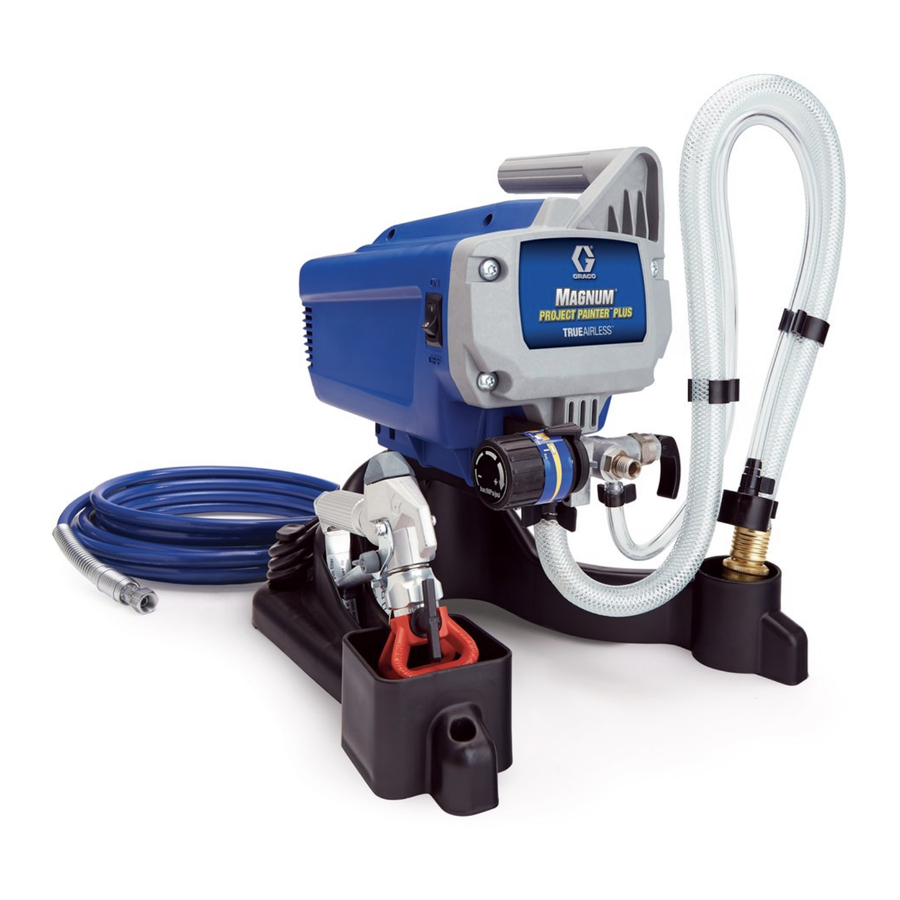
Page 8: Know Your Sprayer
Know Your Sprayer Know Your Sprayer Stand Models ti28247a M Gun Fluid Filter (inside handle) Prime/Spray Valve Pump Pressure Control Knob Pump Fluid Outlet Fitting (airless ON/OFF Switch hose connection) Suction Tube Airless Hose Drain Tube (with diffuser) Inlet Strainer Airless Spray Gun Power Cord Reversible Spray Tip... -
Page 9: Assemble Your Sprayer
When unpacking sprayer for the first time or after long term storage perform setup procedure. Assemble Your Sprayer Connect Graco airless hose to fluid outlet. Use wrench to tighten securely. ti25197a Turn pressure control knob all the way left (counter-clockwise) to lowest set- ting. -
Page 10: Pressure Relief Procedure
Start Up Start Up Engage the trigger lock. Always engage the trigger lock when sprayer is stopped to prevent the gun from being triggered accidentally. Pressure Relief Procedure ti25198b Follow the Pressure Relief Turn pressure control knob to lowest Procedure whenever you see this setting. -
Page 11: Flush Storage Fluid
Start Up Engage the trigger lock. Lift Prime/Spray valve to PRIME posi- tion. If you suspect the spray tip or hose is clogged or that pressure has not been fully relieved: VERY SLOWLY loosen the tip guard retaining nut or the hose end coupling to relieve pressure gradually. -
Page 12: Fill Gun And Hose
Start Up 10. When sprayer starts pumping, flushing NOTE: Some fluids may prime faster if solvent and air bubbles will be purged the ON/OFF Switch is momentarily from system. Allow fluid to flow out of turned off so the pump can slow and drain tube, into waste pail, for 30 to 60 stop. -
Page 13: Cleaning From A Pail
Cleanup Cleanup Cleaning the sprayer after each use results in Place empty waste and flushing fluid a trouble free start up the next time the pails side by side. sprayer is used. Place suction tube in flushing fluid. Use water for water based paint and mineral spirits or compatible oil-based flushing solvent for oil-based paint. - Page 14 Cleanup 11. Turn ON/OFF switch to OFF position. 16. Lift Prime/Spray valve to PRIME posi- tion. NOTE: Step 12 is for returning paint in hose to paint pail. One 50 ft (15 m) hose holds 17. Turn ON/OFF switch to OFF position. approximately 1 quart (1 liter) of paint.
- Page 15 Cleanup Turn pressure control knob to the 11. Turn ON/OFF switch to ON position. Prime/Clean setting. 12. Open Power Flush attachment valve. 13. Circulate water through sprayer, into waste pail, for 20 seconds. 14. Turn ON/OFF switch to OFF position. NOTE: Step 15 is for returning paint in hose to paint pail.
-
Page 16: Clean The Gun
Cleanup Clean the Gun Clean gun fluid filter with water or flushing fluid and a brush every time you flush the system. Replace gun filter if damaged. ti25196b 19. Lift Prime/Spray valve to PRIME posi- tion. ti27494a Remove spray tip and tip guard and clean with water or flushing fluid and a brush. -
Page 17: Short-Term Storage
Storage Storage With proper storage, the sprayer will be ready Engage trigger lock. to use the next time it is needed. ti25196b Leave gun attached to hose. Remove tip and guard and clean with Short Term Storage water or flushing fluid and a brush. Wipe paint off outside of gun using a (up to 2 days) soft cloth moistened with water or flush-... - Page 18 Storage Lift Prime/Spray valve to PRIME posi- Leave gun attached to hose. tion. Remove tip and guard and clean with water or flushing fluid and a brush. 10. Wipe paint off outside of gun using a soft cloth moistened with water or flush- ing fluid.
-
Page 19: Spray Tip Selection
Reference Reference Understanding Tip Number The last three digits of tip number (i.e.: Spray Tip Selection 221413) contain information about hole size and fan width on surface when gun is held 12 in. (30.5 cm) from surface being sprayed. Selecting Tip Size First digit when doubled Spray tips come in a variety of hole sizes for 413 tip has...
Need help?
Do you have a question about the Project Painter Plus and is the answer not in the manual?
Questions and answers