Table of Contents
Advertisement
Quick Links
Advertisement
Table of Contents

Subscribe to Our Youtube Channel
Related Manuals for REVV Generator 120 MK3


Summary of Contents for REVV Generator 120 MK3
- Page 1 Generator 120 MK3 Owner’s Manual...
- Page 2 I quickly built a team of people as passionate about guitar as I am, and Revv was born. To be honest, it grew bigger and faster than I had ever hoped...
-
Page 3: Table Of Contents
R E V V | G E N E R A T O R 1 2 0 M K 3 TABLE OF CONTENTS Warranty TUBES AND BIAS P14/15 Safety Instructions & Warnings Set up & Power up Power Tubes Power Tube Sockets FRONT PANEL LAYOUT P7/10 Preamp Tubes... -
Page 4: Warranty
This warranty will be honored with original proof of purchase to the original owner only. Warranty work must be authorized by Revv Amplification Inc. in advance. All freight and duty (If applicable) are to be prepaid to and from Revv Amplification Inc. of all products that require and have been approved for warranty work. Revv Amplification Inc. -
Page 5: P5 Safety Instructions & Warnings
R E V V | G E N E R A T O R 1 2 0 M K 3 SAFETY & WARNINGS Please read, understand and follow all safety instructions in this manual, as well as those on the rear panel of the amplifier. - Page 6 Channel 1 (default) or your favorite saved • • FX Loop amp setting. • • Guitar & Shielded Revv Cabinet Lighting • Cable Headphones • • MIDI Revv Foot Controller •...
-
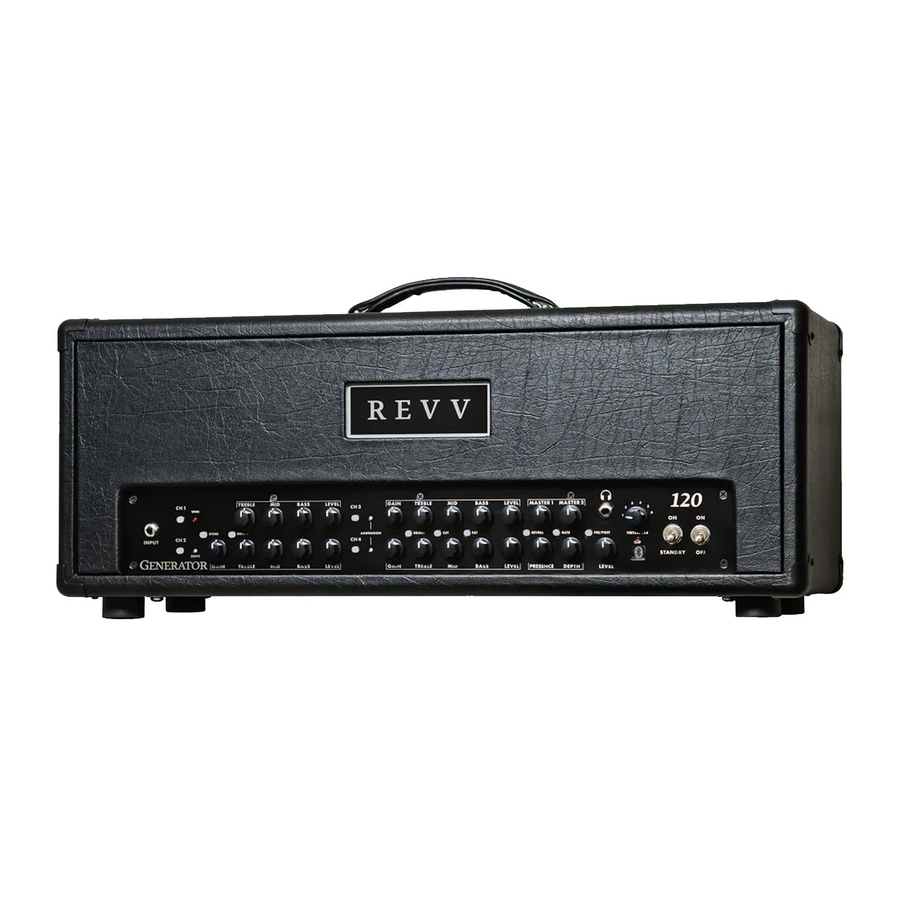
Page 7: Front Panel Layout
R E V V | G E N E R A T O R 1 2 0 M K 3 FRONT PANEL INPUT CHANNEL TWO (CRUNCH) 1⁄4” Instrument cable input. Selected by: 1. pushing the designated front panel button, 2. footswitch button #2 or a footswitch preset mode setting, 3. -
Page 8: Channel Three (Purple Gain)
R E V V | G E N E R A T O R 1 2 0 M K 3 CHANNEL THREE (PURPLE GAIN) MASTER VOLUME CONTROLS Selected by: 1. pushing the designated front panel The Generator is equipped with 2 MIDI & foot- button, 2. -
Page 9: Gate Switch
R E V V | G E N E R A T O R 1 2 0 M K 3 Note: The reverb switch is also used to toggle the FX ability to choose different tube types like EL34s or Loop in and out of the signal path when held down for 2 6L6s as your “virtual”... -
Page 10: Headphone/Xlr Level Control
R E V V | G E N E R A T O R 1 2 0 M K 3 HEADPHONE/XLR LEVEL CONTROL BLUETOOTH WINDOW This control, located under the headphone jack, sets Your amplifier utilizes Bluetooth technology to access the output level of the headphone as well as the stereo the two notes technology for on the fly changes via the XLR outputs located on the rear of the amp. -
Page 11: Back Panel
R E V V | G E N E R A T O R 1 2 0 M K 3 BACK PANEL MAIN POWER CONNECTION POWER TUBE FAULT FUSES When plugging the amplifier into the mains A/C wall The power tubes are fused in pairs. Should a power receptacle, always make sure the amplifier power &... -
Page 12: Xlr Output Connectors
R E V V | G E N E R A T O R 1 2 0 M K 3 The ground lift switch will defeat the ground on the REVERB LEVEL CONTROL amp should you encounter ground noise from other equipment you have connected. -
Page 13: Cabinet Lighting
Some examples: Simply use the 4 pin Din cable provided with all Revv cabinets and connect the amplifier to the cab lighting • 2 - 8 ohm cabinets would be plugged into the the connector on the cabinet. -
Page 14: Power Tubes
EL34 tubes. tubes - but will accept the following tubes & gladly display their tonal characteristics for you in your Revv. Note: While we designed the amplifier to be easy to maintain, we advise that all tubes be set up by a... -
Page 15: Setting The Bias
R E V V | G E N E R A T O R 1 2 0 M K 3 3. Now plug the amplifier into the main power 3. Next, place the red lead into the other red bias test receptacle, unplug any guitar cables from the point &... -
Page 16: Midi
SETUP 2. Press & hold “Reverb” push button. 3. With the “reverb” push button being held, turn on Versatile & optional MIDI control helps Revv amps the power switch. seamlessly integrate into any rig. The amplifier will store 4. Release the reverb push button once the reverb up to 128 programs for program change commands as LED begins to flash. -
Page 17: Midi Program Change
R E V V | G E N E R A T O R 1 2 0 M K 3 Simply continue to press the CH 1 button to get to the MIDI CONTROLLABLE FUNCTIONS channel you desire. As you press the button you will notice the other Channel LEDs turn on as you increase The amplifier functions that can be controlled via MIDI the MIDI channel number. - Page 18 R E V V | G E N E R A T O R 1 2 0 M K 3 The following commands & their CC numbers need The following commands control functions that are only be sent an ON command (0-63) as they are used turned on &...
-
Page 19: Torpedo Remote/Load
4. Input the pin code to pair the Torpedo in your Revv amplifier amplifier but no speaker cab plugged into the other end and your mobile device. -
Page 20: Settings & Saving Cabinets
With the main power in the OFF position: While we know a lot of people like the color-changing Revv logo and cabinet lighting, some do not. The 1. Press and Hold the FAT button then option to turn this feature on and off has been added power ON the amplifier. -
Page 21: Saving A Digital Cab To A Bank
R E V V | G E N E R A T O R 1 2 0 M K 3 Now when you proceed to save your favorite settings 1. Select the channel, drive or aggression setting on each channel (using the “saving channels and you want to save a digital speaker cab to. -
Page 22: Foot Controller
5 PIN DIN Cable. The amplifier & footswitch will work with any 5 PIN DIN cable should you be in a BUTTON 4 pinch, but the Revv cable is always recommended for This button has 2 functions, it will switch to channel 4 best performance. -
Page 23: Preset Mode
Note: When a preset is set on the footswitch, it will not Note: This will erase all your settings from the foot be lost if power is removed from the amp. The Revv controllers memory! footswitch has memory & will retain the settings. Each button is identical in Preset mode &...
Need help?
Do you have a question about the Generator 120 MK3 and is the answer not in the manual?
Questions and answers