Advertisement
Advertisement
Table of Contents

Related Manuals for REVV D20


Summary of Contents for REVV D20
- Page 1 Owner’s Manual Revv Owner’s Manual - 1...
-
Page 2: Intro
INTRO Congratulations and welcome to the Revv family! Thank you for trusting Revv Amplification with such an important part of your musical endeavors. Enjoy tone, durability, and ease of use designed to inspire. Revv Owner’s Manual - 2... -
Page 3: Table Of Contents
— front panel layout — 9-11 — rear panel layout — 12-14 tubes & bias 15-16 — — — bias chart for D20 — — MIDI — — CC Commands — 18-19 — balanced out - XLR — — —... -
Page 4: Safety Instructions & Warnings
• Do not expose the amplifier to high ed to local standards when being oper- temperature, keep away from radiators ated. Do not use 2 pole extension or or heat producing/supplying items. power cords to supply power to this amplifier Revv Owner’s Manual - 4... - Page 5 The electrical installation of the relevant area complies with the requirements of IEC (ANSI) specifications. c) The unit is used in accordance with the operating instructions. d) The grounding of the center pin of the mains plug is maintained to reduce the risk of shock. Revv Owner’s Manual - 5...
- Page 6 ***All electrical and electronic products including batteries should be disposed of separately from the municipal waste stream via designated collection facilities appointed by the government or the local authorities. Revv Owner’s Manual - 6...
-
Page 7: Set Up & Power Up
Guitar and Shielded Cable • MIDI • • • Revv Cabinet Lighting • Headphones • Note: A high-quality shielded instrument cable is recommended for guitar input as well as FX loop connections to prevent unwanted noise. Revv Owner’s Manual - 7... - Page 8 (fully counter clockwise) and all treble, mid and bass controls to the 12 o’clock positions to begin. Set the standby switch to the Revv (up) position and you are ready to begin exploring! Note: Upon power up, you will have noticed that the logo lights up blue and the clip LED illuminates.
-
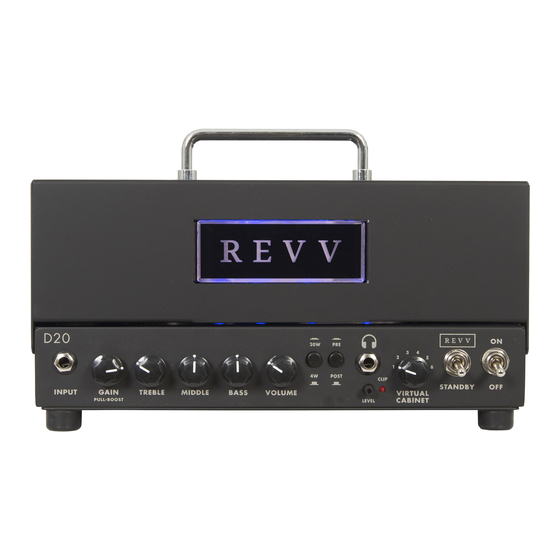
Page 9: Front Panel Layout
3 Band EQ - The Treble, Mid and Bass controls are passive controls and are designed to offer a large range for different variations in both clean and crunch tones. In conjunction with the gain control, the EQ controls will provide some great tone! Revv Owner’s Manual - 9... - Page 10 Torpedo either an input signal from the Pre-amp or the power amp. “Pre” is recommended when setting so as to not “stack” two power amps in series. “Post” is always recommended in all other instances for optimal tone and feel. Revv Owner’s Manual - 10...
- Page 11 Virtual Cabinet Switch - This 6 position selector switch will switch through the first 6 positions of the Two notes virtual cabinet library saved to your D20. You can change the virtual cabinets and all of their options saved to each position by using Two notes Remote software, connected via USB on the rear of the amplifier.
-
Page 12: Rear Panel Layout
The mains input is a 2 part assembly on the D20 , not only will it allow you to plug the amplifier power cable into it, the main fuse is also a part of the assembly. - Page 13 Balanced Output XLR and Ground Lift - The balanced output XLR jack is a direct output from Two notes Torpedo Embedded. By connecting this output to front of house or an audio interface you can capture D20’s tone with no need for a cabinet or microphone! The ground lift switch will defeat the ground on the D20 should you encounter ground noise from other equipment you have connected.
- Page 14 The amplifier can support 4, 8 and 16 ohm cabinets. If you want to use a 4 ohm cabinet, set the D20 to 4 ohms by making sure the switch is “out.”...
-
Page 15: Tubes & Bias
Tubes & Bias Power Tubes - The Revv D20 has been designed to use 6V6GT power tubes in the power section, and it is recommended that Revv 6V6GT power tubes be used whenever replacement is necessary for optimal per- formance. -
Page 16: Bias Chart For D20
Make sure the D20 is connected to a speaker or the reactive load switch is set to internal load. Let the amplifier warm up for a minute then turn on the standby switch. -
Page 17: Midi
Control Change - For very specific uses Control Change signals may be appropriate. We recommend starting with PC signals (virtual cabinet preset recall) for the D20 then only moving on to CC signals for very spe- cific and advanced situations. -
Page 18: Cc Commands
Level B 0-107 0 = -95dB ; 95 = 0dB ; 107 = 12dB Phase B 0 = Normal ; 1 = Invert Mute B 0 = Off (no mute) ; 1 = On (mute) Revv Owner’s Manual - 18... - Page 19 Out Level 0-107 0 = -95dB ; 95 = 0dB ; 107 = 12dB Mute 0 = Off (no mute) ; 1 = On (mute) Preset 0-127 0 = Preset #1 ; 1 = Preset #2… Revv Owner’s Manual - 19...
-
Page 20: Balanced Out - Xlr
In order to run the output of the D20 to an audio interface, connect the D20 to the audio interface with an XLR cable. Set the amplifier up the way you intend to play, (EQ, volume) and then adjust the output of the bal- anced out with the small trimmer on the front of the amplifier. -
Page 21: Usb
The D20 can be connected to Two notes Remote software in order to manipulate all available settings and change the presets found on the front knob of the amplifier. This is via the USB port. You can find the Remote Software for the D20 here: https://www.two-notes.com/downloads... -
Page 22: Reactive Load
Reactive Load The D20 comes with a built in reactive load to allow you to play without the need for a speaker cabinet. On the rear of the amplifier there is an internal load/speaker switch to switch between the speaker cabinet and the reactive load. - Page 23 Industry Canada. To reduce potential radio interference to other users, the antenna type and its gain should be so chosen that the equivalent isotropically radiated power (e.i.r.p.) is not more than that necessary for successful communication. Revv Owner’s Manual - 23...
-
Page 24: Warranty
Amplification Inc. will not be covered by this warranty. This warranty shall not apply to repair or replacements necessitated by any cause beyond the control of Revv Amplification Inc. including, but not limited to, any mal- function, defects, or failure caused by or resulting from unauthorized ser-... - Page 25 Box 29 Ile De Chenes, MB Canada, R0A 0T0 info@revvamplification.com http://www.revvamplification.com Copyright Revv Amplification Inc. 2019...
Need help?
Do you have a question about the D20 and is the answer not in the manual?
Questions and answers