
Related Manuals for Venduro RA SMALL


Summary of Contents for Venduro RA SMALL
- Page 1 RA - MODEL / MODÈLE GEBRUIKSAANWIJZING MANUEL MANUAL RA SMALL Standaard BELGIAN QUALITY BELGIAN QUALITY by Venduro by Venduro...
-
Page 2: Table Of Contents
Inhoud Sommaire Content GEBRUIKSAANWIJZING Elektrische aansluiting Toegelaten gebruik - Gebruiksadvies Tips om een optimale afzuiging te verzekeren Luchtafvoer Dakdoorlaat - Afvoerbuis Functie van de afstandsbediening soft black Touch bediening Openen van kantelpaneel Onderhoud van de randafzuiging Vervangen van de koolstofmat LEDspot vervangen Standaard randafzuiging Montage... - Page 3 MANUEL Raccordement électrique Utilisations autorisées - Conseils d’utilisation Astuces pour garantir une aspiration optimale Évacuation de l’air Sortie de toit - Conduite d’évacuation Fonctionnalité de la télécommande soft black Commande tactile Ouverture du panneau basculant Entretien de l’aspiration périphérique Remplacement du tapis à charbon Remplacement des spots LED Aspiration périphérique standard Installation...
- Page 4 Bedankt voor de aankoop van uw Venduro dampkap. Lees eerst aandachtig de gebruiksaanwijzing. Nog vragen ? Contacteer ons via venduro.be BELGIAN QUALITY BELGIAN QUALITY by Venduro by Venduro...
-
Page 5: Elektrische Aansluiting
Elektrische aansluiting De dampkap is uitgerust met een netspanningskabel 3G1.5 en een zwarte stekker met aarding. (Deze mag nooit ingekort of verlengd worden.) Gebruik steeds een stopcontact met aarding, model 10/16A met pin en/of randaarding. Netspanning: tot 230 volt Wisselstroom: 50/60Hz Bescherming: klasse 1 Het snoer moet, indien nodig, mechanisch beschermd worden. -
Page 6: Toegelaten Gebruik - Gebruiksadvies
Het apparaat moet worden aangesloten op een reglementaire TN of IT installatie, of voorzien worden van een differentiaal- schakelaar van max. 0.3A. Maximum waarde zekering van het net waarop de dampkap wordt aangesloten bedraagt 20A (EN60898, uitschakelcurve B of C). Toegelaten gebruik De dampkap mag niet gebruikt worden als de filters niet reglementair bevestigd zijn. -
Page 7: Tips Om Een Optimale Afzuiging Te Verzekeren
Belangrijk U mag nooit flamberen onder de dampkap ! De aangezogen vlammen kunnen het vet, dat zich in de overigens brandveilige RVS filters bevindt, doen ontvlammen. Vooral bij het frituren verhoogt het risico dat er brand kan ontstaan. Alleen onder toezicht mag er onder de dampkap gefrituurd worden. - Page 8 Dakdoorlaat Hoe minder de afvoer geremd wordt hoe groter het debiet en aldus het nuttige effect van uw dampafvoer ! Goed Slecht Afvoerbuis De afvoerrooster of dakdoorgang moet voldoende doorlaat geven ! Goed Slecht Gebruik bij een muurdoorlaat steeds een doorlaat met lamellen. Er mag geen water van buitenaf de dampkap kunnen binnensijpelen.
-
Page 9: Functie Van De Afstandsbediening Soft Black
Functie van de afstandsbediening soft black AFZUIGING STAND 1 AFZUIGING STAND 2 REINIGING FILTER INDICATOR AFZUIGING STAND 3 LICHT AAN / UIT AFZUIGING STAND 4 BOOST FUNCTIE LICHT + AFZUIGING AAN / UIT LICHT - MOTOR + MOTOR - De motor wordt aangezet met een druk op de of toets. - Page 10 Breng de afstandsbediening opnieuw in de buurt van uw dampkap. Venduro heeft bij het ontwerp van uw dampkap er op toe gezien dat het juiste type verlichting is voorzien rekening houdende met het juiste type en het max toegelaten vermogen.
-
Page 11: Touch Bediening
Touch bediening. De leds op de touch bediening geven continue de huidige status (snelheid en filter) weer als de motor actief is. 2 Knoppen • Licht aan/uit: kan lang ingedrukt worden om te dimmen • Motor aan/uit: kan kort en lang ingedrukt worden 5 Leds •... -
Page 12: Openen Van Kantelpaneel
Openen van kantelpaneel Men opent het door met beide handen, op de desbetreffende plaats aangeduid op de tekening, het paneel gelijkmatig naar beneden (1) te trekken en dan te laten zakken (1). Om te sluiten duwt men het paneel volledig naar boven tot de magneten aantrekken (2). Bij openen van het kantelpaneel, steeds het paneel ondersteunen / vasthouden ! Niet laten openklappen ! Dit om beschadiging van het schokdempertje en scharnieren te voorkomen ! verwijder van vetfilter... -
Page 13: Vervangen Van De Koolstofmat
Onderhoud van de randafzuiging Bij het uitnemen van de vetfilters is het aan te raden het kooktoestel te beschermen met een stuk piepschuim of polystreen. Zo voorkomt u schade indien de filters uit uw handen zouden vallen. Let op dat de kookplaat niet meer in werking is ! U kan de vetfilter verwijderen door: inox dop van u weg drukken in het u-profiel (1). -
Page 14: Ledspot Vervangen
LEDspot vervangen Indien de Led verlichting stuk is dient men de volledige Led lamp vervangen (lamp + behuizing) Lamptype: Venduro LED 6000 RVS/IP44/ 9,5Vdc/3,4W/input 350mA Venduro LED 4000 RVS/IP44/ 9,5Vdc/3,4W/input 350mA Venduro LED 3000 RVS/IP44/ 9,5Vdc/3,4W/input 350mA Venduro LED 2700 RVS/IP44/ 9,5Vdc/3,4W/input 350mA... -
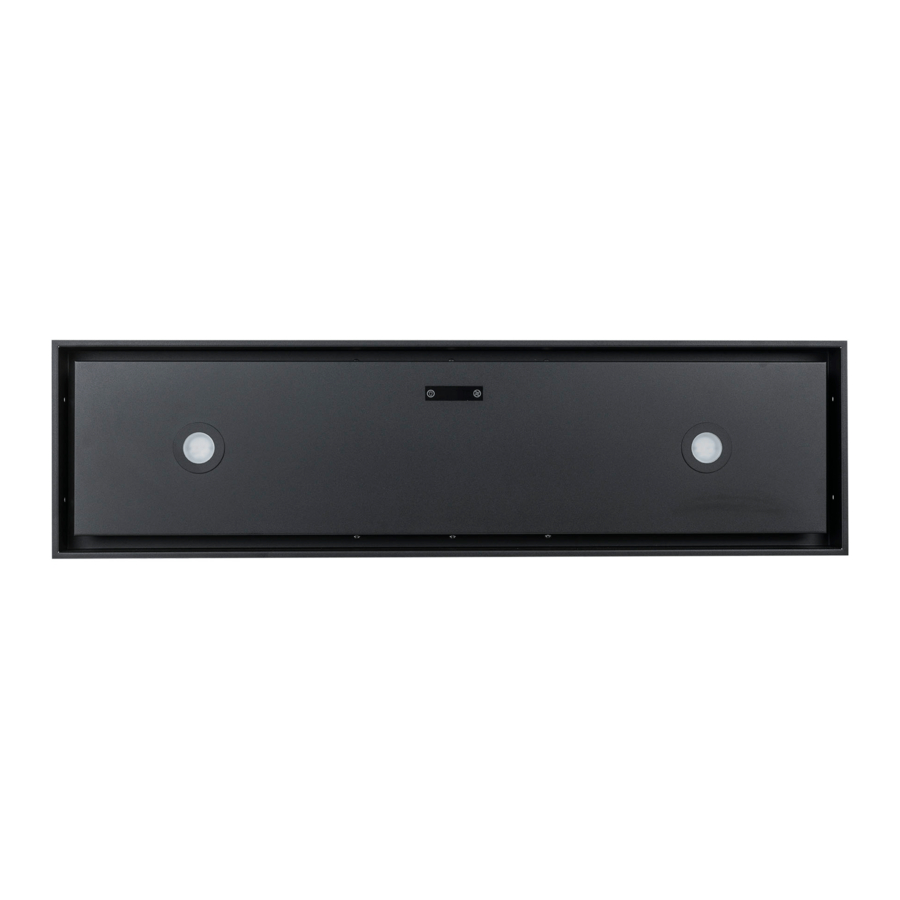
Page 15: Standaard Randafzuiging
RA SMALL Standaard randafzuiging Voorbeeld afmetingen RA SMALL 80 en RA SMALL 110 RANDAFZUIGING RA SMALL 80 RA SMALL 110 1100 1082 Standaard RA80x30 RA SMALL 80... -
Page 16: Montage
Montage Hoogte montage randafzuiging boven kookplaat. Beste efficiëntie behaalt men in afstand tussen kookplaat en RA randafzuiging dampkap 90cm-120cm. Bij hogere afstanden is verlies en uitwaseming mogelijk van vetten en geuren. STANDEN Indicatieve info werkstanden dampkap RA en gebruik: Stand 1: bij kookvocht activiteiten (waterdamp), groenten koken, soep koken, pasta en dergelijke. Stand 2: bij combi kookvocht (waterdamp) en 1 bak activiteit. -
Page 17: Elektrisch Schema New 2018
Elektrisch schema NEW 2018... -
Page 18: Waarborgcertificaat
Anderzijds vervalt de waarborg wanneer het apparaat zou hersteld zijn of omgebouwd zijn met onderdelen die niet van ons fabrikaat zijn. VENDURO is NIET aansprakelijk voor vetfilters die niet juist uitgenomen of teruggeplaatst worden en hierdoor op de kookplaat terecht... - Page 19 ..........................JAAR De firma VENDURO B.V.B.A. behoudt zich het recht, ten alle tijde, GARANTIE...
- Page 20 Merci pour l’achat de votre hotte Venduro Veuillez lire attentivement le manuel. Il vous reste des questions ? Contactez-nous via venduro.be BELGIAN QUALITY BELGIAN QUALITY by Venduro by Venduro...
-
Page 21: Raccordement Électrique
Raccordement électrique La hotte est équipée d’un câble électrique 3G1.5 et d’une fiche noire avec mise à la terre (celle-ci ne peut en aucun cas être raccourcie ou allongée). Utilisez toujours une prise de courant avec une mise à la terre, de modèle 10/16A, avec broche et/ou prise de terre latérale.. Tension du réseau : jusqu’à... - Page 22 L’appareil doit être raccordé à une installation TN ou IT réglementaire ou être équipé d’un commutateur différentiel de max. 0.3 A. La valeur maximale du fusible du réseau auquel est raccordée la hotte est de 20 A (EN 60898, courbe de réaction B ou C). Utilisations autorisées Ne pas utiliser la hotte si les filtres ne sont pas fixés de manière réglementaire.
-
Page 23: Astuces Pour Garantir Une Aspiration Optimale
Important Ne faites jamais flamber d’aliments sous la hotte ! L’aspiration des flammes risquerait d’enflammer les graisses déposées sur les filtres en acier inoxydable, non inflammables. Le risque d’incendie augmente si vous faites frire des aliments. La friture d’aliments sous la hotte n’est autorisée que sous surveillance. Astuces pour garantir une aspiration optimale Ne faites jamais... - Page 24 Sortie de toit Moins l’évacuation sera freinée, plus le débit sera élevé et plus votre extraction sera efficace ! Pas OK Conduite d’évacuation La grille d’évacuation ou la sortie de toit doit permettre un passage suffisant ! Pas OK En cas de sortie murale, utilisez toujours une grille munie de lamelles. L’eau provenant de l’extérieur ne doit pas pouvoir s’infiltrer dans la hotte.
-
Page 25: Fonctionnalité De La Télécommande Soft Black
Fonctionnalité de la télécommande soft black POSITION D’ASPIRATION 1 POSITION D’ASPIRATION 2 INDICATEUR DE NETTOYAGE DE FILTRER POSITION D’ASPIRATION 3 ÉCLAIRAGE ON/OFF POSITION D’ASPIRATION 4 FONCTION BOOST LUMINOSITÉ + ASPIRATION ON/OFF LUMINOSITÉ - MOTEUR + MOTEUR - Allumez le moteur en appuyant sur la touche ou ». Une pression sur la touche enclenchera l’aspiration en position 1. - Page 26 Attention : si l’éclairage était actif, il le restera. Venduro a équipé votre hotte d’un système de surveillance de la charge des piles. Le fait que toutes les LED s’allument brièvement en même temps lorsque vous appuyez sur une touche est le signe que les piles doivent être remplacées.
-
Page 27: Commande Tactile
Commande tactile. Les LED de la commande tactile indiquent en permanence le statut actuel (vitesse et filtre) lorsque le moteur fonctionne. 2 Touches • Éclairage on/off : vous pouvez appuyer longuement sur pour faire varier l’éclairage • Moteur on/off : vous pouvez appuyer brièvement ou longuement sur 5 LED •... -
Page 28: Ouverture Du Panneau Basculant
Ouverture du panneau basculant Ouvrez le panneau basculant en plaçant vos deux mains aux endroits indiqués sur le schéma. Tirez le panneau vers le bas de manière régulière (1) puis laissez-le s’ouvrir. Pour refermer le panneau basculant, repoussez-le complètement vers le haut jusqu’à ce qu’il soit attiré... -
Page 29: Remplacement Du Tapis À Charbon
Entretien de l’aspiration périphérique Lorsque vous retirez les filtres à graisse de la hotte, protégez la cuisinière avec un morceau de frigolite ou de polystyrène. Vous éviterez ainsi d’endommager votre plaque de cuisson si les filtres devaient vous glisser des mains. Veillez à ce que la plaque de cuisson ne chauffe pas! Pour enlever le filtre à... -
Page 30: Remplacement Des Spots Led
Si l’éclairage LED ne fonctionne plus, remplacez l’intégralité de l’ampoule LED (ampoule + logement). Type d’ampoule : Venduro LED 6000 acier inoxydable/IP44/ 9,5 V CC/3,4 W/courant d’entrée 350 mA Venduro LED 4000 acier inoxydable/IP44/ 9,5 V CC/3,4 W/courant d’entrée 350 mA Venduro LED 3000 acier inoxydable/IP44/ 9,5 V CC/3,4 W/courant d’entrée 350 mA... -
Page 31: Aspiration Périphérique Standard
Aspiration périphérique RA SMALL standard Exemple dimensions RA SMALL 80 et RA SMALL 110 ASPIRATION PÉRIPHÉRIQUE RA SMALL 80 RA SMALL 110 1100 1082 Standaard RA80x30 RA SMALL 80... -
Page 32: Installation
Installation Hauteur d’installation de l’aspiration périphérique par rapport à la surface de cuisson. Pour une efficacité optimale, prévoyez une distance de 90 à 120 cm entre la surface de cuisson et l’aspiration périphérique. Des pertes et émanations de graisses et d’odeurs peuvent s nir en cas de distance supérieure. -
Page 33: Schéma Électrique New 2018
Schéma électrique NEW 2018... -
Page 34: Certificat De Garantie
5 ans sur votre appareil, aux conditions énumérées ci-dessous. Les appareils VENDURO sont fabriqués au moyen de matériaux de première qualité et avec le plus grand soin. Ce qui nous permet, par ailleurs, de vous offrir une garantie contre tout vice de construc- tion qui pourrait survenir au cours des 5 premières années après la vente au premier acheteur par le... - Page 35 ..........................ANS DE L’entreprise VENDURO SPRL se réserve le droit d’apporter des GARANTIE...
-
Page 36: Eng
Thank you for purchasing your Venduro cooker hood. First read this user manual carefully. Questions? Contact us via venduro.be BELGIAN QUALITY BELGIAN QUALITY by Venduro by Venduro... -
Page 37: Electrical Connection
Electrical connection The cooker hood has a 3G1.5 mains voltage cable and a black plug including grounding. (It is never permitted to shorten or extend this cable.) Always use a wall socket including grounding, model 10/16A with pin and/or earth connection. Mains voltage: up to 230 volts Alternating current: 50/60 Hz Protection : classe 1... - Page 38 The apparatus must be connected to a TN or IT installation that complies with the regulations or must be equipped with a differential switch of maximum 0.3A. The maximum value of the fuse of the grid to which the cooker hood is connected is 20A (EN60898, shutdown curve B or C). Permitted use The cooker hood may not be used if the filters are not attached according to the...
-
Page 39: Tips To Guarantee Optimal Extraction
Important Never fry with open flames (flambé) under the cooker hood! Sucked in flames can combust the grease located in the stainless-steel filters, which are – inciden- tally – fireproof. There is an increased risk of fire, especially when deep-frying. Someone must be present at all times when deep-frying. - Page 40 Roof bore Fewer obstacles in the extractor mean a larger flow rate and, therefore, greater effectiveness of your cooker hood! Correct Incorrect Discharge pipe The discharge grate or roof bore must provide sufficient extraction! Correct Incorrect In case of a wall passage, always use a passage with lamellas. No water may penetrate the cooker hood from outside.
-
Page 41: Function Of The Soft Black Remote Control
Function of the soft black remote control EXTRACTION POSITION 1 EXTRACTION POSITION 2 ‘CLEAN FILTER’ INDICATORR EXTRACTION POSITION 3 LIGHT ON / OFF EXTRACTION POSITION 4 BOOST FUNCTION LIGHT + EXTRACTION ON / OFF LIGHT - MOTOR + MOTOR - Pushing the button or the button will swith on the motor. - Page 42 2 seconds. Venduro has constructed your cooker hood to include a safety shutdown; in other words, the ex- traction will switch off after 4 hours if the speed has not changed during this time. Attention: If the lighting was switched on then it will stay on.
-
Page 43: Touch Control
Touch control. When the motor is active, the LEDs on the touch control constantly present the current status (speed and filter). 2 Buttons • Light on/off: can be held down longer in order to dim • Motor on/off: can be held down for a shorter or longer time 5 LEDs •... -
Page 44: Opening The Tilting Panel
Opening the tilting panel Gradually pull the panel downwards (1) and lower it (1) using both hands in the place indicated in the drawing will open the panel. To close the panel, push it completely upwards until the magnets snap (2). Always support and hold the tilting panel when opening the cooker hood! Do NOT let it drop open in order to prevent damaging the hinges and the shock absorber! verwijder van vetfilter... -
Page 45: Replacing The Carbon Carbon Discs
Maintaining the cooker hood with edge extraction When removing the grease filters, it is recommended to protect the cooker using a piece of Styrofoam or polystyrene. This way you avoid damaging the cooker in case the filters drop from your hands. Pay attention if the cooker is no longer operating! You can remove the grease filter by: •... -
Page 46: Replacing Ledspots
Replacing LEDspots If the LED lighting is damaged, you should replace the entire LED lamp (lamp + housing). Lamp type: Venduro LED 6000 stainless steel/IP44/ 9.5Vdc/3.4W/input 350mA Venduro LED 4000 stainless steel/IP44/ 9.5Vdc/3.4W/input 350mA Venduro LED 3000 stainless steel/IP44/ 9.5Vdc/3.4W/input 350mA Venduro LED 2700 stainless steel/IP44/ 9.5Vdc/3.4W/input 350mA... - Page 47 RA SMALL Standard edge extraction Example dimensions RA SMALL 80 and RA SMALL 110 EDGE EXTRACTION RA SMALL 80 RA SMALL 110 1100 1082 Standaard RA80x30 RA SMALL 80...
-
Page 48: Installation
Installation Installation height of the cooker hood with edge extraction above the cooker Utmost efficiency is achieved when the distance between the cooker and the RA cooker hood with edge extraction is 90cm-120cm. Loss of efficiency and vaporization of grease and odours is possible at lager distances. -
Page 49: Electricity Diagram New 2018
Electricity diagram NEW 2018... -
Page 50: Warranty Certificate
Alternatively, the warranty shall expire if the device is repaired or modified using parts that are not manufactured by us. VENDURO shall NOT be liable for grease filters, which were removed or replaced incorrectly and consequently ended up onto the cooker! Always protect... - Page 51 ..........................YEAR The company VENDURO BVBA reserves the right at all times to WARRANTY...
- Page 52 Venduro bvba Spieveldstraat 23 Industrieterrein E17/3 B-9160 Lokeren - Belgium T +32 9 340 60 00 BELGIAN QUALITY BELGIAN QUALITY info@venduro.be by Venduro by Venduro venduro.be...
Need help?
Do you have a question about the RA SMALL and is the answer not in the manual?
Questions and answers