Table of Contents
Advertisement
Available languages
Available languages
Quick Links
solar-powered
motion-activated
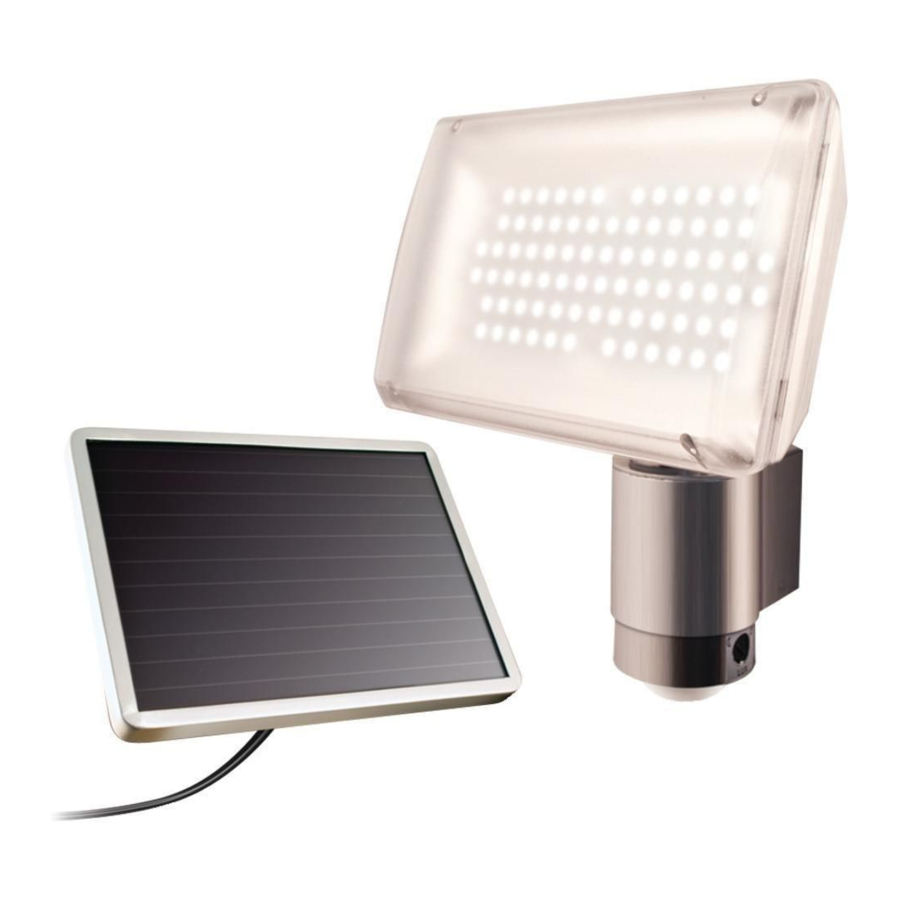
80 LED ALUMINUM SECURITY FLOODLIGHT
ASSEMBLY & OPERATING INSTRUCTIONS
Solar Motion-Activated Security Light - 80 LED Lights
IMPORTANT: READ ALL INSTRUCTIONS CAREFULLY BEFORE USE
ABOUT YOUR SOLAR FLOOD LIGHT
Your MAXSA Solar Security Light converts sunlight into electricity during the day, enabling
the 80 LED lights to turn on automatically at night when motion is detected. With this light,
walking into the dark will no longer be a problem. You can also save the environment by
conserving energy with these energy-efficient solar powered LED lights.
With the battery fully charged, your Solar Security Light can operate for up to a total of
ninety (90) minutes while detecting motion. With the adjustable TIME dials set to the
maximum (+) position, you can make the light last up to 60 seconds from the last
detected motion.
This light comes with 3 AA rechargeable NiMH 2100 mAh batteries. When their
charging ability decreases, they will need to be replaced.
Model #: 40227
1
Advertisement
Table of Contents

Related Manuals for MAXSA 40227


Summary of Contents for MAXSA 40227
- Page 1 IMPORTANT: READ ALL INSTRUCTIONS CAREFULLY BEFORE USE ABOUT YOUR SOLAR FLOOD LIGHT Your MAXSA Solar Security Light converts sunlight into electricity during the day, enabling the 80 LED lights to turn on automatically at night when motion is detected. With this light, walking into the dark will no longer be a problem.
-
Page 2: Included Parts
Carefully remove and identify all the parts from their protective packaging and lay them out in front of you. INCLUDED PARTS: Solar panel angle pivot 4 screws and anchors for mounting solar panel 2 mounting screws (for main body) 15 foot power cable Solar panel Solar panel mounting bracket... -
Page 3: How To Install
CHOOSING A LOCATION FOR YOUR SOLAR SECURITY LIGHT This Solar Security Light comes complete with a solar panel attached to a 15 foot power cord. For optimum sun exposure and longer light output, place the solar panel in a position that receives at least 6-8 hours of direct sunlight per day. - Page 4 Installing the Panel Use the four wood/sheet metal screws supplied (and the wall hangers if needed)to mount the solar panel onto a solid surface. You can adjust the angle of the solar cell by gently rotating the solar cell to a different locking position. Remember to set the panel to face direct sunlight exposure, optimally facing south.
-
Page 5: Maintenance Tips
TIME PERIOD ADJUSTMENT (TIME) The time period control sets the duration that the Solar Security Light will remain illuminated after the last detected motion. The time period is adjustable between 10 seconds to 1 min. The shortest time period is with the TIME control set fully counter-clockwise (–). Increase or decrease the time period by adjusting the TIME dial and re-trigger the sensor unit. -
Page 6: Replacing The Batteries
NOTE: Do not dispose of batteries in general household trash or into a fire since the batteries may explode. Consult your local regulations for correct disposal of batteries. The batteries may also be returned to MAXSA Innovations at 8412 Cathedral Forest Dr., Fairfax Station, VA 22039. Do not take apart the batteries since they contain corrosive chemicals. -
Page 7: Troubleshooting
If the light still switches on, please contact MAXSA for further assistance. • If you have just switched the light to ON, it will immediately perform a “test activation” regardless of lighting or motion conditions. -
Page 8: One-Year Limited Warranty
Fairfax Station, VA 22039; USA within the warranty period, and if the product is defective, MAXSA Innovations, LLC will at its option repair or replace such. This warranty shall constitute the sole liability of MAXSA Innovations, LLC concerning the product. MAXSA... - Page 9 Modelé #: 40227 à énergie solaire activé par le mouvement PROJECTEUR 80 DEL DE SÉCURITÉ EN ALUMINIUM INSTRUCTIONS D’INSTALLATION ET DE FONCTIONNEMENT Projecteur Solaire de Sécurité avec 80 ampoules DEL ATTENTION : Veuillez lire toutes les instructions avant l’utilisation. À PROPOS DE VOTRE PROJECTEUR DE SÉCURITÉ...
- Page 10 Retirez et identifiez toutes les pièces. PIÈCES COMPRIS : Pivot du panneau solaire 4 vis et ancrages pour monter le panneau solaire 2 vis de montage Câble électrique de 5 mètres Support de Panneau Solaire montage Interrupteur ON / OFF Dispositif de protection Compartiment de la...
-
Page 11: Outils Requis Pour L'installation
CHOIX DE L’EMPLACEMENT DE VOTRE PROJECTEUR DE SÉCURITÉ Ce projecteur comprend un panneau solaire fixé au câble électrique de 5 mètres. Pour l’exposition au soleil optimale, installez le panneau solaire dans une position où il peut recevoir 6-8 heures du soleil par jour. Si vous installez le panneau solaire à l’ombre ou derrière une fenêtre, la batterie peut pas complétement charger, et la durée de la lumière va diminuer. - Page 12 Installation du Panneau Utilisez les 4 vis métalliques pour monter le panneau solaire sur une surface solide. Vous pouvez réglez l’angle du panneau par le tourner à une position de verrouillage différente, mais le panneau solaire doit faire face au soleil (au sud). AVANT L’UTILISATION DE VOTRE PROJECTEUR DE SÉCURITÉ...
- Page 13 AJUSTEMET DU PÉRIODE DE TEMPS (TIME) Le cadran TIME règle la durée à laquelle le projecteur reste allumé après détecter le dernier mouvement. Vous pouvez régler le période de temps entre 10 secondes et 1 minute. Pour régler le période de temps à 10 secondes, tournez le cadran au symbole (-).
-
Page 14: Remplacement Des Batteries
FEU CAR LES PILES POURRAIENT EXPLOSER. CONSULTE LES LOIS ET REGLEMENTS LOCAUX POUR SAVOIR OU JETER VOS PILES. LES PILES PEUVENT AUSSI ETRE RETOURNEES À MAXSA INNOVATIONS A 8412 CATHEDRAL FOREST DRIVE, FAIRFAX STATION, VA 22039. N’OUVREZ PAS LES PILES CAR ELLES CONTIENNENT DES PRODUITS CHIMIQUES CORROSIFS. -
Page 15: Dépannage
Si la lumière s’allume toujours, veuillez contacter MAXSA pour de l’aide. • La batterie n’est peut-être pas assez chargée. Réglez l’interrupteur de courant sur la position OFF et chargez la La lumière clignote... - Page 16 Les obligations du manufacturier sont limitées à la réparation et le remplacement des pièces défectueuses lorsque le produit est renvoyé à MAXSA Innovations, frais de renvoi prépayés par l’utilisateur, durant la période de garantie. Pour profiter de la garantie, l’acheteur doit joindre la facture d’achat au produit.
- Page 17 80 LED ALUMINUM SECURITY FLOODLIGHT INSTRUCCIONES GENERALES DE INSTALACIÓN Y FUNCIONAMIENTO PARA LOS MODELOS 40227 IMPORTANTE: LEA TODAS LAS INSTRUCCIONES CUIDADOSAMENTE ANTES DE USAR. ACERCA DE SU LUZ SOLAR DE SEGURIDAD Durante el día, el panel solar incluido en esta unidad de seguridad recarga la batería.
-
Page 18: Piezas Incluidas
Retire con cuidado e identifique todas las piezas del envase protectiva y ponlas en frente de usted. PIEZAS INCLUIDAS: Para el ajustamiento de Tornillos y tacos montaje para montaje en panel solar Tornillos y anclajes para montaje en panel solar Cable de alimentacíon El panel solar... -
Page 19: Herramientas Necesarias Para La Instalación
ELIGIENDO UN LUGAR PARA LA LUZ SOLAR DE SEGURIDAD Esta luz solar de seguridad viene con un panel solar conectado a un cable de 15 pies. Para una óptima exposición solar y una máxima iluminación de luz, coloque el panel solar en una posición que recibe por lo menos 6-8 horas de luz solar al día. - Page 20 Deje el interruptor en la posición OFF durante 3 días con el panel solar colocado directamente a la luz solar. Esto asegurará que la batería de su luz solar de seguridad tenga una carga completa antes de ajustar el sensor de movimiento y el funcionamiento normal.
-
Page 21: Cambio De Pilas
Para probar la sensibilidad de movimiento, apunte de la cabeza del sensor hacia el área deseada. Ajuste el botón giratorio de tiempo (TIME) a la posición mínima (-) y el botón giratorio LUX al ajuste brillante (). Camine lentamente alrededor de la zona de detección, cambiando su ritmo de marcha hasta que la luz se encienda. -
Page 22: Consejos De Mantenimiento
NOTA: No deseche la batería en la basura doméstica general o al fuego ya que la batería puede explotar. Consulte la normativa local para la eliminación cor- recta de la batería. La batería también puede ser devuelta a MAXSA Innovations en 8412 Cathedral Forest Dr., Fairfax Station, VA 22039. No abra la batería, ya que contienen sustancias químicas corrosivas. - Page 23 Si la luz todavía se enciende, póngase en contacto con MAXSA para obtener más ayuda. • Carga de la batería puede ser baja. Gire el interruptor a la posición La luz se OFF y cargue la batería durante tres (3) días de sol con el panel...
-
Page 24: Un Año De Garantía Limitada
Innovaciones MAXSA, la unidad se devuela a las Innovaciones MAXSA, 8412 Cathedra Forest Dr, Fairfax Sation, VA 22039, flete pre-pagado durante el período de garantía. Para obtener la reparación por garantía, el recibo de compra debe ser devuelto con el producto.
Need help?
Do you have a question about the 40227 and is the answer not in the manual?
Questions and answers